Sugared Productions Blog

  • Blog Home
    • Home
  • Online Classes
  • Shop
  • Contact
  • About

Thanksgiving Tutorial Round Up

November 20, 2015 by Sharon Zambito 2 Comments

Hey Y’all!  It’s almost here – TURKEY time!  If you’re like me and running short on time, you might like some help coming up with something creative  🙂  I’ve rounded up some super cute and easy ideas to dress up your Thanksgiving table. I’ll be using a few of these cute ideas myself:


peekaboo-pumpkin-pound-cake

Peekaboo Pumpkin Pound Cake by SheKnows


pumpkin pie cookies Pumpkin Pie Cookies by Munchkin Munchies


turkey-cupcakesTurkey and Stuffing Cupcakes by Saucy Sprinkles


Pumpkin-Pie-CupcakesPumpkin Pie Cupcakes by Hoosier Homemade


pumpkin cheesecakePumpkin Cheesecake Pie by Just A Pinch


cheesecake leaves
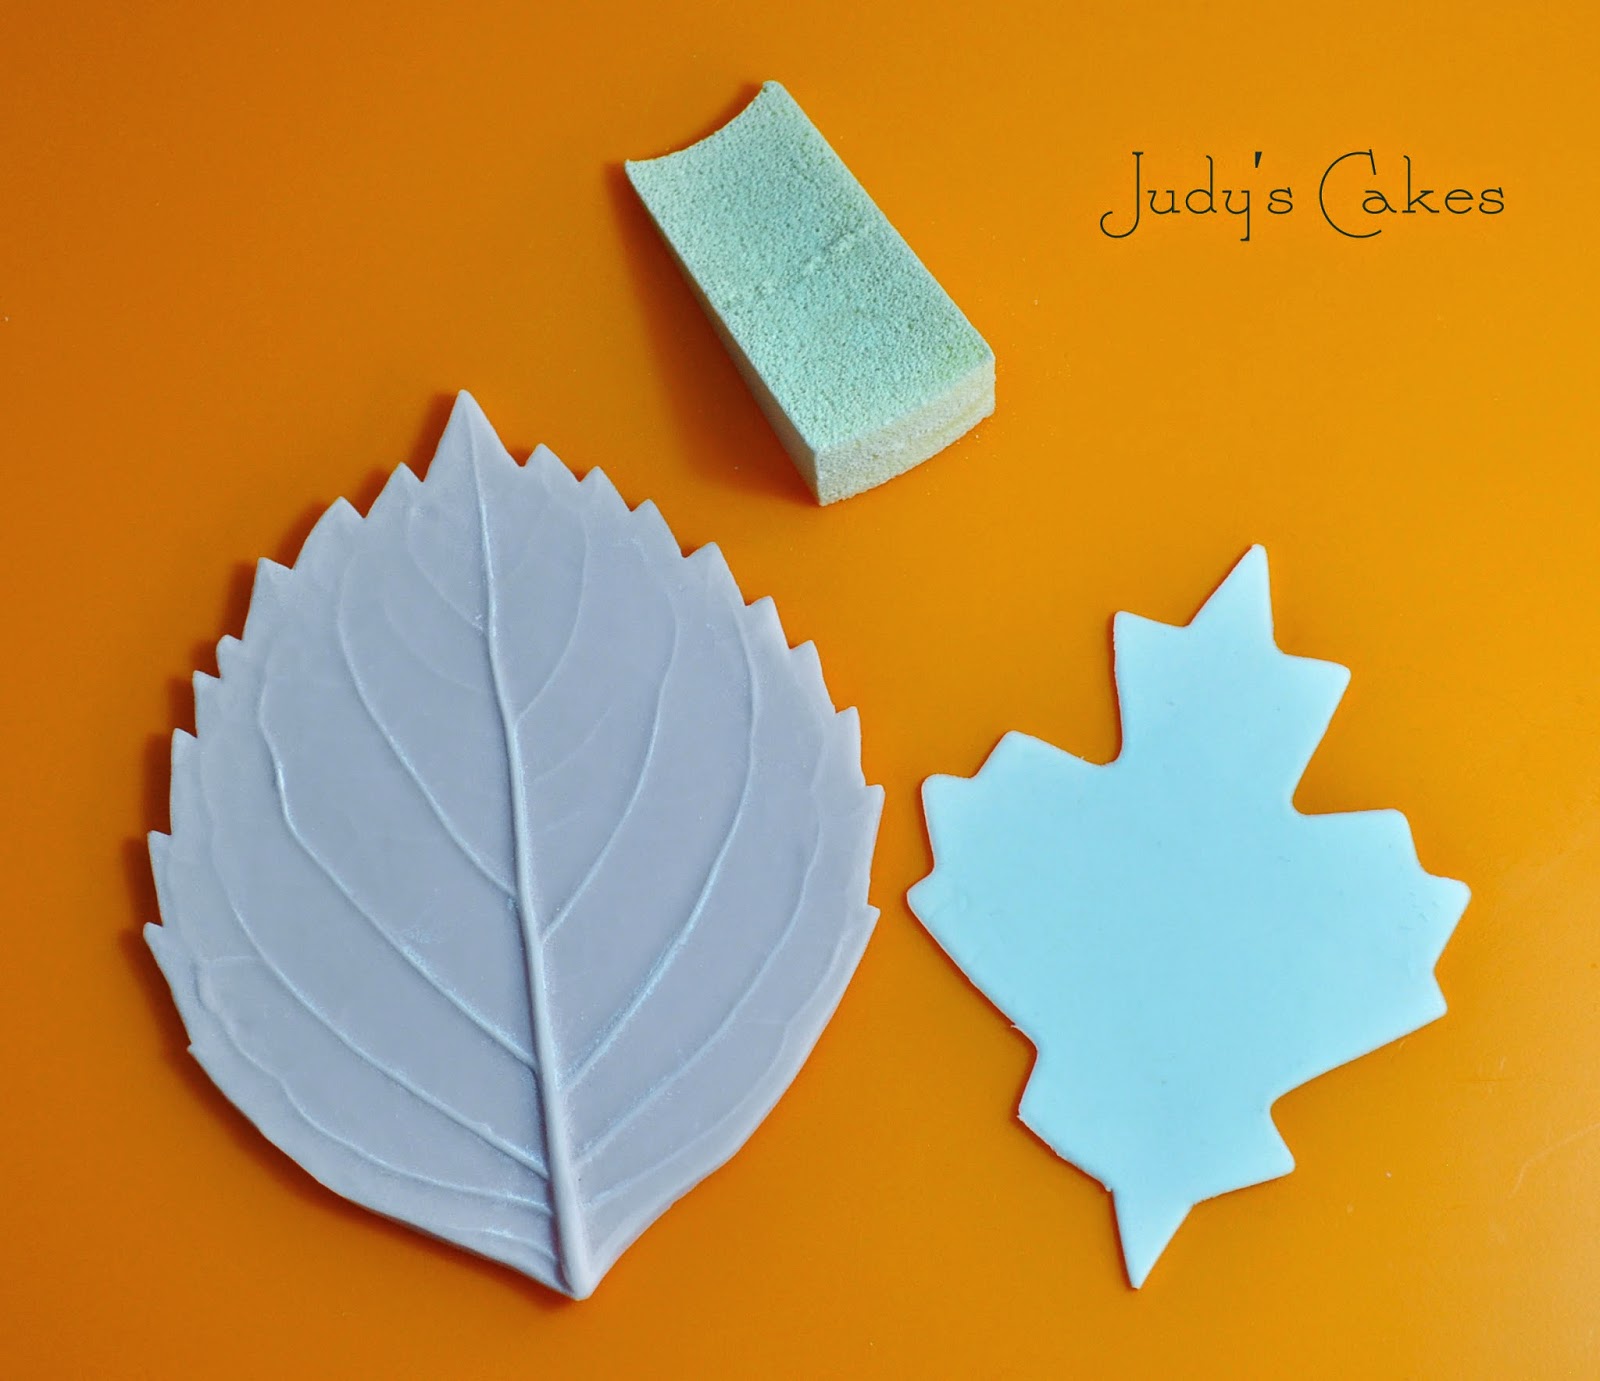
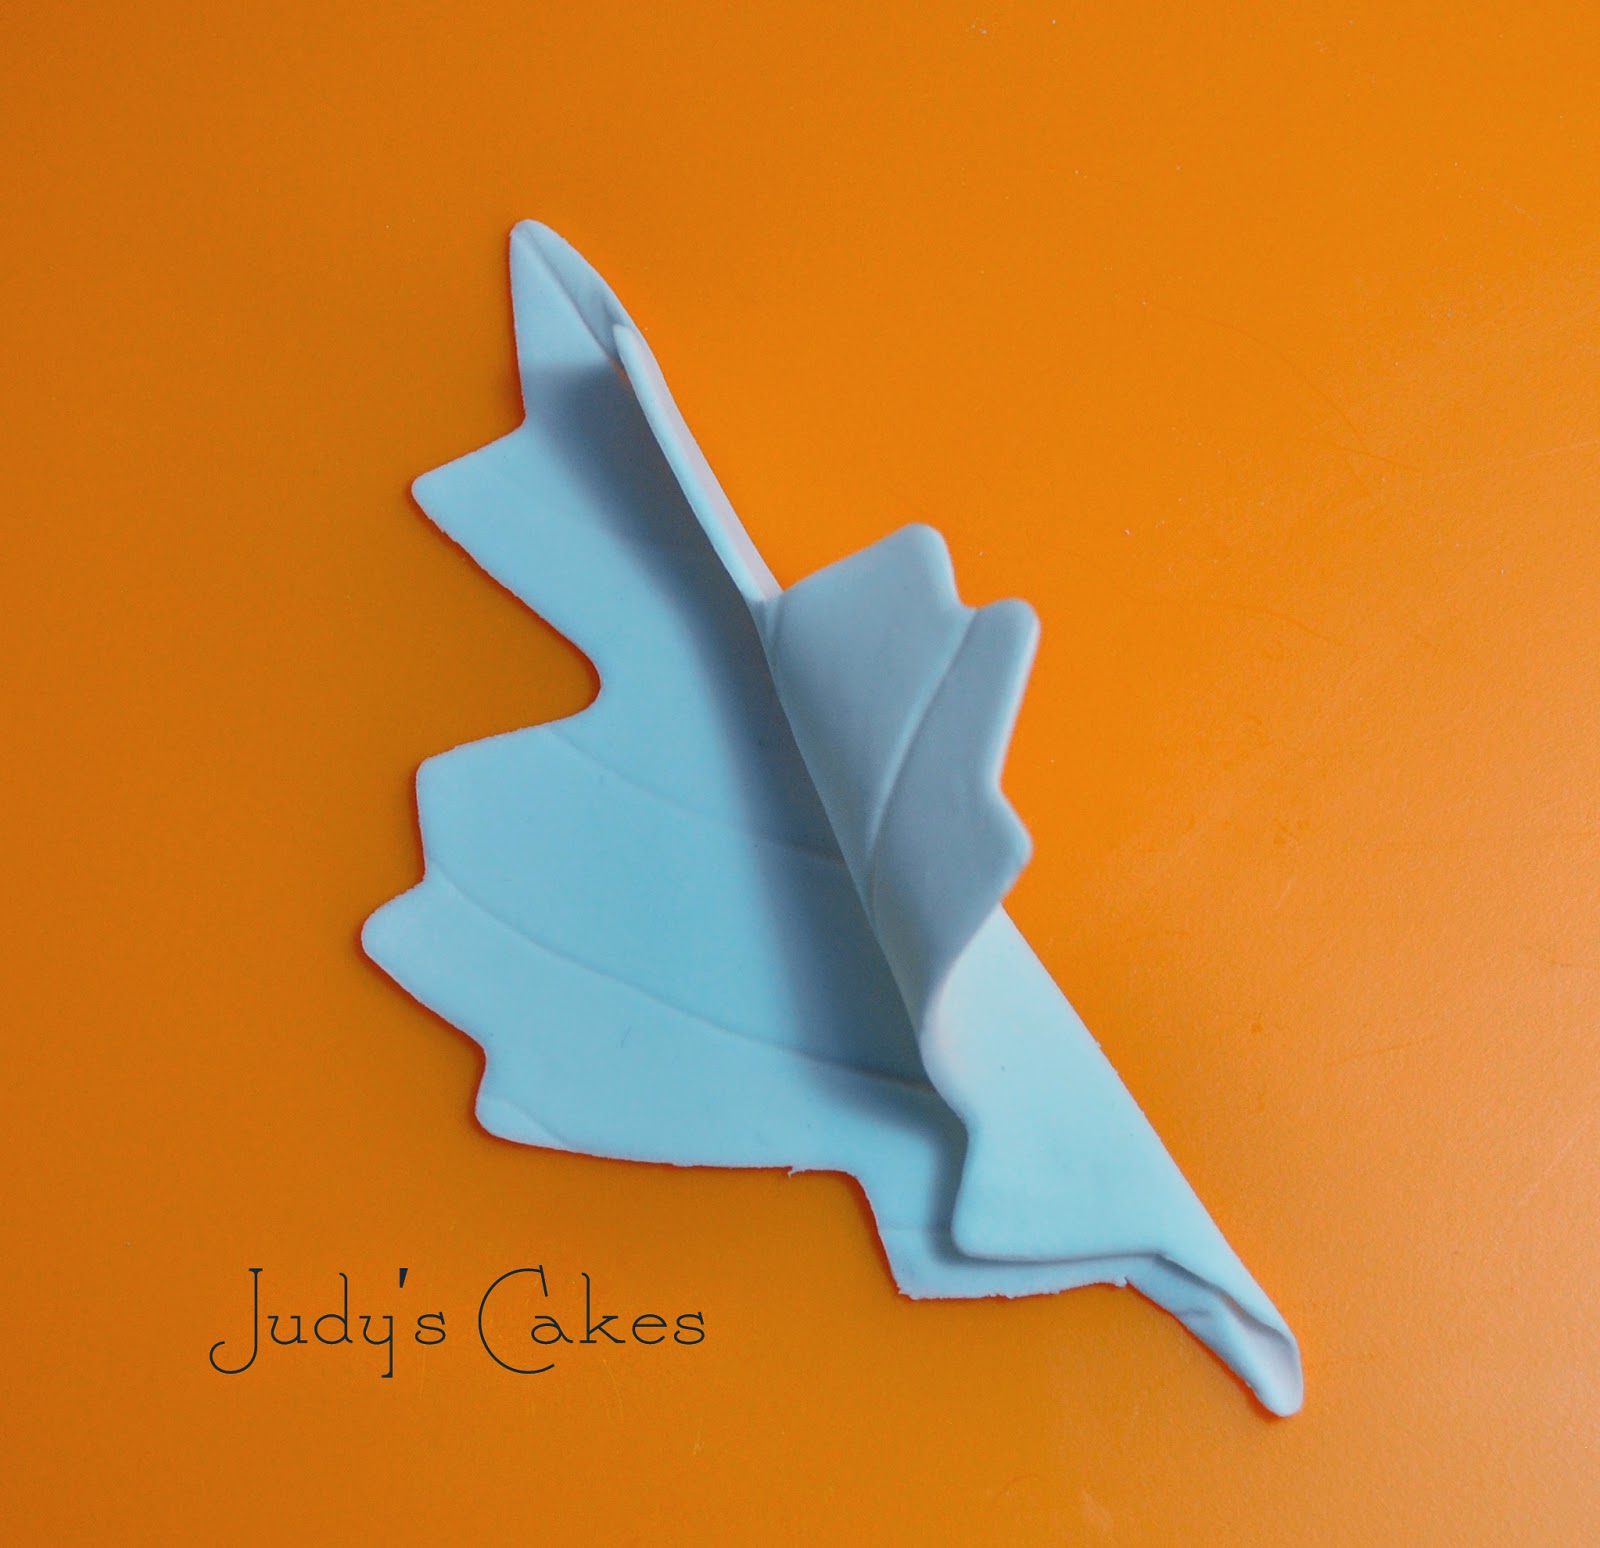
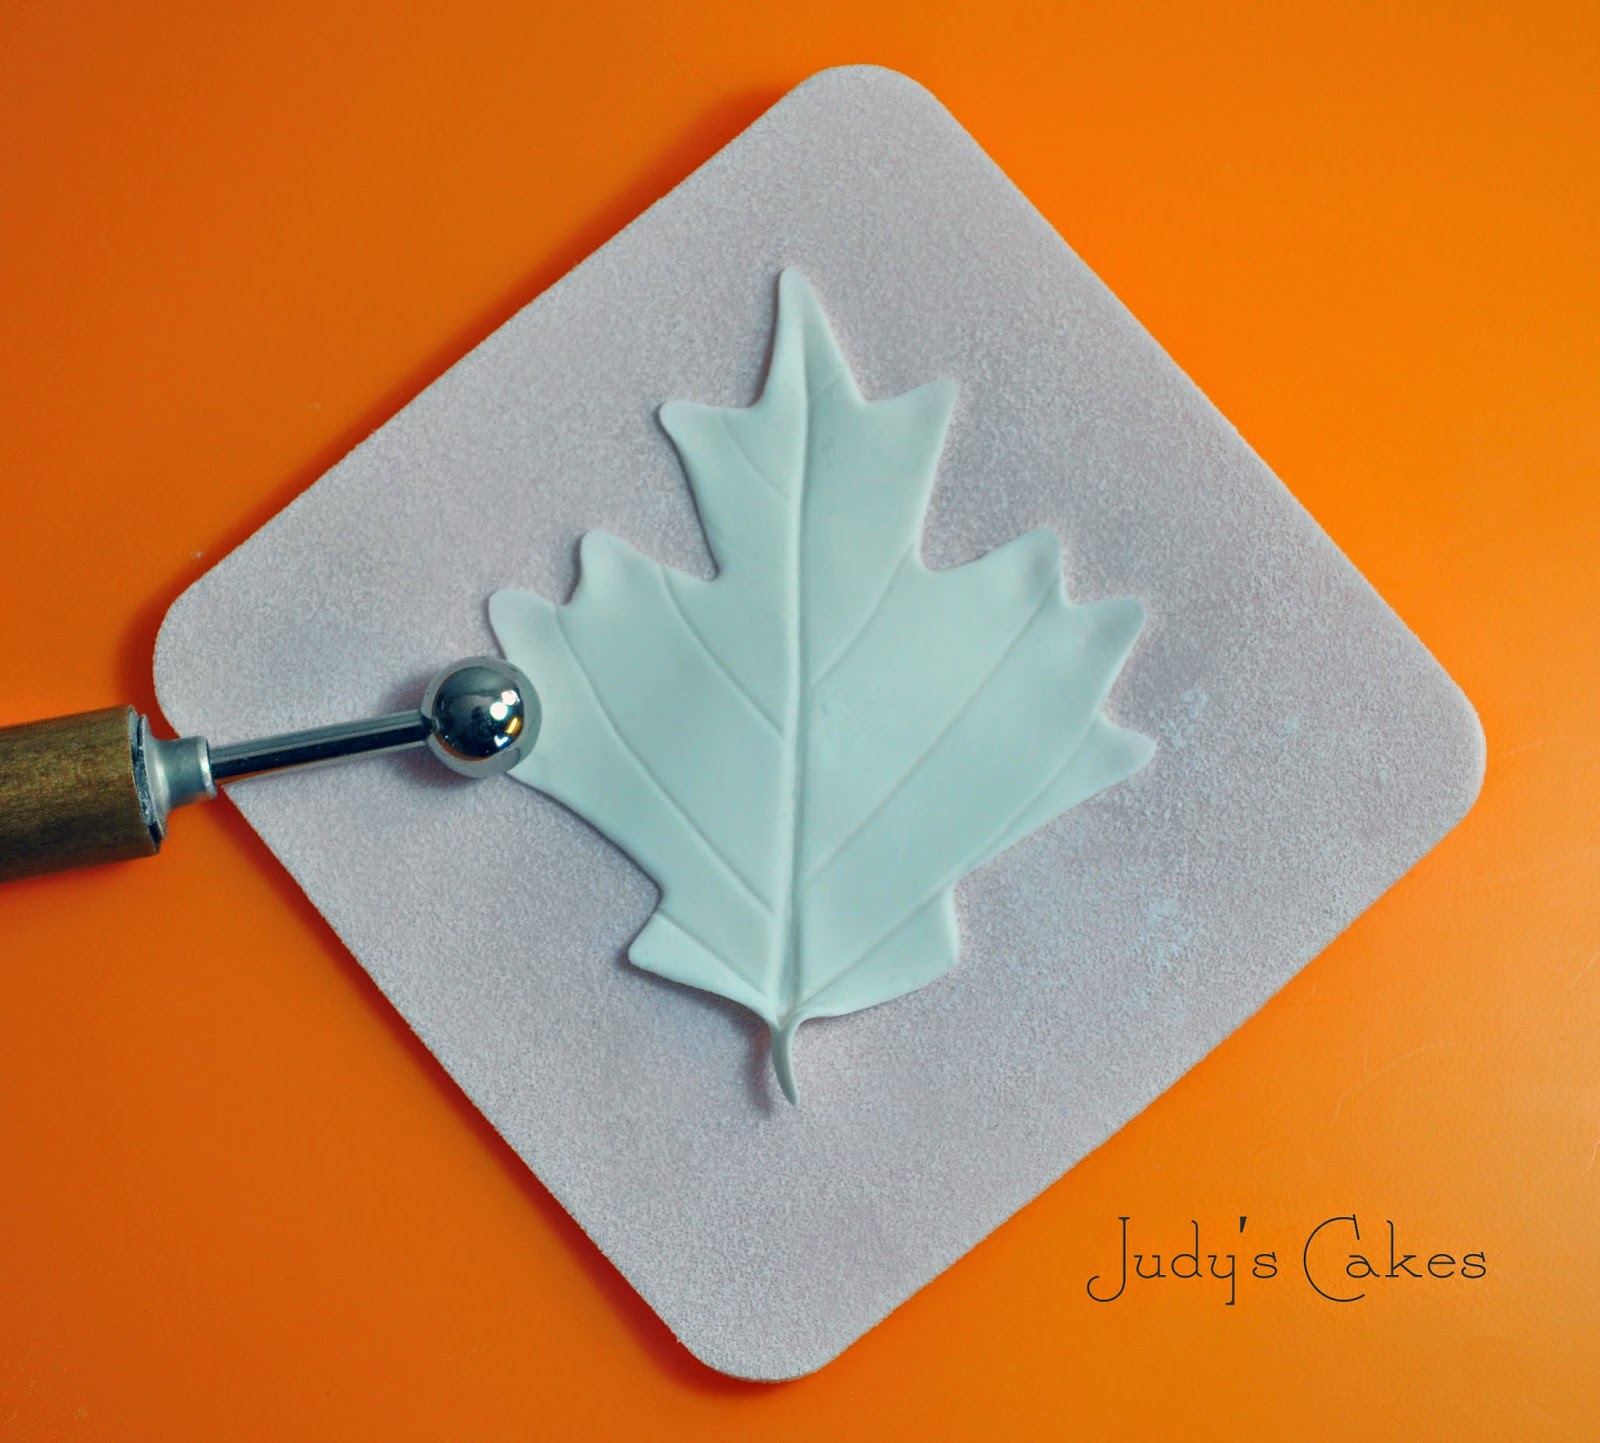
Festive Fall Cheesecake Leaves by Hungry Happenings


Perfect Pumpkin Roll

Perfect Pumpkin Roll by SugarEd Productions


acorn cakeAcorn Cake by The Celebration Shoppe


turkey cake ballsTurkey Cake Balls by SugarEd Productions


turkey pilgrim cakeHave Mercy Turkey Cake Topper by Crazy Cool Cakes by Linda


pretzel-turkeysTurkey Pretzels by Candiquik

I hope some of these ideas help you come up with your own pretty table.  I’d love to hear what you guys are making. I’m always in charge of all the desserts for my extended family gathering, cuz ….well…. I don’t cook very well. They let me do the only thing I do well, haha!

Happy Thanksgiving from all of us at SugarEd Productions!

XX

Sharon

visit our online school


Video: Making American Buttercream

October 28, 2015 by Sharon Zambito 93 Comments

Making American Buttercream Free Video

Hi Friend!

Today I have a free video from the online school for you! Here, I’m showing you how to make my signature buttercream recipe. This buttercream has become known the world over over the last decade. You may have heard of it referred to as “Sugar Shack’s Buttercream” from back in the day when that was my cake business name and online handle.

This icing is so forgiving, elastic and easy to work with. It gives you an incredible amount of “work time” before it loses it’s mind and can’t be worked anymore. (Other recipes literally give you a couple minutes before they freak out.)

Ingredients:

  • 5 1/2 generous cups Sweetex shortening or other brand of hi-ratio shortening.
    • You may substitute some or all shortening with butter but it will make a softer icing and the liquid amount needed will be less.
    • Hi ratio shortening makes a much better icing overall. If you can’t get hi ratio, then be sure the one you use does have at least 3 grams of trans fats per serving. Crisco or other zero trans fats shortenings don’t work in this recipe.
  • 5 pounds powdered cane sugar, unsifted
  • 4 Tbsp. Wedding Bouquet flavoring (or substitute your flavoring of choice in the appropriate amount and adjust the creamer amount to compensate and maintain correct total liquid amount)
  • 12 – 14 Tbsp. hot coffee creamer liquid which is made from mixing a 1:1 ratio of plain powdered coffee creamer with near boiling water. (* You may need to adjust the amount of liquid from batch to batch. Powdered sugar and shortening batches vary and can affect the amount needed.)


This video will give you all sorts of tips and tricks for making it, as well as my secret to getting a PERFECTLY smooth batch of buttercream with no air bubbles! This recipe is so versatile, you can use it underneath fondant and you can even use an impression mat on it. This is a crusting buttercream, so you can also use the Viva paper towel method to get that perfectly smooth, faux fondant finish. There are more videos on all of these techniques in the school, and I hope to see you there! (see below for a free trial offer.)

About butter: I make this with all shortening in the video, but you can substitute up to half with butter. You will have to decrease your liquids in that case, because butter has more water content than shortening. The icing will be more heat and humidity stable the higher the ratio of shortening to butter it has.

NOTES: There are many many many American buttercream recipes out there, but this one has really great properties: super easy to smooth, allows for super sharp edges and corners, crazy long work-ability time, elastic and easily patched/repaired, less prone to cracking and blowouts, non greasy and creamy mouth-feel. BUT in order to get these amazing results the recipe needs to be followed exactly as presented:

  • Hi ratio shortening is crucial, as it creates a much higher quality icing and provides the wonderful properties of this particular icing. Some folks have trouble getting hi ratio, so the 2nd choice would be a store brand that has at least 3 grams of trans fat per serving. That icing will not be as good as with hi ratio, but better than……. Crisco and other zero trans fats shortenings; they will not work and result in a curdled soupy mess.
    •  The best brand of hi ratio is Sweetex, followed by Alpine, but other brands can work as well. You can’t buy hi ratio in a grocery. It’s a commercial grade shortening with extra emulsifiers that can be found at bakery and restaurant supply houses, cake decorating stores and online. Buying it in small portions from cake supply stores will be more expensive than grocery shortening, but the difference it makes is well worth it. However, if you purchase the 50 pound block, portion it out airtight and freeze, it is often more economical than store brands. Yay for saving money!
  • The reconstituted coffee creamer powder is another critical ingredient to the awesome properties of this icing. I don’t use ready flavored liquid creamers as they have added sugar and other ingredients.
  • Be sure your powdered sugar is 100% cane, not beet sugar and is 10x. I don’t know what it is about beets; I love beets, but boy oh boy they do not play well in the sugar.
  • I use a wonderful emulsion flavoring called Wedding Bouquet, which is absolutely divine. I could drink it with a straw…. but I digress. You can use whatever flavorings you like, but adjust the total liquid amount as needed to compensate for the amount of flavorings you use.
  • The all shortening version is cool room temp stable for weeks, and fridge and deep freeze safe for months, a year, maybe longer. Till Armageddon basically. Butter versions are good at room temp for at least a week, fridge and deep freeze safe for months, even a year.
  • Meringue buttercreams (like Swiss Meringue) are another type of icing used in caking. Those are made with cooked egg whites, granulated sugar and all butter. They perform and taste differently. I use both kinds, depending upon the situation. Try them both! (I’ve got tutorials on this kind in the online school as well.)

You can change ingredients in my recipe with limited success, like using milk or cream, other shortenings or sugars, but please be aware that then renders it a different recipe, and it will not perform or look or taste as good as my original recipe 🙂

Amounts for 4.5 quart mixer bowl: 

2.25  lbs Hi ratio shortening
4.5lbs. Confectioners sugar
3/4 Tbs. flavoring
15 Tbs. coffee creamer
15 Tbls. Warm water.

Amounts for 6 quart mixer bowl:

3 lbs sweetex or other hi ratio shortening
6.5 lbs powdered sugar (use a 4 cup measuring cup, 4 cups = 1 lb)
9 tbsp wedding bouquet or flavorings of choice (adjust total liquid as needed)
11 tbsp hot coffee mate liquid

Amounts for 8 quart mixer:

60.5 ounces of Sweetex, hi ratio shortening
1 1/3 cups of hot water and 1 1/3 cups powdered coffee creamer mixed as shown in video
4 Tbsp vanilla extract
3 Tbsp butter flavoring
8 lbs powdered sugar


Disclaimer: this icing ain’t healthy; it ain’t organic; it’s loaded with trans fats, preservatives….and sugar! (And I get a lot of flack about it… party poopers 😛 )   I’m not claiming that it’s good for you. I’m claiming that it works and tastes great. All bad things in moderation is my motto. (Or heavy moderation in my case 🙂 ) It is dessert after all!

If you’ve used my recipe, I’d love to hear your experiences in the comments below. If you haven’t tried it, I encourage you to, because it may just change your caking life. Seriously, I am not just being dramatic. Once I changed to this recipe I was able to get cakes this smooth and sharp:

_

And that leads me to the free trial offer. You can join my online school for two free full weeks and have access to over 300 video and photo tutorials on a huge variety of topics for all skill levels. Also a ton of recipes, articles, photo gallery, forums, private Facebook group, and me! (I give personal support to all members.)

I have a full buttercream course that will lead you through making all the different kinds, to applying and smoothing (get your cake to look like mine above 🙂 , troubleshooting, stacking and more. And I am there with you every step of the way answering questions and providing support.

Try 2 weeks for free. You can stay and pay or leave after that time; cancel anytime with no obligation. No upfront payment.

JOIN HERE

I hope to see inside the school. Happy Caking!

Sharon
SugarEd Productions Online School

Halloween Chocolate Covered Pears

October 17, 2015 by Sharon Zambito Leave a Comment

Hey guys! Today we have a guest post from the ever creative Kim Heimbuck of The Partiologist blog. She has the best ideas (be sure to check out her blog for serious cuteness), and this one is so clever! A unique spin on the traditional candy apple:


Halloween pears

Beware of Pirates?  Not this kind.

You probably didn’t know that there was such a thing as chocolate covered pears.  Well, if I can help it, there will be chocolate covered everything, including pears.

Chocolate Covered Pirate Pear:

Start with as many pears as you plan to make.


Use white candy melts for dipping your pear.


Use the caramel apple sticks.


Insert sticks into the pears and dip into both white and green melted candy melts.


For the pirate, use a round cookie cutter to cut the headpiece.


Also cut an oval piece of fondant for the scarf.


Pinch the oval piece together for the tie.


Fold it in half.


For the eye patch, roll and cut black fondant with a No. 1 strip cutter.


Use a small oval cutter and cut another piece of fondant to make the patch and trim the top.


Layer the patch on top of the strip.


Using number tappits, cut zero’s and pull out the inside for the teeth.


First add the eye patch and then wrap the red fondant around the top of the pear and pinch together the side, add the additional red fondant piece.  Also add the other eye, nose and teeth.


Cut out several white dots and place on the scarf.


Using the large number tappits, cut out a zero and use it for the earring.


Form it into a circle and let dry.


Halloween pears

Add the earring to the pear, cover the wooden stick with a decorative straw and you’ve got yourself a pirate!


Chocolate Covered Frankenstein Pear:

Dip your pear in green candy melts and set aside.


Roll and cut a large piece of black fondant into a circle.  Use a small oval cutter and cut pieces out around the edge of the fondant. Add the black fondant piece to the top of the pear for Frank’s hair.


Add candy eyes to the pear by sticking them on with a bit of frosting or melted candy melts.


Cut a strip for the mouth.  Add a piece of the black fondant strip to the pear for the mouth.  With black frosting, pipe frosting on the pear for stitches and eyebrows. Add a mini orange M&M for the nose and mini marshmallows to the sides.


Halloween pears


Now you can do the monster mash!


HAPPY HALLOWEEN!

——————————————————————

The Partiologist BlogKim has a love for unusual and over the top parties. In 2011 she started her blog, The Partiologist, where she shares her unique and creative ideas. From cakes and cookies, to favors and tablescapes, her inspiring ideas flow freely. Forever fun loving, her mantra is “Life is short; party accordingly!” You can follow Kim on her blog  or Facebook page.
  • Kim’s Full Bio here
Visit out online school


Franque and Broomelda Marshmallow Pops

October 8, 2015 by Sharon Zambito Leave a Comment

Boo!


Did I scare ya?


Probably not, as you intentionally logged onto this post. 🙂


Monster Marshmallow Pops Tutorial


One of my very favorite holidays is upon us. Halloween is a confectioner’s dream, as it provides an opportunity to make some of the cutest tasty treats evah. Let me share with you some I made this week. These were a lot of fun, and not very difficult nor time consuming. They get extra points for that!


Halloween marshmallow pops

Meet Broomelda and Franque. (He is French).


Initial supplies used to make our cozy candy couple include yellow candy melts, green oil based candy color, marshmallows and sucker sticks. I highly recommend Merkens brand melts for optimum dipping performance. In this case I used the campfire roasting marshmallows. Have you seen those things? They are hugantic! They are as big as…..as ……as a giant marshmallow! I also suggest using the thicker sucker sticks, as these bad boys are heavy once they are done.


Big bowl of green melty chocolate.


Other supplies used will be these candies and pre-made googly eyes, that you can get at most cake decorating places.


For Broomelda, we have to cut angles off each side of the gargantu-mallow. Run your knife under hot water, and dry it off before each cut. This will make the cutting of the freakishly large marshmallow much easier.


Stick and dip. Place on wax paper to dry fully.


Let’s do Franque first:

Cut out a circle of black fondant and cut out notches along the outer edge. Do not cut them evenly or symmetrically. Franque does not have the most couture coif I have ever seen. Just sayin’.


Lay the toupee over his head and just press down all around the sides. (Hint: use shortening as your glue. Trust me. You will thank me for this later.) Glue on his googly eyes with melted chocolate. Cut a white Good & Plenty in half and glue in place for his bolts. Give the rest of the box to hubby because he loves those nasty candies. Oh wait, that is my hubby. Ignore that. Next use a paintbrush to drop a dollop of the same green chocolate on his handsome face to make a nose.


Next we need to bring out the big guns. OK just one small gun. Anyway, get your clay gun out, and using the smallest size circle disc, extrude a string of black fondant. Use that to make eyebrows and mouth. Again, using shortening on his face as glue will save you many bad words. And if you just cannot help yourself (like me), use silver luster dust mixed with vodka to paint his bolts. An edible marker (not shown) can be used to make his scar.

You mad confectionery scientists will have
created a marshmallow monster!


MWAHAHAHA!

Now on to Broomelda:


Marshmallow pops


As with all ladies, we need to spend some time on the hair. Use your clay gun with the largest muti hole disc.


Extrude a length of purple fondant and apply to the side of her head.


Repeat process on each side until her head is covered.


Cut a few short pieces to make her bangs. The bob is very in this season in the witch world.


Now to make her face. Clay gun string again for the brows and mouth. Half of the green Mike and Ike candy for the nose. (Keep that box cuz we like those.) Another pair of google eyes.


Well hello my pretty!


To make the pointy part of her hat, start with a ball of black fondant.


Roll it into a cone shape initially, and then continue to elongate and shape it into a witch hat shape.


A circle of black fondant laid on her head, and then the cone part of the hat is attached to the top of that. A couple of purple clay gun strings will create a perfect hat band.


marshmallow pops

 And they are done!


marshmallow pops

Franque: Hey good lookin’. You want to go for a drink?
Broomelda: Why yes, thank you. I will have a Bloody Mary.


marshmallow pops

Double date!


Happy Halloween everybody! Send me pics if you make these and I will post them on Facebook. Please tell all your friends to like our Facebook page.

Sharon
Sugared Productions Online School

visit our online school


  • original post from 2011


NOLA Photography http://bentzphotography.com/

Halloween Treat Ideas and Tutorials

October 7, 2015 by Sharon Z Leave a Comment

Hi friends!

It’s almost that spooky fun time of year! Halloween is such a great holiday for making fun and creative sweets and treats. The possibilities are endless. It’s not to early to start planning, so here’s some ideas and tutorials you help get you kick started:


Mummy cake with edible gauze

Mummy Cake by The Partiologist


Mummy-Pumpkin-Cookies

Mummy Pumpkin Cookies by OMG Chocolate Desserts


oreo bat truffles

Oreo Bat Truffles by One Sweet Appetite


halloween bundt cake

Halloween Bundt Cake by Love Bakes Good Cakes


Reeses Frankenstein Cupcakes

Reese’s Frankenstein Cupcakes by Your Cup of Cake


Haunted Cupcakes

Haunted Cupcakes by Today’s Parent


Cake Ball Brains

Cake Ball Brains by Hungry Happenings


vampiresVampire Cake Pops from Bakerella


R158188.jpg.rendition.largestGhost Cupcakes from Better Homes and Gardens


candied apple 2
Purple Candy Apples
 by The Kitchen McCabe

Aren’t these just the cutest? I can’t wait to see what you guys make; link me to your photos in the comments!

Happy Halloweening!

Sharon
Sugared Productions Online School

visit school


Sequins Part 2 by Kara’s Couture Cakes

October 1, 2015 by Sharon Zambito Leave a Comment

SEE PART 1 HERE

Edible Gelatin Sequins:  Using Powdered Gelatin and General Tips and Tricks

Many people have powdered gelatin more readily available to them (sooooo easy to get at the local super market!) rather than the sheet gelatin that I used in my Edible Gelatin Sequin tutorial. So I’m gonna break down the powdered gelatin method, which is slightly different. Still easy, just different. Below the powdered method you’ll find some general tips and tricks on how to get the best gelatin sequins and troubleshooting some common irregularities.


Powdered Gelatin Method

Powdered Gelatin1

I used Knox Unflavored Powdered Gelatin. You’ll find these in a box with four each .25 oz. packets inside. In a microwave safe bowl, pour in 2/3 cup cool water. Sprinkle each of the packets individually over the surface of the water evenly.


Powdered Gelatin Hydrating Multi2

The gelatin will get weird and wrinkley looking when it begins to absorb the water. It’s normal. Let it absorb as much as possible; there should be little to no dry, light powder left one the surface.


Powdered Gelatin Hydrated3

Give the hydrated gelatin a stir. It will become solid as you stir, able to be formed into a ball. Or three balls to make a snowman. But don’t play with it too much or you’ll incorporate air which will cause more work later. I know because I tried making a gelatin snowman. Now you know not to. 🙂 Use the back of your spatula to smooth out any larger clumps of unevenly hydrated gelatin before heading to the microwave.

Microwave in short bursts of about 15 seconds until the thick mixture becomes very liquid. Give it a stir in between each burst in the microwave break up the solid areas and evenly distribute the heat throughout.


 Grainy Powdered Gelatin4

If the gelatin is liquid but still looks grainy when dripping from your spatula, heat it just until there are no more little grains. Do not over heat it, it should feel barely warm if you dip a finger in– never hot.


 Smooth Powdered Gelatin5

After another 7 seconds in the microwave it was completely smooth and without a grainy texture.


 Powdered Gelatin Straininig Stocking6

Due to the little clumps that typically form in the gelatin when you sprinkle it you’ll want to strain it through a very fine cloth. If you have even the slightest of clumps it will clog your size 1 piping tip and cause you to want to throw the bottle across the kitchen. (Well, at least that’s my childish reaction when my piping tips get clogged. But I hear our fabulous cookie friends feel equally tantrum-y when their piping bags and tips don’t behave. So. Justified. 🙂 )

This is a section cut from a pair of girls tights/stockings that I got at the dollar store. NO they haven’t ever been worn. I’m not the girly type. Wash them with dish soap before using them for any food application. (Why dish soap and not in with the laundry? Dish soap is food safe. We don’t use laundry detergent and fabric softener on our dishes. At least I hope you don’t.) You can use either the toe end, or if you have multiple sections for different uses you can just securely tie a knot in one end.


 Powdered Gelatin Strainer7

Place the closed end into a see-through glass and fold the top ends over the outside to create a nice wide opening to pour the liquid gelatin into.


Poured Powdered Gelatin8

 Carefully pour your gelatin into the open strainer.


Squeezing Powdered Gelatin

Much of the gelatin will move through the strainer on its own. To get the last bit through pinch the top of the stocking between your thumb and forefinger, keeping you hand close to the top of the cup and pull the stocking upward with your opposite hand slowly. Seriously, do it slow. You’ll regret doing it fast and say to yourself, “Self, that was dumb. We should have listened to Kara.”

And now, you’re ready to pour it into your little bottle fitted with a number 1 tip and start making sequins!

***A quick side note: if you use highly saturated color like this one (Wilton Rose) the stocking strainer will most likely become stained. Having a colored stocking for applications like this is good. Don’t think you’ll be able to use this again for anything like white royal icing. Why did I choose white, by the way? I can see if it’s clean when I wash it 🙂 I’m a functionality nerd.


Tips, Tricks and Gelatin Sequin Troubleshooting

I found that I got a little fussy about irregularly shaped sequins. I wanted perfect circular little sequins like the ones on my milkmaid costume from my tap dancing recital when I was 5. (I’ll find a picture. It’s too darn funny to NOT share now that I’ve mentioned it!) So I played a bit and figured out exactly why I was getting irregular shapes and paid close attention to the qualities and conditions with each tray I created. Here are my findings…


Sequins Irreglar Shape

They aren’t perfect. But they’re so close! What was going wrong with these guys?


Well, two things.

1) Improper temperature. If the gelatin is too warm when you’re dropping it onto the non-stick surface, it may fall and run slightly into different directions. It’s kinda rebellious that way.

-or-

2) If when dropping the little spots of gelatin the end of your tip touches the non-stick surface you’re likely to drag, ever so slightly, the tip when picking it up to move to the next spot. That slight drag from touching the tray will give you an irregular, oval shape as you’re pulling the droplet to the side. Make sure they drop straight from the bottle by simply letting them drip onto the surface.


  Sequin Irregular sizes

Another instance of inconsistent shapes. Some of these guys are just so different that it shouldn’t be ignored. There should be some uniformity in their appearance. The gelatin here was getting too cool. when gelatin is warm it’s really tough to get drops this small, it wants to run and pool in larger amounts. When the gelatin gets cool you may feel like you have more control over it, but you’ll have to move slower and much more intentionally to get them to come out of your bottle and to get drops to fall. Just like too warm wasn’t cool up above, being too cool isn’t cool either.


Sequin Too Close
Now. You may think you’re saving space and being reeeeaallllyyyyyy efficient with the use of your tray by getting them as close as possible. Well, you’ll learn…


Sequins Merged
Because you’ll end up with merged and VERY irregular drops. The gelatin will naturally spread when you drop it. The drops are so tiny that it’s tough to see, but you know it happens when 5 seconds after you’ve dropped to close to each other, they reach out and begin snuggling, becoming one. Just like at a pre-teen dance, keep some distance between those two!


 Sequin Nipples

 Last, but definitely not least… The nipple effect. Now guys, this may be ok with you. BUT it’s not ok on cakes. Wait… Nipple? Yep. That little dot in the center that you didn’t intend to put there? It’s air. It’s a bubble. But it makes a naughty looking sequin. Some of these are unavoidable, like when you pick up your bottle and turn to right side up and then back down. Air gets caught around the tip inside and can’t really move down into the bottle. The gelatin is too thick, so it stays put until you give it a squeeze. But they can become excessive if the gelatin has foamy bubbles when you pour it into the bottle initially. If your warmed and colored gelatin has foam on the top, take a moment and skim it off before pouring it into the bottle. Then, no nipples! 🙂

And that concludes this installment of fun with edible gelatin sequins! If you have questions or comments, let me know! I’m happy to help. 🙂

— Kara

                                                                                                                                                           About the Author 

251810_10200343574050004_56449475_nI am a graduate of The Culinary Institute of America and have studied under some of the best pastry chefs and cake decorators in the world. I specialize in fondant covered cakes, gourmet cupcakes and cookies, custom designed to perfectly fit each client’s unique occasion. The only thing better than how my cakes look, is how they taste! Ask me about cake!

Kara’s Couture Cakes
Kara’s Facebook

                                                 Kara’s Blog

————————————————————————————————–

Sugar Flowers, Flowers, and More Flowers!

September 24, 2015 by Sharon Z 4 Comments

Hi Sugar friends!

Today I want to share some of our tutorials that are floral inspired. Flowers are perfect for adding that special touch to your cakes! Get inspiration from these projects and add your own special touch!

fantasy rose sugar flower video tutorial

My easy fantasy rose, with bling in the middle for an extra effect!

I did these flowers in preparation for my appearance on TLC’s Ultimate Cake Off a few years back. (Any of you remember that hot mess ? LOL)


magnolia sugar flower video tutorial

The Southern magnolia is a classic! A good beginner flower to learn.

Will add a touch of elegance to any cake: wedding, anniversary, birthday and more.


poppy sugar flower video tutorial

Red is such a bold color! These poppies are sure to make people look twice!


wafer paper ranunculus tutorial

wafer paper ranunculus tutorial

Wafer Paper has so many possibilities!

You would be surprised how easy it is to learn to make these gorgeous Ranunculus flowers.


apple blossom sugar flower tutorial

These apple blossoms are so realistic!

This would be perfect for those cakes that need a soft, feminine addition!


isomalt sugar garden video tutorial
How about an isomalt garden?


isomalt sugar garden video tutorial

Sidney Galpern of Simi Cakes used both blown and pulled sugar to create these gorgeous flowers in the video tutorial she filmed for our online school.


isomalt sugar garden video tutorial

And a sweet little birdie too! ( And the leaves, and dragonfly, and sculpture on top……)


fantasy Bermuda Bling sugar flower video tutorial

My custom Bermuda Bling fantasy flower is super easy to make.


fantasy Bermuda Bling sugar flower video tutorial

Simple gumpaste cut outs with pearl and dragees turn boring cutters into extraordinary flowers.


gumpaste peony video tutorials

Who doesn’t just love all the varieties peonies come in?


gumpaste peony video tutorials

Gorgeous open ruffled peony.


oriental gumpaste peony video tutorialOriental style open ruffles peony.


gumpaste peony video tutorialTraditional closed  full size peony. Just gorgeous!


watercolor buttercream and chocolate blossoms video tutorialGorgeous water color buttercream and chocolate blossoms.

watercolor buttercream and chocolate blossoms video tutorialThese flowers are made of solid chocolate, not modeling chocolate 🙂


What a beautiful array of edible flowers, yes?

I hope you get some inspiration from these, some of my favorite sugar flowers! I want to see your floral creations, so link me in the comments!

** Our school contributors did an amazing job putting together tutorials for our online school. Thanks to Lisa Bugeja, Kara Andretta, Naomi Hubert and Sidney Galpern.

Until next time, Happy Caking!

Sharon
Sugared Productions Online School


NOLA Photography http://bentzphotography.com/

Free Woodland Cake Tutorial

September 10, 2015 by Sharon Zambito Leave a Comment

Grab Your Free PDF!

 Yep, it’s totally free!


Free tutorial

Download It Here


Please enjoy it!
Sharon
www.sugaredproductions.com


NOLA Photography http://bentzphotography.com/

Gumpaste Autumn Leaves Tutorial

September 9, 2015 by Sharon Z 16 Comments

Hi guys! Today we have a tutorial from Judy Anderson over at judyscakes.blogspot.com. She is going to show us how to make realistic Fall Leaves, perfect for those Autumn Themed treats we showed you recently!


How To Make Fall Leaves

Fall is my favorite time of year! The harvest season finally is over, the crisp autumn air moves in, and the kids go back to school. It seems that life becomes more relaxed, and everything begins to slow down just a bit. One of my favorite things about this time of year is watching the leaves transform into a beautiful display of colors!

Where I grew up, the leaves pretty much went from green to yellow to dead. Although it was beautiful, those leaves can’t compare to the kaleidoscope of autumn colors found in other areas of the country. I now live in Utah, surrounded by majestic mountains with several canyons only minutes away from my front door. If you drive through these canyons during the fall season, the array of colors you’ll see is simply breathtaking!

A few weeks ago, I decorated a cake with several different fall flowers and leaves. Some people asked me how I made these leaves, while a few even thought they were real! Now that’s quite a compliment! (Pardon me… I’m blushing at the moment. LOL)  So I thought I’d put together a tutorial to show you how it’s done.

Part #1 will show you how to cut out the leaves. Part #2 will show you how to color the leaves.

PART ONE:  Cutting out the leaf.

You’ll need: gum paste, rolling pin, ball tool, foam pad, triangle makeup sponge, leaf cutter, and a leaf veiner.
Roll the gum paste out until it’s thin. Place it over the top of the leaf cutter. Roll the rolling pin over the gum paste, then run your finger across the edge of the cutter. Doing this will give you a much cleaner cut edge.
The leaf cutter I used has an annoying thick stem at the bottom of the leaf. (I have no idea why they designed it that way!) Use a sharp knife to cut the outer edges of the stem off so it’ll look more realistic.
Next get your veiner and makeup sponge ready.
Place your leaf over the top of the veiner. Then, using the makeup sponge, press down on the leaf to imprint the vein details onto the gum paste.
Fold your leaf in half to make the center vein more defined.
Place the leaf on a foam pad, then use the ball tool to thin the outside edges of the leaf.
Using your fingers, pinch together the bottom stem and the tip of each rounded edge on your leaf. You can see above that the edges on the right side are pinched, while the edges on the left are not.Forming little points like this instead of leaving the edges round makes a huge difference. I think this one of the most important steps in making your leaf look more realistic.
Here’s the finished leaf!  Dry your leaves on crumpled aluminum foil or egg crate foam to keep them from being too flat. Now let the leaves dry completely before adding any color.

 In the first part I showed you how to cut out a leaf and make it look more realistic. Here I’ll discuss using different petal dusts on your leaves to achieve bold vibrant colors.

 At the top of this picture is a plain yellow leaf that was cut out of gum paste. Below it are three examples of the same basic leaf that were brushed with different colors of petal dust. Yes… even the orange leaf started out yellow. The color possibilities are endless!!!

Here’s a similar example to the one above. Except I used pink gum paste instead of yellow to make the basic leaf.

 Before we get started, here are a few basic rules to keep in mind:

1- Never start out using dark colors.
You can always make a color darker… but it’s almost impossible to lighten it up! This same rule applies to both gum paste and petal dust. By starting out light,  it’s easier to vary the value and intensity of each color.

2- Less is more.
Begin by adding colors a little at a time. You can always apply more color later… but it’s very difficult to remove once it’s on.

3- Blend the edges of the colors together.
Doing this will make the colors flow together naturally, so they won’t look spotted or splotchy. Be careful, however, not to over blend!

4- Don’t worry if the tips or small parts of your leaf break off.
The truth about fall leaves is that they’re either drying up or already dead. Take a look at real leaves… you’ll notice that they’re all shriveled up, crumbly, torn, or even have holes in them. Leaves are not perfect. In fact, they’ll look more realistic if they have flaws.

5- Use many different colors of petal dust on each leaf.
Don’t be afraid to make extra leaves and experiment with your colors. You won’t know how they work unless you try them.

6- Use a lot of different brushes.
I use small paint brushes to apply the petal dust. For this tutorial, I used one brush for the yellows, one for the greens, one for the light reds and oranges, and one for the dark reds and burgundy. Plus I had one very tiny brush for only dark brown.


OK… let’s start with the yellow leaf.

I began by dusting a mid-tone yellow here and there, concentrating on the center of the leaf.

Then I randomly add light orange to a few other places on the leaf.
 
Next, I deepen the color by adding a mid-tone orange to the outside edges of the light orange spots.

Then I add a couple of different reds to the outside areas of the dark orange. The farther out from the center I go, the darker the colors become. Finally, I hit a few of the lighter spots with bright yellow. This helps add vibrancy to the leaf.

The next step is to add a just a touch of dark brown. Using the flat side of your tiny brush, stroke upward across the very outside edge of your leaf. This helps bring dimension and realism to it’s appearance. Finally, add just a hint of brown to the veins. Be careful not to go too dark, or the veins will look like you drew them in.

There’s a huge variety of colors you can make with a basic yellow leaf. Play around a little, and see what kind of colors you can come up with.

Next up… the red leaf.

I start by adding a reddish orange color to different parts of the leaf.

Next I brush on a mid-tone red to the remaining areas.

I deepen a few of the reds by adding an even darker red color.

 Finally, to make the dark reds look even richer… add burgundy to a few spots. You can also add some pink or light orange to brighten the lighter areas. Finish off by touching just the outside edge of your leaf with dark brown, and then lightly trace over the veins. (Do this the same way it was described above for the yellow leaf.)

Here’s an example of a variety of colors you can achieve by starting out with the same basic pink leaf. Try using different shades of orange, pink, red,  burgundy, and even a little dark green.

These fall leaves are a great way to practice your skills. Don’t be afraid to play around and use a variety of color combinations. You can even try adding blue or purple to your color scheme! If a leaf breaks… don’t worry, it doesn’t matter. You can still use it! The whole idea is to discover new ways to use color and to have fun. You might even be surprised at how artistic you can be!!!

unnamed

Judy Anderson-  Judy’s Cakes

I was an art major in college, so my art background has been very helpful in developing my cake designs. Cake decorating has blended my love for art and baking together into one! I began decorating cakes in 2008. I’m self taught and specialize in making gum paste flowers. Several of my cakes have been published in Cake Central Magazine, and I won honorable mention in their “Wedding Cake of the Year” contest. I’m also an ongoing contributor to the Satin Ice Website.


NOLA Photography http://bentzphotography.com/

Autumn Themed Treats

September 6, 2015 by Sharon Zambito Leave a Comment

Hi ya’ll!!

Have you had enough of summer? I know I have. It’s hot as heck down here in the deep south.

Let’s dream about the upcoming Fall season. Here’s a round up of Autumn themed treats and recipes to help get us ready!


Chocolate-Caramel-Cupcakes-Sweetopia-590x885

 Chocolate Caramel Cupcakes from Sweetopia


Indian-Corn-Cookies-480x324

Indian Corn Cookies from Sweet SugarBelle


pumpkin-cake-pops-120-800x535

Pumpkin Cake Pops from The Pink Whisk


basket1a small

Autumn Basket Cake from SugarEd Productions


cat

Kitty Cat Pumpkin Cake from The Cake Girls


dark_gourd_cake_8

Chocolate Painted Cake from The Cake Blog


IMG_1076smallTurned

Slice of Pie Cookies from Cookie Crazy


easy-no-bake-pumpkin-patties

Pumpkin Patties from Mom On Timeout

I can almost smell the scent of pumpkin pie in the air. I hope these got you inspired for Fall baking.

Happy Caking!

Sharon

  • « Previous Page
  • 1
  • …
  • 3
  • 4
  • 5
  • 6
  • 7
  • …
  • 15
  • Next Page »

Sharon Zambito

Sharon Zambito

An RN turned SAHM turned cake maniac. Owner of SugarEd Productions Online School. Join me for some caking, baking, and all around sweet fun :)

Follow me..

  • Facebook
  • Instagram
  • Pinterest
  • YouTube

Pinterest

  • Autumn House Two Trees Machine Embroidery Design – Blasto Stitch
    Autumn House Two Trees Machine Embroidery Design – Blasto Stitch
  • Embroider  Sew :: Jelly Roll Purses - Embroidery Garden In the Hoop Machine Embroidery Designs
    Embroider Sew :: Jelly Roll Purses - Embroidery Garden In the Hoop Machine Embroidery Designs
  • (1) How to QUICKLY & SAFELY remove acrylic, gel, and dip powder polish | BAGGY METHOD - SO EASY! - YouTube
    (1) How to QUICKLY & SAFELY remove acrylic, gel, and dip powder polish | BAGGY METHOD - SO EASY! - YouTube
  • (1) Bouffant Surgical Cap - YouTube
    (1) Bouffant Surgical Cap - YouTube
Follow Me on Pinterest

Follow Me on Instagram

Instagram requires authorization to view a user profile. Use autorized account in widget settings

Recent Posts

  • Egg Safety Basics
  • Stable Mabel Support System Sale
  • Guest Post : 4 Vegan Cake Recipes No One Should Miss Out On!

Popular Posts

  • Ways To Make Your Cake Fluffy And Moist
  • How To Stencil on Cookies with Royal Icing
  • Doctored Cake Mix Recipes
  • Transferring an Image Without a Projector
  • All About Buttercream!
  • How to Fix Broken Ganache
  • Edible vs Non Toxic Gold Dusts

Categories

Search

Archives

Copyright © 2025 · Sharon Zambito and SugarEd Productions,LLC

Copyright © 2025 · Evangeline Theme on Genesis Framework · WordPress · Log in