Sugared Productions Blog

  • Blog Home
    • Home
  • Online Classes
  • Shop
  • Contact
  • About

Graduation Wedge Cake

May 19, 2009 by Sharon Zambito 143 Comments

Hello everyone!
Good gravy have I been busy! Running pillar to post. Burning the candle at both ends. Nose to the grindstone. Running around like a chicken with my head cut off. Burning the midnight oil. OK, I will stop. You get the idea. I bet you guys have been busy too since it is graduation time.
My beautiful and sweet niece graduated from high school last weekend, and I made her a special cake. I wanted to try the tilted method using wedges. I had not done that before. It was really pretty easy.
I wanted to of course use her school colors and mascot, but also incorporate little bits of her life, while making it fun and whimsical.
The grad hat was a styro ball I cut and carved a bit and covered with fondant. The mortar board was a square of fondant with tylose, dried ahead and glued on with chocolate. I used a 4 inch ball and a 5 inch square in this case. The clay gun was used to make the tassel.
The scroll work was done with a cutter set available here.
The paw prints were stenciled on, and represent LSU, where she is going to college. I used the alphabet tappit cutters for the LSU letters. I used the funky alphabet cutters for her name.
The initials in the heart are of Paige and her boyfriend, Chris.
I did not have time to make the flowers, so I purchased them, and dusted some to add color.

Here are the flowers I purchased:

Cally lily spray

Rose spray

Large roses

Blue roses


The graduation figure was made with a chocolate mold. I used fondant with tylose in the mold, let it dry firm, and then airbrushed it with super pearl luster dust.

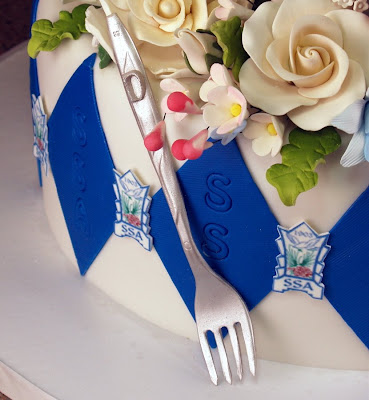
The fork represents the restaurant where she works as a hostess. That thing was quite a challenge to make. I was so engrossed in trying to get one of those suckers to come out right, I forgot to take photos. But here is how I did it:

I rolled out a piece of gumpaste and pressed it between 2 plastic forks that were stacked on top of each other. I squeezed them hard together to make the impression of the handle and the 4 tines into the gumpaste. While they were sandwiched together I trimmed around the outside of the fork edges with an exacto knife. Then I took the top fork off and let the cut out gumpaste sit atop the bottom one for a good long time. After it dried a good bit, I took that gumpaste “fork” and laid it on the table and trimmed to the exact outline of the impressions made by real forks. The handle was easy peasy, but trying to cut the tines out made me curse and throw things. And curse some more. They kept breaking off or were just crappy looking. After creating a graveyard of about 12 reject forks, I decided to go with shorter than real-life tines, and got one fork that was decent. I put that back on top of the plastic fork to get the proper shape and let it dry a day or two. Airbrushed it silver after I added the letter D on the top of the handle. I just knew I was going to break it, but God was smiling on me and it made it to the cake. Whew!
————————————-
Here are some photos of the construction. Please forgive the terrible quality of these photos. I was very pressed for time as my power had gone out for quite a while and put me behind schedule. On top of that, I was working with a heavily bandaged finger after slicing it it open cutting the Styrofoam wedges with a very long, very sharp knife. I think I needed a stitch or two, but no time for that!
I put the ganached tiers atop a Styrofoam lift, so I would be able to tuck the fondant under the cake and foamcore board under it for a clean bottom look.
Here is one tier after it was covered.
I had topsy turvy dummies laying around, which worked out great, because the top slant was already cut for me. I just had to trim them down to the height I wanted. (Note: to be considered food safe, you need to cover your wedge and board with something appropriate.)
I attached a piece of thin foamcore to the bottom of each styro wedge with white chocolate. This would prevent the supports from going into the styro under the weight of the cakes. I doweled the bottom cake as usual under the wedge support.
I used melted chocolate to attach the wedge to the lower tier, and more melted chocolate on top of the wedge, then placed the middle tier in place and held it there until the chocolate firmed up. Then I drove 2 wooden dowels down through both tiers.

I repeated the same process to apply the top tier. I wanted the top tier to have more of a tilt to the opposite side, but I miscalculated my slant, so it basically came out straight. Oh well, live and learn. (Dagnabbit!) After the top tier was in place, I drove one large wooden dowel down the middle of all 3 tiers.

That cake was very stable and did not budge. Cutting and serving it proved to be a little bit messy, as the melted chocolate between the tiers did tear off some of the fondant when I disassembled it. But I guess that is the price you have to pay to get this look and have it be super stable. I guess you could try to do it without the melted chocolate, but I felt better having it there as glue.


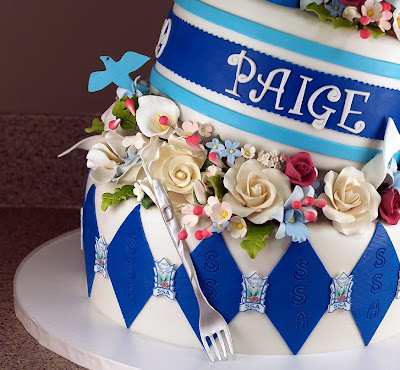
I cut apart all the purchased flower sprays and arranged them on the cake, using royal icing as glue where needed. The fondant dove is the school mascot.


I used the school logo clip art that I got off their website. I made little icons with edible icing sheets backed with white fondant, to put between the diamonds. The school initials, SSA, were impressed into the diamonds using the JEM alphabet cutter set.

Paige just loved her cake and thanked me over and over and over. Everyone at the party went nuts over it; it was very good for my ego, LOL! I have 4 more nieces coming up behind her, graduating from the same school, so I better start thinking of more design ideas soon! Oy vay. I’ll think about that later.


—————————–
NOTE: THIS CONTEST HAS ENDED:

Totally Topsy Turvy is almost ready! Just a few more tweaks in editing and we are going to the presses! I am really proud of this one; I think you guys will like it too. I take you through every single step of making this cake from start to finish. No stone is left unturned. And there are a few fun surprises thrown in there too.

I am so happy with this DVD, I feel like having a give-a-way! (The crowd jumps to its feet and roars!) To enter, just leave a comment below, and you will be entered into a random drawing for a free copy of Totally Topsy Turvy! I will draw the winner on Monday.


GOOD LUCK!
Sharon
www.sugaredproductions.com

Remy Stirs the Pot

May 7, 2009 by Sharon Zambito 24 Comments

Hello Sugar Friends!
So sorry for the delay in posting. I have been crazy busy; and it continues through next week. Whew, this old cake chick is tired! I hope all of you are doing great, and your caking adventures are going well.
I am working on some things to post next week, so in the mean time I thought I would show this cute cake I made a few months back for the daughter of a friend. She was having her party at one of those little chef places, so the theme of the cake was just perfect! When the mom asked me if I could make Remy stirring the soup pot like in the movie, I said sure I can! Then of course, after I hung up the phone, my thought was : How the heck am I going to do that? The pot I can do, but figure modeling is not my strong suit. So I just jumped in and went for it.

I used a real chopping board for the cake base, and I love the effect that gave.


Here is the first body parts of Remy drying. I find this image quite disturbing. He scares me. But not as much as possums.
I put on his face and arms, and then used a bubble tea straw to simulate the spoon he would be holding on the real cake.

Hands make holding the spoon a tad easier for him. His little chef hat makes him official!


Here he is drying so he would have the proper body position for the cake. He no longer scares me. I think he is pretty dern cute now.
Here are 3 layers of cake iced with thickened ganache as I described in this post.
Here are the pot handles drying. An Aussie friend gave me the idea to use aquarium air tubing wrapped in fondant. I taped them down to the table so they would dry in the proper curve. I have no idea if that is food safe, so do some research before you do this.
 
Here I am working on the cheese and veggies, all made of fondant with tylose.

Cute little carrots.

Swiss and aged Gouda. Tee hee.
I wrapped the cake in white fondant, added the top trim and the handles, and then airbrushed it with copper luster dust. Buttercream makes the soup, with little fondant veggies sprinkled on top.
Despite using the straw to configure his arms, when I put the real spoon in the cake, I could not get it to line up with his hands correctly. After a few choice words, I just decided that he was shifting the spoon from one hand to the other, and my picture caught it mid-shift. Yep, I like that story.
I also chose to ignore the fact that he is walking on the soup more than he is standing on the edge of the pot. (Rat bastard.)
Sometimes things just don’t go as we plan, and we have to suck it up. I hate when that happens.
But overall, I was very pleased with the cake, and mom and daughter went crazy over it. Mission accomplished!
————————–
Here is a cake I did last weekend before going to Texas using the run sugar technique. Is this something you guys would like to see on DVD?
——————————
Back from Texas
I had a wonderful time in Texas last weekend. The DOS and classes were a blast! I love traveling to teach and meet cake people. Cake peeps are the best on earth!
Check out this cake Sandy in Texas made in my fish class. Hers came out better than mine. She is banned from any future classes with me.

Check out Sandy’s great cakes at: http://www.picturetrail.com/sandyscakes


        ————————-

Topsy Turvy DVD
Todd and I are working on the finishing touches for Totally Topsy Turvy. It’s going to be close to 4 hours long. It will include a narrated slide show showing how to cut and serve a topsy, and also has some bloopers from the shoot! I love the music for this one; my favorite so far! Thank you for the pre-orders placed already. May 15 is the cut off to get the free recipes!
————————-
OK kids, back to my busy, crazy, wonderful life, and I will check in with you guys next week. This weekend is my 46th birthday, 24th wedding anniversary and Mother’s Day. I got me some serious eating to do!
Happy Mother’s day to you all! (Even if you do not have kids, you are still a mother to your cakes, so go celebrate!)
Sharon
http://www.sugaredproductions.com/


How to make a 3D car cake

April 23, 2009 by Sharon Zambito 38 Comments

Hi Sugar Buddies!
I got back from the DOS in Winnie, Tx and boy did we have fun! Of course there was torrential rain and flooding while we were there. What is it with the severe weather everywhere I travel to? Maybe God is trying to tell me to stay my butt home? Nah.
So anyway, I am slamming busy this week , so I am pleased to present you with a guest entry from Karen in LA on her 3D car cake. Karen is a wonderful cake artist, and she does some really great 3D stuff.
Take it away Karen:
I usually try and find the original dimensions of a vehicle first. Then scale it down to where it will fit on a piece of paper (8×14).Then from there, I use a ruler to see the size of the tire space, space from bumper to start of tire, distance between tires then the distance between the back tire and the back bumper. Now I am able to get my dimensions for my board with holes inset for the tires to go up in. (I always do a paper template also in case someone needs one again!!!!)


Place the cakes on the board. Align the ‘car template’ up against the cake.
Then carve.
I do a lot of my details with icing build up instead of actually cutting into the cake, this makes it sooooo much easier! This isn’t a very good pic, but you can see what is taking place. I did smooth it more after this pic was taken also!!!
While the paint is drying, I fix my little boards that are gonna go under the cake. So when it’s dry, I place it on the ‘taped on both sides’ blocks so it doesn’t go anywhere!!!!!
Then on to the painted and window details. Windows were fondant covered with an edible image. Gradient fill. Nothing fancy!!! Outlined with airbrush black and silver dust.
From here it is all details which take the majority of the time. The wheels were gumpaste painted black also!!!!
Here it is moved over to the cake board getting all the detail work done.

And the finished product!!!

———————————-
Thank you Karen for that great tutorial! You rock! Below is a picture of the first car cake I made using Karen’s technique, but I used fondant. I was very happy with it!
—————————
You guys have a wonderful weekend and I will see you next week!
Happy caking!
Sharon
www.sugaredproductions.com

The Story of the Cherry Hog

April 14, 2009 by Sharon Zambito 27 Comments


Once upon a time there were 3 sisters that grew up in the city of New Orleans with their 2 older brothers and parents. They were not exactly poor, but things were very tight, as they were living on one modest accountant’s salary. Melba, the mom, knew how to make every penny stretch. She was very frugal. There were never any treats like candy, soda, chips, or cookies in the house. Those things were reserved for very special occasions.

Since vacations were out of the budget, the family would make day trips a few times a summer to a nearby state park. The kids would swim in the Bogafalaya river and play on the sandy beach. Melba would pack an ice chest and picnic basket and they would spend the day swimming, eating, and relaxing.

On one particular trip to the river, Melba really splurged and bought a bag of fresh cherries. Not a big bag, mind you. But this was still a really special treat for the kids to get such an extravagance.

So on this particular day, after lunch, the 2 youngest sisters, Sharon and Janice, decided to go for a nice long swim, anticipating their refreshing treat of cherries upon their return. They wanted to save them for the just the right moment, to enjoy them to their fullest. So after their nice swim in the river, they happily skipped back to the picnic table, excited about the luscious fruit that awaited them. But alas, to their dismay, they discovered that their older sister Barbara (aka the Cherry Hog) had eaten them all! All of them! All that was left was a bag of pits and stems.

Needless to say the 2 little sisters were disappointed….. no, devastated….. no, scarred for life! Despite years in therapy and reading many self help books, they have not been able to work through the trauma of this event. In this tragic story they did not live happily ever after. So needless to say, to this day they give Barbara grief about it any chance they can get.

—————————————-


Last week, when the whole family was invited to a friend’s house on the bayou for a Good Friday seafood boil, they took the opportunity to also celebrate Barbara’s birthday.


And here is the Cherry Hog’s birthday cake.


CH with her cake. She loved it.


                        Sharon and CH.


Sharon, CH and Janice.


Seafood boil of crabs , crawfish, potatoes, corn and more!


And fresh boiled shrimp! It was so yummy!


J-Man got to drive the boat!


Cherry Hog and her nephew D.


The cake was yummy and enjoyed by all. We had a wonderful day of boating, eating, and playing board games.
 
Note: Cherry Hog claims to have no memory of this event ever happening. Classic case of denial, if you ask me.


—————————————


HOW TO MAKE CHERRY HOG’S CAKE:


My BFF Heather gave me the great idea of using Styrofoam as the base of the cake. I used an 8 inch ball and cut it a little shorter than in half. I cut a flat bottom so it would stand up, and I used another piece of styro as “sand paper” to shape the bottom half of the cherry. (I learned that trick in a Collette Peter’s demo.)


Then I sharpened wooden dowels and drove them thru the styro and into the cake drum base for stability. I used 3, but in retrospect I could have done with just 2.


I then attached a circle of parchment paper to the top of the styro with buttercream to form a barrier with the cake.


First layer of cake in place.


I put a ball of modeling chocolate down in the hole to serve as the pit. Tee hee. Then I plugged the hole with the cake from the heating core.


Second layer of cake in place.


Carved to a cherry shape with a sharp knife. I intentionally went with a somewhat asymmetrical look, because real cherries are not perfectly round. Also makes the carving easier; I love that!


Then I applied a basecoat of thickened ganache over the whole thing. The ganache is 2 parts semi sweet chocolate to one part heavy cream. You let it cool to a thick paste consistency and then apply it just like a buttercream coat with a hot spatula. It firms up to make a nice chocolate shell; a wonderful surface on which to apply your fondant.


I smeared the whole cake with piping gel and then applied red fondant. I used a wad of fondant cupped in my hand in lieu of fondant smoothers. This works great on round and curved shapes.
I then gave the whole cake a liberal rubdown with everclear alcohol to get the excess cornstarch off before airbrushing. What??? No Crisco? I know what you are thinking. Sharon rubs down everything with Crisco! Yes, this is true, but not in the case of airbrushing. That will cause the airbrush color to not go on smoothly and you might get blotching.


After the everclear dried (took about 2 minutes) , I gave it several coats of red color. Let the coats dry in between or you will get pooling and dripping of color. Here it is still wet with color. (And I am still blowing red snot a week later.)


One more coat of color and dried.


I made the stem by wrapping several 18 gauge floral wires with brown floral tape and then airbrushed brown and green over that. I just stuck the stem down thru the center of the cake and down into the base of the styro. Note: This is not food safe, but it was for Cherry Hog so I did not care. The proper thing to do would have been to coat the part of the stem going down into the cake with chocolate and dried before inserting.


I made the beach chair with the cutter set here. I cut the pieces from white gumpaste. After fully dried I painted them with brown airbrush color mixed with everclear to make the wood look. The seat of the chair is white gumpaste. Ain’t it cute?? I love this chair! The sand is Domino’s brownulated sugar from the grocery store.


It was a lot of fun making this cake! This is when I love caking the most. A fun, challenging cake that has a special story to go with it.


Now you all go make one for your favorite Cherry Hog!


Happy Hogging!
Sharon
http://www.sugaredproductions.com/


PS. Remember you can click on the photos for a larger view.


Chocolate Bunny Boxes

April 11, 2009 by Sharon Zambito 5 Comments

It just would not be Easter without chocolate bunnies, right? I just had to share with you these adorable chocolate boxes I made. I got the mold here.

They are so cute filled up with candies. And you can eat the whole box! Gotta love that.


Paint the accent areas inside the mold with colored chocolate and a paint brush. It’s easier to do if the chocolate is cooled off a bit and a bit stiffer. Don’t be too worried about staying exactly in the lines. If you paint out of the lines, just let it air dry, and then use a toothpick to scrape off the excess where you don’t want it to be. Use a soft brush to brush out all the “crumbs”. Why not pop it in the fridge instead of waiting for it to air dry? Because that will cause the chocolate to release from the mold, and when you try to clean it up with the tooth pick, the whole piece of colored chocolate will pop right out. And then you will cry, and have to start all over.

This is what the outside of the mold looks like after the inside has been painted.


Then fill both cavities with melted chocolate in the color of your choice. Make sure the chocolate is cool to the touch. If it is too warm, it will melt your colored accents and they will run and smear. And then you will cry, and have to start all over again.

Edited to clarify: The above mold is the 2 pieces of the box. One side is the top, and the other side is the bottom part of the box with the cavity for the candies already in there. When you unmold it, the 2 pieces come out as you see in the finished product. I apologize for not getting a photo of the bottom part of the mold empty.


I put it in my freezer for 12-14 minutes, and then the 2 pieces come right out of the mold with a gentle tap. Let them come to room temp in cool room before you touch them. If not, you will get finger marks on the condensation you will not be able to repair. Then you will cry, and have to start all over again.
Isn’t he cute???
All packaged up and ready to be delivered by the real Easter Bunny.
Wishing all of you a blessed and peaceful Easter with your family and friends,
Sharon
www.sugaredproductions.com

How to Make Baby Booties

March 26, 2009 by Sharon Zambito 18 Comments


Who doesn’t love a cute little baby bootie? No, I don’t mean their butts, but those are dern cute too!


I’m talkin‘ bout those cute baby shoes you can use for toppers on your baby cakes!


Here is a step by step tutorial on how I make them using the cutter set you can find HERE:


I use gumpaste for mine, and I highly recommend the Nic Lodge recipe. But some folks do use fondant with success. Cut out 2 soles. There is no left and right foot. Cut them the thickness of the cutter itself. I let those dry one day before I proceed.


Then cut out the toe flap. Don’t go too thin or you will have “toe issues” when you apply it to the sole.


I thin the edges slightly.


Then I fold up that flap that I thinned.


Paint with water for glue.


Then I apply the sole (the sole cutter is marked as to which end is the toe). That wet flap is going to go under the bottom of the sole itself.


See how that flap is wrapped under the sole? Many people do not do it this way. They do not thin it, and just wet the to flap and attach it right along the outside edge of the sole. That does not work too well for me, but many people do it that way. So try both ways and see what works best for you. I stuff the inside of the toe with a little cotton to get a nice shape. If your toe flap is rolled too thin, the sole will break through, or you just will not get a good clean look. I let this dry a while before moving on to the next step.


Cut out the back flap piece.


Clean the holes out with a round piping tip.


Thin the edges a bit.


Bend up that flap and wet it with water.


Attach the back flap starting in the middle and then wrapping the 2 sides forward.


I had to prop the shoe up here to take the picture, so I could not actually show you doing it with my hands. These photos were taken many years ago before I even knew how to turn a camera on, so I apologize for the poor quality.


Stuff the shoe to help it hold its shape and let it dry a full day. Then you can go back and add the laces. Do not try to thread and tie the shoe laces like a real shoe. Make them like a dress bow. One loop on one side, one on the other, and a faux knot in the middle. I use my clay gun , using the smallest round disc, to make the laces. (See first pic above.)


Ain‘t that cuuuute? You can learn how to make this package cake and bows HERE.


These make a nice keepsake for the mom to be. They will last indefinitely.


Customers go nuts over these little things. You will be a superstar cake decorator when they see these!!


Give them a try. They are really fun to make. You can also get creative and modify them a little to make sneakers and Mary Janes.
 
 
Love your cakes.
You made them.
God made you,
And God don’t make junk.
So you don’t either!
 
 
Happy Bootie Making!
Sharon
http://www.sugaredproductions.com/


Sugar Free Celebration Cake

March 11, 2009 by Sharon Zambito 39 Comments

Today we have a guest blog entry by my other big sister Janice. You have met my other sister, Barbara, already. Janice is 7 years older than me, and Barb just 1-2 older than her. Since there was such a gap in our ages, they were not really my playmates when I was a kid. In fact, I think I was their play-thing, but that is a whole therapy session in and of itself. Once we reached adulthood, that gap in years has faded away and we three have become very close. Don’t get me wrong; they still take care of me and look out for me and spoil me. Some things just should not change in life.
Janice is the adventurer of us three. She rides Harley’s with her boyfriend, and has para sailed with my dear hubby as Barb and I fried on the beach watching. She has traveled the country and has a bucket list of things to do that scares the bejeesus out of me and Barb. This was her bright idea:

Janice is a crackerjack legal secretary, and my secretary as well. ( I call her CJ.) One day when I can start paying her, she is going to leave that huge corporate law firm down in the city that she works for. She takes care of all my invoicing and PO’s for wholesale orders, and keeps me in line with business law issues. She also comes on cake trips with me and Barb to help me vendor. And let me tell you; that girl could sell ice to an Eskimo. That girl has a gift for sales! She is beautiful, skinny, funny, and just damn near perfect. Another overachieving sister, sheesh. Hard to keep up with those two! But I love them both so.
So without further adieu, I present to you Janice……
—————————————-
Since I am a diabetic and several other members of my family adhere to a sugar-free diet, I am always responsible for providing a sugar-free dessert at all of our family gatherings. Thanks to the invention of Splenda, I’ve come up with some pretty good ones over the years.
A few months back, my sister Sharon, the professional cake baker/decorator, sent me an email with a recipe for a knock-your-socks off sugar-free cake, and asked me to make it for the holidays. It looked just beautiful in the picture – much more elegant than anything I had made in the past. Since I am not one to shy away from a challenge, I said I would give it a try.
 
As Christmas got closer, I started to stress out over it. I wanted it to be perfect. That’s just the German in me. I decided that I needed to take the whole day off on Christmas Eve to work on this cake so that I could take my time and not be rushed. Good thing I did that because as it turns out, it took me all day to make it and I finished it at 9:00 p.m. that night. Of course, I did take a break to run a few miles that morning, and to go to church that evening.
Because cake layers baked with Splenda don’t rise very much like cakes with regular sugar, I decided that I wanted to double the recipe to make the cake taller. But I only had two cake pans, so I had to bake the layers in two batches. That took a little extra time, and as it turned out, when I started to construct the cake, I only used three layers, instead of four. Four would have been too tall.


Mascarpone cheese was a challenge to find, but my daughter-in-law, the health nut vegetarian, found it for me at the Whole Foods Market. I let the cream cheese sit out at room temperature to soften it, but I actually think it was a little too soft. Next time, I think I would not leave it out as long because when I went to spread the filling, it was a little drippy over the sides. I think it would go on better if it were a little bit firmer. When you add the vermouth, that softens it too. But the best part was that since it was sugar-free, I got to sample it as I was making it! And since I had the vermouth out anyway, I decided to make myself a little martini. What the heck, it’s Christmas Eve, right?

I splurged on organic strawberries, also bought at the Whole Food Market. Expensive, but I figured if you’re going to create something special, you should buy only the best ingredients.


Chopped hazelnuts are not easy to find either. I went to three different stores before I found them at a Winn Dixie. I thought they needed to be a little bit finer, so I put them in a food processor just to chop them up a bit more.


I could not find a paper doily with a design that was open enough to use as a stencil for the powdered cocoa. So my sister, Sharon, found some snowflake coloring pages online and emailed them to me. I printed one of those and cut it out with a razor knife, and used that as the stencil.


The whole strawberries on the top of the cake are dipped in sugar-free chocolate melting wafers that my sister ordered for me from one of her suppliers.


Here’s what went into the filling:

1 tub (something like 250grams) mascarpone cheese
1/2 tub (about 100grams) light cream cheese

About 5 tablespoons Red Martini (sweet red vermouth)
1 teaspoon vanilla extract
1/4 cup Splenda
About 2 cups small strawberries, cleaned and halved


First cake layer.
 

First cake layer with sugar free strawberry jam on top.

Add some mascarpone filling.

Add fresh strawberry slices and repeat with each layer.

I used the sugar-free Cool Whip for the frosting.

Chopped nuts were pressed onto outside and design stenciled on top with cocoa.
 
The finished cake!

When the cake was finally done, I was exhausted, but I was happy with the end result. I put the whole thing in the refrigerator to firm up overnight. But as I flopped down on the sofa and sipped on my dirty martini, I immediately started stressing over how I was going to transport this masterpiece the next day from my house in Kenner to my sister’s house in Mandeville – about a 50 minute trip.

The next morning, I had to pick up my 95-year old aunt who lives nearby in an assisted living home. She’s in a wheelchair and it takes a while to get her situated in the car. I wanted my confectionery creation to be off the ice for as little time as possible, so I loaded up my car with all my gifts, but left the cake in my refrigerator, went and picked up my aunt, and then went back home to get the cake. I put a towel on the backseat to level it (center seat, of course – that’s the safest seat, right?), strapped it in with the seat belt, gave it a little kiss and jumped into the car and headed out. I figured I would speed just a little bit and the most my cake would be off the ice was 45 minutes.
So here I am, zipping along, with my old aunt in the front seat, and my award-worthy culinary delicacy in the back seat. Can’t wait to get to Sharon’s house so everybody can see it. (The cake, I mean, not my aunt. They see her all the time.)
Well, how could I have foreseen that when I turned onto Causeway Boulevard, it would be a freaking parking lot! Fog on the bridge! What?! Fog on Lake Pontchartrain. It’s a warm day, 1:00 o’clock in the afternoon, how can there be fog on the bridge? I could not believe it. Traffic was limited to one-lane, speed limits were greatly reduced, and that 50 minute trip turned into a three-hour trip. It took me three hours to get to my sister’s house in Mandeville! I was so upset because I had spent all day making this cake and I just knew it was in the backseat melting! And I also knew that my 95-year old aunt was going to have to use the bathroom very soon, and boy, was I going to be in trouble!
When I finally got to my sister’s house, I had to have my nephew, Daniel, open the lid and look at the cake. I couldn’t bear to do it. He said it looked fine, but I said, “Put the damn thing in the refrigerator and get me a martini!” He said, “Okay, but it won’t do much good because the power is out.” The power was out! It’s a conspiracy, I thought. There are terrorists working behind the scenes here to assure that my delectable piece of culinary craftsmanship would turn into a melted mess of vermouth-laced drippy cheese, strawberry juice and Cool-Whip. This cake baking stuff is not my thing! Sharon, I don’t know how you do it. This is too stressful! I am a legal assistant. Someone give me a brief to type! That I can do.
Well, the power came back on shortly, the cake was still firm and beautiful, and tasted delicious when we served it. It’s a good recipe and I highly recommend it.

————————————————-


Sharon here again. Whew, I am stressed out just reading that! Now I want a martini too. That was a crazy Christmas Day. Our 3PM lunch did not get served until 6:30 due to the power outage and late guests. In perfectly fine weather too!
Well, I think Janice did a fabulous job on her cake, and it did taste wonderful too. Thank you for the entry sis, and helping me out on my blog.
Speaking of blogs, if you guys like mine, just leave me a note in the comment section below, and you will be entered into a drawing to win this fabulous prize! :

Isn’t it great?! There are only 2 hats like this in existence, and I own the other one. So if you want a little piece of SugarEd to call your very own, let me know how great and fabulous and amazing and wonderful my blog is! Oh yeah, you can also leave a comment about Janice’s great post too, yadda yadda yadda.
I will announce the winner by random drawing sometime next week, when the spirit moves me. Gotta keep you guys on your toes, don’t I?
Happy Sugar Free Caking!
Sharon the baby sister Zambito
http://www.sugaredproductions.com/

Mardi Gras King Cake

February 17, 2009 by Sharon Zambito 38 Comments

HAPPY MARDI GRAS EVERYONE!


Since it is Mardi Gras season right now down here in the Big Easy, I thought you might enjoy learning about another one of our unique culinary creations. I have recruited my big sister Barbara to do a guest blog entry on making a king cake. Barbara is the inventor of the original King Rock (more on that later). In addition to that, she is just the best big sister ever. She looks after me. She is an accountant by profession, so she helps with my business finances, taxes, and all that other icky stuff I have no clue about. She also comes on some of my cake trips with me to help me out with my demos and my vendor table. She is one of the most energetic, social, and fun to be with people I know. She is a very cool chick and I love her tons. So now I present to you… Barbara…..


—————————————-


Hi, I’m Barbara, Sharon’s sister, and she’s asked me to do a guest blog. This is me getting ready for Mardi Gras, which this year falls on February 24.


(Note from Sharon: I have this same outfit and yes we do wear this when we go parading.)

Speaking of Mardi Gras, that brings me to the topic of the day. I am not a cake decorator. I see some of the magnificent pieces of art that you all do and I am in complete awe. But, I am here today to talk about the king of all cakes – the King Cake.

If you are not from the New Orleans are, you might be asking yourself “what is a King Cake?” A king cake is a brioche-style cake similar to a coffee cake that is served throughout the carnival season in New Orleans. The carnival season begins on the 12th Day of Christmas, the Epiphany (January 6), which is the day the three kings visited the Baby Jesus. It is believed that it took the three kings 12 days to find their way to the stable. The carnival season ends on Mardi Gras Day, which is the Tuesday before Ash Wednesday.

The king cake is circular, representing the circular path the three kings had to take to ward off King Herod, who was seeking them so that he could kill the Christ Child. The king cake is typically decorated with colored icing and/or sugar. The three colors are purple, green and gold, the colors of Mardi Gras, which represent justice, faith and power. I’ve also heard that the three colors represent the three gifts presented by the Magi (gold, frankincense, and myrrh.) Within each cake is hidden a small plastic doll, which represents the Baby Jesus. (In olden times, it used to be a porcelain doll, or a bean or pea.)


King Cake parties where all the rage when I was growing up. Whoever was lucky enough to get the doll in their piece of cake would be named king (or queen) of that party and had to throw the next party. Today, this tradition is very prevalent in offices throughout the city where the person who gets the doll must bring the next cake. King cake sales are so prosperous that many bakeries in New Orleans are more profitable during the carnival season than they are for the entire rest of the year.


The making of a king cake should not be taken lightly. Since this is a yeast sweet bread, it has to be kneaded and left to rise twice, and is a day-long commitment. There are many bakeries that make excellent king cakes, so why in the world would anyone want to make their own? Just for the fun of it!!

My introduction into making home-made king cakes came many years ago. I found a recipe and tried it out on my family. Geez almighty, it was horrible. It came out heavy and hard as a rock, so much so that they called it the King Rock. My other sister, Janice, told her office mates about it and they accused her of exaggerating – that it couldn’t possibly have been that bad. So, they asked me to make a cake for their office party. Much to my dismay, it was just as horrible, but everyone was so polite and complimentary so as not to hurt my feelings, but I knew it was a bomb. I hope to think that I have gotten a little better at it over the years, but it is still tricky. I continue to try out new recipes and techniques, as I continue my search for perfection.

The recipe below is a really good one. It produces a light, but moist cinnamon cake. A few pointers for success: You have to get the yeast at just the right temperature (105 to 115 degrees) and let it foam for at least 10 minutes. You have to be careful not to add too much flour and not to over knead it. The dough should be slightly sticky, but elastic and able to hold its own shape, but never firm.


You have to be careful not to over bake it or it will be dry. I now use an instant-read thermometer, which should register 195 to 200 degrees for doneness.


The recipe is below. Basically, this is what you do. It’s much like making a bread dough. Let it rise till double in bulk and then roll out into a rectangle.


Here’s what it looks like rolled out with the cinnamon sugar sprinkled on:


Then roll up each piece into a long string.


Pinch the edges together so that the filling doesn’t ooze out. Flatten down the pinched edge afterwards so that it lays flat.


Twist the two strings together.


Form into a circle on a baking pan.


Let rise until double in bulk.

This is what it looks like right out of the oven.


Let cool and then decorate with a glaze and colored sprinkles.


See the baby’s head?


And that’s me with my cake.


You can do these in a variety of ways. You can divide the rectangle of dough into thirds and braid it like this. I rolled these strings in the cinnamon sugar to get it on the outside, rather than on the inside.


This is what it looked like after it was left to rise, baked and decorated. This one raised a lot and was very light and airy.


This one was filled with cinnamon sugar, raisins, and pecans. If you put a lot of “stuff” in your cake, it won’t rise as much.


You can also use other fillings, such as cream cheese filling, apple pie filling, lemon pie filling, cherry pie filling, etc. But I don’t like those. They turn out too sweet for my taste and the filling overpowers the taste of the cake. I’m a purist and like just a little cinnamon sugar.


So, that’s it. I hope that you all give it a try and bring a bit of New Orleans to wherever you might live. Also, if you ever have the chance to visit New Orleans during Mardi Gras, the city would love to have you. Let me just say that Mardi Gras is not only what you see in the media. Yes, there are some unmentionable things that go on in the French Quarter, but that is a very small piece of what our carnival season is about. Mardi Gras outside of the Quarter is very family oriented. The parade routes are filled with kids and families having fun. When we were little kids, my family did not miss a parade. We loved every minute of it. We would lift Sharon, the youngest, smallest and spryest of all of us, over barricades to get that all-elusive string of beads, trinket or doubloon out of our reach. Police were all over the place supposedly monitoring such infractions, but because she was so cute, the police would just look at her and us, and just shake their heads. We trained her young; you should see how she still scoops up the parade throws.


Happy Mardi Gras!


KING CAKE RECIPE:
(This recipe makes two medium size cakes.)

¼ cup warm water (105 to 115 degrees)
1 tablespoon (1 package) dry yeast
1/3 cup sugar
5 ¾ to 6 ¼ cups unbleached all-purpose flour
1 ½ teaspoons salt
½ cup warm milk (105 to 115 degrees)
1 cup sour cream
3 large eggs
finely grated zest of 1 lemon or orange
8 tablespoons (1 stick) unsalted butter, at room temperature, cut into small pieces

Cinnamon Sugar:
1 cup sugar
4 teaspoons ground cinnamon


Frosting:

4 cups powdered sugar
4 tablespoons butter, melted
7 tablespoons hot water, more as needed
1/4 teaspoon almond flavoring


1) Pour warm water into small bowl. Sprinkle yeast and a pinch of sugar over the surface. Stir to dissolve and let stand at room temperature until foamy; about 10 minutes.


2) Place 1 ½ cups of the flour, the remaining sugar, and the salt in mixer bowl. Make a well and add the milk, sour cream, eggs, and zest in the center. Beat until smooth on medium-low speed, about 1 minute.


3) Add the yeast mixture and beat for 1 minute more.


4) Stop the machine and add 1 cup more flour. Beat for 1 minute.


5) Add the butter pieces and beat on low speed until incorporated.


6) Add the remaining four, ½ cup at a time, until a soft, smooth dough that just clears the sides of the bowl is formed. Switch to the dough hook when the dough thickens, about two-thirds through adding the flour.


7) When all flour is added, knead with dough hook for about 5 minutes on medium speed. (If you don’t have a dough hook for your mixer, you’ll need to turn the dough out onto a lightly floured surface and knead for about 5-10 minutes.)


8) Turn dough out onto lightly floured surface. Knead until smooth and just able to hold its own shape, under 1 minute if you used the dough hook (6 to 10 kneads to smooth it out), dusting with flour only 1 tablespoon at a time, just enough to prevent sticking to your hands and the work surface. This dough will be very smooth, with a definite soft elastic quality, a little sticky, but never stiff, and will hold its shape.


9) Place the dough ball in a greased deep container, turn once to grease the top, and cover loosely with plastic wrap. Let rise in a warm place until double in bulk, 2 ½ to 3 hours. Do not allow the dough to rise over double.


10) Punch dough down with fist. Turn out onto lightly floured surface. Let rest 10 minutes.


11) Divide the dough in half with a bench scraper, pizza cutter or knife, never tearing the dough.


12) Divide each half into thirds. Roll out to a rectangle approx. 20 x 12 inches.


13) Divide in half with pizza cutter. Brush with melted butter keeping edges dry. Sprinkle with cinnamon sugar.


14) Roll up and pinch ends together so filling does not ooze out. Flatten pinched edge.


15) Twist two long rolled pieces together. Form into a circle and fold edges under.


16) You can insert baby trinket into cake at this point or wait until after it is baked. (I like to wait after it is baked if it is plastic.) Insert from underneath. (If you don’t have a baby trinket, use a whole pecan, walnut or other object; just be careful it is big enough that it cannot be swallowed whole.)


17) Cover with greased plastic wrap or light cloth towels and let rise in a warm place until double in size, about 1 to 1 ½ hours.


18) Preheat oven to 350 degrees. Bake 20-25 minutes. An instant-read thermometer will read 195 to 200 degrees.


19) Let cakes completely cool.


20) To prepare frosting, mix melted butter, powdered sugar and flavoring; add hot water 1 Tablespoon at a time until glaze reaches desired spreading consistency. You don’t want this too thin because it will run right off the cake or too thick because it won’t drip down the side of the cake.


21) Pour frosting over cake; sprinkle with purple, green and gold colored sprinkles or colored sugar.


—————————————-


Sharon again here. WOW! Was that great or what? Thanks Sis for showing me up on my own blog. Dang overachiever.  (Just kidding.) But seriously, I have been trying to convince Barb for months now to start her own food blog. She is a good cook, and photography has been a hobby of hers for a long time. What do you guys think? If you think she needs to start her own blog, leave a note in the comment section below ……


Then you can pretend you are down here with us having a great time while you sip your Mardi Gras martinis.


Mardi Gras Martini:


This festive concoction will add color to your celebration and your cheeks. To make purple sugar, add a few drops of red and blue food coloring to granulated sugar and mix. Rim glasses with a cut lemon and dredge in colored sugar, add a lemon twist and enjoy this purple, green and gold treat.


 2 ounces vodka
1 ounce triple sec
1 drop creme de menthe dark
Lemon twist, optional


In a martini shaker, combine vodka, triple sec and creme de menthe with ice and shake until well chilled. Strain into a martini glass, preferably one rimmed with purple sugar. Garnish with a lemon twist.(*from acj.com)


Happy Mardi Gras Everyone!

Sharon
PS We’ve got a full video tutorial on making the King Cake in our online school:
http://www.sugaredproductions.com/
Visit our online school


Boxes and Bows is Shipping Now!

February 13, 2009 by Sharon Zambito 7 Comments

 
SugarEd Productions presents our newest release, Boxes and Bows.
 
 
Free Bonus: All orders placed before 2/28/09 will include a copy of 4 paper templates Sharon uses in the DVD.
 
 
SugarEd Productions presents Sharon Zambito as she leads you through an all inclusive lesson on Boxes and Bows in cake. This two disc DVD set takes you through the entire decorating process for four different package cake styles and their corresponding bows. Bonus techniques are also included. Total run time is 3 hours, 50 minutes.


Techniques taught include:
— 5 panel box top lid made from dried fondant panels
— 4 panel gift box made from dried fondant panels
— fondant overlay lid
— two piece soft fondant lid
— gumpaste “propped” lid
— 2 prong embossed dress bow with cording edge
— 4 prong embossed dress bow with pearl edging and center knot
— making a loopy gift bow
— soft fondant “floppy” gift bow
— gumpaste “satin” dress bow and tails for the side of a cake
— applying fondant/gumpaste stripes to the side of a cake
— placing a fondant blanket inside the cake gift box
— making gumpaste pearls in 2 sizes, and using them on the cake and bow loops
— using the Tappits brand toy and alphabet cutters
— making a novelty fondant life preserver
— using a clay gun for decorative trims on both the cakes and the bows
 

Nearly four hours of instruction at a great price!


Learn to make all of the cakes you see here.


FILIGREE CUTTER SET ON SALE TOO!


Create beautiful lace patterns with this 16 piece metal cutter set, custom made and imported in a limited supply.
 

AVAILABLE HERE


We have lots of cool new tools too, please come check them out:
 
www.sugaredproductions.com


Making a Gumpaste Wine Bottle

February 4, 2009 by Sharon Zambito 14 Comments

Hey Sugar Friends! I promised you a post before I left to go teach a class in Kentucky this weekend. I pulled up these very old, very craptastic photos to put together a little tutorial for you. (I can’t spoil you guys with always posting my fabulous foody photos with my new awesome lens, now can I?)
I colored my gumpaste VERY dark green, but be advised it takes a lot longer to dry when you do that. I had to let each piece dry 2.5-3 days before I could assemble it. That was using the Nic Lodge gumpaste recipe. The one you see in this pic was Satin Ice gumpaste and it stayed soft. So I recommend the Nic Lodge recipe or using white gumpaste and coloring it after the bottle is dry.
HEAVILY dust the underside of your rolled out gumpaste; lay on top of a real bottle and cut out the top half. The pink fondant is just shoved under there to keep the bottle from rolling. Let that dry fully ( 2-3 days in this case.)

Then flip that all over, so the dry half is now on the bottom of bottle, and cut out the other half on top, using the dry piece as a guide to cut your seem so they match . The bottle I really used for the cake was a cleaner cut than shown in this pic. Let that dry fully.(2-3 days)

When both pieces are nice and hard, then you cut a strip of GP or fondant, moisten it, and attach to the inside rim of the GP bottle as shown. Do this on both sides of the bottle. Then place the two pieces in place together. Use your fingers and a long dowel or skewer to go up inside the bottom hole to press the wet strip to the insides of the bottle to secure it well. Let that dry a while. Then I gave the whole bottle a rub down with Crisco and wiped off the excess to get rid of cornstarch residue. I spackled the side seams with matching buttercream (or royal). Cut a round disc for the bottom and just adhere with water. After the Crisco all absorbed in, I gave it a good spraying of edible lacquer.

I used candy foil for the neck of the bottle. I ended up having to use real paper for the labels because the piping gel was showing thru the edible images. That’s it I think!

Hope you get a chance to try them, they are fun!
So now I am going to brave the freezing cold, ice storm and power outage to get to my class in Kentucky. I am like the Postman; nothing will keep me from my students! I will check in with you guys next week when I get back!

Happy caking,
Sharon
www.sugaredproductions.com


  • « Previous Page
  • 1
  • …
  • 12
  • 13
  • 14
  • 15
  • Next Page »

Sharon Zambito

Sharon Zambito

An RN turned SAHM turned cake maniac. Owner of SugarEd Productions Online School. Join me for some caking, baking, and all around sweet fun :)

Follow me..

  • Facebook
  • Instagram
  • Pinterest
  • YouTube

Pinterest

  • Autumn House Two Trees Machine Embroidery Design – Blasto Stitch
    Autumn House Two Trees Machine Embroidery Design – Blasto Stitch
  • Embroider  Sew :: Jelly Roll Purses - Embroidery Garden In the Hoop Machine Embroidery Designs
    Embroider Sew :: Jelly Roll Purses - Embroidery Garden In the Hoop Machine Embroidery Designs
  • (1) How to QUICKLY & SAFELY remove acrylic, gel, and dip powder polish | BAGGY METHOD - SO EASY! - YouTube
    (1) How to QUICKLY & SAFELY remove acrylic, gel, and dip powder polish | BAGGY METHOD - SO EASY! - YouTube
  • (1) Bouffant Surgical Cap - YouTube
    (1) Bouffant Surgical Cap - YouTube
Follow Me on Pinterest

Follow Me on Instagram

Instagram requires authorization to view a user profile. Use autorized account in widget settings

Recent Posts

  • Egg Safety Basics
  • Stable Mabel Support System Sale
  • Guest Post : 4 Vegan Cake Recipes No One Should Miss Out On!

Popular Posts

  • Ways To Make Your Cake Fluffy And Moist
  • How To Stencil on Cookies with Royal Icing
  • Doctored Cake Mix Recipes
  • Transferring an Image Without a Projector
  • All About Buttercream!
  • How to Fix Broken Ganache
  • Edible vs Non Toxic Gold Dusts

Categories

Search

Archives

Copyright © 2025 · Sharon Zambito and SugarEd Productions,LLC

Copyright © 2025 · Evangeline Theme on Genesis Framework · WordPress · Log in