Hey Sugar Friends! I promised you a post before I left to go teach a class in Kentucky this weekend. I pulled up these very old, very craptastic photos to put together a little tutorial for you. (I can’t spoil you guys with always posting my fabulous foody photos with my new awesome lens, now can I?)
I colored my gumpaste VERY dark green, but be advised it takes a lot longer to dry when you do that. I had to let each piece dry 2.5-3 days before I could assemble it. That was using the Nic Lodge gumpaste recipe. The one you see in this pic was Satin Ice gumpaste and it stayed soft. So I recommend the Nic Lodge recipe or using white gumpaste and coloring it after the bottle is dry.
 HEAVILY dust the underside of your rolled out gumpaste; lay on top of a real bottle and cut out the top half. The pink fondant is just shoved under there to keep the bottle from rolling. Let that dry fully ( 2-3 days in this case.)
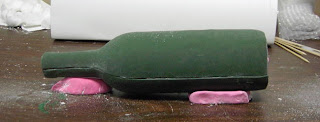
Then flip that all over, so the dry half is now on the bottom of bottle, and cut out the other half on top, using the dry piece as a guide to cut your seem so they match . The bottle I really used for the cake was a cleaner cut than shown in this pic. Let that dry fully.(2-3 days)

When both pieces are nice and hard, then you cut a strip of GP or fondant, moisten it, and attach to the inside rim of the GP bottle as shown. Do this on both sides of the bottle. Then place the two pieces in place together. Use your fingers and a long dowel or skewer to go up inside the bottom hole to press the wet strip to the insides of the bottle to secure it well. Let that dry a while. Then I gave the whole bottle a rub down with Crisco and wiped off the excess to get rid of cornstarch residue. I spackled the side seams with matching buttercream (or royal). Cut a round disc for the bottom and just adhere with water. After the Crisco all absorbed in, I gave it a good spraying of edible lacquer.

I used candy foil for the neck of the bottle. I ended up having to use real paper for the labels because the piping gel was showing thru the edible images. That’s it I think!

Hope you get a chance to try them, they are fun!
So now I am going to brave the freezing cold, ice storm and power outage to get to my class in Kentucky. I am like the Postman; nothing will keep me from my students! I will check in with you guys next week when I get back!
Happy caking,
Sharon
www.sugaredproductions.com


Great tutorial, as usual! I hope the trip is easy and you don’t freeze too much!
nice thanks for sharing!
Thank you for the tutorial, the bottle is awesome!
Have a nice trip!
Thanks so much thats awesome!
Great tutorial! Could of used this a couple of years ago!!!
I made a wine bottle a few years back for the Mid-Atlantic Wedding cake comptetition. They sell the molds for chocolate which really work great! I used gumpaste for my “label” and decorated it using edible markers and gold dust. I also used some edible gold sheets to make my cork cover. I airbrushed mine a forest green and then used the spray edible laquer to finish it. I even made ice cubes with isomalt and a gumpaste wine bucket!
I appreciate all of the information that you share!!!!
Vicki 🙂
Great tutorial! One question…which gumpaste do you recommend?
Love ya!! Have a safe trip!! 🙂
Thanks for the info!
Thanks for the info!
great tutorial spotless work thanx for sharing!
Thanks for this post. I just got my first big order (100) people! It’s a wine theme party and I needed to know how to do this. I have all of your videos and they have helped my business tremendously. thanks again…
Sharon,
Great tutorial. I do have a question though. Couldn’t you air brush the finished bottle instead of coloring the gumpaste before hand?
thanks,
Shannon
Can you please tell me if there is some place I could order one or two of these gum paste bottles? Much appreciated.
no place to buy them that I know of; they have to be made 🙂