Sugared Productions Blog

  • Blog Home
    • Home
  • Online Classes
  • Shop
  • Contact
  • About

Is your mixer head too high?

January 18, 2016 by Sharon Zambito Leave a Comment

Hello Sugar Friend–

We all strive for smooth and airless icing, but sometimes it can be a source of great angst. I know in my early caking days I was so frustrated because I couldn’t get it to look the way I wanted.

There were many days I wanted to throw my mixer, bowl, spatula, all out the window — and take up knitting.

But after lots of trial and error, I finally developed a recipe and a process that yields amazing results, like this:

how to get smooth buttercream

I’m sharing my experience in these last few posts with the hope that it’ll make things a little easier and prevent you from chucking stuff out the window 🙂

Half of the battle is in the making of the buttercream: to get it as airless and smooth as possible before icing the cake.

The fact is that if the head of your mixer is not adjusted correctly you’ll never get that airless batch of buttercream.

These photos below show what it can look like if the alignment is off.

These are taken at the time in the buttercream making process when just about all of the PS is added, still at low speed, but before I crank it up to high. If during the adding sugar process, you see the effect on the left (icing sticking to sides of bowl and creating a center ring of air), then something is wrong. Most likely the height of the paddle in your bowl is too high.

You’ll get air being pulled into the icing, and it won’t come out super smooth like in the video in this post.

adjusting your mixer head

See the photo in the middle? This is what the icing should look like at the same point in the process. NO air tunnels.

That photo was taken after I adjusted the paddle height to get it correct.

See that screw under the head of the mixer in photo 3? That’s how you adjust the height of the paddle. You use a screwdriver to adjust it right or left to raise or lower the head, which adjusts how close the beater comes to the bottom of the bowl.

There is a sweet spot for the beater, and this is how you can test it:

If a penny stays on the center hump as in this video below it’s juuust right. If the penny gets knocked around the bowl, then the paddle height is off.

This REALLY makes a difference in the quality of your icing.

Here’s a video showing the penny staying in place as it should.

My mixer is the KA Artisan, but the screw should be in a similar place for other models and brands.

Here’s a video showing where the screw is for the lift head.

** You’ll note that the 2nd video shows another way to test the penny (or dime in this case.) The beater is at the correct height if the dime is moved only 1/2 inch at each pass of the beater. If it stays in the same place or is moved all over the bowl, the adjustment is wrong. It’s the same principle as my “penny on the hump” test, just another way of testing the same thing.

If you don’t have a Kitchen Aid, check with the customer service of your brand, and they should be able to tell you how to adjust the beater height.

This little tweak can really have a HUGE impact on the smoothness of your icing.

And starting with smooth icing is one step closer to having a super smooth cake — which is what we all want, right?

So grab your pennies and go check yours now. I’m glad I did back in the day or I’d be knitting right now 🙂

Sharon

PS.  If you want to learn more about making and using buttercream, I have a detailed video course in my online school. It covers different types, the making of, applying and smoothing to cakes and much more.

Get access here:  https://www.sugaredproductions.com/subscribe/

How to Comb a Cake Video

January 14, 2016 by Sharon Zambito 2 Comments

Hello sugar friends

I have a secret.

I’ve rediscovered an old love.  A love I had forgotten all about.

The cake comb.

Lot’s of folks think it’s too “old fashioned” or “grocery store-ish” to use them on cakes these days. But I disagree.

They can absolutely work with today’s more simplistic styles:

how to comb a cake


Or ramped up a bit with trendy flowers on a cake pedestal:

how to comb a cake
There are many comb styles available. From the “traditional” thin lines to fun multi-faceted patterns.

And using a comb cake doesn’t have to look old fashioned. You can see how stylish it looks in the photos above using a crusting buttercream.

But they work just as well on meringue buttercream, ganache and royal icing.

PLUS they kill two birds with one stone: they ice and decorate the sides of the cake at the same time – a real labor and time saver for us.

There are some tricks, however, to using them with success. All combs are not created equal.

How you hold the comb and the consistency of the icing is key.

I teach all of that (and more) in my new video tutorial that was released in my online school last week.

The response to it has been amazing. I’m excited to see how interested folks are in learning this somewhat forgotten technique. I love bringing “old school” techniques into modern decorating trends.

I’ve had folks who missed my New Year’s special ask if I would run it again.

In fairness to those who took advantage of the offer at that time, I can’t run that offer again.

BUT I can offer you a discount on the combing video:

$3 to download a copy and keep forever.

As well as getting a full month of membership to the school and access to the over 300 tutorials on the inside. You can stay at the end of that month or leave; no commitment or risk.

Get your combing video download:

https://www.sugaredproductions.com/o1/

Brush off those old cake combs and let’s bring them into the 21st century together!I’d love to see what you do with them.

Talk soon,
Sharon

PS. Current members get to download the video too, along with all the other goodies and bonuses I give out on a regular basis 🙂


NOLA Photography http://bentzphotography.com/

Free Holiday Tutorial Bundle

December 6, 2015 by Sharon Zambito 2 Comments

Happy Holidays everyone!

I’ve really got the Christmas spirit, and I have a gift for you. Actually, I have two!

Free Holiday Tutorial Bundle

I’ve put together a FREE PDF tutorial bundle for two of the most popular ones in my online school.

The “famous” ruffled Christmas tree cake was a viral hit. You may have seen it floating around the internet. (It’s my most stolen cake photo 🙂

Free Holiday Tutorial Bundle


How about this squeezably cute Santa figure? I want to pinch his rosy cheeks! Created by the insanely talented and Cake International Gold Award winner, Rhu Strand, exclusively for our online school.

Free Holiday Tutorial Bundle

Just click on the red button below to request your copy. Please note that sometimes the email that delivers the PDF bounces or gets lost in cyberspace. Just drop me a note at support@sugaredproductions.com if yours doesn’t arrive.

You’ll see an offer for a $1 trial to my online school, and I hope you join me. But know that is totally optional, and the PDF is my gift to you whether you join or not 🙂

The PDF will arrive in your email inbox within 15 minutes, and I’ll also send you some emails over the course of the next week or so that are packed with even more tutorials, valuable cake decorating info, stories and a super special offer. It’s going to be a fun week, so keep an eye on your inbox! (You can opt out anytime you wish.)

Ready to get your holiday gifts?

Send My Free PDF!

Happy Holidays!!

Sharon
SugarEd Productions Online School


NOLA Photography http://bentzphotography.com/

Indian and Pilgrim Owl Cupcakes Tutorial

November 23, 2015 by Sharon Zambito Leave a Comment

Hey sugar friend! Thanksgiving is just a few days away. Need an idea for dessert? Here’s some easy but really cute cupcakes that you can put together really quickly. How adorable are these little owls dressed like Indian and Pilgrims?  I die from cuteness.

Thanksgiving owl cupcakes tutorial

Supplies:

1 Batch of Cupcakes
buttercream
6, 13, 30, 44, 64mm circle cutters
44mm & 64mm scalloped circle cutter
Non-stick rolling pin
Cocktail stick
Water brush for sticking
Sharp or craft knife
Windsor Clikstix small
Soft brush
Pair of white pop socks, cornstarch and a small plastic container
Spatula
Wilton 6B piping Nozzle
Piping bag
Tall glass to pop your piping bag into.
80g of gumpaste (I used Satin Ice)
50g of chocolate fondant
60g of white fondant
20g of Orange fondant
40g of black fondant
2g of yellow
Brown food color gel/paste
Wafer paper (various colors, I used what I had left over)

These toppers will take at least 12 hours to dry hard enough so they won’t sag onto your cupcakes, so make sure you give yourself plenty of time before you decide you want them.


Thanksgiving owl cupcakes tutorialTo start with, I’m going to teach you a trick to stop things sticking to your board, cutters etc. I can’t claim it as my own idea but it works a treat. Starting with a pair of white pop socks (stockings), put one inside the other. Open the socks up together and put 1 tablespoon of cornstarch in the socks. Hold the socks at each end making sure the cornstarch is in the center and tie the two ends together cutting the ends to tidy them up. Voila! A brand new dusting bag. Keep it in a little container to keep it fresh and clean. Why cornstarch? Well I know many people use icing sugar, but that for me just makes everything even stickier, so it’s just a preference thing.


Thanksgiving owl cupcakes tutorialMix 80g of gumpaste with 40g of chocolate fondant and knead well. I added a touch of brown food color gel just to bring it back to a darker brown color again. To make the owls – cut 8 x 68mm rounds, making sure you keep any paste you are not using in an airtight container so it doesn’t go hard while you are working.


Thanksgiving owl cupcakes tutorial To make the Owl’s ears, you’ll need the 44mm cutter. Use this to cut a small section away from the top of the round, like this.


Thanksgiving owl cupcakes tutorial To give the Owls a stitched look, I used a cocktail stick to emboss the outer edge. You can buy a stitch embossing tool, but using a cocktail stick is just a nice, quick, CHEAP way of getting the same effect.


Thanksgiving owl cupcakes tutorial Next, knead 10g of chocolate and 50g of white fondant together to get the nice beige tummy color for the Owls. Roll the paste out to 2mm thick and cut 8 x 30mm rounds out for the tummies. Remember to keep the spare paste wrapped up tight, so it doesn’t go dry.


Thanksgiving owl cupcakes tutorial Repeat the stitching effect with your cocktail stick again, just inside the outer edge of the rounds.


Thanksgiving owl cupcakes tutorial Using the water brush, gently brush under where you want the tummies to go, I placed mine in the center at the bottom but you can off set them if you like.


Thanksgiving owl cupcakes tutorial To make the eyes you’ll need the 13mm round cutter. Roll and cut 16 x 13mm rounds, trimming the tops like this.


Thanksgiving owl cupcakes tutorial Using the water brush, stick the white rounds above the tummies, and then using the 6mm round cutter, add the pupils to the whites of the eyes. You can make them crossed or looking in different directions; it’s fun to give them a bit of personality.


Thanksgiving owl cupcakes tutorial 
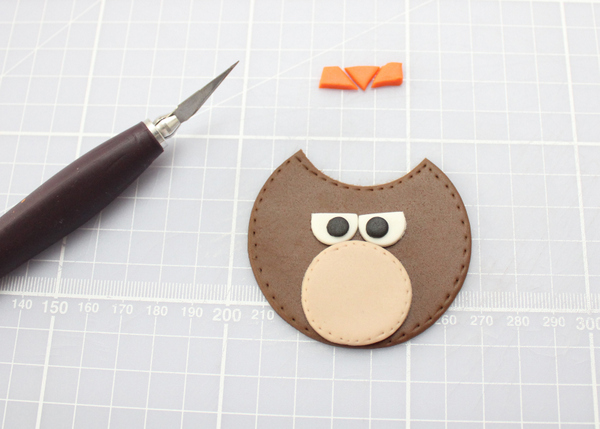
To make the beaks, roll and cut small triangles from the orange paste.


Thanksgiving owl cupcakes tutorial Using the water brush, stick the beaks just below the eyes.


Thanksgiving owl cupcakes tutorial To make the wings you will need the 44mm scalloped round cutter. Using the remainder of the brown paste, cut scalloped rounds, and then cut them into four. I made sure the wings were 4 x scallops wide.


Thanksgiving owl cupcakes tutorial Stick the wings to the side of the Owl’s body with the water brush.


Thanksgiving owl cupcakes tutorial To make the Native Owl’s headdress – roll the orange paste and cut a long thin strip. Use the cocktail stick to emboss a pattern into it. I chose triangles and dots, but you can do which ever pattern you like.


Thanksgiving owl cupcakes tutorial Stick the headdress on with a brush of water above the eyes and trim the excess off with a sharp knife.


Thanksgiving owl cupcakes tutorial To make the feathers I used wafer paper. I had some Autumn leaves left over from some previous cupcakes and thought they were the perfect colors. You can use plain edible paper and dust it with powder food color to get these sort of colors. You could also use colored gum paste and feather it with a sharp knife. I used a craft knife to cut feather shapes out of the wafer leaves, and then feathered the edge by cutting thin strip into the edges.


Thanksgiving owl cupcakes tutorial When you are sticking the feathers together with the water brush, you need to make the brush is quite dry as you don’t want to melt the paper. Once they are all stuck together, use a tiny brush of water to stick them to the back of the owl’s head.


Thanksgiving owl cupcakes tutorial To make the pilgrim’s hat I cut a 4cm triangle and cut 5mm of the tops.


Thanksgiving owl cupcakes tutorial Then fold the bottom edge upwards to make the hat rim.


Thanksgiving owl cupcakes tutorial To make the buckles, cut tiny yellow fondant rectangles, and then cut tiny black fondant squares, sticking them onto the yellow rectangles with a dot of water.


Thanksgiving owl cupcakes tutorial Then add the buckle to the hat like this. The hat can then be added to the Owl’s head with a small brush of water.


Thanksgiving owl cupcakes tutorial To make the ‘Give Thanks’ topper cut 4 x 64 mm scalloped round.


Thanksgiving owl cupcakes tutorial Use the 48 mm plain cutter to cut 4 x rounds for the center of the scalloped rounds.


Thanksgiving owl cupcakes tutorial Roll the orange fondant out, making sure the counter and cutters are well and truly dusted with your cornflour dusting bag. I used the Windsor Clikstix Small for these letters and committed a sin by popping the plunger backs out. I just prefer the look of the rounded letters without the plunger backs in the cutters. I then remove the letters from the cutter with a small soft brush so as not to mark them.


Thanksgiving owl cupcakes tutorial Arrange your message onto the plain toppers and stick down with a brush of water.


Thanksgiving owl cupcakes tutorial To ice the cupcakes I added a Wilton 6B to a small piping bag. I find it much easier to pop the piping bag into a tall glass so I have both hands free to add the buttercream to the bag.


Thanksgiving owl cupcakes tutorial Pipe the tops of the cupcakes by starting in the center, piping out towards the wrapper, using this as a guide to pipe round to where you started and then up once more, finishing in the center by pushing down slightly and pulling up quickly.


Thanksgiving owl cupcakes tutorial Add the dried topper to your cakes and they are ready to serve.


Thanksgiving owl cupcakes tutorial

Happy Thanksgiving everyone!!

———————————————————————————-

Thanks to Victoria Threader, a renowned cupcake artist from the UK. After watching her mother bake her beautiful birthday cakes (still to this day), Victoria waited until she had a family of her own to start baking. Victoria is self taught and currently has her own feature in goodtoknow recipes magazine, where she shows you how to create wonderful cupcakes.
You can follow Victoria on her Facebook page: Victorious Cupcakes and at goodtoknowrecipes.com.

———————————————————————————-

I hope you enjoyed the tutorial and Happy Thanksgiving everyone!

Sharon

visit our online school


Thanksgiving Tutorial Round Up

November 20, 2015 by Sharon Zambito 2 Comments

Hey Y’all!  It’s almost here – TURKEY time!  If you’re like me and running short on time, you might like some help coming up with something creative  🙂  I’ve rounded up some super cute and easy ideas to dress up your Thanksgiving table. I’ll be using a few of these cute ideas myself:


peekaboo-pumpkin-pound-cake

Peekaboo Pumpkin Pound Cake by SheKnows


pumpkin pie cookies Pumpkin Pie Cookies by Munchkin Munchies


turkey-cupcakesTurkey and Stuffing Cupcakes by Saucy Sprinkles


Pumpkin-Pie-CupcakesPumpkin Pie Cupcakes by Hoosier Homemade


pumpkin cheesecakePumpkin Cheesecake Pie by Just A Pinch


cheesecake leavesFestive Fall Cheesecake Leaves by Hungry Happenings


Perfect Pumpkin Roll

Perfect Pumpkin Roll by SugarEd Productions


acorn cakeAcorn Cake by The Celebration Shoppe


turkey cake ballsTurkey Cake Balls by SugarEd Productions


turkey pilgrim cakeHave Mercy Turkey Cake Topper by Crazy Cool Cakes by Linda


pretzel-turkeysTurkey Pretzels by Candiquik

I hope some of these ideas help you come up with your own pretty table.  I’d love to hear what you guys are making. I’m always in charge of all the desserts for my extended family gathering, cuz ….well…. I don’t cook very well. They let me do the only thing I do well, haha!

Happy Thanksgiving from all of us at SugarEd Productions!

XX

Sharon

visit our online school


Free Baking Charts

November 7, 2015 by Sharon Zambito 15 Comments

Hi Sugar Friend!

Hope you are having a great week and all your cakes this past weekend were a huge success!

Lately here on the blog we have been discussing cake baking, recipes, icing and baking issues. I thought it might be helpful to consolidate that valuable information (and more) for you. So I’ve created 3 awesome free charts that you can keep and reference forever. I’ve bundled them into one PDF file. Print them out or keep them on your mobile device to have at your fingertips anytime.


Here’s what’s included in the free PDF bundle:

 free batter and serving charts

  1) The famous WASC recipe and a chart on how much batter to put into each cake pan size.


 free batter and serving charts

2) A handy chart of wedding and party servings for each size cake and shape.


 free batter and serving charts

3) An easy to reference guide with tips to troubleshoot common baking problems.


You’ll get all 3 full size info-graphics in PDF form. The images are way too big to post here on the blog and still be able to read them clearly, so below is just a small snapshot of what they look like. You will of course get the full size (free) PDF that you can zoom into as close as you like. (Me, I have to zoom in reeeeeeal close 🙂


free baking charts


Just click the button below and fill out the form, telling me which email address to send the PDF to. (I promise that I do not sell, share or in any other way abuse your email address. I guard it with my life, as I do my own.)

Please note: Sometimes the email that contains the PDF gets bounced back or goes to spam/junk and you may not receive it. Please know we do send out every request immediately, but if you do not get it within 15 minutes, please email support@sugaredproductions.com and I will personally zip one back to you. I really want you to have it; these are such helpful and convenient graphics to have on hand.

Send My Free PDF

Grab yours now. I hope you find it helpful, and let me know if you have any questions in the comments section below. I’m happy to help.

(Be sure to check your emails daily this coming week (after you get the PDF). I have more free info and some fun stuff coming your way.)

Sweet regards,
Sharon Zambito

PS. I’m running a very rare FREE TRIAL to my online school this week.

Free trial to SugarEd Online School

You can have access to the whole website and over 300 tutorials for a full week. I have tons more information about baking cakes as well as cake decorating in the school.

You can stay and pay at the end of the week, or cancel anytime and never be charged. It’s a rare opportunity to have a look at all the great things inside the school. See why we were named a finalist in the Cake Masters Awards for Best Learning Experience.

Join our thousands of happy members…. and me! (I give full personal support to all members.) Hope to see you on the inside!

CLICK HERE FOR FREE TRIAL

Free trial to SugarEd Online School


Video: Making American Buttercream

October 28, 2015 by Sharon Zambito 93 Comments

Making American Buttercream Free Video

Hi Friend!

Today I have a free video from the online school for you! Here, I’m showing you how to make my signature buttercream recipe. This buttercream has become known the world over over the last decade. You may have heard of it referred to as “Sugar Shack’s Buttercream” from back in the day when that was my cake business name and online handle.

This icing is so forgiving, elastic and easy to work with. It gives you an incredible amount of “work time” before it loses it’s mind and can’t be worked anymore. (Other recipes literally give you a couple minutes before they freak out.)

Ingredients:

  • 5 1/2 generous cups Sweetex shortening or other brand of hi-ratio shortening.
    • You may substitute some or all shortening with butter but it will make a softer icing and the liquid amount needed will be less.
    • Hi ratio shortening makes a much better icing overall. If you can’t get hi ratio, then be sure the one you use does have at least 3 grams of trans fats per serving. Crisco or other zero trans fats shortenings don’t work in this recipe.
  • 5 pounds powdered cane sugar, unsifted
  • 4 Tbsp. Wedding Bouquet flavoring (or substitute your flavoring of choice in the appropriate amount and adjust the creamer amount to compensate and maintain correct total liquid amount)
  • 12 – 14 Tbsp. hot coffee creamer liquid which is made from mixing a 1:1 ratio of plain powdered coffee creamer with near boiling water. (* You may need to adjust the amount of liquid from batch to batch. Powdered sugar and shortening batches vary and can affect the amount needed.)


This video will give you all sorts of tips and tricks for making it, as well as my secret to getting a PERFECTLY smooth batch of buttercream with no air bubbles! This recipe is so versatile, you can use it underneath fondant and you can even use an impression mat on it. This is a crusting buttercream, so you can also use the Viva paper towel method to get that perfectly smooth, faux fondant finish. There are more videos on all of these techniques in the school, and I hope to see you there! (see below for a free trial offer.)

About butter: I make this with all shortening in the video, but you can substitute up to half with butter. You will have to decrease your liquids in that case, because butter has more water content than shortening. The icing will be more heat and humidity stable the higher the ratio of shortening to butter it has.

NOTES: There are many many many American buttercream recipes out there, but this one has really great properties: super easy to smooth, allows for super sharp edges and corners, crazy long work-ability time, elastic and easily patched/repaired, less prone to cracking and blowouts, non greasy and creamy mouth-feel. BUT in order to get these amazing results the recipe needs to be followed exactly as presented:

  • Hi ratio shortening is crucial, as it creates a much higher quality icing and provides the wonderful properties of this particular icing. Some folks have trouble getting hi ratio, so the 2nd choice would be a store brand that has at least 3 grams of trans fat per serving. That icing will not be as good as with hi ratio, but better than……. Crisco and other zero trans fats shortenings; they will not work and result in a curdled soupy mess.
    •  The best brand of hi ratio is Sweetex, followed by Alpine, but other brands can work as well. You can’t buy hi ratio in a grocery. It’s a commercial grade shortening with extra emulsifiers that can be found at bakery and restaurant supply houses, cake decorating stores and online. Buying it in small portions from cake supply stores will be more expensive than grocery shortening, but the difference it makes is well worth it. However, if you purchase the 50 pound block, portion it out airtight and freeze, it is often more economical than store brands. Yay for saving money!
  • The reconstituted coffee creamer powder is another critical ingredient to the awesome properties of this icing. I don’t use ready flavored liquid creamers as they have added sugar and other ingredients.
  • Be sure your powdered sugar is 100% cane, not beet sugar and is 10x. I don’t know what it is about beets; I love beets, but boy oh boy they do not play well in the sugar.
  • I use a wonderful emulsion flavoring called Wedding Bouquet, which is absolutely divine. I could drink it with a straw…. but I digress. You can use whatever flavorings you like, but adjust the total liquid amount as needed to compensate for the amount of flavorings you use.
  • The all shortening version is cool room temp stable for weeks, and fridge and deep freeze safe for months, a year, maybe longer. Till Armageddon basically. Butter versions are good at room temp for at least a week, fridge and deep freeze safe for months, even a year.
  • Meringue buttercreams (like Swiss Meringue) are another type of icing used in caking. Those are made with cooked egg whites, granulated sugar and all butter. They perform and taste differently. I use both kinds, depending upon the situation. Try them both! (I’ve got tutorials on this kind in the online school as well.)

You can change ingredients in my recipe with limited success, like using milk or cream, other shortenings or sugars, but please be aware that then renders it a different recipe, and it will not perform or look or taste as good as my original recipe 🙂

Amounts for 4.5 quart mixer bowl: 

2.25  lbs Hi ratio shortening
4.5lbs. Confectioners sugar
3/4 Tbs. flavoring
15 Tbs. coffee creamer
15 Tbls. Warm water.

Amounts for 6 quart mixer bowl:

3 lbs sweetex or other hi ratio shortening
6.5 lbs powdered sugar (use a 4 cup measuring cup, 4 cups = 1 lb)
9 tbsp wedding bouquet or flavorings of choice (adjust total liquid as needed)
11 tbsp hot coffee mate liquid

Amounts for 8 quart mixer:

60.5 ounces of Sweetex, hi ratio shortening
1 1/3 cups of hot water and 1 1/3 cups powdered coffee creamer mixed as shown in video
4 Tbsp vanilla extract
3 Tbsp butter flavoring
8 lbs powdered sugar


Disclaimer: this icing ain’t healthy; it ain’t organic; it’s loaded with trans fats, preservatives….and sugar! (And I get a lot of flack about it… party poopers 😛 )   I’m not claiming that it’s good for you. I’m claiming that it works and tastes great. All bad things in moderation is my motto. (Or heavy moderation in my case 🙂 ) It is dessert after all!

If you’ve used my recipe, I’d love to hear your experiences in the comments below. If you haven’t tried it, I encourage you to, because it may just change your caking life. Seriously, I am not just being dramatic. Once I changed to this recipe I was able to get cakes this smooth and sharp:

_

And that leads me to the free trial offer. You can join my online school for two free full weeks and have access to over 300 video and photo tutorials on a huge variety of topics for all skill levels. Also a ton of recipes, articles, photo gallery, forums, private Facebook group, and me! (I give personal support to all members.)

I have a full buttercream course that will lead you through making all the different kinds, to applying and smoothing (get your cake to look like mine above 🙂 , troubleshooting, stacking and more. And I am there with you every step of the way answering questions and providing support.

Try 2 weeks for free. You can stay and pay or leave after that time; cancel anytime with no obligation. No upfront payment.

JOIN HERE

I hope to see inside the school. Happy Caking!

Sharon
SugarEd Productions Online School

Halloween Chocolate Covered Pears

October 17, 2015 by Sharon Zambito Leave a Comment

Hey guys! Today we have a guest post from the ever creative Kim Heimbuck of The Partiologist blog. She has the best ideas (be sure to check out her blog for serious cuteness), and this one is so clever! A unique spin on the traditional candy apple:


Halloween pears

Beware of Pirates?  Not this kind.

You probably didn’t know that there was such a thing as chocolate covered pears.  Well, if I can help it, there will be chocolate covered everything, including pears.

Chocolate Covered Pirate Pear:

Start with as many pears as you plan to make.


Use white candy melts for dipping your pear.


Use the caramel apple sticks.


Insert sticks into the pears and dip into both white and green melted candy melts.


For the pirate, use a round cookie cutter to cut the headpiece.


Also cut an oval piece of fondant for the scarf.


Pinch the oval piece together for the tie.


Fold it in half.


For the eye patch, roll and cut black fondant with a No. 1 strip cutter.


Use a small oval cutter and cut another piece of fondant to make the patch and trim the top.


Layer the patch on top of the strip.


Using number tappits, cut zero’s and pull out the inside for the teeth.


First add the eye patch and then wrap the red fondant around the top of the pear and pinch together the side, add the additional red fondant piece.  Also add the other eye, nose and teeth.


Cut out several white dots and place on the scarf.


Using the large number tappits, cut out a zero and use it for the earring.


Form it into a circle and let dry.


Halloween pears

Add the earring to the pear, cover the wooden stick with a decorative straw and you’ve got yourself a pirate!


Chocolate Covered Frankenstein Pear:

Dip your pear in green candy melts and set aside.


Roll and cut a large piece of black fondant into a circle.  Use a small oval cutter and cut pieces out around the edge of the fondant. Add the black fondant piece to the top of the pear for Frank’s hair.


Add candy eyes to the pear by sticking them on with a bit of frosting or melted candy melts.


Cut a strip for the mouth.  Add a piece of the black fondant strip to the pear for the mouth.  With black frosting, pipe frosting on the pear for stitches and eyebrows. Add a mini orange M&M for the nose and mini marshmallows to the sides.


Halloween pears


Now you can do the monster mash!


HAPPY HALLOWEEN!

——————————————————————

The Partiologist BlogKim has a love for unusual and over the top parties. In 2011 she started her blog, The Partiologist, where she shares her unique and creative ideas. From cakes and cookies, to favors and tablescapes, her inspiring ideas flow freely. Forever fun loving, her mantra is “Life is short; party accordingly!” You can follow Kim on her blog  or Facebook page.
  • Kim’s Full Bio here
Visit out online school


Franque and Broomelda Marshmallow Pops

October 8, 2015 by Sharon Zambito Leave a Comment

Boo!


Did I scare ya?


Probably not, as you intentionally logged onto this post. 🙂


Monster Marshmallow Pops Tutorial


One of my very favorite holidays is upon us. Halloween is a confectioner’s dream, as it provides an opportunity to make some of the cutest tasty treats evah. Let me share with you some I made this week. These were a lot of fun, and not very difficult nor time consuming. They get extra points for that!


Halloween marshmallow pops

Meet Broomelda and Franque. (He is French).


Initial supplies used to make our cozy candy couple include yellow candy melts, green oil based candy color, marshmallows and sucker sticks. I highly recommend Merkens brand melts for optimum dipping performance. In this case I used the campfire roasting marshmallows. Have you seen those things? They are hugantic! They are as big as…..as ……as a giant marshmallow! I also suggest using the thicker sucker sticks, as these bad boys are heavy once they are done.


Big bowl of green melty chocolate.


Other supplies used will be these candies and pre-made googly eyes, that you can get at most cake decorating places.


For Broomelda, we have to cut angles off each side of the gargantu-mallow. Run your knife under hot water, and dry it off before each cut. This will make the cutting of the freakishly large marshmallow much easier.


Stick and dip. Place on wax paper to dry fully.


Let’s do Franque first:

Cut out a circle of black fondant and cut out notches along the outer edge. Do not cut them evenly or symmetrically. Franque does not have the most couture coif I have ever seen. Just sayin’.


Lay the toupee over his head and just press down all around the sides. (Hint: use shortening as your glue. Trust me. You will thank me for this later.) Glue on his googly eyes with melted chocolate. Cut a white Good & Plenty in half and glue in place for his bolts. Give the rest of the box to hubby because he loves those nasty candies. Oh wait, that is my hubby. Ignore that. Next use a paintbrush to drop a dollop of the same green chocolate on his handsome face to make a nose.


Next we need to bring out the big guns. OK just one small gun. Anyway, get your clay gun out, and using the smallest size circle disc, extrude a string of black fondant. Use that to make eyebrows and mouth. Again, using shortening on his face as glue will save you many bad words. And if you just cannot help yourself (like me), use silver luster dust mixed with vodka to paint his bolts. An edible marker (not shown) can be used to make his scar.

You mad confectionery scientists will have
created a marshmallow monster!


MWAHAHAHA!

Now on to Broomelda:


Marshmallow pops


As with all ladies, we need to spend some time on the hair. Use your clay gun with the largest muti hole disc.


Extrude a length of purple fondant and apply to the side of her head.


Repeat process on each side until her head is covered.


Cut a few short pieces to make her bangs. The bob is very in this season in the witch world.


Now to make her face. Clay gun string again for the brows and mouth. Half of the green Mike and Ike candy for the nose. (Keep that box cuz we like those.) Another pair of google eyes.


Well hello my pretty!


To make the pointy part of her hat, start with a ball of black fondant.


Roll it into a cone shape initially, and then continue to elongate and shape it into a witch hat shape.


A circle of black fondant laid on her head, and then the cone part of the hat is attached to the top of that. A couple of purple clay gun strings will create a perfect hat band.


marshmallow pops

 And they are done!


marshmallow pops

Franque: Hey good lookin’. You want to go for a drink?
Broomelda: Why yes, thank you. I will have a Bloody Mary.


marshmallow pops

Double date!


Happy Halloween everybody! Send me pics if you make these and I will post them on Facebook. Please tell all your friends to like our Facebook page.

Sharon
Sugared Productions Online School

visit our online school


  • original post from 2011


NOLA Photography http://bentzphotography.com/

Free Woodland Cake Tutorial

September 10, 2015 by Sharon Zambito Leave a Comment

Grab Your Free PDF!

 Yep, it’s totally free!


Free tutorial

Download It Here


Please enjoy it!
Sharon
www.sugaredproductions.com


NOLA Photography http://bentzphotography.com/
  • « Previous Page
  • 1
  • 2
  • 3
  • 4
  • Next Page »

Sharon Zambito

Sharon Zambito

An RN turned SAHM turned cake maniac. Owner of SugarEd Productions Online School. Join me for some caking, baking, and all around sweet fun :)

Follow me..

  • Facebook
  • Instagram
  • Pinterest
  • YouTube

Pinterest

  • Autumn House Two Trees Machine Embroidery Design – Blasto Stitch
    Autumn House Two Trees Machine Embroidery Design – Blasto Stitch
  • Embroider  Sew :: Jelly Roll Purses - Embroidery Garden In the Hoop Machine Embroidery Designs
    Embroider Sew :: Jelly Roll Purses - Embroidery Garden In the Hoop Machine Embroidery Designs
  • (1) How to QUICKLY & SAFELY remove acrylic, gel, and dip powder polish | BAGGY METHOD - SO EASY! - YouTube
    (1) How to QUICKLY & SAFELY remove acrylic, gel, and dip powder polish | BAGGY METHOD - SO EASY! - YouTube
  • (1) Bouffant Surgical Cap - YouTube
    (1) Bouffant Surgical Cap - YouTube
Follow Me on Pinterest

Follow Me on Instagram

Instagram requires authorization to view a user profile. Use autorized account in widget settings

Recent Posts

  • Egg Safety Basics
  • Stable Mabel Support System Sale
  • Guest Post : 4 Vegan Cake Recipes No One Should Miss Out On!

Popular Posts

  • Ways To Make Your Cake Fluffy And Moist
  • How To Stencil on Cookies with Royal Icing
  • Doctored Cake Mix Recipes
  • Transferring an Image Without a Projector
  • All About Buttercream!
  • How to Fix Broken Ganache
  • Edible vs Non Toxic Gold Dusts

Categories

Search

Archives

Copyright © 2025 · Sharon Zambito and SugarEd Productions,LLC

Copyright © 2025 · Evangeline Theme on Genesis Framework · WordPress · Log in