Sugared Productions Blog

  • Blog Home
    • Home
  • Online Classes
  • Shop
  • Contact
  • About

Under the Sea

June 2, 2009 by Sharon Zambito 15 Comments

Note: I had to delete and re-enter this post to fix my html problems. The sad part is I lost all of your wonderful comments. ๐Ÿ™


Under the Sea , Take Two:

ย 

Hello Sugar Friends!

I hope you had a nice holiday weekend, and that this weekend is shaping up nicely for you. I had another busy week of DVD editing, doctor appointments, end of school stuff, and cakes.

Did I mention the END OF SCHOOL? YEEE HAAW! Summer is here! No homework, no early mornings after being up half the night working. No more washing uniforms, keeping up with project deadlines, and attending boring open houses. (Oops, did I just say that? Well, I confess. I love my kids and all. But I really hate going to open house.) 12 more weeks of freedom until I have to attend another one. (Sharon squeals with delight.)

And nothing says summer more than the beach, right? Who doesn’t love a nice relaxing day on the warm sand and in the cool clear water. So I thought it only fitting to usher in summer by sharing this cute little cake I just did yesterday for a sweet little boy.


Here is a scan of the treat bag the mom gave me to use for the theme:

The cake was iced in buttercream and I made all the little creatures from fondant with a bit of tylose added. (I made a back fin for the seahorse and promptly forgot to put it on. I have no idea where it is. It was so small it probably got swiped into the trash. Hate when I do that. But no worries, because our seahorse has magical powers and he can swim upright with no fins.)

I used various shaped cutters in various sizes to create the animals. I have tens of thousands of shaped cutters in all kinds of sizes. OK, I have dozens.
Air bubbles were piped buttercream dots tapped down with my finger.

The different seaweed and coral were also just formed freehand from fondant. See that brain coral? SO easy. Roll a ball and poke it a gillion times with the end of a paintbrush. Voila!


Mr. Happy Whale was also made from fondant/tylose. Probably the easiest figure I have ever modeled. I think he is so cute! I love Mr. Happy Whale. I did not want him to go with the big mean lady who came to pick him up. ๐Ÿ™
So now that summer is officially here, I am going to put my sunscreen on, get my book, and go work on my tan.
No I am not. At least not right now. Have to get dressed to go to a “function” for hubby’s job tonight. I hate functions. Just about as much as I hate open houses. (Sigh)
Sharon
http://www.sugaredproductions.com/

Graduation Wedge Cake

May 19, 2009 by Sharon Zambito 143 Comments

Hello everyone!
Good gravy have I been busy! Running pillar to post. Burning the candle at both ends. Nose to the grindstone. Running around like a chicken with my head cut off. Burning the midnight oil. OK, I will stop. You get the idea. I bet you guys have been busy too since it is graduation time.
My beautiful and sweet niece graduated from high school last weekend, and I made her a special cake. I wanted to try the tilted method using wedges. I had not done that before. It was really pretty easy.
I wanted to of course use her school colors and mascot, but also incorporate little bits of her life, while making it fun and whimsical.
The grad hat was a styro ball I cut and carved a bit and covered with fondant. The mortar board was a square of fondant with tylose, dried ahead and glued on with chocolate. I used a 4 inch ball and a 5 inch square in this case. The clay gun was used to make the tassel.
The scroll work was done with a cutter set available here.
The paw prints were stenciled on, and represent LSU, where she is going to college. I used the alphabet tappit cutters for the LSU letters. I used the funky alphabet cutters for her name.
The initials in the heart are of Paige and her boyfriend, Chris.
I did not have time to make the flowers, so I purchased them, and dusted some to add color.

Here are the flowers I purchased:

Cally lily spray

Rose spray

Large roses

Blue roses


The graduation figure was made with a chocolate mold. I used fondant with tylose in the mold, let it dry firm, and then airbrushed it with super pearl luster dust.

The fork represents the restaurant where she works as a hostess. That thing was quite a challenge to make. I was so engrossed in trying to get one of those suckers to come out right, I forgot to take photos. But here is how I did it:

I rolled out a piece of gumpaste and pressed it between 2 plastic forks that were stacked on top of each other. I squeezed them hard together to make the impression of the handle and the 4 tines into the gumpaste. While they were sandwiched together I trimmed around the outside of the fork edges with an exacto knife. Then I took the top fork off and let the cut out gumpaste sit atop the bottom one for a good long time. After it dried a good bit, I took that gumpaste “fork” and laid it on the table and trimmed to the exact outline of the impressions made by real forks. The handle was easy peasy, but trying to cut the tines out made me curse and throw things. And curse some more. They kept breaking off or were just crappy looking. After creating a graveyard of about 12 reject forks, I decided to go with shorter than real-life tines, and got one fork that was decent. I put that back on top of the plastic fork to get the proper shape and let it dry a day or two. Airbrushed it silver after I added the letter D on the top of the handle. I just knew I was going to break it, but God was smiling on me and it made it to the cake. Whew!
————————————-
Here are some photos of the construction. Please forgive the terrible quality of these photos. I was very pressed for time as my power had gone out for quite a while and put me behind schedule. On top of that, I was working with a heavily bandaged finger after slicing it it open cutting the Styrofoam wedges with a very long, very sharp knife. I think I needed a stitch or two, but no time for that!
I put the ganached tiers atop a Styrofoam lift, so I would be able to tuck the fondant under the cake and foamcore board under it for a clean bottom look.
Here is one tier after it was covered.
I had topsy turvy dummies laying around, which worked out great, because the top slant was already cut for me. I just had to trim them down to the height I wanted. (Note: to be considered food safe, you need to cover your wedge and board with something appropriate.)
I attached a piece of thin foamcore to the bottom of each styro wedge with white chocolate. This would prevent the supports from going into the styro under the weight of the cakes. I doweled the bottom cake as usual under the wedge support.
I used melted chocolate to attach the wedge to the lower tier, and more melted chocolate on top of the wedge, then placed the middle tier in place and held it there until the chocolate firmed up. Then I drove 2 wooden dowels down through both tiers.

I repeated the same process to apply the top tier. I wanted the top tier to have more of a tilt to the opposite side, but I miscalculated my slant, so it basically came out straight. Oh well, live and learn. (Dagnabbit!) After the top tier was in place, I drove one large wooden dowel down the middle of all 3 tiers.

That cake was very stable and did not budge. Cutting and serving it proved to be a little bit messy, as the melted chocolate between the tiers did tear off some of the fondant when I disassembled it. But I guess that is the price you have to pay to get this look and have it be super stable. I guess you could try to do it without the melted chocolate, but I felt better having it there as glue.


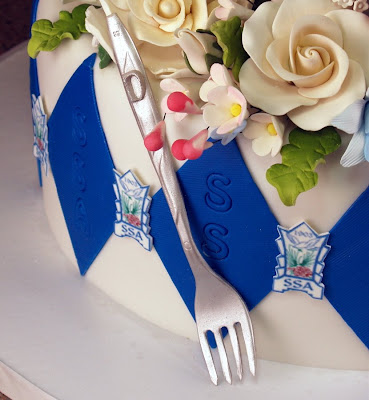
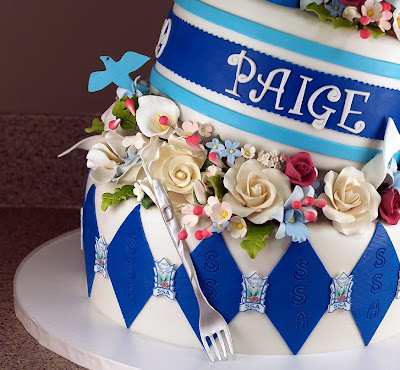
I cut apart all the purchased flower sprays and arranged them on the cake, using royal icing as glue where needed. The fondant dove is the school mascot.


I used the school logo clip art that I got off their website. I made little icons with edible icing sheets backed with white fondant, to put between the diamonds. The school initials, SSA, were impressed into the diamonds using the JEM alphabet cutter set.

Paige just loved her cake and thanked me over and over and over. Everyone at the party went nuts over it; it was very good for my ego, LOL! I have 4 more nieces coming up behind her, graduating from the same school, so I better start thinking of more design ideas soon! Oy vay. I’ll think about that later.


—————————–
NOTE: THIS CONTEST HAS ENDED:

Totally Topsy Turvy is almost ready! Just a few more tweaks in editing and we are going to the presses! I am really proud of this one; I think you guys will like it too. I take you through every single step of making this cake from start to finish. No stone is left unturned. And there are a few fun surprises thrown in there too.

I am so happy with this DVD, I feel like having a give-a-way! (The crowd jumps to its feet and roars!) To enter, just leave a comment below, and you will be entered into a random drawing for a free copy of Totally Topsy Turvy! I will draw the winner on Monday.


GOOD LUCK!
Sharon
www.sugaredproductions.com

Remy Stirs the Pot

May 7, 2009 by Sharon Zambito 24 Comments

Hello Sugar Friends!
So sorry for the delay in posting. I have been crazy busy; and it continues through next week. Whew, this old cake chick is tired! I hope all of you are doing great, and your caking adventures are going well.
I am working on some things to post next week, so in the mean time I thought I would show this cute cake I made a few months back for the daughter of a friend. She was having her party at one of those little chef places, so the theme of the cake was just perfect! When the mom asked me if I could make Remy stirring the soup pot like in the movie, I said sure I can! Then of course, after I hung up the phone, my thought was : How the heck am I going to do that? The pot I can do, but figure modeling is not my strong suit. So I just jumped in and went for it.

I used a real chopping board for the cake base, and I love the effect that gave.


Here is the first body parts of Remy drying. I find this image quite disturbing. He scares me. But not as much as possums.
I put on his face and arms, and then used a bubble tea straw to simulate the spoon he would be holding on the real cake.

Hands make holding the spoon a tad easier for him. His little chef hat makes him official!


Here he is drying so he would have the proper body position for the cake. He no longer scares me. I think he is pretty dern cute now.
Here are 3 layers of cake iced with thickened ganache as I described in this post.
Here are the pot handles drying. An Aussie friend gave me the idea to use aquarium air tubing wrapped in fondant. I taped them down to the table so they would dry in the proper curve. I have no idea if that is food safe, so do some research before you do this.
ย 
Here I am working on the cheese and veggies, all made of fondant with tylose.

Cute little carrots.

Swiss and aged Gouda. Tee hee.
I wrapped the cake in white fondant, added the top trim and the handles, and then airbrushed it with copper luster dust. Buttercream makes the soup, with little fondant veggies sprinkled on top.
Despite using the straw to configure his arms, when I put the real spoon in the cake, I could not get it to line up with his hands correctly. After a few choice words, I just decided that he was shifting the spoon from one hand to the other, and my picture caught it mid-shift. Yep, I like that story.
I also chose to ignore the fact that he is walking on the soup more than he is standing on the edge of the pot. (Rat bastard.)
Sometimes things just don’t go as we plan, and we have to suck it up. I hate when that happens.
But overall, I was very pleased with the cake, and mom and daughter went crazy over it. Mission accomplished!
————————–
Here is a cake I did last weekend before going to Texas using the run sugar technique. Is this something you guys would like to see on DVD?
——————————
Back from Texas
I had a wonderful time in Texas last weekend. The DOS and classes were a blast! I love traveling to teach and meet cake people. Cake peeps are the best on earth!
Check out this cake Sandy in Texas made in my fish class. Hers came out better than mine. She is banned from any future classes with me.

Check out Sandy’s great cakes at: http://www.picturetrail.com/sandyscakes


ย  ย  ย  ย  ————————-

Topsy Turvy DVD
Todd and I are working on the finishing touches for Totally Topsy Turvy. It’s going to be close to 4 hours long. It will include a narrated slide show showing how to cut and serve a topsy, and also has some bloopers from the shoot! I love the music for this one; my favorite so far! Thank you for the pre-orders placed already. May 15 is the cut off to get the free recipes!
————————-
OK kids, back to my busy, crazy, wonderful life, and I will check in with you guys next week. This weekend is my 46th birthday, 24th wedding anniversary and Mother’s Day. I got me some serious eating to do!
Happy Mother’s day to you all! (Even if you do not have kids, you are still a mother to your cakes, so go celebrate!)
Sharon
http://www.sugaredproductions.com/


Daring Bakers: Cheescake

April 27, 2009 by Sharon Zambito 8 Comments

Finally!

After a couple of savory challenges, we are finally back to sweets for the Daring Bakers group! Now that’s what I’m talkin bout!

I know I have made no bake cheescakes before, but I do not recall if I have made a baked one from scratch. So if I can’t remember, it really means it has been to long to count anyway. This was a really easy, straightforward recipe that even the kitchen challenged like myself could do. And I am proud to say mine had no cracks on top! Zero. Nada. But I have no pictures to prove it, so you will have to take my word for it.
The April 2009 challenge is hosted by Jenny from Jenny Bakes. She has chosen Abbey’s Infamous Cheesecake as the challenge.

I dressed mine up with tinted coconut grass and a fondant bunny looking for his carrots. It was one of the desserts for our family Easter dinner.

It was tasty, but not the best cheesecake I have ever had. It was very creamy and mild in flavor. I like my cheesecake to have bit more twang to it. My piece was also very soft from sitting out for for a few hours. I think it would have been better cold from the fridge.


Abbey’s Infamous Cheesecake:

Crust:

2 cups / 180 g graham cracker crumbs

1 stick / 4 oz butter, melted

2 tbsp. / 24 g sugar

1 tsp. vanilla extract


Cheesecake:

3 sticks of cream cheese, 8 oz each (total of 24 oz) room temperature

1 cup / 210 g sugar

3 large eggs

1 cup / 8 oz heavy cream

1 tbsp. lemon juice

1 tbsp. vanilla extract (or the innards of a vanilla bean)

1 tbsp liqueur, optional, but choose what will work well with your cheesecake


DIRECTIONS:

1. Preheat oven to 350 degrees F (Gas Mark 4 = 180C = Moderate heat). Begin to boil a large pot of water for the water bath.

2. Mix together the crust ingredients and press into your preferred pan. You can press the crust just into the bottom, or up the sides of the pan too – baker’s choice. Set crust aside.

3. Combine cream cheese and sugar in the bowl of a stand-mixer (or in a large bowl if using a hand-mixer) and cream together until smooth. Add eggs, one at a time, fully incorporating each before adding the next. Make sure to scrape down the bowl in between each egg. Add heavy cream, vanilla, lemon juice, and alcohol and blend until smooth and creamy.

4. Pour batter into prepared crust and tap the pan on the counter a few times to bring all air bubbles to the surface. Place pan into a larger pan and pour boiling water into the larger pan until halfway up the side of the cheesecake pan. If cheesecake pan is not airtight, cover bottom securely with foil before adding water.

5. Bake 45 to 55 minutes, until it is almost done – this can be hard to judge, but you’re looking for the cake to hold together, but still have a lot of jiggle to it in the center. You don’t want it to be completely firm at this stage. Close the oven door, turn the heat off, and let rest in the cooling oven for one hour. This lets the cake finish cooking and cool down gently enough so that it won’t crack on the top. After one hour, remove cheesecake from oven and lift carefully out of water bath. Let it finish cooling on the counter, and then cover and put in the fridge to chill. Once fully chilled, it is ready to serve.


Pan note: The creator of this recipe used to use a spring form pan, but no matter how well she wrapped the thing in tin foil, water would always seep in and make the crust soggy. Now she uses one of those 1-use foil “casserole” shaped pans from the grocery store. They’re 8 or 9 inches wide and really deep, and best of all, water-tight. When it comes time to serve, just cut the foil away.


Prep notes: While the actual making of this cheesecake is a minimal time commitment, it does need to bake for almost an hour, cool in the oven for an hour, and chill overnight before it is served. Please plan accordingly!


Some variations from the recipe creator:

** Lavender-scented cheesecake w/ blueberries – heat the cup of heavy cream in the microwave or a saucepan until hot but not boiling. Add 2 tbsp of lavender flowers and stir. Let lavender steep in the cream for about 10-15 minutes, then strain the flowers out. Add strained cream to cheesecake batter as normal. Top with fresh blueberries, or make a quick stove top blueberry sauce (splash of orange juice, blueberries, a little bit of sugar, and a dash of cinnamon – cook until berries burst, then cool)


** Cafe au lait cheesecake with caramel – take 1/4 cup of the heavy cream and heat it in the microwave for a short amount of time until very hot. Add 1-2 tbsp. instant espresso or instant coffee; stir to dissolve. Add this to the remainder of cream and use as normal. Top cheesecake with homemade caramel sauce (I usually find one on the food network website – just make sure it has heavy cream in it. You can use store-bought in a pinch, but the flavor is just not the same since its usually just sugar and corn syrup with no dairy).


** Tropical โ€“ add about a half cup of chopped macadamias to the crust, then top the cake with a mango-raspberry-mandarin orange puree.


** Mexican Turtle – add a bar of melted dark chocolate (between 3 and 5 oz., to taste) to the batter, along with a teaspoon of cinnamon and a dash of cayenne pepper (about 1/8 tsp.). Top it with pecan halves and a homemade caramel sauce.


** Honey-cinnamon with port-pomegranate poached pears โ€“ replace 1/2 cup of the sugar with 1/2 cup of honey, add about a teaspoon or more (to taste) of cinnamon. Take 2 pears (any variety you like or whatever is in season), peeled and cored, and poach them in a boiling poaching liquid of port wine, pomegranate juice/seeds, a couple of “coins” of fresh ginger, a cinnamon stick, and about a 1/4 cup of sugar. Poach them until tender, then let cool. Strain the poaching liquid and simmer until reduced to a syrupy-glaze consistency, then cool. Thinly slice the cooled pears and fan them out atop the cooled cheesecake. Pour the cooled poaching syrup over the pears, then sprinkle the top with chopped walnuts and fresh pomegranate seeds.


Some variations from Jenny (from JennyBakes):

**Key lime – add zest from one lime to sugar before mixing with cream cheese. Substitute lemon juice, alcohol, and vanilla with key lime juice.


**Cheesecakelets – put in muffin tins, ramekins, or custard cups. Try baking 20-35 minutes, or until still a little jiggly, and cool as before.


Overall it was a very good and easy recipe and I would like to try some of the other variations in the future. If you make it, let me know how you like it. And check out the Daring Bakers’ blog roll to see what creations other members have come up with.

Happy baking!

Sharon
http://www.sugaredproductions.com/


How to make a 3D car cake

April 23, 2009 by Sharon Zambito 38 Comments

Hi Sugar Buddies!
I got back from the DOS in Winnie, Tx and boy did we have fun! Of course there was torrential rain and flooding while we were there. What is it with the severe weather everywhere I travel to? Maybe God is trying to tell me to stay my butt home? Nah.
So anyway, I am slamming busy this week , so I am pleased to present you with a guest entry from Karen in LA on her 3D car cake. Karen is a wonderful cake artist, and she does some really great 3D stuff.
Take it away Karen:
I usually try and find the original dimensions of a vehicle first. Then scale it down to where it will fit on a piece of paper (8×14).Then from there, I use a ruler to see the size of the tire space, space from bumper to start of tire, distance between tires then the distance between the back tire and the back bumper. Now I am able to get my dimensions for my board with holes inset for the tires to go up in. (I always do a paper template also in case someone needs one again!!!!)


Place the cakes on the board. Align the ‘car template’ up against the cake.
Then carve.
I do a lot of my details with icing build up instead of actually cutting into the cake, this makes it sooooo much easier! This isn’t a very good pic, but you can see what is taking place. I did smooth it more after this pic was taken also!!!
While the paint is drying, I fix my little boards that are gonna go under the cake. So when it’s dry, I place it on the ‘taped on both sides’ blocks so it doesn’t go anywhere!!!!!
Then on to the painted and window details. Windows were fondant covered with an edible image. Gradient fill. Nothing fancy!!! Outlined with airbrush black and silver dust.
From here it is all details which take the majority of the time. The wheels were gumpaste painted black also!!!!
Here it is moved over to the cake board getting all the detail work done.

And the finished product!!!

———————————-
Thank you Karen for that great tutorial! You rock! Below is a picture of the first car cake I made using Karen’s technique, but I used fondant. I was very happy with it!
—————————
You guys have a wonderful weekend and I will see you next week!
Happy caking!
Sharon
www.sugaredproductions.com

My Own Personal Cake Wrecks

April 17, 2009 by Sharon Zambito 14 Comments


I did not want to go away for the weekend and leave you guys on the heels of the negativity of yesterday’s post. Wendy is always telling me to work on having positive chi. Or maybe she said she likes chai tea. I am not sure. But anyway, in order to lighten my aura, and drive out the negative energy (and to calm down Janel Waters, tee hee)….I leave you with some very good news.


Take a look at these babies:

My first couple of attempts at a topsy turvy cake style. The fondant on the one above literally just slid down the side of the cake. I had a good 2 inches of fondant under those folds at the bottom.


Bulges galore, more saggy fondant. A total nightmare.
So what is the good news? Very soon I am going to teach you how not to do this. I promise. Because these cakes made me cry. And I do not want you to cry.
Ah yes, I feel better now. Much more chi-a-fied.
See ya next week kids!
Sharon

The Story of the Cherry Hog

April 14, 2009 by Sharon Zambito 27 Comments


Once upon a time there were 3 sisters that grew up in the city of New Orleans with their 2 older brothers and parents. They were not exactly poor, but things were very tight, as they were living on one modest accountant’s salary. Melba, the mom, knew how to make every penny stretch. She was very frugal. There were never any treats like candy, soda, chips, or cookies in the house. Those things were reserved for very special occasions.

Since vacations were out of the budget, the family would make day trips a few times a summer to a nearby state park. The kids would swim in the Bogafalaya river and play on the sandy beach. Melba would pack an ice chest and picnic basket and they would spend the day swimming, eating, and relaxing.

On one particular trip to the river, Melba really splurged and bought a bag of fresh cherries. Not a big bag, mind you. But this was still a really special treat for the kids to get such an extravagance.

So on this particular day, after lunch, the 2 youngest sisters, Sharon and Janice, decided to go for a nice long swim, anticipating their refreshing treat of cherries upon their return. They wanted to save them for the just the right moment, to enjoy them to their fullest. So after their nice swim in the river, they happily skipped back to the picnic table, excited about the luscious fruit that awaited them. But alas, to their dismay, they discovered that their older sister Barbara (aka the Cherry Hog) had eaten them all! All of them! All that was left was a bag of pits and stems.

Needless to say the 2 little sisters were disappointed….. no, devastated….. no, scarred for life! Despite years in therapy and reading many self help books, they have not been able to work through the trauma of this event. In this tragic story they did not live happily ever after. So needless to say, to this day they give Barbara grief about it any chance they can get.

—————————————-


Last week, when the whole family was invited to a friend’s house on the bayou for a Good Friday seafood boil, they took the opportunity to also celebrate Barbara’s birthday.


And here is the Cherry Hog’s birthday cake.


CH with her cake. She loved it.


ย  ย  ย  ย  ย  ย  ย  ย  ย  ย  ย  ย  Sharon and CH.


Sharon, CH and Janice.


Seafood boil of crabs , crawfish, potatoes, corn and more!


And fresh boiled shrimp! It was so yummy!


J-Man got to drive the boat!


Cherry Hog and her nephew D.


The cake was yummy and enjoyed by all. We had a wonderful day of boating, eating, and playing board games.
 
Note: Cherry Hog claims to have no memory of this event ever happening. Classic case of denial, if you ask me.


—————————————


HOW TO MAKE CHERRY HOG’S CAKE:
ย 

 
My BFF Heather gave me the great idea of using Styrofoam as the base of the cake. I used an 8 inch ball and cut it a little shorter than in half. I cut a flat bottom so it would stand up, and I used another piece of styro as “sand paper” to shape the bottom half of the cherry. (I learned that trick in a Collette Peter’s demo.)


Then I sharpened wooden dowels and drove them thru the styro and into the cake drum base for stability. I used 3, but in retrospect I could have done with just 2.


I then attached a circle of parchment paper to the top of the styro with buttercream to form a barrier with the cake.


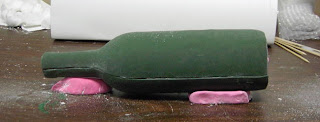
First layer of cake in place.


I put a ball of modeling chocolate down in the hole to serve as the pit. Tee hee. Then I plugged the hole with the cake from the heating core.


Second layer of cake in place.


Carved to a cherry shape with a sharp knife. I intentionally went with a somewhat asymmetrical look, because real cherries are not perfectly round. Also makes the carving easier; I love that!


Then I applied a basecoat of thickened ganache over the whole thing. The ganache is 2 parts semi sweet chocolate to one part heavy cream. You let it cool to a thick paste consistency and then apply it just like a buttercream coat with a hot spatula. It firms up to make a nice chocolate shell; a wonderful surface on which to apply your fondant.


I smeared the whole cake with piping gel and then applied red fondant. I used a wad of fondant cupped in my hand in lieu of fondant smoothers. This works great on round and curved shapes.
I then gave the whole cake a liberal rubdown with everclear alcohol to get the excess cornstarch off before airbrushing. What??? No Crisco? I know what you are thinking. Sharon rubs down everything with Crisco! Yes, this is true, but not in the case of airbrushing. That will cause the airbrush color to not go on smoothly and you might get blotching.


After the everclear dried (took about 2 minutes) , I gave it several coats of red color. Let the coats dry in between or you will get pooling and dripping of color. Here it is still wet with color. (And I am still blowing red snot a week later.)


One more coat of color and dried.


I made the stem by wrapping several 18 gauge floral wires with brown floral tape and then airbrushed brown and green over that. I just stuck the stem down thru the center of the cake and down into the base of the styro. Note: This is not food safe, but it was for Cherry Hog so I did not care. The proper thing to do would have been to coat the part of the stem going down into the cake with chocolate and dried before inserting.


I made the beach chair with the cutter set here. I cut the pieces from white gumpaste. After fully dried I painted them with brown airbrush color mixed with everclear to make the wood look. The seat of the chair is white gumpaste. Ain’t it cute?? I love this chair! The sand is Domino’s brownulated sugar from the grocery store.


It was a lot of fun making this cake! This is when I love caking the most. A fun, challenging cake that has a special story to go with it.


Now you all go make one for your favorite Cherry Hog!


Happy Hogging!
Sharon
http://www.sugaredproductions.com/


PS. Remember you can click on the photos for a larger view.


Santa Dropped His Drawers

February 11, 2009 by Sharon Zambito 10 Comments

Ouch. That hadda hurt.
Remember my guy I made in the Bronwen Weber class? Well I loved him so much I did not have the heart to disassemble him. Since November he has gotten more saggy and a little leaky. But this is what I found this morning when I got up. Before I had my coffee too.
Rest in peace dude. I will miss you.

Making a Gumpaste Wine Bottle

February 4, 2009 by Sharon Zambito 14 Comments

Hey Sugar Friends! I promised you a post before I left to go teach a class in Kentucky this weekend. I pulled up these very old, very craptastic photos to put together a little tutorial for you. (I can’t spoil you guys with always posting my fabulous foody photos with my new awesome lens, now can I?)
I colored my gumpaste VERY dark green, but be advised it takes a lot longer to dry when you do that. I had to let each piece dry 2.5-3 days before I could assemble it. That was using the Nic Lodge gumpaste recipe. The one you see in this pic was Satin Ice gumpaste and it stayed soft. So I recommend the Nic Lodge recipe or using white gumpaste and coloring it after the bottle is dry.
HEAVILY dust the underside of your rolled out gumpaste; lay on top of a real bottle and cut out the top half. The pink fondant is just shoved under there to keep the bottle from rolling. Let that dry fully ( 2-3 days in this case.)

Then flip that all over, so the dry half is now on the bottom of bottle, and cut out the other half on top, using the dry piece as a guide to cut your seem so they match . The bottle I really used for the cake was a cleaner cut than shown in this pic. Let that dry fully.(2-3 days)

When both pieces are nice and hard, then you cut a strip of GP or fondant, moisten it, and attach to the inside rim of the GP bottle as shown. Do this on both sides of the bottle. Then place the two pieces in place together. Use your fingers and a long dowel or skewer to go up inside the bottom hole to press the wet strip to the insides of the bottle to secure it well. Let that dry a while. Then I gave the whole bottle a rub down with Crisco and wiped off the excess to get rid of cornstarch residue. I spackled the side seams with matching buttercream (or royal). Cut a round disc for the bottom and just adhere with water. After the Crisco all absorbed in, I gave it a good spraying of edible lacquer.

I used candy foil for the neck of the bottle. I ended up having to use real paper for the labels because the piping gel was showing thru the edible images. That’s it I think!

Hope you get a chance to try them, they are fun!
So now I am going to brave the freezing cold, ice storm and power outage to get to my class in Kentucky. I am like the Postman; nothing will keep me from my students! I will check in with you guys next week when I get back!

Happy caking,
Sharon
www.sugaredproductions.com


New Orleans Doberge Cake

January 7, 2009 by Sharon Zambito 21 Comments

What is Doberge, you say? You look it up in a french dictionary and the word is not there. How do you pronounce it? (I say dough-bearj; some say dough-bosh or dough-boj.)
Doberge cake is an iconic staple of living in New Orleans. It is a yummy multi-layered cake with pastry cream inside and a poured glaze on the outside. You can order one for yourself here:

Traditional flavors are chocolate, lemon and caramel. But how did this deliciously delicate delight come to be? I did a little research and learned a few things myself.

Back in the 1930’s there was a New Orleans woman named Beulah Ledner, who came from a baking family in Germany. She started baking during the Depression to supplement the income from her husband’s furniture business. Experimenting in her kitchen, she came up with a variation on the famed Hungarian-Austrian dobos torta, which was thin layers of sponge cake filled with butter cream. She changed that to thin layers of butter cake with a custard filling, either chocolate or lemon.
This was a cake that was subtly rich and lighter than the original, and better suited to the New Orleans climate. But its inventor recognized that “dobos” wouldn’t fly in New Orleans. She thought it should be “Frenchified” to fit the city’s style. And so the name “doberge” was born.
The business was first known as Mrs. Charles Ledner Bakery and was based in her home. Eventually she moved to a store front. A heart attack caused Beulah Ledner to sell the bakery, the name and the recipes to the Joe Gambino family in 1946. The agreement forbade her from operating another bakery in Orleans Parish for five years. But she could not stay away, and 2 years later opened another business in a neighboring parish (ie county) called Beulah Ledner Bakery. Beulah Ledner worked until she was 87 and sold Beulah Ledner Bakery in 1981. She died at 93, her culinary legacy intact.

Gambino’s Bakery is another icon of New Orleans, more famous for the doberge cake than Beulah. Many think that it originated there, but now we know better!

No one knows the original recipe except for Gambino’s , but here is a recipe we found on the Internet that my best friend Heather has made with good success. The only difference is that an authentic doberge cake has a poured glaze icing, not a spread on one:

CHOCOLATE DOBERGE CAKE

CAKE:

2 cups cake flour sifted
1 teaspoon baking soda
1 teaspoon salt
10 tablespoons butter
1-1/2 cups sugar
3 eggs separated whites beaten until stiff
1 cup buttermilk
2 squares unsweetened chocolate melted
1-1/4 teaspoons vanilla
1 teaspoon almond extract


FILLING:

2-1/2 cups evaporated milk
2 squares semisweet chocolate
1-1/4 cups granulated sugar
5 tablespoons flour
4 egg yolks
2 tablespoons butter
1-1/4 teaspoon vanilla
1/4 teaspoon almond extract


FROSTING:

3 cups sugar
1 cup evaporated milk
2 ounces bittersweet or unsweetened chocolate
4 tablespoons butter
1 teaspoon vanilla


DIRECTIONS:

Preheat oven to 300.
Grease and flour 2 round cake pans.
In a medium bowl sift flour, soda and salt 3 times.
Cream margarine and sugar in a large mixing bowl then add egg yolks one at a time.
Gradually alternate adding the flour mixture and buttermilk then add chocolate and mix well by beating about 3 minutes.
Fold in the three beaten egg whites, vanilla and almond extract.
Bake 45 minutes.
Allow cake to completely cool then split each layer into thirds to make six thin layers.
Put milk and chocolate in a saucepan and heat until chocolate is melted.
In a bowl combine sugar and flour.
Make a paste by adding hot milk chocolate by tablespoons to the sugar and flour and then return to saucepan.
Stir over medium heat until thick.
Add 4 egg yolks all at once and stir rapidly to completely blend.
Cook 3 minutes longer.
Remove from heat then and add butter, vanilla and almond extract.
Cool and spread on cake layering as you go.
Do not spread on top layer.
Combine sugar and milk in a heavy saucepan and bring to a boil stirring constantly.
Reduce heat and simmer 6 minutes without stirring.
Remove from heat and blend in chocolate.
Add butter and vanilla and return to medium low heat cooking 2 minutes.
Place in refrigerator to cool.
Beat well and then spread on top and sides of the cake.

——————————————————-

Now, we all know I am a fan of short cuts. Don’t get me wrong, taste is critically important to me, but if I can find a way to get excellent results with a little less work, I am all over that. So in my laziness, um, I mean, thriftiness, I have created a “doctored” version that Heather teasingly calls my Faux-berge cake.

Sharon’s Fauxberge Chocolate Cake
2 layers of your favorite doctored cake recipe in white or yellow
Jello pudding cups premade chocolate pudding
Chocolate buttercream icing
Chocolate ganache
Torte each cake layer into 3 thinner layers. Spread a thin layer of pudding in between each layer. (Premade cups have a better consistency than making the pudding in the box.) And it’s easier!! MWAHAHAHA.

Here are the 6 layers of cake on a 1/2 inch fomecore board. You will need to cover the fomecore with something appropriate to make it food safe. This was for family so I threw caution to the wind.


Ice to the edge of the fomecore with a layer of chocolate buttercream and chill in fridge until firm.


Now this next step is NOT necessary and I usually do not do it. However, this puppy was a huge 15 inch cake and rather unstable. So I gave it a coating of thick ganache (made with a 2:1 ratio of chocolate to cream.) You let the ganache thicken to a paste consistency and ice the cake with your spatula and bench scraper just like you do for buttercream. It sets up nice and firm to give you a stable chocolate “shell” encasing the layers. That top ledge of chocolate you can see in the picture was removed with my palette knife after the cake was fully chilled, but before I poured the thinner ganache layer on top.


Wanna see something scary?…………………….


Here is my ganache pouring set up. (Pretend you don’t see that pile of laundry on the chair, kay?) From bottom to top: cookie sheet lined with foil, fondant bucket wrapped in plastic wrap for food safety, piece of non skid stuff, cooling rack, piece of non-skid, and chilled cake on its fomecore board. When the iced cake is fully chilled, then you pour the final ganache coating on. That’s a LOT of ganache for this huge a$$ cake! My friend Jacque has a great tutorial on how to pour ganache on her fabulous blog Daisy Lane Cakes. Thanks Jacque, you rock!


OK, wanna see something even more scary?………………….

Moving that huge cake with wet ganache into the lowest shelf of my fridge where it barely fits without messing it up! Stress! I need a drink.


I let that ganache firm up overnight. Next day I took it out the fridge (fairly easy now that it is firm) and placed it on the display board, piped a border and placed the edible photo on top. This was for my sister in law’s dad’s 85th birthday bash. Everyone went nuts over this cake, in both looks and taste. I was even told it was better than Gambino’s! Shhh, don’t tell I cheated.


And here is a picture of the cake after serving. This photo was taken with D’s cell phone. Don’t think we’ll be getting any blog awards with this one! LOL


So there you have it, class. Your lesson on the New Orleans Doberge cake. Your assignment is to go make one of these beauties and tell me how you like it! Enjoy!

Sharon
http://www.sugaredproductions.com/
  • « Previous Page
  • 1
  • …
  • 7
  • 8
  • 9
  • 10
  • Next Page »

Sharon Zambito

Sharon Zambito

An RN turned SAHM turned cake maniac. Owner of SugarEd Productions Online School. Join me for some caking, baking, and all around sweet fun :)

Follow me..

  • Facebook
  • Instagram
  • Pinterest
  • YouTube

Pinterest

  • Autumn House Two Trees Machine Embroidery Design โ€“ Blasto Stitch
    Autumn House Two Trees Machine Embroidery Design โ€“ Blasto Stitch
  • Embroider  Sew :: Jelly Roll Purses - Embroidery Garden In the Hoop Machine Embroidery Designs
    Embroider Sew :: Jelly Roll Purses - Embroidery Garden In the Hoop Machine Embroidery Designs
  • (1) How to QUICKLY & SAFELY remove acrylic, gel, and dip powder polish | BAGGY METHOD - SO EASY! - YouTube
    (1) How to QUICKLY & SAFELY remove acrylic, gel, and dip powder polish | BAGGY METHOD - SO EASY! - YouTube
  • (1) Bouffant Surgical Cap - YouTube
    (1) Bouffant Surgical Cap - YouTube
Follow Me on Pinterest

Follow Me on Instagram

Instagram requires authorization to view a user profile. Use autorized account in widget settings

Recent Posts

  • Egg Safety Basics
  • Stable Mabel Support System Sale
  • Guest Post : 4 Vegan Cake Recipes No One Should Miss Out On!

Popular Posts

  • Ways To Make Your Cake Fluffy And Moist
  • How To Stencil on Cookies with Royal Icing
  • Doctored Cake Mix Recipes
  • Transferring an Image Without a Projector
  • All About Buttercream!
  • How to Fix Broken Ganache
  • Edible vs Non Toxic Gold Dusts

Categories

Search

Archives

Copyright © 2025 · Sharon Zambito and SugarEd Productions,LLC

Copyright © 2025 ยท Evangeline Theme on Genesis Framework ยท WordPress ยท Log in