Here is one side piece in place and the top edge trimmed flush with the top of the cake.
And here is the finished product:
Here is one side piece in place and the top edge trimmed flush with the top of the cake.
And here is the finished product:
My dear friend Kim linked me to a cake by another artist that was the perfect inspiration for the wave scene. Thank you Kim! You saved my booty!
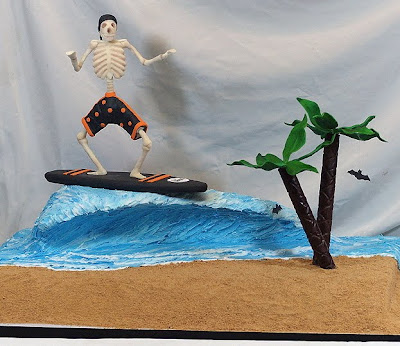
It was sturdy enough to hold the weight of the modeling chocolate. When I formed him out of the wire, I left about 5 inches of extra wire below the feet, which went down into the dummy while I made him. That extra wire later went thru the surf board and down into the wave to anchor him in place.
I then molded the modeling chocolate around the wires to form his body parts. After he was firm, I used petal dusts to give him some creepy color.
The surf board was cut from thin Styrofoam. I printed out a paper template of the board using clip art. You see the reject skeleton lying there because I used him to help determine the size of the surfboard.
The episode where I am one of 3 assistants to Rebecca Sutterby will air on October 5, 2009 at 10 PM EST on the TLC network.
I printed out several pictures of dog figurines too help me do mine. First I did the basic body shape with indentations where the legs and arms will attach. I scored it up with a metal tool to give it some fur texture.
Then I added the hind legs and one front leg. Every piece starts as either a ball or a sausage, and then you refine the shape from there.
And here is how I spent my Sunday:
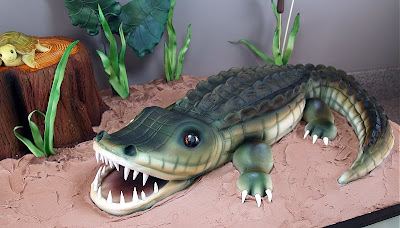
This past weekend Dena Bryngelson and I taught our Swamp Thing class here in New Orleans. And boy did we have fun!
No seriously, I am not kidding. It was that fun.
This is Kim D, another home grown gal. Doesn’t she just look like a nice person? Well, she’s not.
This is Chae, another loyal student. She has the cutest Cajun accent. Here her gator has his crumb coat and awaits his skin.
Here is a little video of some of the class action. This video proves that I certainly need to keep my day job.
Ok,Ok, I confess I doctored the photo.
Saturday night after class Dena and I slept at my mother in law’s house because she lives very close to the classroom. (My house is an hour away.) After class a large group of us went out for a nice leisurely dinner. By the time we got back to the house it was after 10 PM and we were really pooped.
So my alarm goes off, and I get up to check on Dena. She is in the shower already. Check.
That is the last thing I remember, up until the point that Dena comes into my room . “Sharon , Sharon? Didn’t you want to leave at 8:30?” I hear her saying thru my slumber.
I sit bolt up in the bed. “What? What? What time is it?”
“8:45”
“What? really? OMG how did that happen? I must have fallen back asleep! Shit! Class starts at 9 am! The students are probably already there! Crap!”
So I jump up still half asleep and started grabbing clothes and toothbrush and God knows what else out of my bag, and run around in circles in the room getting nothing accomplished. I cannot think. I am panicked. I cannot believe I did this. I am never late for my classes. Ever. I am very punctual and responsible. OMG. OMG.
It was the bed’s fault! That damned evil magical power sleep fairy dust bed! It must have cast a spell on me and sucked me back into its vortex via a transcendent gravitational force field. Dang mother in law and her perfect bed.
Dena, being the voice of reason, as well as being perfectly made up, cute and perky (I coulda decked her), suggested that she go ahead on to the classroom and get the students started while waiting for me to come. (We did have 2 cars, thank goodness.) So she went on ahead and I went into overdrive. In less than 15 minutes I was dressed, hair pulled up, slapped some make up on, brushed my teeth and threw on my wrinkled clothes and was out the door, blowing MIL a kiss goodbye as the wind I created rushing past her nearly knocked her 4 foot 6 inch body down onto the sofa. Driving well over the speed limit and taking turns on 2 wheels (not really), I made it to class just 18 minutes past 9. I got a round of applause when I walked in. Funny ladies.
And that is why I look like I do in that picture. As you can see, it was by no fault of my own. It was that evil magical bed. Yep.
While I am working on my blog post about our trip, feast your eyes on some of these incredible creations. These are all cakes made by attendees, in the cake display room. They come from all over the world, and the work there is just astounding! This is just a tiny sampling of what was there. Enjoy!
By the same artist as hamburger cake; she was from Argentina.
I am so gunna steal, er….borrow, that applique and lace motif.
Love this.
Owen and his wife, Cathy, are two of our very best friends in the entire world. We are in-laws (twice removed), but our kids think they are cousins. We have been “family” for over 20 years, and celebrate every major holiday and life event together. Our families are very close, and I cannot imagine my life without them in it.
Well, Owen turned 50 this year, and Cathy planned a huge surprise party for him. (Why I had to keep the cake secret because he might read here from time to time.) So when Cathy asked me to make the cake, I said of course! At first I thought I might just do a huge flat cake in a more simple design. But that didn’t last too long. The idea came to me late one night while I was sleeping, I think. I don’t remember exactly when it came to me, but as soon as it did, I knew I was in trouble. I knew it would be a challenge. Going places I had not gone in cake before. But just like all the other crazy ideas I get, I knew I had to try. I could not talk myself out of it. It became an obsession. It consumed my every waking thought for the better part of 2 weeks.
My idea was to incorporate a picture of Owen and Reagan side by side that I photo shopped into the cake. But not just a boring ole picture on the cake. No, not on my cake. It has to move! It has to pop up and down! It has to pop up and down on the lid of an Uncle Sam hat! Yes, that’s it! Perfect! Awesome!
Now how in the heck was I going to do that? I didn’t have one iota of an idea how to go about doing that. But I know someone who does! There was only one person to call in for back-up on this one…. my brother Michael. Michael is a genius (literally), an engineer, and he is a guru at all things mechanical, electrical and technological. He started taking things apart and rebuilding them when he was a little kid. He had a “lab” under our house growing up with all kinds of gadgets and goodies down there. ( He set boobie traps so my sisters and I could not get into it and mess it up, LOL.)
But Mike has always been my hero. When my other siblings were torturing me and making my life a living hell, he was always sweet and nice to me. If I had a broken toy or mechanical doll, I would go crying to him, and I knew he could always make it work again. And he always did. He always made it work. He is a friggin’ genius. And my hero. And the nicest, sweetest guy on earth. So of course, he was happy to help me with my ambitious project.
So I tell Mike what I am trying to accomplish, and while he thought about what we needed to get to make this work, I got started on the cylinder of the hat so it would have ample time to dry:
Then I covered the dummy with parchment paper, and wrapped it with gumpaste to form the hat cylinder. I used the exact same process I use when I make my gumpaste crowns. I let that sit for 2 or 3 days to firm up before I slid the gumpaste off the dummy. After I slid it off, I let it dry about a week before I touched it again.
The top of the hat was one single cake cardboard covered on one side with red fondant. I needed to keep the lid as light as possible, because we did not know how much weight the motor would be able to handle.
The cylinder was glued to the hat brim with some chocolate on the inside.
You can also see in these photos that the gumpaste cylinder did wrinkle some over the 1.5 weeks it was drying. I assume it was from the sheer height and weight of it. Gravity just taking its toll. It was purely cosmetic, and did not affect its stability. I felt confident I would be able to cover all that when I decorated it. (Well, I hoped, anyway…)
We needed a very sturdy way to hinge the lid to the cylinder, so Mike put a strip of fomecore down the back of the hat. We glued it on with chocolate, and cut a hole in the bottom so the electrical wire for the motor could come out the back, later to be attached to the power supply. The hinge was attached to the fomecore with epoxy glue. (Really strong stuff!)
So what were we going to use to motorize this thing? I of course did not have a flipping clue. I had explained to Mike what I wanted to do, and he found two hobby motors on Amazon that he thought might work. He wasn’t sure though, as there was not enough info in the product description for him to really know. We would not know until they came in: their size, if they were strong enough, would the gears have the proper height rotation, and their speed. Would they be too weak? Too fast? Too slow? I ordered them right away, and it was an absolutely excruciating week waiting for them to come in. Not knowing the fate of my idea! It was torture! I really wanted this cake to work, not just for myself and meeting the challenge, but I really wanted it to be special for Owen.
So the motors finally come in, and I open the boxes to find about 800 little plastic pieces in a bag. Ack! Obviously it was a model kit, and needed to be assembled. I rushed over to Mike’s to deliver them so he could get started on assembly, and we made a date for him to cover over the next day to see how this was all going to work (or not.) Needless to say, I did not sleep that night. (again.)
So Mike came over the next day (and the next 2 days after that) to get this hat working. We glued fomecore to the hat brim to prop the motor up to the right height. Everything was glued down with melted chocolate and masking tape to get it as secure as possible. The wire ran from the motor, out the back of the hat, to the power source.
Mike attached an eye hook to the underside of the lid. Then I was able to glue on the photo. A thick copper wire went from the motor gear to the lid. As the motor ran, the gear would turn, making the wire go up and down. (We hoped!) The electrical thing on the left is his power supply unit he brought over to give it juice. Did it work? Did we fail? You will have to wait to find out….
In the midst of all of this I had even another idea. (Yes, a dangerous thing.) Wouldn’t it be cool if I could incorporate some audio into the cake of Reagan wishing Owen a happy birthday? Oh yeah, that would be awesome! Surely there has to be a way to do that! Some hidden speakers or something. But the bigger problem was getting audio of Reagan’s voice saying happy birthday. No way would I find that anywhere. Maybe I knew someone who could do an impersonation and record that. I really didn’t have much hope that this would come to fruition, but it was a cool idea anyway.
So one evening, on a whim, I decided to do an internet search. Just to see what was out there. So I googled “Reagan audio saying happy birthday”……. and to my utter amazement, within 5 minutes I found it! An audio file from 1968 of Ronald Reagan wishing a newspaper mogul a happy 90th birthday. I jumped out my chair and howled with excitement! This was just what I needed! I could not believe I found it! It was surely a sign from God. This cake had to be made. I had to press on. I hadto make it work!
I did not want the mp3 player justhanging out on the cake board, so I built a little box to cover it out of fondant with tylose added. I made a hole in the cake board, and threaded the speaker wires under the cake board so they could not be seen. I made a small hole in the box right over the “play” button of the mp3 player. I put a large silver dragee into that hole, so when you pressed it, the “play” button was activated, and the audio played. It was too stinkin’ cool! I listened to it over and over, and got a huge chuckle each time. (Lordy, I have no life.)
The 50 was made from fondant with tylose added, and dried super firm. I made another disc of fondant with a hole cut out the center to let the light shine through from the rotating stand. The 50 was super-glued onto the white disc. The rotating, light up cake topper is made by Wilton, and battery operated. It was perfect for this use!
To support the hat, I used a stress free ring support with long legs. The legs went down into the blue tier (which was a single layer 13 inch round, filled), and extended above the cake to the desired height. Wilton plastic columns slipped right over the stress free legs to give the perfect presidential look to the cake!
Here is the cake set up at the party. Did everything work? Was it a success? Did Owen like it?
You can also view the video here.
So as you can see, much to my amazement and sheer jubilation, it all worked out and Owen loved it! He just went on and on about how incredible it was, and how much he loved it. It was also a huge hit with all the guests at the party. They could not believe it was a real cake. Everyone that knows Owen got a huge laugh out of it, because it was such a funny and appropriate theme for him.
I am tickled pink that my idea came to life, even though it was very nerve wracking! I could not have done it without my incredible brother Mike. The motor and all the electrical stuff was done by him. I felt bad that he got sucked into my black hole of craziness, but he said he enjoyed the project. And I believe him; he lives for this kind stuff!
The cake was fun, the party was fun, working with Mike was fun. I have such a great life. I am truly blessed.
——————————–
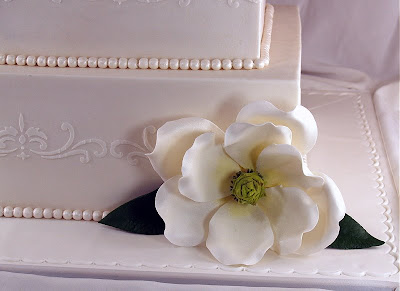
Turn the paste over so the center vein is up, and cut out the petal.
Thin the edges with a ball tool.
I remember my own first communion very well. It was such a big milestone in our young lives. I think we were in the first grade. I was so excited to finally be able to receive the Host. The pretty white dress and veil was such a treat to have in our modest lifestyle. I remember we practiced as a class in the church several times for the ceremony. Where to sit, how to file up to the front, when to approach the kneeler, when to kneel, when to stand. On the very last practice day they even served us unconsecrated hosts, so we could practice accepting it on our tongues (there was no hand communion back then), and to get a feel for its taste and consistency. That day I was SO excited. I mean SUPER excited that we were getting a real host. Of course, as per the curse of those whose last names start with a Z (yes, my maiden name started with a Z too), I was the last one. Last pew, last seat, last in line. I was so very worried that they would run out of hosts before I got up there. As the line moved forward I was just praying… please don’t run out… please don’t run out. Of course they ran out. Story of my life. Another emotional scar I have had to overcome. To this day I practically run out of my pew, knocking people over, to get in line at communion time cuz I am afraid they are going to run out.
But I digress. Let me share with you some of the cakes I made this year:
This one was for a male, and the mom wanted it to be classic, elegant, simple, but no way feminine. No flowers, no colors. This one I iced in white buttercream. I used the diamond impression mat on the sides and put small candy pearls at the intersections.
The same stencil was used with luster dust on the drape and knot. The cross was cut out from fondant with gumpaste, and allowed to dry firm. Later, 4mm pearls were attached to the edge, and the whole thing was airbrushed with super pearl dust after I applied the monogram initial.
—————————
This cake was made for sweet little Elizabeth, a close family friend. Lizzy designed her entire cake from start to finish. This was the first custom cake she had ever had, and she was super excited. I did exactly as she instructed me to.
The cake was iced in white buttercream. 8 mm pearls were used for the borders. Satin ribbon was applied around the tiers, and the monogram was printed on an edible icing sheet and backed with fondant.
The cross was cut from fondant, piped with royal, and airbrushed with super pearl. All the flowers were made from gumpaste using this set.
My hubby delivered the cake, and said she was absolutely thrilled and overjoyed with her cake. She and her cousins and sisters were oogling over it, and they even ate the flowers!
Look at this sweet note she wrote me the next week. Just melts my heart:
—————————–
Here is another one for a young man. He also specified “very simple and nothing girly”. Those boys are very concerned that their cakes be masculine! LOL
Also iced in white buttercream. The lighting makes the cake look as if it is two tone, but it was not. The shaped plaque was molded white chocolate. The chalice and Host were made with a chocolate mold from fondant with tylose, dried and then painted.
Mine did not do the original justice, but Eva was happy. Here are some progress photos:
I baked a single layer sheet cake and cut large pieces to fit under my cross template, made from card stock.