Easter Egg Basket Cake
Here are some eggs fresh out of the molds. Oh no!! Look at those ugly seems! What shall we do?? No worries, we can clean that up easily.
I think I might even like it better than the first version. Whew, so glad that worked out, because who ever heard of an Easter basket with no handles?
So all is well that ends well! I hope you guys give this basket technique a try. I would suggest using a lot of tylose or gumpaste in your handle, and give it at least a week to dry if not longer. Or possibly even form it over very sturdy wire that can provide some support. I have made large handles using this method many times with success; I think this time it had not dried long/hard enough.
Oh and make TWO of everything!
Happy Caking Everyone!
Sharon
http://www.sugaredproductions.com/
Sugar Free Yule Log
Christmas 2009 is near, and as always, I am assigned the task of providing a sugar-free dessert for my family on Christmas Day. Having done this for quite a few years now, and being easily bored, I am once again looking for something new and different; the same old apple and pumpkin pies seem so ordinary. (Although I do have a fabulous recipe for sugar-free apple pie that I may share with you in a future blog.) But Christmas seems to call for something a little more special, a little more decorative, a little more elegant. And as it usually turns out – a little more of a pain in the patootie.
As the festive season draws nigh, I begin to ponder how I will top last year’s spectacular creation, and I ask my sister Sharon, who you all know and love, to suggest something impressive and “bloggable.” She emails me a recipe for a Buche de Noel, or Yule Log. “What do you think about this?” I ask Pepper Marie. “It looks pretty difficult but I think I can adapt the recipe to sugar-free.” Pepper Marie is my 16-year old Pomeranian, and she helps me do everything. I seek her opinion in all things, great and small, and never make a move without her. She is to me as Wendy is to Sharon. Pepper Marie says that I should scrap the whole cake idea and serve a rotisserie chicken instead. “Chicken for dessert?” I ask. “Sounds like a winner to me!” she says. (Every year, her Christmas wish list is the same: a rotisserie chicken, whole, and no sharing, please.)
There are many theories about the origin of this decorative holiday dessert, but it seems clear that the Buche de Noel dates back to the time of Napoleon. One legend has it that Napoleon issued a decree that on the coldest nights, the peasants had to keep their chimneys closed to keep the cold air from coming in. (What a control freak!) That meant that the fireplaces could not be lit, so the patisseries (French bakeries) made these cakes in the shape of logs, and it became a French tradition. My question is how did they make these cakes if the fireplaces could not be lit? They didn’t have electric ovens back then, did they?
Be that as it may, since I am planning a trip to France in May/June of 2010, I think this is the perfect selection for this year’s confection. Since it’s going to be sugar-free, I guess I will call it my Buche de Noel sans Sucre. So on Christmas Eve, I take the day off, and right after breakfast (oatmeal for me, chicken for Pepper Marie), I pop my trustee IPOD into the dock, hit the shuffle, and as Pink declares that it is time to “Get the Party Started,” Pepper Marie and I begin this year’s culinary creation.
The Buche de Noel sans Sucre consists of four parts: the cake, the filling, the icing and the decorations. As Fats begins “Walkin’ To New Orleans,” Pepper Marie and I begin to assemble our ingredients for the first part – the cake:
Ingredients:
Three large eggs
Three tbs sugar-free strawberry jam
150g (5 oz) cocoa powder
A few squares of very dark, high cocoa content chocolate (I bought mine at Whole Foods)
One tsp cornflour
200g (7 oz) raspberries
300ml whipping cream (I used sugar-free Cool Whip)
The recipe says to start by preheating the oven to 375 degrees. That seems high to me, so I set it to 350. I grease a standard oblong fudge tin (or jelly roll pan), and separate the eggs. In one bowl, I whisk the egg yolks and two tablespoons of the sugar-free strawberry jam. Kenny is begging Ruby not to take her love to town, as I sieve the cocoa powder and cornflour and gently stir in. The recipe does not say to add water, but the batter seems very dry to me, so I add some water. “Tootsie Roll, does this look right to you?” I ask Pepper Marie. She sniffs it and says, “I think it needs some chicken broth.”
I place the egg whites in another bowl and beat with a mixer on high speed until they form stiff peaks. I slowly fold the egg white mixture into the chocolaty batter, spoon into the greased tin and place in the oven for about 15 minutes or until firm. I remove and allow to cool.
I wash and hull and the raspberries while Sting pleads with Roxanne not to put on the red light. I place the raspberries in a food processor and puree, adding a little Splenda to sweeten them just a tad.
I stir the pureed raspberries into the cream one-quarter at a time and it turns a beautiful pink shade. Of course, at this point, I cannot resist a little taste. That’s the best part about making sugar-free desserts – I get to taste!
The Village People extol the benefits of joining the YMCA as I sprinkle some cocoa powder onto a clean surface (I use a clean, smooth dish towel, but I imagine you can use parchment paper just as well). I carefully remove the sponge from the tin and lay it on the cocoa, and spread the remaining sugar-free jam all over the sponge.
I then spoon the raspberry cream on and spread.
Now, the hardest part about making a Yule Log is getting the cake light and spongy enough to roll it up without cracking. Remember before when I said I thought the batter was too dry so I added water? I now believe I did not add quite enough. I am not a baker, however. I am a legal assistant. I can e-file a brief with the Federal court, set up a corporate deposition, and arrange a multi-party international conference call, all at the same time and in the blink of an eye. But make a judgment call about what looks right and what doesn’t when baking? Well, that is just not my area of expertise. “I think it needed more liquid,” I tell Pepper Marie. “It’s not too late to go with the chicken idea,” she says. “I may regret not taking your advice,” I say as I roll up the sponge. To my dismay, it cracked substantially upon rolling. “OMG!” I say. “I hope the icing covers this mess up.” “This baking stuff is too stressful,” says Pepper Marie. “I need a little nap.”
It’s time for me to get ready for church anyway. So I go get dressed, and as I am about to leave, My Special Angel is playing on the IPOD. “How appropriate,” I think to myself as I pause and take a long look at my Sweetie sleeping like a little angel. She is getting very old. I will say a special prayer for my own Special Angel at church tonight.
When I return, Pepper Marie and I are both refreshed – she physically, and I spiritually – and we are both ready for some victuals and libations. So I fix her some dinner (yes, this involves chicken), and mix myself a martini. Grey Goose, up and dirty, with two olives! Ahhh, this is good!
Now it is time to get back to work. This cake is taking longer than I thought it would. As I begin to assemble the ingredients for the icing, Prince is partying like it’s 1999. “He’s been partying for ten years now! He’s going to have a heck of a hangover!” I tell Pepper Marie, but she is too busy scarfing down chicken to worry about Prince.
The recipe I use for the icing comes from one of my diabetic cookbooks, and I must tell you that I do not love it. It is made with chocolate and butter, and that’s what it tastes like – butter. There is no cream in the buttercream, if you know what I mean. It calls for a substantial amount of salt which common sense should tell me is a flaw in the recipe, and maybe if I baked more often this would register with me. But like I said before, I am no Sharon Zambito. I make the first batch and it tastes incredibly salty. Now I am getting stressed again! “I knew that was too much salt!” I say. Pepper suggests that it would actually taste pretty good on top of some chicken. Once again, she’s probably right, but I am not to be defeated. I draw strength from Gloria’s assurances that I Will Survive. (Well, that and the martini.) “I will survive this cake,” I say, as I throw out the whole batch of icing and remake it without the salt. Thank God I have enough ingredients to make a second batch.
It is better without the salt, but still has a strong taste of butter. Since I would not recommend this recipe, I am giving you another one for the icing. This is what I would do next time.
1 envelope Dream Whip
½ teaspoon vanilla
½ cup milk
1 box sugar-free chocolate Jello pudding
Blend together milk, vanilla, and Dream Whip. Beat until stiff. Add pudding mix and continue to beat until light and fluffy. Add milk as needed until desired consistency is reached.
I’m thinking that if you want to simply things, you could probably use the sugar-free Cool Whip and just eliminate the milk. Or maybe use the milk to make the pudding and then mix that with the Cool Whip? Dream Whip, Cool Whip, Kool and the Gang? What do you think? I don’t know. Just don’t use the recipe that I used unless you like eating sticks of butter.
Speaking of Kool and the Gang, it’s time to Get Down On It, and I spread my new batch of icing onto the cake. One of Sharon’s palette knives would come in handy about now, but since I don’t have one of those [hint to Sharon for a Christmas gift], I use a small spatula or butter knife to form bark-like ridges on the icing. I use a toothpick to make the rings on the sides to look like a log.
Well that hid the cracks pretty well. So far so good. Now it is time for the decorations.
I was looking at pictures online trying to get ideas on how to decorate the Buche de Noel sans Sucre. You could really just use some store-bought holly, twigs, etc., and that would look very nice, But while I was surfing the web, I saw one that was decorated with meringue mushrooms. Cute! And luckily for me, a recipe was included.
Ingredients:
2 large egg whites, room temperature
1/4 tsp cream of tartar
½ superfine sugar (This is hard to find. You can use regular granulated sugar and process it for about 30 seconds in a food processor. I used Splenda, but I think meringue comes out better with real sugar. The Splenda did work, though.)
I line a baking sheet with parchment paper and set up a pastry bag with a No. 6 (½ inch diameter) round plain tip. I preheat the oven to 200 degrees, beat the room temperature egg whites with an electric mixer at slow speed until foamy. Then I add the cream of tartar and beat at medium speed until soft peaks form. I continue beating (increasing speed to high), gradually adding the sugar until the whites are stiff and glossy. I rub a little of the meringue between my fingers to make sure all the sugar has dissolved.
With a rubber spatula, I place the meringue into the pastry bag.
To pipe the caps, I hold the pastry bag upright and close to the parchment paper. I pipe the meringue with even pressure into even rounds building up the meringue to form a round. You can adjust the size of the caps depending on the size of your cake. I sharply twist the bag and stop the pressure as I slowly move the tip off the meringue. Try to make the top as smooth as possible but you can use a wet fingertip to smooth out any bumps. This takes practice, and the finished product is fragile. Make way more than you think you need.
To pipe the stems, I hold the pastry bag upright and close to the parchment paper. I pipe the meringue with even pressure into a cone shape, making the base of the stem a little larger than the top. I try to keep the stems as straight as possible. Again, make more than you need.
I bake the meringues for approximately one hour or until the mushrooms are firm enough that they can be lifted from the baking sheet without sticking.
To glue the caps to the stems, I use a little melting chocolate. I take a mushroom cap and spread some of the melted chocolate on the underside, and then press the stem onto it. You have to be very careful when you are doing this because the meringue is so fragile, if you use too much pressure, you can easily crush the mushroom. The first one I tried, the mushroom disintegrated into dust in my fingers. Actually, that happened a few times before I got the hang of it. I thought that Pepper Marie was making fun of me until I realized that Queen was singing Another One Bites The Dust on the IPOD.
Willie is pining to be On the Road Again, which reminds me that I need to take this concoction on the road tomorrow. I am tortured by memories of last year’s unexpected three-hour trek across the Causeway with my “needs refrigeration” cake melting in the back seat, and my “needs frequent potty stops” Aunt in the front seat. Luckily, this year I don’t need to go quite that far; our family celebration is being hosted by my son and daughter-in-law, who live five minutes from my apartment. Also, blessedly, my brother and his family are picking up my Aunt from her assisted living home, so I am relieved of that responsibility as well. I have only the Yule Log to worry about. Nevertheless, just to be on the safe side, I opt to transport the cake undecorated. So as Aaron Neville reserves his spot in that number When the Saints Go Marching In, Pepper Marie and I march off to bed to await the arrival of Santa Paws.
Our family celebration the next day is not until 5:00 p.m. I am able to spend the morning with Pepper Marie before I go to a friend’s house for Christmas dinner. (FYI – my contribution to this Christmas dinner is the aforementioned sugar-free apple pie which is a huge hit. It does not taste like sticks of chocolate butter.) I return home in the afternoon, with just enough time to load up my Honda Civic with gifts, kiss my precious Old Lady Dog on her soft, furry head, and I am off to my son’s house. This year, the Christmas Confection can ride in the front seat with me. I go slow, slow, slow, with one hand always on the dessert plate. I have horrible images of some reckless driver who has spent the last two days in an alcoholic stupor pulling out in front of me, causing me to slam on my breaks, and sending my Buche de Noel sans Sucre flying into the dashboard. “Good thing I don’t do this for a living,” I say out loud although there is no one to hear. “I’d have a ulcer.”
Upon arrival at the home of my son and daughter-in-law, I assemble the Yule Log. I have brought the meringue mushrooms in a plastic container lined with paper towels (for shock absorption!), and some of those store-bought holly and pine cones for embellishment. I arrange them all on the dessert dish. I sprinkle some Splenda “snow” on top of the log. “Wow, that looks great!” I say. “I’m a genius! A gourmet baker! I could be on the bleepin’ Ultimate Cake Off!” Unfortunately, as I am standing there expounding on my own creativity, the Splenda “snow” dissolves into the icing before my very eyes, and is soon gone from sight. Well, who knew? “That’s OK,” I say, “it’s just like a snowfall in New Orleans. It melts as soon as it hits the ground.”
The dish looks fantastic, and in spite of my disappointment with the taste of the icing, my family seems to like the Buche de Noel sans Sucre. Are they just being polite? Perhaps it is more appealing to the taste buds because it is so pretty, and they didn’t have the experience of that awful first batch of salty icing? Maybe they really DO like eating sticks of butter? I don’t know, but everyone tries it, even those who are not sugar restricted. If they mind the taste of the creamless buttercream icing, they don’t let on. In any event, the entire cake is soon gone. I guess that’s a good sign.
If any of you want the recipe for the creamless chocolate buttercream, let Sharon know and I’ll have her post it on the blog. Perhaps you know of a way to improve it. Maybe with a little chicken broth?
Well, here’s wishing all of you in Blogland a very Merry Christmas and a Super[bowl] New Year, from all of us down here in the Who Dat Nation! Talk to you soon.
In Memoriam –
I dedicate this blog entry to my beloved Pepper Marie, my Baby, my Special Angel, my Tootsie Roll, my Helper, who passed from this life on May 14, 2010, just shy of her 17th birthday. No words can ever express the loss that I feel. I am forever grateful for every day I had with her, for the many years that she was at my side, for her unconditional love. She truly was my helper. She helped me do everything from the minute I woke up in the morning until the second I fell asleep at night. And even in between – I slept peacefully just knowing she was there. Many times she was my “glue” – she held me together through some really hard times. And we had lots of good times, too. We traveled all over the U.S. together. But whatever life brought our way, it was always she and I. We took it all on together. I carry her in my heart now, and always will. On what would have been her 17th birthday, I celebrated her life with a rotisserie chicken and champagne. And what a life it is to celebrate. I love you, Baby.
Pepper Marie
August 25, 1993 – May 14, 2010
Tulip Time!
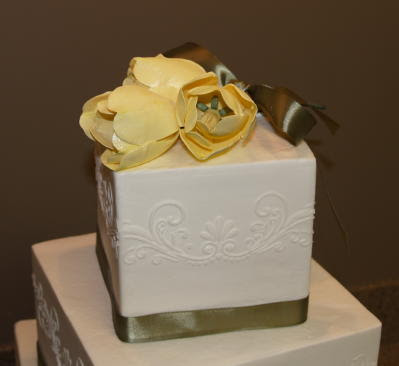
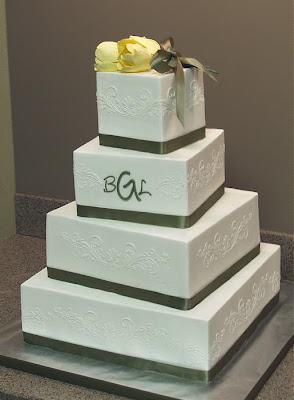 This bride came to me with her cake design and colors already determined. A very classic, simple cake with a small nosegay of tulips on the top.
Buttercream stenciling on buttercream. With our pretty creations on top.
So let’s do this!
 Use a piece of white gumpaste to form the…. the…. the…… the little thingies that stick out the sides of that middle stamen thingy. Yeah, make a bunch of those. The mold can be found here.
Then dust them with shades of mossy green petal dust.
 Now, to make that yellow middle stamen thingy, form a sausage of yellow gumpaste and insert a wire into one end.
 Use your thumb and forefinger to pinch around the top of the sausage three times.
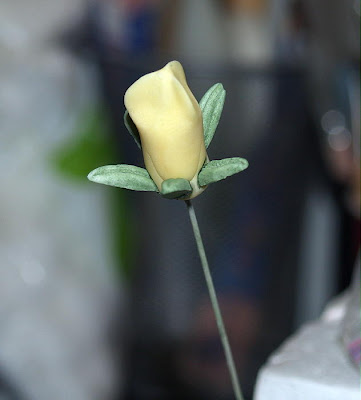 Then take five of those green stick out the side thingies, dip a little bitty bit of each end in water or gum glue, and stick into the bottom of the yellow sausage, going all the way around.
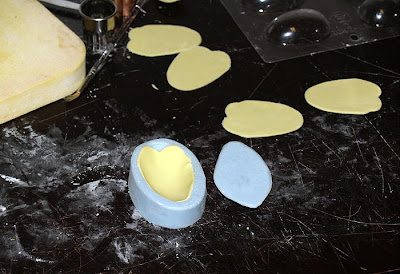 Roll your yellow gumpaste thin (number 5 on my pasta roller). Cut out the smaller petals with the tulip cutter and vein in the double sided press.
 Give them a little pinch on one end and lay them over a former, which in this case is a half egg chocolate mold sheet.
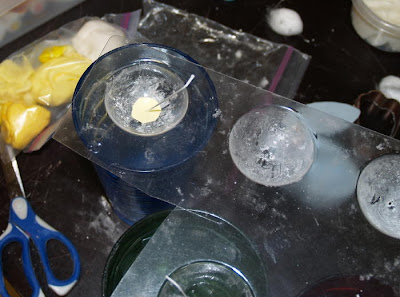 You will build your flower inside the half sphere candy mold. Put a disc of yellow gumpaste in the bottom and poke a hole through the center with a wire. Poke holes through the center of the sphere molds as well.
 Insert the stamen wire through the holes and attach the base of it to the petals with a very light dab of water or gum glue.
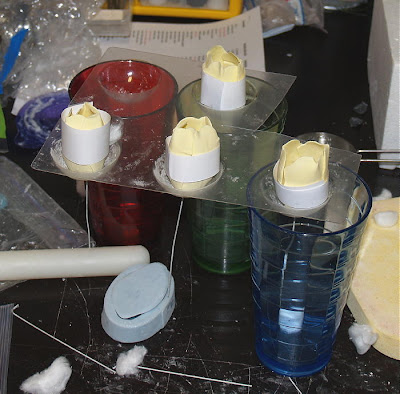 When the first portion is dry, make another set of three petals with the larger petal cutter and vein. When those are firm enough, hold the partially made flower upside down and glue 3 more petals on in another row. (This step was not shown). You can dry the flowers upside down at this point, or you can put them back in the formers. I used paper collars to hold the outer petals at just the degree of openness I wanted.
Allow those to dry fully and give them a light dusting with the shade of yellow petal dust you desire. A very light puff of super pearl can be applied also for a little sheen.
Hangin’ Ten in 2010!
 Oh man the weather! We were in heaven as soon as we stepped out of the airport. Mild temps, low humidity and beautiful blue skies. So very different from where we live, where it is so hot and humid it is a chore to breathe.
 Do you guys recall our adventurous trip last year? My sisters rode in the lap of luxury in the air and their limos, while Wendy, D and I drove a cargo van across the country through about 8 million miles of cornfields. Well, time for payback, sistahs.
Our crew.
Our vendor booth with all the stuff.
 It was Connie’s birthday, so we surprised her with a cupcake with a little ceramic squirrel on it. Connie has serious squirrel issues, hence her horrified face. I love the expression on Diane’s face in this one.
In The Beginning….
Hello everyone! How is your summer going? Mine has been busy as heck and it is flying by.
 These are the actual class cakes. My brother Michael took the class with me. He is such a cool guy. You have met him before here and here. I think mine are the two on the right. The class was given at a local cake supply shop, and would be the equivalent of Wilton 1 and 2 , I would guess.
 A sheet cake I did shortly after. The flower basket is made like those panoramic eggs with a mold and granulated sugar. I think that started my infatuation with molds.
 Proof that at one time I could make a buttercream rose that was halfway decent.
 Ah, my famous rough icing that I use when I do not want to bother with smoothing the cake. Freehand writing could use a little work, LOL.
 I remember bringing this baby shower cake to work at the hospital where I worked at the time. All plastic decorations….. haha
 I seem to have been fascinated by plastic decorations. Tried my hand at block writing since my script left something to be desired.
TIME FOR A GIVE-AWAY!
Beach Ball Blowout
It’s summertime! Time for swimming pools, the beach, flip flops and frozen drinks…..
What better way to celebrate a birthday than with a beach ball blow out cake? This is one of my most popular designs, and I get tons of requests for info on how I did the ball, so here is the scoop:
The ball is 8 inches of pure unadulterated……… Styrofoam. Bet you thought I was gunna say cake, huh? Do I look nuts?….. No seriously, you could do it in cake just the same way, but we did not need that much cake.
Figuring out how to get the beach ball pattern on there was challenging. My first few attempts were shall we say, less than stellar. Then it hit me. The stroke of genius. The Divine intervention. The best idea I have ever had in my entire life!!
I drove my little self right over to Walgreen’s (making one pit stop at the gas station for a fountain Diet Coke because they have the best syrup to carbonation ratio of course.) And I picked up an inflatable beach ball. I cut out one segment of the ball and scanned it in two pieces with my scanner. I then cropped the two halves together in my editing program, and voila! I had one perfect jpeg image of a beach ball segment, that I could then resize to any size I needed to fit any size ball I needed.
I printed it out the size that I needed, and cut it out to make a template. I love templates. I use them for everything. I am not sure which I love more: templates, Diet Coke, or cornstarch. They all play such a huge roll in my life. (I think cornstarch is winning; I adore that stuff.) Then I used that template to cut out the sections of colored fondant, and applied them to the piping gel covered ball. White circles on the opposite ends of the ball were applied for authenticity.
The curlies are made by wrapping strips of fondant around a dowel rod until they are firm enough to hold their shape. Then slide them off, shape as desired, and let dry fully. I demonstrate this in the Topsy Turvy DVD.
The life preservers are simply made from cutting white fondant discs and applying red stripes, then wrapping a clay gun string around as the rope. I demonstrate this in the Boxes and Bows DVD .
Winter Roses for a Spring Wedding
So a few months back a lovely bride brings me this magazine cover for her wedding cake. She wanted it exactly the same, except for the appliques not to be snowflakes since she was having a spring wedding. The magazine did not give credit to the artist, so at the time I did not know it was the amazing Liz Finch of Britain. I have since found that out, and contacted her to thank for such a gorgeous design, and to let her know I copied it. She was very lovely and sharing.
 I hoped that my version would do her incredible art justice. I was pleased with my rendition in the end, and the bride was happy with it too.
 The bow was satin, and the brooch was costume jewelry purchased by the bride. At the time that I made the cake, I had no idea what those flowers were, so I just tried to copy them as closely as I could with the materials I had available to me. Liz has since told me that they are Christmas roses, and there is a cutter set available for them. Good to know for next time!
 So I just winged it based off the magazine photo. I started with two types of stamens I purchased online here and here.
 This photo is washed out, so you can’t really tell that the tips of the stamens are yellow. I gathered up a few of each type, and used white floral tape to assemble them around a short floral wire.
 I pinched the ends of the petals to elongate them just slightly, and then pushed the slightly dampened stamen wire down thru the center of it.
 I then let them dry upside down until they were fully dry. (Yeah, that is a cooling rack on a Viva paper towel roll… I am just so high tech! LOL)
 Next I cut out little discs of white gumpaste, to provide a base to glue the flower petals onto. Liz has told me that her flower petals were individually wired, but this worked in a pinch!
 I let the discs firm up a good bit, and then slipped them up the wire. Notice that I left a space between the green blossom and the white disc. We need that space to place our petals. The white discs did not want to stay in place , so I cheated and put a dab of hot glue under each to keep it from sliding around.
 Then it was time to cute the petals. I used this rose set, the same one I used to make the purple flowers on my TLC cake. It was the closet shaped cutter I had to what I saw in the magazine photo. I rolled the gumpaste to number 5 on the pasta roller, and very barely softened the edges with a very light touch with the ball tool. The petals looked to me to be on the thicker side, than say regular roses, so I purposefully left them that way.
Then I dampened the white disc and applied the petals around it.
 I pinched the petals to give them movement, and lifted and turned them slightly to make them look more realistic. I propped the petals up with cotton to achieve the shape that I wanted.
 After they were fully dry, I dusted the insides of the flowers, down at the base of the stamens, with some yellow and kiwi green. Then I gave the whole flower a dusting with super pearl luster dust. The dusting really makes gumpaste flowers come to life. When I assembled the cake, I put them in place and glued them down with just a small dab of melted white chocolate.
 A little bling added to the topper. I also dusted the fondant appliques with super pearl. I brought the cake in 2 sections and finished the assembly at the venue. It was really quite striking and beautiful in person.
_______________________________________________
Grapesicle Buttercream and Red Ranunculus
 I believe the flowers are ranunculus, but most pictures I found have them pretty closed and you do not see much of the centers. But the cake photo she provided had them very open, with the centers very prominent.
 Start by putting a ball of green gumpaste onto the end of a wire. The size of the ball depends upon how big you want to go with the flowers. We made a variety of sizes, because we wanted a variety of flowers in different stages of bloom on the cake.
 Next you make an indentation on the end of the ball with the flat side of an exacto knife. Then make a little hole inside that circle with the pointy tip of a small paintbrush. ( I forgot to photograph those two steps, my bad.) Then score the sides all around the ball with a veining or dresden tool to make the lines.
 Now time to add the petals. I colored my Wilton premade gumpaste (love that stuff) with super red gel color. I rolled it out to number 5 on the pasta roller and used the JEM all in one rose cutter to cut out the petals. I used the 50mmsize for the first 2 rows of petals.
 Use the large ball in the center of the petal only to make it cup shaped, and let them dry out for about 5 minutes.
 Then you can attach 3 or 4 around the centers. I did one here in a more closed, tight wrap, and one more open and frilly. I did not want all of the flowers to look exactly the same. If you vary them up a bit, and shape some of the petals differently, you will get a much more realistic look on your finished cake.
 Then I cut out more of the same sized petals. This time I used the ball tool to thin them out along the edges, but did not press so hard and to make them very ruffly. Yet. Make the very outer petals more ruffly.
Yes, I use a lot of cornstarch. I love cornstarch. Do not fear the cornstarch, for it is your friend.
 Here is one flower with the second row of petals in place. I used 5 petals for the second row. Notice that this bud has 4 petals in the inner row. There are no set rules with this flower. Vary the number or petals and configurations throughout the flowers.
 Then the outermost petals were done with a larger single rose petal cutter. This set is an FMM rose cutter set. You can just make it work with whatever cutters you have. I used 6 or 7 petals for the outer rows. It is not an exact science. In fact, I was winging this all the way through!
 Here are some flowers in varying stages, some tighter and more clustered, some with less rows and more open and loose.
 Here are some drying upside down so the petals do not fall off. You wet the end of the petals, hold your flower upside down, and apply the petals in an overlapping fashion till you make it all the way around the flower. Tweak and bend the ends of the petals with your fingers, and then hang it upside down to dry for a while till it is good and set. You have to do this after every row or all the stuff will just slide right off the flower.
 After they are able to hold their own shape, I stick them in styro to finish drying fully, overnight.
 This was a test one. Dusted it with poinsettia petal dust, with a tad of impatient pink in the center petals. Then I wiped the center with a small brush with a tad of shortening to give it some shine and take the dusty look off. Then I sprayed edible lacquer over the whole flower. (Got that tip from Rebecca also). The lacquer spray will darken the color so keep that in mind. This center had a bit too much red dust on it for my liking, so I was more careful to keep red dust off of them after this one. (Although just a little bit of red here and there looked pretty good on them!)
 All dusted! See how well they matched the color swatch she gave me? Score! Love it when that happens!
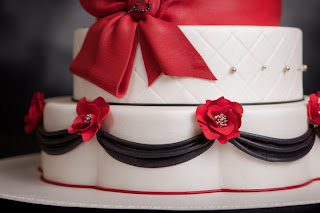
Now how in the world are we going to get 60 flowers to stay on a BC cake?
 Welcome to my dipping station. I left the wires on the flowers nice and long. But we know we can’t stick nasty wires into the cake, so I coated them in white chocolate. I filled a tall cup with melted chocolate, dipped the wires in, shook off the excess, then threaded them down into the cooling rack to dry fully. When it came time to arrange them on the cake, I just stuck them right in, and they went so far into the cake, they held up beautifully. I did not even need any melted chocolate to glue the flowers onto the sides. Which made things much easier and cleaner for the cake server.
Pulling from the Archives
I wish you all the very happiest of holidays, a blessed time with family and friends, and hope all of your wishes for the new year come true.
Sharon
www.sugaredproductions.com
- « Previous Page
- 1
- …
- 5
- 6
- 7
- 8
- 9
- 10
- Next Page »


