Sugared Productions Blog

  • Blog Home
    • Home
  • Online Classes
  • Shop
  • Contact
  • About

Martini Glasses Winner

February 27, 2009 by Sharon Zambito 2 Comments


Hi everyone! Hope you all had a great Mardi Gras. I had a terrific time in Michigan teaching despite it being about 345 degrees below zero! 🙂 I will post some pics of the classes when I get a chance. Right now I am in a frenzy getting ready for our next DVD shoot on Monday and Tuesday. YAY!

The winner by random drawing of the fabulous Mardi Gras martini glasses is Audrey:

Audrey said…
Stuff like this makes me wish I had a big sis (or 2)! Sounds like you have a wonderful family. I’m so grateful you’re willing to share them and all you do with us. Enjoy Mardi Gras! 🙂

February 17, 2009 10:34 AM


Audrey, you did not leave an email address so I need you to email me at sugaredinfo@aol.com to claim your prize.


Congratulations and thanks to all who entered! We will have another give-away coming up soon!

Sharon
http://www.sugaredproductions.com/


Michigan Classes this weekend!

February 19, 2009 by Sharon Zambito 13 Comments


Yes, I am once again going to the frigid North to teach. This thin skinned Southern girl is going to have her pansy ass kicked by the cold too! Tomorrow I am going to K mart to buy thermal long johns to wear under my jeans. No seriously. I am. I can’t handlethe cold! But I digress.

The Mid Michigan Sugar Artists have been kind enough to invite me to their day of sharing In Okemos, MI and to stay on to teach a 2 day class. Sunday Feb 22 I will be teaching a 3 hour mini class . We will be doing a gift package cake start to finish. Then I have a demo later in the day on fondant covered boards. There are other great classes and demos scheduled, but to be honest I only paid attention to the things that pertained to me. SO, go here to get all the great info:

Mid Michigan Sugar Artists
 
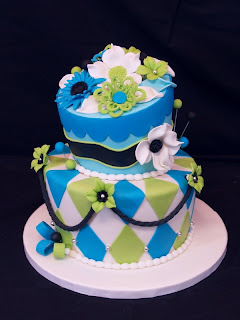
And if that is not enough Sugarshack for you, come to Jackson, MI on Feb 23 and 24 for my two day Topsy Turvy class at the Cake Connection. I will be teaching the cake below. Most of the supplies and lunch is provided both days, plus a few fun surprises. It is not too late to sign up, so check out the links for registration info. I would love to see you if you can join us!
 

And if you do join us, please bring me coffee. Hot coffee. With cream and equal. Make sure it’s hot. Dear Lord what have I gotten myself into?

Hope to see you there!

Sharon

http://www.sugaredproductions.com/


Mardi Gras King Cake

February 17, 2009 by Sharon Zambito 38 Comments

HAPPY MARDI GRAS EVERYONE!


Since it is Mardi Gras season right now down here in the Big Easy, I thought you might enjoy learning about another one of our unique culinary creations. I have recruited my big sister Barbara to do a guest blog entry on making a king cake. Barbara is the inventor of the original King Rock (more on that later). In addition to that, she is just the best big sister ever. She looks after me. She is an accountant by profession, so she helps with my business finances, taxes, and all that other icky stuff I have no clue about. She also comes on some of my cake trips with me to help me out with my demos and my vendor table. She is one of the most energetic, social, and fun to be with people I know. She is a very cool chick and I love her tons. So now I present to you… Barbara…..


—————————————-


Hi, I’m Barbara, Sharon’s sister, and she’s asked me to do a guest blog. This is me getting ready for Mardi Gras, which this year falls on February 24.


(Note from Sharon: I have this same outfit and yes we do wear this when we go parading.)

Speaking of Mardi Gras, that brings me to the topic of the day. I am not a cake decorator. I see some of the magnificent pieces of art that you all do and I am in complete awe. But, I am here today to talk about the king of all cakes – the King Cake.

If you are not from the New Orleans are, you might be asking yourself “what is a King Cake?” A king cake is a brioche-style cake similar to a coffee cake that is served throughout the carnival season in New Orleans. The carnival season begins on the 12th Day of Christmas, the Epiphany (January 6), which is the day the three kings visited the Baby Jesus. It is believed that it took the three kings 12 days to find their way to the stable. The carnival season ends on Mardi Gras Day, which is the Tuesday before Ash Wednesday.

The king cake is circular, representing the circular path the three kings had to take to ward off King Herod, who was seeking them so that he could kill the Christ Child. The king cake is typically decorated with colored icing and/or sugar. The three colors are purple, green and gold, the colors of Mardi Gras, which represent justice, faith and power. I’ve also heard that the three colors represent the three gifts presented by the Magi (gold, frankincense, and myrrh.) Within each cake is hidden a small plastic doll, which represents the Baby Jesus. (In olden times, it used to be a porcelain doll, or a bean or pea.)


King Cake parties where all the rage when I was growing up. Whoever was lucky enough to get the doll in their piece of cake would be named king (or queen) of that party and had to throw the next party. Today, this tradition is very prevalent in offices throughout the city where the person who gets the doll must bring the next cake. King cake sales are so prosperous that many bakeries in New Orleans are more profitable during the carnival season than they are for the entire rest of the year.


The making of a king cake should not be taken lightly. Since this is a yeast sweet bread, it has to be kneaded and left to rise twice, and is a day-long commitment. There are many bakeries that make excellent king cakes, so why in the world would anyone want to make their own? Just for the fun of it!!

My introduction into making home-made king cakes came many years ago. I found a recipe and tried it out on my family. Geez almighty, it was horrible. It came out heavy and hard as a rock, so much so that they called it the King Rock. My other sister, Janice, told her office mates about it and they accused her of exaggerating – that it couldn’t possibly have been that bad. So, they asked me to make a cake for their office party. Much to my dismay, it was just as horrible, but everyone was so polite and complimentary so as not to hurt my feelings, but I knew it was a bomb. I hope to think that I have gotten a little better at it over the years, but it is still tricky. I continue to try out new recipes and techniques, as I continue my search for perfection.

The recipe below is a really good one. It produces a light, but moist cinnamon cake. A few pointers for success: You have to get the yeast at just the right temperature (105 to 115 degrees) and let it foam for at least 10 minutes. You have to be careful not to add too much flour and not to over knead it. The dough should be slightly sticky, but elastic and able to hold its own shape, but never firm.


You have to be careful not to over bake it or it will be dry. I now use an instant-read thermometer, which should register 195 to 200 degrees for doneness.


The recipe is below. Basically, this is what you do. It’s much like making a bread dough. Let it rise till double in bulk and then roll out into a rectangle.


Here’s what it looks like rolled out with the cinnamon sugar sprinkled on:


Then roll up each piece into a long string.


Pinch the edges together so that the filling doesn’t ooze out. Flatten down the pinched edge afterwards so that it lays flat.


Twist the two strings together.


Form into a circle on a baking pan.


Let rise until double in bulk.

This is what it looks like right out of the oven.


Let cool and then decorate with a glaze and colored sprinkles.


See the baby’s head?


And that’s me with my cake.


You can do these in a variety of ways. You can divide the rectangle of dough into thirds and braid it like this. I rolled these strings in the cinnamon sugar to get it on the outside, rather than on the inside.


This is what it looked like after it was left to rise, baked and decorated. This one raised a lot and was very light and airy.


This one was filled with cinnamon sugar, raisins, and pecans. If you put a lot of “stuff” in your cake, it won’t rise as much.


You can also use other fillings, such as cream cheese filling, apple pie filling, lemon pie filling, cherry pie filling, etc. But I don’t like those. They turn out too sweet for my taste and the filling overpowers the taste of the cake. I’m a purist and like just a little cinnamon sugar.


So, that’s it. I hope that you all give it a try and bring a bit of New Orleans to wherever you might live. Also, if you ever have the chance to visit New Orleans during Mardi Gras, the city would love to have you. Let me just say that Mardi Gras is not only what you see in the media. Yes, there are some unmentionable things that go on in the French Quarter, but that is a very small piece of what our carnival season is about. Mardi Gras outside of the Quarter is very family oriented. The parade routes are filled with kids and families having fun. When we were little kids, my family did not miss a parade. We loved every minute of it. We would lift Sharon, the youngest, smallest and spryest of all of us, over barricades to get that all-elusive string of beads, trinket or doubloon out of our reach. Police were all over the place supposedly monitoring such infractions, but because she was so cute, the police would just look at her and us, and just shake their heads. We trained her young; you should see how she still scoops up the parade throws.


Happy Mardi Gras!


KING CAKE RECIPE:
(This recipe makes two medium size cakes.)

¼ cup warm water (105 to 115 degrees)
1 tablespoon (1 package) dry yeast
1/3 cup sugar
5 ¾ to 6 ¼ cups unbleached all-purpose flour
1 ½ teaspoons salt
½ cup warm milk (105 to 115 degrees)
1 cup sour cream
3 large eggs
finely grated zest of 1 lemon or orange
8 tablespoons (1 stick) unsalted butter, at room temperature, cut into small pieces

Cinnamon Sugar:
1 cup sugar
4 teaspoons ground cinnamon


Frosting:

4 cups powdered sugar
4 tablespoons butter, melted
7 tablespoons hot water, more as needed
1/4 teaspoon almond flavoring


1) Pour warm water into small bowl. Sprinkle yeast and a pinch of sugar over the surface. Stir to dissolve and let stand at room temperature until foamy; about 10 minutes.


2) Place 1 ½ cups of the flour, the remaining sugar, and the salt in mixer bowl. Make a well and add the milk, sour cream, eggs, and zest in the center. Beat until smooth on medium-low speed, about 1 minute.


3) Add the yeast mixture and beat for 1 minute more.


4) Stop the machine and add 1 cup more flour. Beat for 1 minute.


5) Add the butter pieces and beat on low speed until incorporated.


6) Add the remaining four, ½ cup at a time, until a soft, smooth dough that just clears the sides of the bowl is formed. Switch to the dough hook when the dough thickens, about two-thirds through adding the flour.


7) When all flour is added, knead with dough hook for about 5 minutes on medium speed. (If you don’t have a dough hook for your mixer, you’ll need to turn the dough out onto a lightly floured surface and knead for about 5-10 minutes.)


8) Turn dough out onto lightly floured surface. Knead until smooth and just able to hold its own shape, under 1 minute if you used the dough hook (6 to 10 kneads to smooth it out), dusting with flour only 1 tablespoon at a time, just enough to prevent sticking to your hands and the work surface. This dough will be very smooth, with a definite soft elastic quality, a little sticky, but never stiff, and will hold its shape.


9) Place the dough ball in a greased deep container, turn once to grease the top, and cover loosely with plastic wrap. Let rise in a warm place until double in bulk, 2 ½ to 3 hours. Do not allow the dough to rise over double.


10) Punch dough down with fist. Turn out onto lightly floured surface. Let rest 10 minutes.


11) Divide the dough in half with a bench scraper, pizza cutter or knife, never tearing the dough.


12) Divide each half into thirds. Roll out to a rectangle approx. 20 x 12 inches.


13) Divide in half with pizza cutter. Brush with melted butter keeping edges dry. Sprinkle with cinnamon sugar.


14) Roll up and pinch ends together so filling does not ooze out. Flatten pinched edge.


15) Twist two long rolled pieces together. Form into a circle and fold edges under.


16) You can insert baby trinket into cake at this point or wait until after it is baked. (I like to wait after it is baked if it is plastic.) Insert from underneath. (If you don’t have a baby trinket, use a whole pecan, walnut or other object; just be careful it is big enough that it cannot be swallowed whole.)


17) Cover with greased plastic wrap or light cloth towels and let rise in a warm place until double in size, about 1 to 1 ½ hours.


18) Preheat oven to 350 degrees. Bake 20-25 minutes. An instant-read thermometer will read 195 to 200 degrees.


19) Let cakes completely cool.


20) To prepare frosting, mix melted butter, powdered sugar and flavoring; add hot water 1 Tablespoon at a time until glaze reaches desired spreading consistency. You don’t want this too thin because it will run right off the cake or too thick because it won’t drip down the side of the cake.


21) Pour frosting over cake; sprinkle with purple, green and gold colored sprinkles or colored sugar.


—————————————-


Sharon again here. WOW! Was that great or what? Thanks Sis for showing me up on my own blog. Dang overachiever.  (Just kidding.) But seriously, I have been trying to convince Barb for months now to start her own food blog. She is a good cook, and photography has been a hobby of hers for a long time. What do you guys think? If you think she needs to start her own blog, leave a note in the comment section below ……


Then you can pretend you are down here with us having a great time while you sip your Mardi Gras martinis.


Mardi Gras Martini:


This festive concoction will add color to your celebration and your cheeks. To make purple sugar, add a few drops of red and blue food coloring to granulated sugar and mix. Rim glasses with a cut lemon and dredge in colored sugar, add a lemon twist and enjoy this purple, green and gold treat.


 2 ounces vodka
1 ounce triple sec
1 drop creme de menthe dark
Lemon twist, optional


In a martini shaker, combine vodka, triple sec and creme de menthe with ice and shake until well chilled. Strain into a martini glass, preferably one rimmed with purple sugar. Garnish with a lemon twist.(*from acj.com)


Happy Mardi Gras Everyone!

Sharon
PS We’ve got a full video tutorial on making the King Cake in our online school:
http://www.sugaredproductions.com/
Visit our online school


Boxes and Bows is Shipping Now!

February 13, 2009 by Sharon Zambito 7 Comments

 
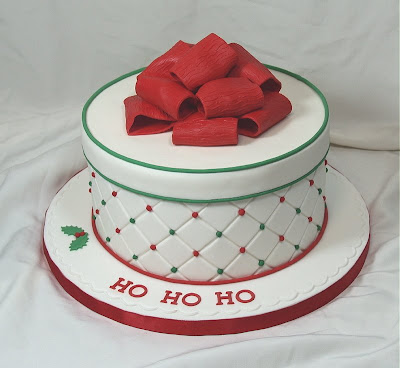
SugarEd Productions presents our newest release, Boxes and Bows.
 
 
Free Bonus: All orders placed before 2/28/09 will include a copy of 4 paper templates Sharon uses in the DVD.
 
 
SugarEd Productions presents Sharon Zambito as she leads you through an all inclusive lesson on Boxes and Bows in cake. This two disc DVD set takes you through the entire decorating process for four different package cake styles and their corresponding bows. Bonus techniques are also included. Total run time is 3 hours, 50 minutes.


Techniques taught include:
— 5 panel box top lid made from dried fondant panels
— 4 panel gift box made from dried fondant panels
— fondant overlay lid
— two piece soft fondant lid
— gumpaste “propped” lid
— 2 prong embossed dress bow with cording edge
— 4 prong embossed dress bow with pearl edging and center knot
— making a loopy gift bow
— soft fondant “floppy” gift bow
— gumpaste “satin” dress bow and tails for the side of a cake
— applying fondant/gumpaste stripes to the side of a cake
— placing a fondant blanket inside the cake gift box
— making gumpaste pearls in 2 sizes, and using them on the cake and bow loops
— using the Tappits brand toy and alphabet cutters
— making a novelty fondant life preserver
— using a clay gun for decorative trims on both the cakes and the bows
 

Nearly four hours of instruction at a great price!


Learn to make all of the cakes you see here.


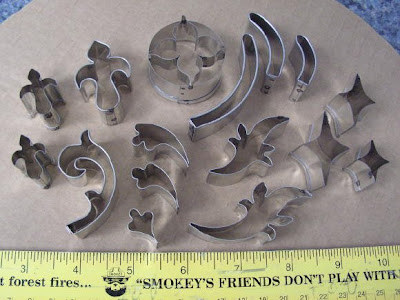
FILIGREE CUTTER SET ON SALE TOO!


Create beautiful lace patterns with this 16 piece metal cutter set, custom made and imported in a limited supply.
 

AVAILABLE HERE


We have lots of cool new tools too, please come check them out:
 
www.sugaredproductions.com


Santa Dropped His Drawers

February 11, 2009 by Sharon Zambito 10 Comments

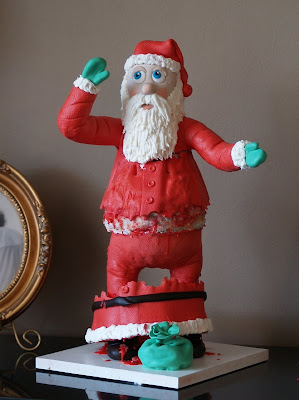
Ouch. That hadda hurt.
Remember my guy I made in the Bronwen Weber class? Well I loved him so much I did not have the heart to disassemble him. Since November he has gotten more saggy and a little leaky. But this is what I found this morning when I got up. Before I had my coffee too.
Rest in peace dude. I will miss you.

Organization Tips

February 10, 2009 by Sharon Zambito 3 Comments

 
GOT CAKE STUFF?


What are we to do with all our great cake toys? Has it taken over your house? I recently posted about my cake space and how I organize my supplies. I asked you guys to send in organization/storage tips that have worked for you. I will share those with you now.


Weirkd says : I got this idea from a gal that took a class with me. She had cart on wheels that was made for either scrapbooking or crafts that she got at Michael’s. It had a handle on it with wheels and folded up like a piece of luggage. It had so many compartments in it! It was a great idea!I also like the rolling bins that they also sell at craft stores. You can put labels on the outside of them so you know exactly what is in which drawer without digging threw it all!

Eventually I will have all my cutters in individual Ziplocs with its corresponding veiners and labeled & alphabetized.

I keep my dusts in a small Rubbermade container that is actually made for school supplies like pencils. And you can use the long skinny containers that are made for spaghetti for your floral wires! You can have one for each size if you’d like!


SharonG says: I have all my things in my kitchen, so there isn’t much room. I do try to keep my stuff organized as best I can. One thing that has been helpful for me is 7 drawer cart with rollers I got at Wal-Mart for around $20.00. This doesn’t hold everything, but it has been great for me to put the things in that I use the most. I am able to pull it up to the area I am working at, and it is quicker for me to get to them


Fiddlesticks says: I use a tall/large rolling cart that I keep inside of my walk in pantry!


———————————–


KDweir says: I have a great idea about how to organize everything though. I’m a big fan of the Rubbermaid stuff also. Walmart has great deals on different sized bins with lids. If I ever get around to it, I want to organize my cutters and veiners by putting them in baggies with the label of what they are on them. Then have an A-Z card and have them alphabetized within the container. I also know people that put little pictures on the outsides of the containers or a list in an envelope attached to it so they can pull the list and see whats inside without having to tear through it all.


Also found helpful is a wooden insert that my husband got me from Kohls I believe. It fits inside your drawers and sections off everything for you. Then you can put whatever in each little space. I found this better for my pencil/junk drawer then my cake stuff. The little cubbies is kind of too small for my cake stuff!


Sharon says: A multi-compartment pencil/pen holder from the office store is a great place to put your gumpaste tools, knifes, small roller, tweezers etc. Easy to see what you have and grab what you need.

Use extra cabinet space (if you have any) to store cake mixes so they don’t take over your pantry.

Try to remember to consolidate colored fondant scraps into one bucket and get rid of extra buckets to save space.


Thanks to all of you who submitted tips; all great ideas!


Happy caking,
Sharon
http://www.sugaredproductions.com/


Making a Gumpaste Wine Bottle

February 4, 2009 by Sharon Zambito 14 Comments

Hey Sugar Friends! I promised you a post before I left to go teach a class in Kentucky this weekend. I pulled up these very old, very craptastic photos to put together a little tutorial for you. (I can’t spoil you guys with always posting my fabulous foody photos with my new awesome lens, now can I?)
I colored my gumpaste VERY dark green, but be advised it takes a lot longer to dry when you do that. I had to let each piece dry 2.5-3 days before I could assemble it. That was using the Nic Lodge gumpaste recipe. The one you see in this pic was Satin Ice gumpaste and it stayed soft. So I recommend the Nic Lodge recipe or using white gumpaste and coloring it after the bottle is dry.
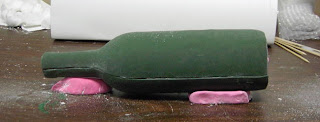
HEAVILY dust the underside of your rolled out gumpaste; lay on top of a real bottle and cut out the top half. The pink fondant is just shoved under there to keep the bottle from rolling. Let that dry fully ( 2-3 days in this case.)

Then flip that all over, so the dry half is now on the bottom of bottle, and cut out the other half on top, using the dry piece as a guide to cut your seem so they match . The bottle I really used for the cake was a cleaner cut than shown in this pic. Let that dry fully.(2-3 days)

When both pieces are nice and hard, then you cut a strip of GP or fondant, moisten it, and attach to the inside rim of the GP bottle as shown. Do this on both sides of the bottle. Then place the two pieces in place together. Use your fingers and a long dowel or skewer to go up inside the bottom hole to press the wet strip to the insides of the bottle to secure it well. Let that dry a while. Then I gave the whole bottle a rub down with Crisco and wiped off the excess to get rid of cornstarch residue. I spackled the side seams with matching buttercream (or royal). Cut a round disc for the bottom and just adhere with water. After the Crisco all absorbed in, I gave it a good spraying of edible lacquer.

I used candy foil for the neck of the bottle. I ended up having to use real paper for the labels because the piping gel was showing thru the edible images. That’s it I think!

Hope you get a chance to try them, they are fun!
So now I am going to brave the freezing cold, ice storm and power outage to get to my class in Kentucky. I am like the Postman; nothing will keep me from my students! I will check in with you guys next week when I get back!

Happy caking,
Sharon
www.sugaredproductions.com


Daring Bakers: Tuiles

January 28, 2009 by Sharon Zambito 12 Comments


After missing two Daring Bakers challenges during the holidays I needed to put up or shut up this month. One more miss and I would have been kicked out! LOL. Luckily this one was pretty easy and not too time consuming, as once again I am pressed for time. Ain’t I always? Aren’t we all?
This month’s project was tuiles. Tuiles? What the heck is tuile? I thought it was that meshy fabric you made bows out of for the pews at weddings. Shows how much of a baking sophisticate I am. Not.

Traditionally, tuiles are thin, crisp almond cookies that are gently molded over a rolling pin or arched form while they are still warm. Once set, their shape resembles the curved French roofing tiles for which they’re named.

This month’s challenge is brought to us by Karen of Bake My Day and Zorra of 1x umruehren bitte aka Kochtopf. They have chosen Tuiles from The Chocolate Book by Angélique Schmeink and Nougatine and Chocolate Tuiles from Michel Roux.
Recipe:
Preparation time batter 10 minutes, waiting time 30 minutes, baking time: 5-10 minutes per batch
65 grams / ¼ cup / 2.3 ounces softened butter (not melted but soft)
60 grams / ½ cup / 2.1 ounces sifted confectioner’s sugar
1 sachet vanilla sugar (7 grams or substitute with a dash of vanilla extract)
2 large egg whites (slightly whisked with a fork)
65 grams / 1/2 cup / 2.3 ounces sifted all purpose flour
1 table spoon cocoa powder/or food coloring of choice
Butter/spray to grease baking sheet
Oven: 180C / 350F
Using a hand whisk or a stand mixer fitted with the paddle (low speed) and cream butter, sugar and vanilla to a paste. Keep stirring while you gradually add the egg whites. Continue to add the flour in small batches and stir to achieve a homogeneous and smooth batter/paste. Be careful to not over mix.Cover the bowl with plastic wrap and chill in the fridge for at least 30 minutes to firm up. (This batter will keep in the fridge for up to a week, take it out 30 minutes before you plan to use it).Line a baking sheet with parchment paper or grease with either butter/spray and chill in the fridge for at least 15 minutes. This will help spread the batter more easily if using a stencil/cardboard template such as the butterfly. Press the stencil on the baking sheet and use an off sided spatula to spread batter. Leave some room in between your shapes. Mix a small part of the batter with the cocoa and a few drops of warm water until evenly colored. Use this colored batter in a paper piping bag and proceed to pipe decorations on the wings and body of the butterfly.Bake butterflies in a preheated oven (180C/350F) for about 5-10 minutes or until the edges turn golden brown. Immediately release from baking sheet and proceed to shape/bend the cookies in the desired shape.
These cookies have to be shaped when still warm, you might want to bake a small amount at a time or maybe put them in the oven to warm them up again. Or: place a baking sheet toward the front of the warm oven, leaving the door half open. The warmth will keep the cookies malleable.If you don’t want to do stencil shapes, you might want to transfer the batter into a piping bag fitted with a small plain tip. Pipe the desired shapes and bake. Shape immediately after baking using for instance a rolling pin, a broom handle, cups, cones….

I chose the regular flavor tuile and served them on pistachinilla mousse with specialty cream. ( AKA I screwed up the boxed pistachio mouse by adding too much liquid and had to add a box of vanilla Jello pudding to make it set up. And while I am confessing, that specialty cream is Cool Whip.) I know. I know. I am such a cheater.
But hey, in my own defense, I have a wedding order this week, am working furiously to get the Boxes and Bows DVD ready, and my chronic reflux is flared up bad. Had to set my priorities and I figured the wedding cake and getting the DVD to you guys was more important than home made mousse. Yeah. That sounds good. I’m sticking with that story.

J said the cookies looked like the flowers in Bikini Bottom on Sponge Bob. He is right! They are a delightfully thin, light , not too sweet cookie. Perfect with mouse, pudding, sorbet ice cream or a spot o tea. Easy and fast too, and fun to shape while they are warm. Give them a try!

____________________________________

Speaking of reflux, I have not had a Diet Coke in about 6 weeks and I feel like this:
J had a close encounter with the hair dryer. He is such a goofball. Gawd I love that kid.
I will try to post early next week before I go to the Owensboro class (still have openings, hint hint). If I don’t, I will surely check back in early the following week. If all goes well, Boxes and Bows will ship that week too!

Happy Cooky-ing,
Sharon
http://www.sugaredproductions.com/


Boxes and Bows on Pre-order now!

January 24, 2009 by Sharon Zambito 6 Comments


The much anticipated Boxes and Bows DVD
is on sale now here.
 
It will ship in about 3 weeks.


The tools used in Boxes and Bows are here.


The Design Gallery DVD is also on sale
for a limited time here.


Come check out all our new cool stuff!
 
You know you want to. 🙂


A few cakes to peek at…

January 21, 2009 by Sharon Zambito 19 Comments

 
Hello Sugar Friends!
 
I hope your week is winding down to have been a good one. I was busy this week with doctor’s appointments, school meetings, and working on the near ready Boxes and Bows DVD stuff. While I ponder my next brilliant blog topic, I thought I would share with you a few cakes pictures of some you may not have seen. Some are new and some are not so new.


This a whimsical cake I did this week. All fondant. I used my new camera lens for the first time taking these pics. I shot these really fast on auto settings, but I can see a difference already. When I have time to play around with the manual settings I think I can get better results.


I made this flower with one of my favorite cutter sets. I used gold highlighter (not edible) mixed with vodka and sprayed them with my airbrush.


I painted the ropes with the same mixture and a brush. I like this shot; it’s kinda cool I think.


Here is a one tier whimsical I made for my friend Carla’s birthday. Too bad she lives in Texas and never got any of it. I sent her pictures and described the taste for her. She said it was really good. Tee hee hee. We are silly like that.


Lemon cake with lemon filling, ganache, and fondant. Yes it was way yummy.


Here is a buttercream cake for a 1st birthday. I hand modeled the topper. The barrel of monkeys were made from fondant using a mold I made myself with Silicone Plastique.


He’s really fat!


Geaux Saints!
This cake I iced in buttercream. I used the diamond impression mat on the side. The fleur de lis was made from dried fondant and trimmed with a string from the clay gun and painted gold.


Little football guys are strawberries dipped in white chocolate with plastic helmets that I painted and decorated.


The Bratz girls done on a buttercream sheet cake. The image was done using Toba Garrett’s glace icing and the run sugar technique. Here is the technique shown on cookies; it is the same process done right on top of the cake. The frame was airbrushed pink with fondant circles and dots applied.


What kind of cool cakes are ya’ll working on this week? I hope they all come out great! Have a great weekend and I will check in again next week.
 
Happy caking everyone!
 
Sharon
http://www.sugaredproductions.com/


  • « Previous Page
  • 1
  • …
  • 30
  • 31
  • 32
  • 33
  • 34
  • …
  • 36
  • Next Page »

Sharon Zambito

Sharon Zambito

An RN turned SAHM turned cake maniac. Owner of SugarEd Productions Online School. Join me for some caking, baking, and all around sweet fun :)

Follow me..

  • Facebook
  • Instagram
  • Pinterest
  • YouTube

Pinterest

  • Autumn House Two Trees Machine Embroidery Design – Blasto Stitch
    Autumn House Two Trees Machine Embroidery Design – Blasto Stitch
  • Embroider  Sew :: Jelly Roll Purses - Embroidery Garden In the Hoop Machine Embroidery Designs
    Embroider Sew :: Jelly Roll Purses - Embroidery Garden In the Hoop Machine Embroidery Designs
  • (1) How to QUICKLY & SAFELY remove acrylic, gel, and dip powder polish | BAGGY METHOD - SO EASY! - YouTube
    (1) How to QUICKLY & SAFELY remove acrylic, gel, and dip powder polish | BAGGY METHOD - SO EASY! - YouTube
  • (1) Bouffant Surgical Cap - YouTube
    (1) Bouffant Surgical Cap - YouTube
Follow Me on Pinterest

Follow Me on Instagram

Instagram requires authorization to view a user profile. Use autorized account in widget settings

Recent Posts

  • Egg Safety Basics
  • Stable Mabel Support System Sale
  • Guest Post : 4 Vegan Cake Recipes No One Should Miss Out On!

Popular Posts

  • Ways To Make Your Cake Fluffy And Moist
  • How To Stencil on Cookies with Royal Icing
  • Doctored Cake Mix Recipes
  • Transferring an Image Without a Projector
  • All About Buttercream!
  • How to Fix Broken Ganache
  • Edible vs Non Toxic Gold Dusts

Categories

Search

Archives

Copyright © 2025 · Sharon Zambito and SugarEd Productions,LLC

Copyright © 2025 · Evangeline Theme on Genesis Framework · WordPress · Log in