Sugared Productions Blog

  • Blog Home
    • Home
  • Online Classes
  • Shop
  • Contact
  • About

Halloween Tutorial Round Up

October 21, 2015 by Sharon Z Leave a Comment

Hi guys! Today we have a few tutorials from our online school to share with you.

I hope these give you some inspiration for your Halloween projects !!

(You can join us for only $1 HERE to access all of these and over 300 more.)

–

–

Broomelda the Jack O’ Lantern Witch is a perfect center piece cake for Halloween! This 4 hour video covers a ton of techniques that will be useful across many cakes styles:

Broomelda video tutorial for $1

The 4 hour video course includes:

  • creating pumpkin shape from cake
  • covering pumpkin in fondant
  • fondant underlay method
  • airbrushing pumpkin
  • creating hat (from cake) and brim
  • structural support
  • using edible lace product to create striped bow and tulle sash on hat
  • creating and painting brooch
  • creating facial features
  • flashing eyes
  • creating broom
  • embossed fondant presentation board

Video sneak peek here:

LEARN MORE ABOUT BROOMELDA HERE

———————————————–


glowing skull cake tutorial

This skull cake is so spooky, and the electric lights in the eyes add an amazing touch.

———————————————–


halloween  figure tutorial

Next is this adorable fondant cat wizard and his book of spells.
The perfect balance of spooky and cute.

———————————————–


wizard figure tutorial

How cute is this wizard and his apprentice?
All modeled from fondant.

———————————————–


witchy cupcake toppers

These witch cupcakes are easy to make, add candy spiders for an extra spooky touch.


I hope that these tutorials get you inspired and ready for Halloween!!

Thanks to our school contributors Naomi Hubert, Rhu Strand, and Brittany Rumohr
for their wonderfully deatiled tutorials!

Remember you can join our online school for only$1 for a full month.

DETAILS HERE

Until next time; happy caking!

Sharon
Sugared Productions Online School

visit our online school


You don’t have to be like “them” to be great!

October 12, 2015 by Sharon Z 12 Comments

SugarEd Productions Blog

You log in to Pinterest to gather ideas for a client, or to find some inspiration for your next event. As you scroll, you start to admire all the amazing cakes you see. You oohh and ahh at the amazing cake paintings, the perfect cookies, and those incredibly innovative cake pops! Then it begins….cake envy.

Cake envy goes a little something like this: you start to compare photos, you start to compare colors, you start to compare styles. Before long you begin to give into the idea that you need to be “better”. What you contribute to the world is NOT cutting the mustard! We have all been here; today I am asking you to stop!

You Don't Have To Be Like Them To Be Great!

Please do not misunderstand me, as cake decorators we are all artists. We should never stop trying to get better, to grow, to improve. But YOUR style is necessary. The community needs your contribution! We have all heard the sayings about snowflakes: no two are alike. The same goes for artistic styles. To try and imitate or duplicate what someone else is doing, is robbing yourself and the world of all the beautiful work you have to offer! Do what moves you. Embrace your style, it’s yours and it’s beautiful.

The next time you feel cake envy kicking in, pull up this article. Remind yourself you have just as much to offer the community as anybody else. We are ALL needed! We are ALL valuable. We are ALL good!


Until next time; happy caking!

Sharon
Sugared Productions Online School

visit our online school


Halloween Treat Ideas and Tutorials

October 7, 2015 by Sharon Z Leave a Comment

Hi friends!

It’s almost that spooky fun time of year! Halloween is such a great holiday for making fun and creative sweets and treats. The possibilities are endless. It’s not to early to start planning, so here’s some ideas and tutorials you help get you kick started:


Mummy cake with edible gauze

Mummy Cake by The Partiologist


Mummy-Pumpkin-Cookies

Mummy Pumpkin Cookies by OMG Chocolate Desserts


oreo bat truffles

Oreo Bat Truffles by One Sweet Appetite


halloween bundt cake

Halloween Bundt Cake by Love Bakes Good Cakes


Reeses Frankenstein Cupcakes

Reese’s Frankenstein Cupcakes by Your Cup of Cake


Haunted Cupcakes

Haunted Cupcakes by Today’s Parent


Cake Ball Brains

Cake Ball Brains by Hungry Happenings


vampiresVampire Cake Pops from Bakerella


R158188.jpg.rendition.largestGhost Cupcakes from Better Homes and Gardens


candied apple 2
Purple Candy Apples
 by The Kitchen McCabe

Aren’t these just the cutest? I can’t wait to see what you guys make; link me to your photos in the comments!

Happy Halloweening!

Sharon
Sugared Productions Online School

visit school


Baking Troubleshooting Guide

October 1, 2015 by Sharon Z 15 Comments

Hi ya’ll! From time to time every baker experiences some issues when baking a cake.  Below are some tips to help you solve some of the problems you may encounter. I hope that these tips help you make beautiful cakes!

baking troubleshooting guide at SugarEdProductions.com


Cake Bottom Crust Too Dark:

  • oven too hot (lower by 25 degrees)
  • use a heat shield on bottom rack (flat cookie trays work great and are cheap)
  • using a lower quality cake pan (splurge for the good ones)
  • over-baking (take it out when just a tad of crumb remains on toothpick)


Cake Doming:

  • oven too hot (lower by 25 degrees)
  • over mixed cake batter (only use speed 1-2 on mixer for no longer than 90 seconds)
  • use wet strips (bake even strips) and a heating core to even out heat and baking rates


Cake Sticks to Pan:

  • not enough pan grease preparation
  • cake not cool enough (wait 10-15 minutes after cakes come out before removing from pan)
  • cake too cool (gently warm bottom of pan over low burner flame to melt the fat and flip cake out)


baking troubleshooting guide at SugarEdProductions.com

This is one type of product to use in your pan preparation for an easy release!


Sinking in Middle/Falling:

  • over-mixed batter (only use speed 1-2 on mixer for no longer than 90 seconds)
  • under-baked (doctored cake mix recipes take longer)
  • opening the oven door prematurely or too frequently (stop peaking!)
  • oven temperature too low (check your actual oven temp with an oven thermometer)
  • too much fat, liquid, or sugar in the recipe (don’t add more than recipe calls for)


Dry Edges:

  • oven too hot (lower by 25 degrees)
  • use wet (or bake even) strips
  • use heating core or flower nail
  • using low quality pan (did you get the good ones yet?)
  • over-baking (chocolate more susceptible; take it out 3-4 minutes before you “think” it’s really ready)


baking troubleshooting guide at SugarEdProductions.com

Here is a picture of a heating core in action! You can find these at your at your local craft store, cake decorating supply shop, and online.


Good News! I’ve created a printable PDF version of this blog post; keep it handy when you bake; it may help you troubleshoot when things don’t go quite as expected. (It’s actually a PDF bundle of 3 that contains this troubleshooting guide, a cake servings chart, and a batter amount chart. Grab yours:

Send My Free PDF

(I have full tutorials on all these topics and more in our online school 🙂

Until next time, Happy Caking!

Sharon
Sugared Productions Online School

Visit our online school


Sugar Flowers, Flowers, and More Flowers!

September 24, 2015 by Sharon Z 4 Comments

Hi Sugar friends!

Today I want to share some of our tutorials that are floral inspired. Flowers are perfect for adding that special touch to your cakes! Get inspiration from these projects and add your own special touch!

fantasy rose sugar flower video tutorial

My easy fantasy rose, with bling in the middle for an extra effect!

I did these flowers in preparation for my appearance on TLC’s Ultimate Cake Off a few years back. (Any of you remember that hot mess ? LOL)


magnolia sugar flower video tutorial

The Southern magnolia is a classic! A good beginner flower to learn.

Will add a touch of elegance to any cake: wedding, anniversary, birthday and more.


poppy sugar flower video tutorial

Red is such a bold color! These poppies are sure to make people look twice!


wafer paper ranunculus tutorial

wafer paper ranunculus tutorial

Wafer Paper has so many possibilities!

You would be surprised how easy it is to learn to make these gorgeous Ranunculus flowers.


apple blossom sugar flower tutorial

These apple blossoms are so realistic!

This would be perfect for those cakes that need a soft, feminine addition!


isomalt sugar garden video tutorial
How about an isomalt garden?


isomalt sugar garden video tutorial

Sidney Galpern of Simi Cakes used both blown and pulled sugar to create these gorgeous flowers in the video tutorial she filmed for our online school.


isomalt sugar garden video tutorial

And a sweet little birdie too! ( And the leaves, and dragonfly, and sculpture on top……)


fantasy Bermuda Bling sugar flower video tutorial

My custom Bermuda Bling fantasy flower is super easy to make.


fantasy Bermuda Bling sugar flower video tutorial

Simple gumpaste cut outs with pearl and dragees turn boring cutters into extraordinary flowers.


gumpaste peony video tutorials

Who doesn’t just love all the varieties peonies come in?


gumpaste peony video tutorials

Gorgeous open ruffled peony.


oriental gumpaste peony video tutorialOriental style open ruffles peony.


gumpaste peony video tutorialTraditional closed  full size peony. Just gorgeous!


watercolor buttercream and chocolate blossoms video tutorialGorgeous water color buttercream and chocolate blossoms.

watercolor buttercream and chocolate blossoms video tutorialThese flowers are made of solid chocolate, not modeling chocolate 🙂


What a beautiful array of edible flowers, yes?

I hope you get some inspiration from these, some of my favorite sugar flowers! I want to see your floral creations, so link me in the comments!

** Our school contributors did an amazing job putting together tutorials for our online school. Thanks to Lisa Bugeja, Kara Andretta, Naomi Hubert and Sidney Galpern.

Until next time, Happy Caking!

Sharon
Sugared Productions Online School


NOLA Photography http://bentzphotography.com/

Doctored Cake Mix Recipes

September 16, 2015 by Sharon Z 232 Comments

Hi sugar friends!

Today let’s talk about a sometimes controversial topic: doctored cake mixes. There is quite a debate about this in the cake decorating world.

Some folks feel that using box mixes is not real baking nor are they real cakes. Well, as a big boxed mix gal myself, I wholeheartedly disagree. A good box mix cake is just as worthy as a great scratch recipe. Using a mix does not make you any less of a baker or a decorator, and don’t let anyone make you feel differently. I embrace all types of cakes (homemade and mix), icings (shortening based American and butter based meringues), and fondant (commercial, homemade and marshmallow based.) Everything has its place in cake decorating, and you should use what works for you and your customers, and don’t feel bad about it!

Scratch baking will never go out of style, and there’s nothing quite like a great homemade cake. But doctored mixes offer the best of both worlds. You get the consistency and reliability of a box mix, and the texture of homemade cake. Scratch baking is indeed a science, and requires the proper mixing technique and temperature of ingredients to get the right result. Sometimes you just want things to be a little easier 🙂

Feel free to bake whatever way you are comfortable with (or both). There are no wrong answers.

Here are my favorite doctored recipes. We’ll start with the most basic and work up to the more involved.


Basic Doctored Cake Mix

Result: the addition of the extra egg and pudding will give you a just slightly more dense cake than the normal fluffiness of a plain box mix. Great for cupcakes, buttercream cakes; but not recommended for carving, structured cakes, or under buttercream/fondant cakes.

Ingredients

  • 1 box desired flavor cake mix
  • ingredients listed on box
  • 1 large egg
  • 1 small box instant pudding in a coordinating flavor

Directions

Use one box mix and prepare according to instructions, adding the extra ingredients listed above.
Pour into prepared pans and bake at 325 until it tests done.


Cake Mix Extender

Result: This is great for when one box is not enough and 2 boxes are too much for your needs. It will give you a texture very close to regular box mix. Great for cupcakes, buttercream cakes; but not recommended for carving, structured cakes, or under buttercream/fondant cakes.

Ingredients

  • 1 cup all purpose flour
  • 1/2 cup sugar
  • 1 tsp. baking powder
  • 1 egg
  • 1/2 cup water

Directions

1. Sift dry ingredients together with cake mix in a large mixing bowl. Mix in the ingredients called for on the box (eggs, oil and water), adding the extra egg and water from this recipe.
2. Mix on medium/low speed until smooth and no lumps remain, being careful not to over mix. (No more than 2 minutes.)
3. Pour into prepared pans and bake per instructions on box. (I bake at 325 for more even baking.)


Pound Cake From a Mix 

Result: A fairly dense cake, close to a scratch pound cake, but not quite that dense. Good for carving, buttercream or fondant cakes. A little too heavy for cupcakes and dessert style cakes.

Ingredients

  • 1 pkg (18 oz) favorite cake mix
  • 1 pkg (4 serving size) instant pudding mix
  • 4 eggs
  • 1 cup water
  • 1/2 cup oil

Directions

1. Preheat oven to 350°F. In large bowl, combine cake mix, pudding mix, eggs, water and oil; beat at medium speed with electric mixer for 2 minutes. Pour into prepared pan.
2. Bake 30-35 minutes for round pans; 35-40 minutes sheet pan. Cool in pans 10 minutes; remove from pans to cooling grid and cool completely.


White Almond Sour Cream Cake by Rebecca Sutterby (WASC)

Result: This recipe is world famous. Probably the most common doctored recipe out there. This makes a super moist cake with good density. Not quite as dense as pound cake but a tight crumb. This cake can be a bit soft and “wet” and might form a crystallized sugar “shell” on the top when baking; that is normal. This will also extend the volume vs a regular box recipe.Good for dessert cakes, cupcakes, carving, buttercream or fondant cakes. Makes great cake balls with no binder needed. Seriously a wonderful recipe. (The carrot cake version is to die for.)

Ingredients

  • 1 box cake mix 15.25 ounces
  • 1 cup all purpose flour
  • 1 cup granulated sugar
  • 1-1/8 cup water
  • 1 cup sour cream
  • 1 tsp. clear vanilla flavoring
  • 1 tsp. clear almond flavoring
  • 2 Tbsp. vegetable oil
  • 4 large egg whites or 3 whole eggs

Directions

1. Combine dry ingredients in mixer bowl and mix well with whip attachment. Add remaining ingredients and mix with beater attachment on speed 1 – 2 until smooth and incorporated. Do not overmix.
2. Pour into prepared pans and bake at 325 until done. Baking times will vary, but a 10 inch round cake will take approx. 60 to 65 minutes.
3. You can make this into any flavor by starting with a flavored cake mix, and adjust the flavorings as desired. May be doubled.

— NOTE: The water is reduced to 1 1/8 cup per mix for the now smaller 15 oz cake mixes. — I do not recommend Pillsbury for this recipe.
— NOTE: You can create almost any flavor cake with this recipe by starting with that flavored cake mix and changing the additional flavorings.


Sharon’s Sturdy Cake Recipe:

Result: This is my go to and most used recipe. Makes a very sturdy cake, dense but not quite a pound cake, tight crumb, and super moist. Not as soft and wet as the WASC. Good for dessert cakes, cupcakes, carving, buttercream or fondant cakes. Makes great cake balls with no binder needed. A great multi purpose recipe.

Ingredients

  • 1 box cake mix (Sharon uses Betty Crocker)
  • 1 small box instant pudding in a coordinating flavor
  • 1 cup sour cream
  • 1 whole large egg
  • 3 large egg whites
  • 1/2 cup water
  • 1/3 cup plus 1 Tbsp. oil
  • 1 tsp. vanilla flavoring (optional)
  • 1 tsp. almond flavoring (optional)
  • 1 tsp. butter flavoring (optional)
  • other flavorings as desired

Directions

1. Mix all ingredients in mixer at speed one or two, scraping down the sides, until just incorporated. Batter will be very thick. Fill pans just a little over half full.
2. Bake at 325 until center bounces back and toothpick is clean. Be careful not to underbake. The will take longer to bake than an undoctored mix due to the added ingredients.

— NOTE: you can create almost any flavor cake with this recipe by starting with that flavored cake mix, a coordinating pudding flavor, and changing the additional flavorings.
— NOTE: white chocolate flavored pudding will keep the batter more white in color, and vanilla will make it more yellow. Recipe may be doubled.


So that’s my top doctored mix recipes and I use them proudly! I hope you find them helpful. Let me know if you try any and how you like ’em. Leave me a comment and tell me your favorite doctored mix recipe.

AND…… as a thank you for stopping by my blog, I’ve got a free video for you on how to make the WASC, probably the most popular doctored recipe out there:

SEE THE VIDEO HERE 

Happy Caking!
Sharon

Gumpaste Autumn Leaves Tutorial

September 9, 2015 by Sharon Z 16 Comments

Hi guys! Today we have a tutorial from Judy Anderson over at judyscakes.blogspot.com. She is going to show us how to make realistic Fall Leaves, perfect for those Autumn Themed treats we showed you recently!


How To Make Fall Leaves

Fall is my favorite time of year! The harvest season finally is over, the crisp autumn air moves in, and the kids go back to school. It seems that life becomes more relaxed, and everything begins to slow down just a bit. One of my favorite things about this time of year is watching the leaves transform into a beautiful display of colors!

Where I grew up, the leaves pretty much went from green to yellow to dead. Although it was beautiful, those leaves can’t compare to the kaleidoscope of autumn colors found in other areas of the country. I now live in Utah, surrounded by majestic mountains with several canyons only minutes away from my front door. If you drive through these canyons during the fall season, the array of colors you’ll see is simply breathtaking!

A few weeks ago, I decorated a cake with several different fall flowers and leaves. Some people asked me how I made these leaves, while a few even thought they were real! Now that’s quite a compliment! (Pardon me… I’m blushing at the moment. LOL)  So I thought I’d put together a tutorial to show you how it’s done.

Part #1 will show you how to cut out the leaves. Part #2 will show you how to color the leaves.

PART ONE:  Cutting out the leaf.

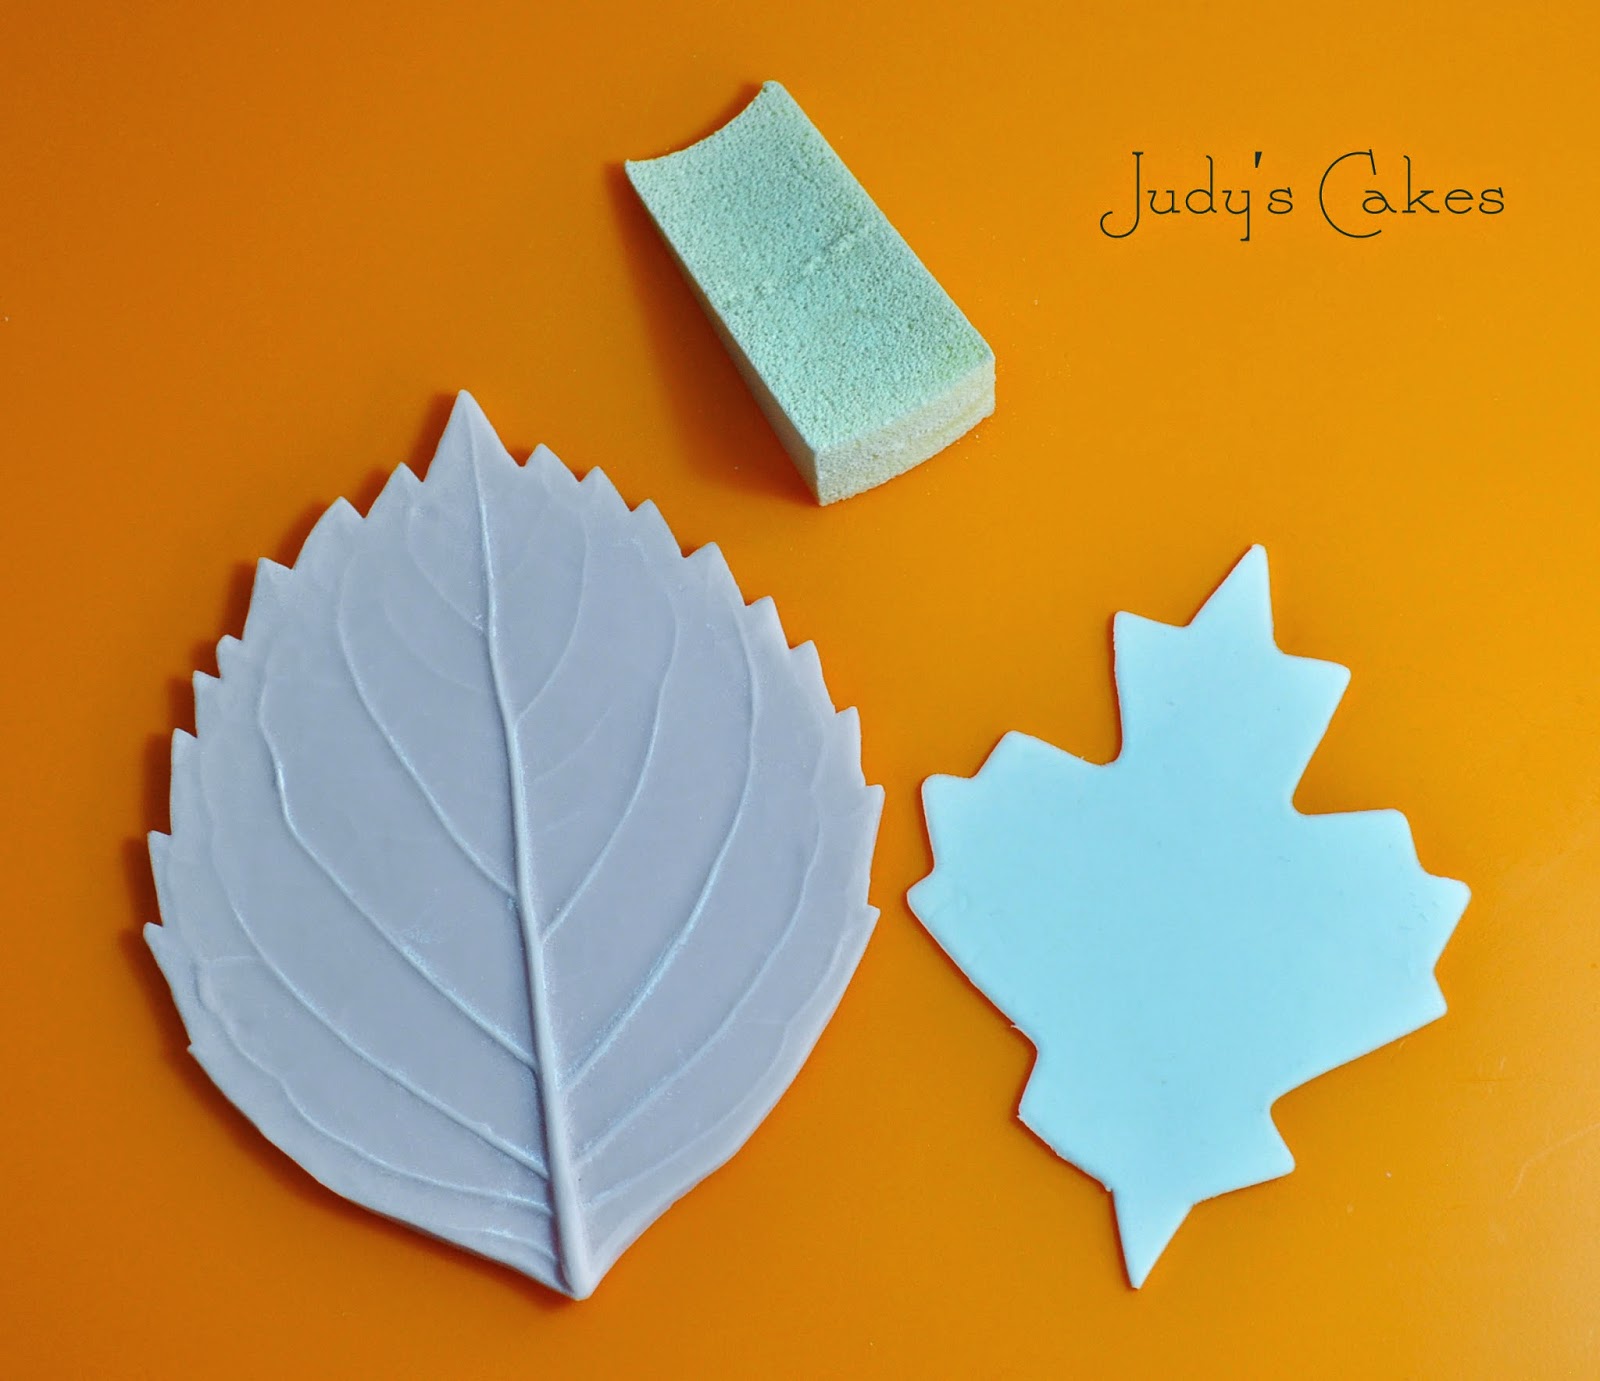
You’ll need: gum paste, rolling pin, ball tool, foam pad, triangle makeup sponge, leaf cutter, and a leaf veiner.
Roll the gum paste out until it’s thin. Place it over the top of the leaf cutter. Roll the rolling pin over the gum paste, then run your finger across the edge of the cutter. Doing this will give you a much cleaner cut edge.
The leaf cutter I used has an annoying thick stem at the bottom of the leaf. (I have no idea why they designed it that way!) Use a sharp knife to cut the outer edges of the stem off so it’ll look more realistic.
Next get your veiner and makeup sponge ready.
Place your leaf over the top of the veiner. Then, using the makeup sponge, press down on the leaf to imprint the vein details onto the gum paste.
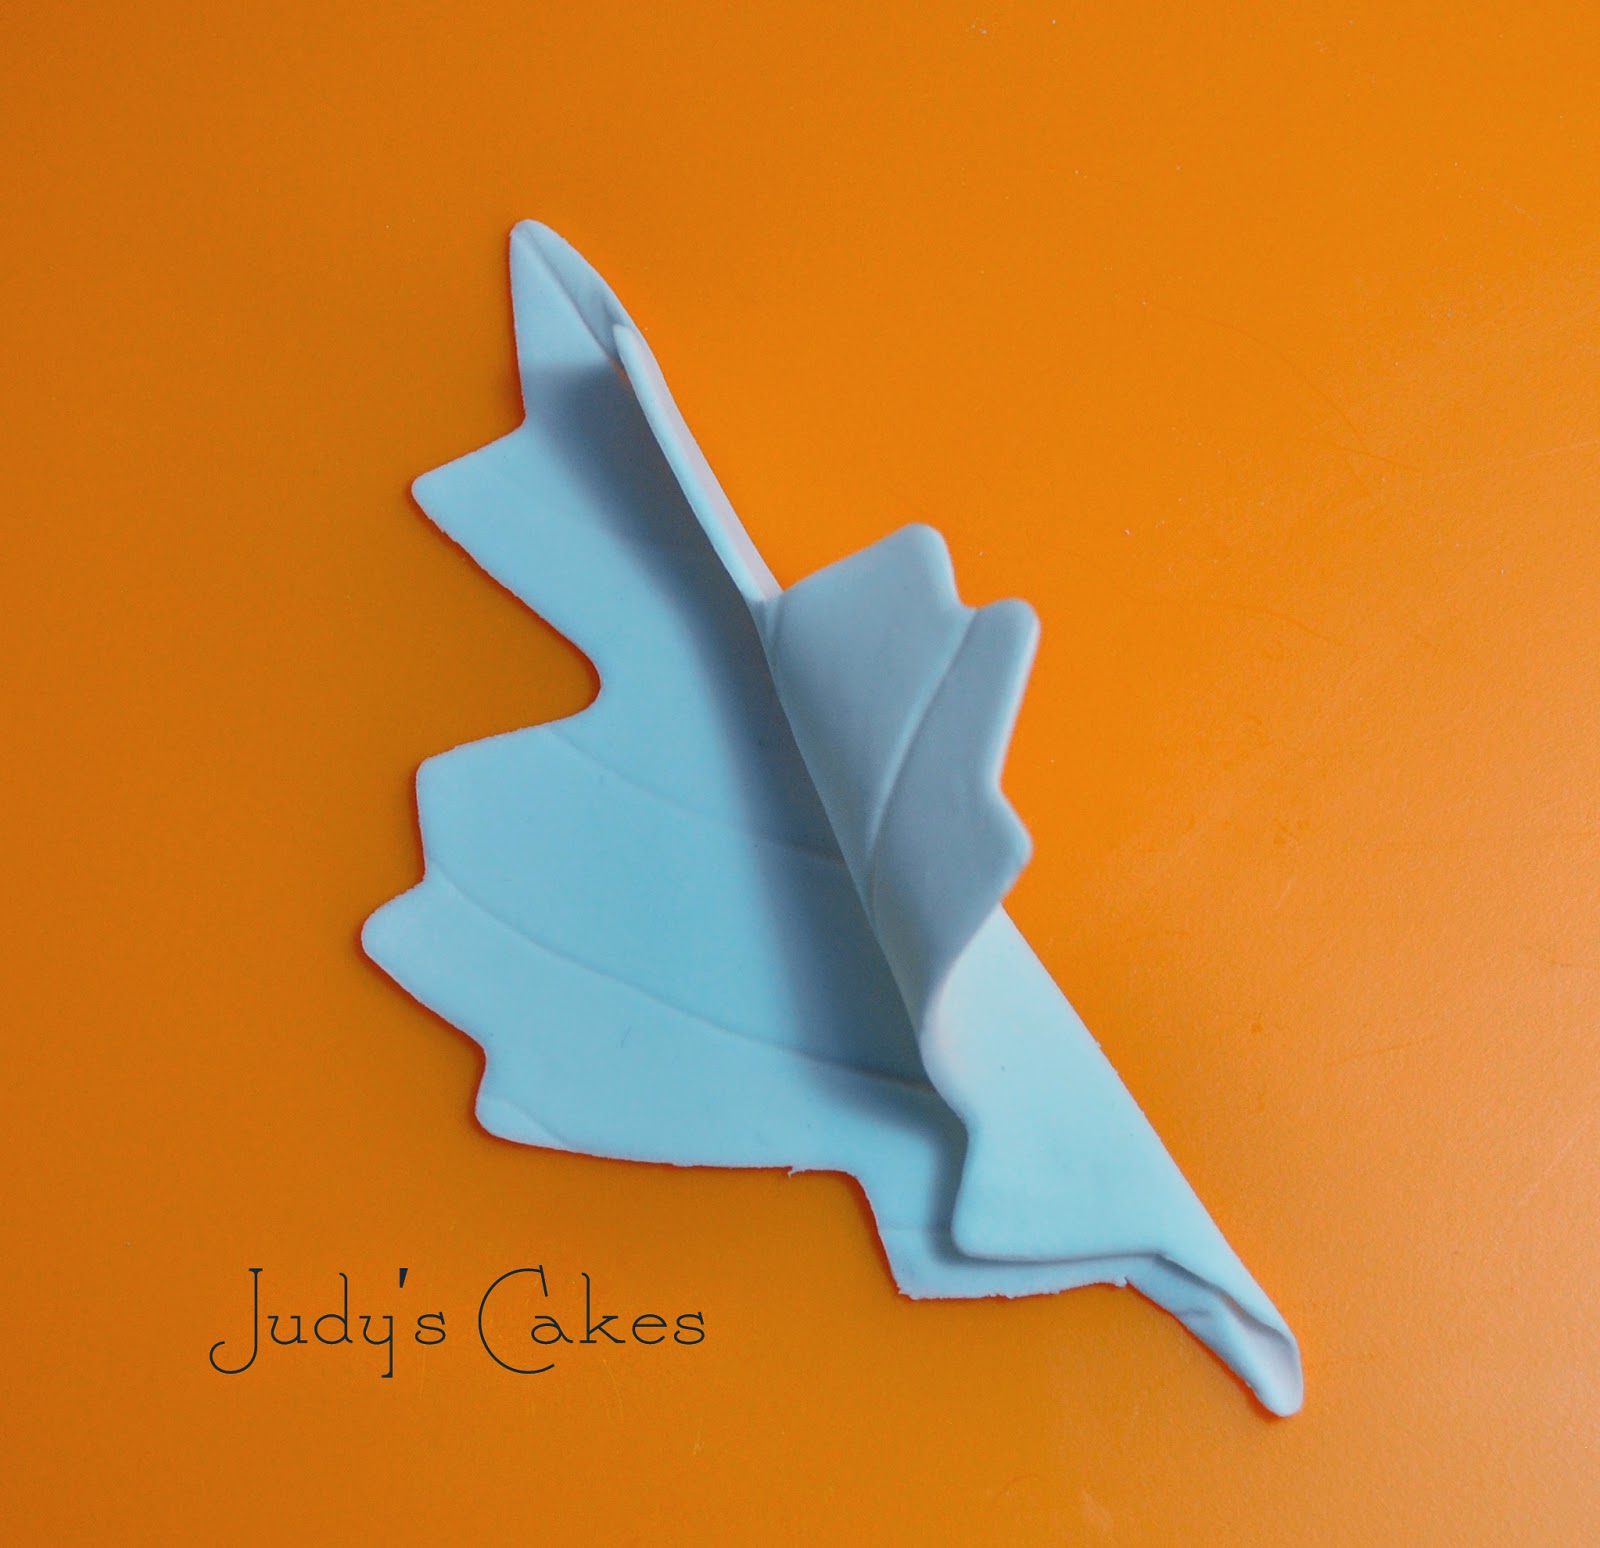
Fold your leaf in half to make the center vein more defined.
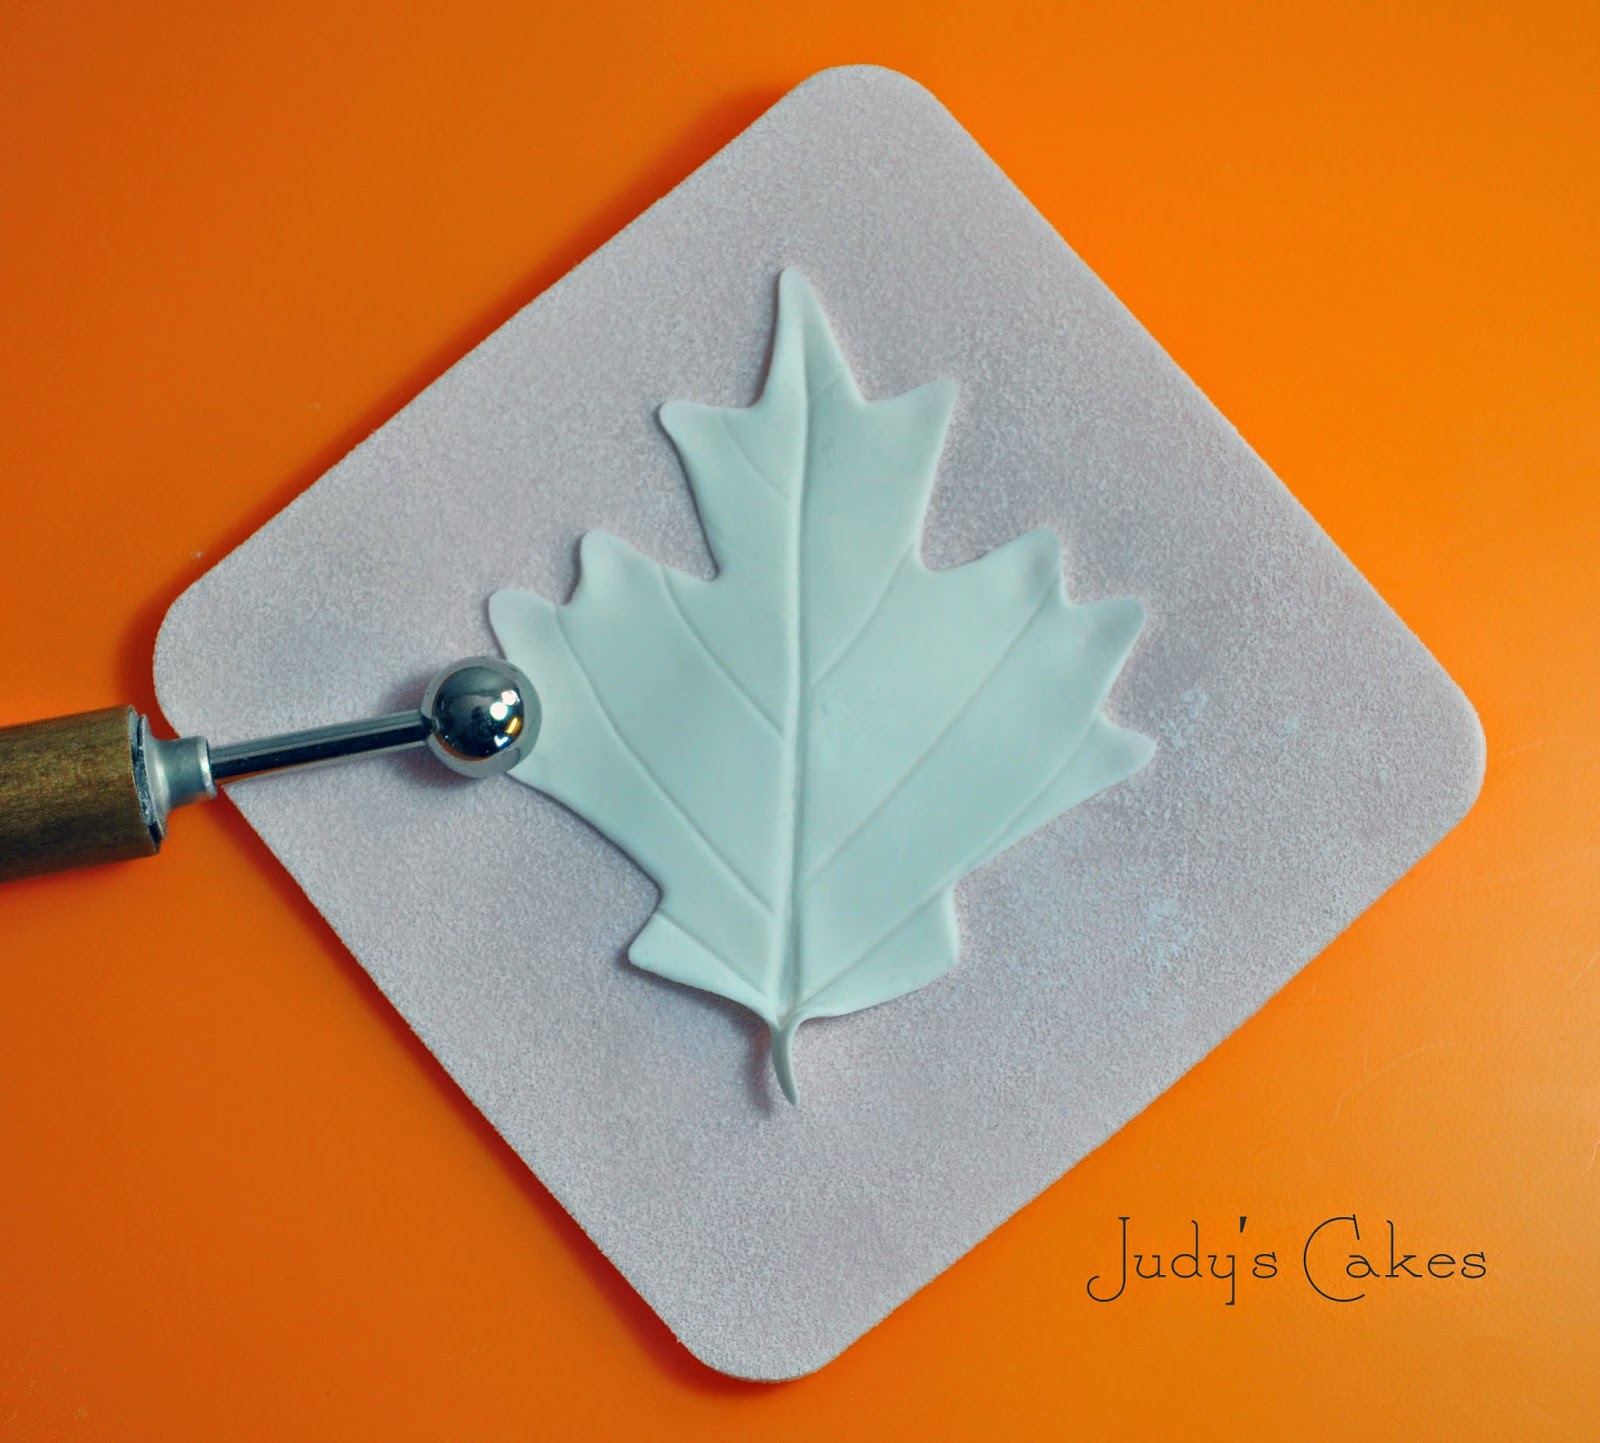
Place the leaf on a foam pad, then use the ball tool to thin the outside edges of the leaf.
Using your fingers, pinch together the bottom stem and the tip of each rounded edge on your leaf. You can see above that the edges on the right side are pinched, while the edges on the left are not.Forming little points like this instead of leaving the edges round makes a huge difference. I think this one of the most important steps in making your leaf look more realistic.
Here’s the finished leaf!  Dry your leaves on crumpled aluminum foil or egg crate foam to keep them from being too flat. Now let the leaves dry completely before adding any color.

 In the first part I showed you how to cut out a leaf and make it look more realistic. Here I’ll discuss using different petal dusts on your leaves to achieve bold vibrant colors.

 At the top of this picture is a plain yellow leaf that was cut out of gum paste. Below it are three examples of the same basic leaf that were brushed with different colors of petal dust. Yes… even the orange leaf started out yellow. The color possibilities are endless!!!

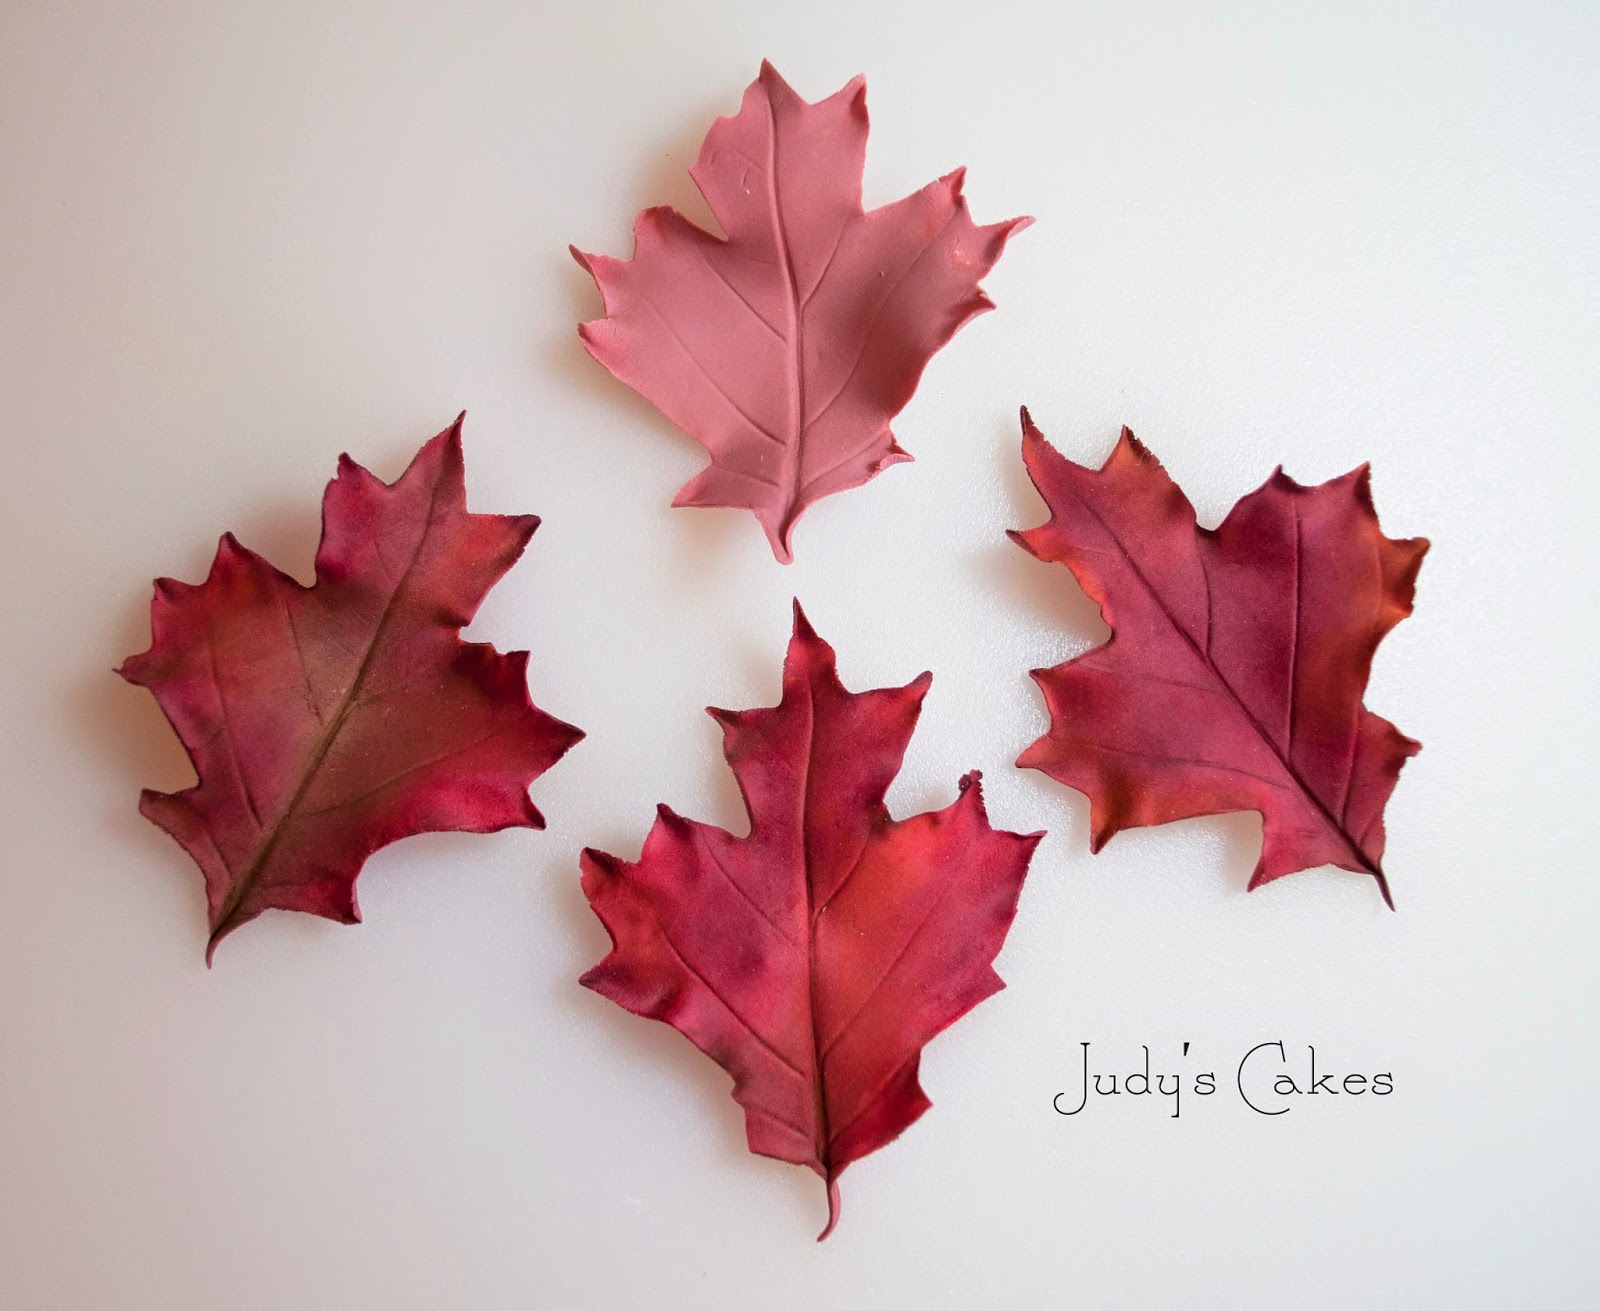
Here’s a similar example to the one above. Except I used pink gum paste instead of yellow to make the basic leaf.

 Before we get started, here are a few basic rules to keep in mind:

1- Never start out using dark colors.
You can always make a color darker… but it’s almost impossible to lighten it up! This same rule applies to both gum paste and petal dust. By starting out light,  it’s easier to vary the value and intensity of each color.

2- Less is more.
Begin by adding colors a little at a time. You can always apply more color later… but it’s very difficult to remove once it’s on.

3- Blend the edges of the colors together.
Doing this will make the colors flow together naturally, so they won’t look spotted or splotchy. Be careful, however, not to over blend!

4- Don’t worry if the tips or small parts of your leaf break off.
The truth about fall leaves is that they’re either drying up or already dead. Take a look at real leaves… you’ll notice that they’re all shriveled up, crumbly, torn, or even have holes in them. Leaves are not perfect. In fact, they’ll look more realistic if they have flaws.

5- Use many different colors of petal dust on each leaf.
Don’t be afraid to make extra leaves and experiment with your colors. You won’t know how they work unless you try them.

6- Use a lot of different brushes.
I use small paint brushes to apply the petal dust. For this tutorial, I used one brush for the yellows, one for the greens, one for the light reds and oranges, and one for the dark reds and burgundy. Plus I had one very tiny brush for only dark brown.


OK… let’s start with the yellow leaf.

I began by dusting a mid-tone yellow here and there, concentrating on the center of the leaf.

Then I randomly add light orange to a few other places on the leaf.
 
Next, I deepen the color by adding a mid-tone orange to the outside edges of the light orange spots.

Then I add a couple of different reds to the outside areas of the dark orange. The farther out from the center I go, the darker the colors become. Finally, I hit a few of the lighter spots with bright yellow. This helps add vibrancy to the leaf.

The next step is to add a just a touch of dark brown. Using the flat side of your tiny brush, stroke upward across the very outside edge of your leaf. This helps bring dimension and realism to it’s appearance. Finally, add just a hint of brown to the veins. Be careful not to go too dark, or the veins will look like you drew them in.

There’s a huge variety of colors you can make with a basic yellow leaf. Play around a little, and see what kind of colors you can come up with.

Next up… the red leaf.

I start by adding a reddish orange color to different parts of the leaf.

Next I brush on a mid-tone red to the remaining areas.

I deepen a few of the reds by adding an even darker red color.

 Finally, to make the dark reds look even richer… add burgundy to a few spots. You can also add some pink or light orange to brighten the lighter areas. Finish off by touching just the outside edge of your leaf with dark brown, and then lightly trace over the veins. (Do this the same way it was described above for the yellow leaf.)

Here’s an example of a variety of colors you can achieve by starting out with the same basic pink leaf. Try using different shades of orange, pink, red,  burgundy, and even a little dark green.

These fall leaves are a great way to practice your skills. Don’t be afraid to play around and use a variety of color combinations. You can even try adding blue or purple to your color scheme! If a leaf breaks… don’t worry, it doesn’t matter. You can still use it! The whole idea is to discover new ways to use color and to have fun. You might even be surprised at how artistic you can be!!!

unnamed

Judy Anderson-  Judy’s Cakes

I was an art major in college, so my art background has been very helpful in developing my cake designs. Cake decorating has blended my love for art and baking together into one! I began decorating cakes in 2008. I’m self taught and specialize in making gum paste flowers. Several of my cakes have been published in Cake Central Magazine, and I won honorable mention in their “Wedding Cake of the Year” contest. I’m also an ongoing contributor to the Satin Ice Website.


NOLA Photography http://bentzphotography.com/

Hey Batta Batta Batta Swing!

September 5, 2015 by Sharon Z Leave a Comment

Hi sweet friends!

Since we are in the throws of summer, today let’s talk about America’s favorite past time: baseball….but in all sugar! Here’s some sweet baseball projects that will hopefully inspire you to create your own.

How about a 3D baseball glove all made of cake! So realistic it will knock the (baseball) socks off your guests! With just some easy carving and simple airbrushing, it’s a home run.


Final_top

Next we have a baseball cap cake so real looking it’s sure to fool people! Tip: Add your hometown colors and make it a game day treat


                                  Hat078


Finally, this array of baseball themed sugar cookies is sure to be a crowd pleaser! Sweet butter cookies decorated with royal icing details, even down to the tiny stitching!

Try these next time you need a baseball themed treat and you’ll  hit a grand slam!

** Our school contributors did an amazing job putting together tutorials on these. Thanks to Charity Fent Cake Design, LilaLoa Cookies and Sandy Thompson.

Until next time, happy caking!

Sharon

www.sugaredproductions.com

  • « Previous Page
  • 1
  • …
  • 6
  • 7
  • 8

Sharon Zambito

Sharon Zambito

An RN turned SAHM turned cake maniac. Owner of SugarEd Productions Online School. Join me for some caking, baking, and all around sweet fun :)

Follow me..

  • Facebook
  • Instagram
  • Pinterest
  • YouTube

Pinterest

  • Autumn House Two Trees Machine Embroidery Design – Blasto Stitch
    Autumn House Two Trees Machine Embroidery Design – Blasto Stitch
  • Embroider  Sew :: Jelly Roll Purses - Embroidery Garden In the Hoop Machine Embroidery Designs
    Embroider Sew :: Jelly Roll Purses - Embroidery Garden In the Hoop Machine Embroidery Designs
  • (1) How to QUICKLY & SAFELY remove acrylic, gel, and dip powder polish | BAGGY METHOD - SO EASY! - YouTube
    (1) How to QUICKLY & SAFELY remove acrylic, gel, and dip powder polish | BAGGY METHOD - SO EASY! - YouTube
  • (1) Bouffant Surgical Cap - YouTube
    (1) Bouffant Surgical Cap - YouTube
Follow Me on Pinterest

Follow Me on Instagram

Instagram requires authorization to view a user profile. Use autorized account in widget settings

Recent Posts

  • Egg Safety Basics
  • Stable Mabel Support System Sale
  • Guest Post : 4 Vegan Cake Recipes No One Should Miss Out On!

Popular Posts

  • Ways To Make Your Cake Fluffy And Moist
  • How To Stencil on Cookies with Royal Icing
  • Doctored Cake Mix Recipes
  • Transferring an Image Without a Projector
  • All About Buttercream!
  • How to Fix Broken Ganache
  • Edible vs Non Toxic Gold Dusts

Categories

Search

Archives

Copyright © 2025 · Sharon Zambito and SugarEd Productions,LLC

Copyright © 2025 · Evangeline Theme on Genesis Framework · WordPress · Log in