Sugared Productions Blog

  • Blog Home
    • Home
  • Online Classes
  • Shop
  • Contact
  • About

Turkey 3D Cookies

November 18, 2011 by Sharon Zambito 3 Comments

Thanksgiving Blog Blitz Post #4!


Gobble! Gobble!


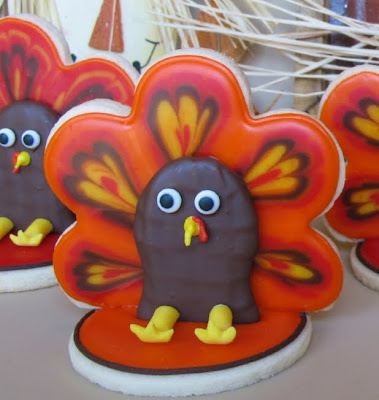
How about some 3D turkey cookies?


As I have mentioned before, I have a weakness for cute little turkey confections. Here is another take on turkey cookies:


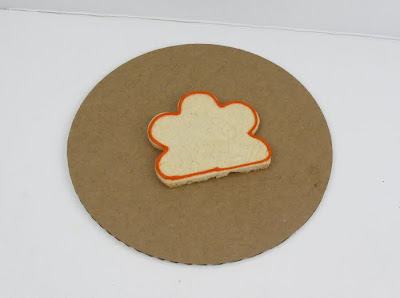
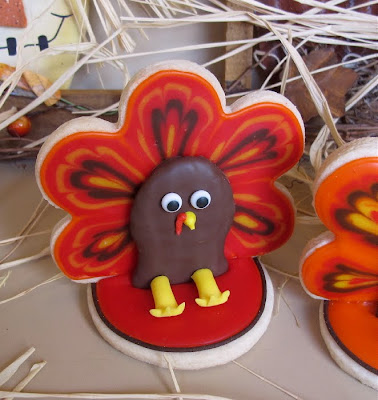
Bake your  favorite  cookie recipe and cut out large blossom shapes. After cooling, cut a portion off the bottom to make a flat  bottom edge. Outline your cookie with thickened icing and flood in your main color. I used glace icing here, but you can also use royal.


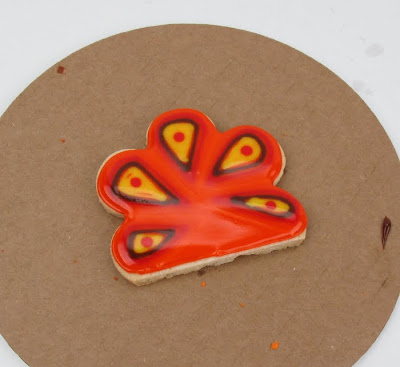
Immediately pipe in the above pattern with the other colors in flood consistency icing. It will sink right in. Then take a toothpick and drag it through that pattern, starting from the outer edge of the cookie, in toward the center.


Do this 3-5 times in each section of the blossom. You will create the feather pattern you see above. Let that fully dry, about 24 hours.


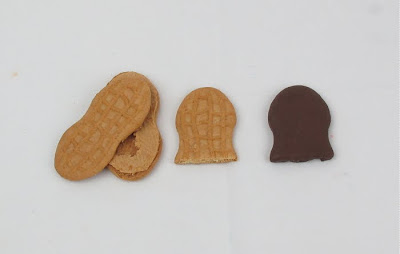
Use Nutter Butter cookies to make the turkey body. Take the cookies apart, scrape off the peanut butter, happily eat that, and then cut the  bottom portion of the cookie off. Happily eat that too. Dip the cookie in melted chocolate and let dry fully.


Use candy eyes, and royal icing to pipe the beak and red jiggly neck thingy. (Been getting a lot of use out of those candy eyes lately too. They rock.)


When you are ready to assemble, outline and flood a circle shaped cookie for the base. Let that set up for a few hours, but not until it is fully dried through. At this point you can put the feather cookie and body cookie on top of the base cookie. It will sink down a little bit into the still partially wet icing. When that fully dries, it will hold the whole cookie together. You might have to prop up the  back of the cookie with a little something while it is drying to  keep it perfectly upright.  Let that  base surface dry very well.


Use a clay gun to extrude a thick string of yellow fondant. Smash down  one  end with your finger and then cut out notches to make the feet.


Bend the feet up at the ankles and put them in place. I also used a very thin clay gun string in black to outline the base cookie to give it a little pop.


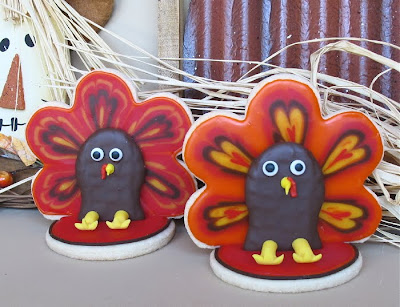
Turkey time!  How cute would these be on your Thanksgiving place setting? Or lined up on a dessert buffet.

I hope you try these. You will seriously impress your family and friends!


Sugar Cookie Recipe:

one cup sugar
one cup butter
one egg
1 tsp each vanilla and almond flavoring as desired
3 cups all purpose flour, sifted

Cream sugar and softened butter. Add egg and flavorings and beat for a minute or so. Add flour one cup at a time until just incorporated. Knead gently for a minute. Ready to roll out and use right away. Bake at 325.


Glace icing:

one pound powdered sugar
6 TBS light corn syrup
6TBS milk
clear flavorings as desired

Combine in bowl and mix well with a whisk. Adjust with more sugar or milk to create outline and flooding consistencies.


MAKE US PLEASE!

Happy Turkeys!
Sharon
www.sugaredproductions.com


Share this:

  • Tweet
  • Email
  • Print

Filed Under: Cookies, Holidays, Recipes, Thanksgiving and Fall, Tutorials

Comments

  1. ButterYum says

    November 19, 2011 at 1:24 am

    absolutely adorable!!!

    Reply
  2. SugarEd Productions says

    November 20, 2011 at 3:05 am

    It does not dry quite as hard, but dry enough to stack and bag; but still soft to the bite. It is quite nice.

    Reply
  3. FarzNinja says

    November 20, 2011 at 8:59 pm

    Awww, as soon as I saw that I couldn't resist the temptation to eat those lovely cookies! 🙂 I am definitely making those according to your blog post in the future! Moreover, I hope you can spare some moments to check out my new blog: http://ninjapenguinlife.blogspot.com/

    Thanks!

    Reply

Leave a Reply Cancel reply

Your email address will not be published. Required fields are marked *

Sharon Zambito

Sharon Zambito

An RN turned SAHM turned cake maniac. Owner of SugarEd Productions Online School. Join me for some caking, baking, and all around sweet fun :)

Follow me..

  • Facebook
  • Instagram
  • Pinterest
  • YouTube

Pinterest

  • Autumn House Two Trees Machine Embroidery Design – Blasto Stitch
    Autumn House Two Trees Machine Embroidery Design – Blasto Stitch
  • Embroider  Sew :: Jelly Roll Purses - Embroidery Garden In the Hoop Machine Embroidery Designs
    Embroider Sew :: Jelly Roll Purses - Embroidery Garden In the Hoop Machine Embroidery Designs
  • (1) How to QUICKLY & SAFELY remove acrylic, gel, and dip powder polish | BAGGY METHOD - SO EASY! - YouTube
    (1) How to QUICKLY & SAFELY remove acrylic, gel, and dip powder polish | BAGGY METHOD - SO EASY! - YouTube
  • (1) Bouffant Surgical Cap - YouTube
    (1) Bouffant Surgical Cap - YouTube
Follow Me on Pinterest

Follow Me on Instagram

Instagram requires authorization to view a user profile. Use autorized account in widget settings

Recent Posts

  • Egg Safety Basics
  • Stable Mabel Support System Sale
  • Guest Post : 4 Vegan Cake Recipes No One Should Miss Out On!

Popular Posts

  • Ways To Make Your Cake Fluffy And Moist
  • How To Stencil on Cookies with Royal Icing
  • Doctored Cake Mix Recipes
  • Transferring an Image Without a Projector
  • All About Buttercream!
  • How to Fix Broken Ganache
  • Edible vs Non Toxic Gold Dusts

Categories

Search

Archives

Copyright © 2025 · Sharon Zambito and SugarEd Productions,LLC

Copyright © 2025 · Evangeline Theme on Genesis Framework · WordPress · Log in