Sugared Productions Blog

  • Blog Home
    • Home
  • Online Classes
  • Shop
  • Contact
  • About

Hey Batta Batta Batta Swing!

September 5, 2015 by Sharon Z Leave a Comment

Hi sweet friends!

Since we are in the throws of summer, today let’s talk about America’s favorite past time: baseball….but in all sugar! Here’s some sweet baseball projects that will hopefully inspire you to create your own.

How about a 3D baseball glove all made of cake! So realistic it will knock the (baseball) socks off your guests! With just some easy carving and simple airbrushing, it’s a home run.


Final_top

Next we have a baseball cap cake so real looking it’s sure to fool people! Tip: Add your hometown colors and make it a game day treat


                                  Hat078


Finally, this array of baseball themed sugar cookies is sure to be a crowd pleaser! Sweet butter cookies decorated with royal icing details, even down to the tiny stitching!

Try these next time you need a baseball themed treat and you’ll  hit a grand slam!

** Our school contributors did an amazing job putting together tutorials on these. Thanks to Charity Fent Cake Design, LilaLoa Cookies and Sandy Thompson.

Until next time, happy caking!

Sharon

www.sugaredproductions.com

3D Standing Letter… in Cake!

September 5, 2015 by Sharon Zambito 1 Comment

Hello everyone!

I’m bringing back an older post from the archives due to it’s high popularity. A  fun project I made for my son’s graduation last year. See how I made it:

I was very pressed for time in getting it done, as well as preparing for the big party we threw for him, so this is not a high quality professional photo tutorial by any means.

It is more of an explanation of how I created the cake with a few craptastic photos that I took added in. This in no way represents the quality of tutorials I deliver in my online cake decorating school, LOL.

JWATER


The method that I used would not apply to every letter of the alphabet, but hopefully you will be able to take away some techniques from this tutorial that you can apply to other cakes. So here we go!


 (click to enlarge:)

Jason cake FINAL


The diagram above basically shows how the cake was constructed. The very bottom portion was Styrofoam cut from a 2 inch thick sheet cake dummy. Because the bottom of the letter has those cut angles on each side, I wanted to be sure that the base was strong enough to support the weight of the tall side of the J. I put a piece of regular cake cardboard on top of the Styrofoam for food safety reasons. Then I built the cake above that. This cake was about 17 inches tall, and after it was ganached and covered in modeling chocolate it was about 3 inches deep, (front to back). So it was basically a very tall and skinny cake. (caps and I would say it served 15 – 20).

I baked 2 inch high dense chocolate cakes in two pans: a 9 x 13 and a 12 x 18. I overfilled the pans so the cakes would bake over the top, so that when I leveled the cakes they would be as close to 2 inches tall as possible. I then cut pieces from those sheet cakes as I built the cake.

I used ¼ inch foam core to support the “tiers” of the cake. I did not want to go any higher than 6 inches of cake without internal support. I used bubble tea straws for support as indicated in the diagram above.

NOTE: I built the cake while it was actually lying flat on its back on a big board. Then I ganached it, partially covered it in modeling chocolate. And not until then did I stand it up, secure to the base board and finish it. You will see more of this process in the photos that follow.


IMG_4272

I made a paper template in the actual size I wanted the finished cake to be. (photo above). I then used this as a guide to to make the foamcore ganache templates, and also used this as a guide to build the cake.


IMG_4275

The photo above shows the section of Styrofoam cut out for the bottom of the cake. IMPORTANT: the size of this Styrofoam base is about a1/4 -1/2 inch smaller all the way around than the paper template itself.

The reason for that is that there has to be enough room around the cake, once built, to apply a thick layer of ganache. If you cut this Styrofoam piece exactly the same size as the template, and build the rest of the cake to the exact measurements of your paper template, you will have no room for ganache later when you use the cardboard templates.


IMG_4277

Above you see two templates made from one quarter inch foam core. These were my ganache boards. These were covered in press and seal plastic wrap, and used as the guide for the bench scraper to ganache the cake after it was built.


This next portion I am going to explain, I do not have process photos of:

I built the cake lying flat on the bottom foamcore template. I had the entire thing lying on the larger foamcore board (that you see in the photo below). Once the cake was all “stacked” and built, I then put a layer of ganache on the entire top surface of the cake. While the ganache was still very soft, I put the top foamcore template (covered in press and seal) on it and pressed firmly down. I used a level while pressing down on the top template to get it as level as possible. I then left it alone for a while so the ganache would firm up. Then I took a larger foamcore board and put it on top of the entire cake and flipped the entire project over. I removed the previously bottom, but now on top, foamcore template. Repeated the process of applying a layer of ganache, putting the (press and seal covered) template board back on, pressing firmly and getting it level. I left that to set up until firm.


10338808_10202926199169361_863531217_n

Then I ganached the sides of the cake and used the edges of the two templates on the top and bottom of the cake to guide my bench scraper, to give me the sharp outline of the letter. (We have instructional videos in our online school on making spreadable ganache, as well as using two template boards like this to create a perfect shell.)

I put a very thick layer of ganache on all sides of the cake, because I wanted it to be super stable once I stood it up. I wasn’t sure how the cake was going to react to standing up straight, so I went really heavy with the coating of ganache. (You can see here why it is important that the Styrofoam base and the entire cake once built, was smaller than the actual template boards. It left space for ganache to be applied around the outer perimeter of the cake.)

Remember that the top and bottom templates are covered in press and seal plastic wrap. The smooth sides of the plastic wrapped templates are against the ganache. Once the whole cake was covered in ganache, (as you  see in the photo above), I left it overnight to totally set up. The next day, the templates popped right off and I repaired any divots in the surface of the ganache with some fresh ganache and let that set up totally before starting to cover the cake.

Next came the covering of the cake. I decided to use modeling chocolate so that I would have more workability time and be able to blend seams and such better than if I had used fondant. In retrospect, I’m not sure I would do that again. The modeling chocolate showed a lot of blemishes and was rather “delicate”. I wonder if I could have gotten a cleaner looking surface using fondant with tylose. (I realize that these photos do not show the imperfections in the surface of the cake, but there were many.)


10309564_10202938189429110_7344175358695697366_n (2)

Back to the covering of the cake: I first covered the sides of the letter. I rolled out strips of modeling chocolate and wrapped them around the sides of the cake. I did not cover the whole perimeter of the cake in one strip of modeling chocolate. I did it in sections and placed the seams in the inside corners of the letter as indicated in the photo above. Next, I covered the top surface with modeling chocolate, trimmed it, and blended the seems joining the side strips to the top piece with my finger.

Note: notice in the photo above that I did not cover the Styrofoam at the base of the cake. I did not want to stand the cake up onto modeling chocolate, because the weight of the cake would have caused it to squoosh out the bottom and not given a clean look.

Then it was time to stand the cake up. I slid the cake a bit so that the bottom edge of the Styrofoam was even with the bottom of the rectangular cardboard you see in the picture above. Then I put my hand under that cardboard and used that to stand the cake straight up onto the wood grain fondant covered baseboard. I put some melted white chocolate on the cake board where the bottom of the J would be standing on it.


phorrrrrto (2)

Here is the back of the letter, right after the cake was stood up onto the board. Two wooden dowels were then driven through the cake and down into the baseboard as indicated above. I decided not to put a long wooden dowel down the tall side of the J because I was not traveling with this cake. If I were going to have to bring it to another venue, I would recommend doweling that side too. That being said, the cake was pretty stable once it was all assembled. I think the ginormous amount of ganache surrounding the cake made it very stable.

To cover the back of the cake: I rolled out modeling chocolate onto a piece of foam core, popped that into the freezer for about 10 min., then cut out the letter shape using my paper template. I popped that back into the freezer for another 7 min. or so to get it super firm. I used shortening, applied liberally, (as you can see in the photo above), as the glue to hold the back panel on. The back panel was very firm from being in the freezer, so I just stood it up and attached it to the back of the cake, being careful not to put too much pressure onto the precariously standing cake. I then used my fingers to smooth the seam where the back panel and the side strips of modeling chocolate met.


phxsdsdcsdoto (2)

Here is a photo of the cake after it is standing up and doweled into the baseboard. The holes on the top of the cake created from the wooden dowels were plugged with little pieces of modeling chocolate and blended in as well as possible. (However, they were visible.)

NOTE: I wanted the front of the cake to have some dimension and have that “collegiate font” look. So I actually created another panel with red modeling chocolate in the shape of the J, but made it a bit smaller then the front of the cake. I applied that to the front of the cake, then I outlined that with black fondant using the semicircle disc of my clay gun.

NOTE: the woodgrain fondant board was made by putting fondant onto a cake drum. I scored it to create planks, used a wood grain impression mat, and painted it with airbrush color diluted with vodka. Once that was dry, I dusted it with brown petal dusts to give it more dimension. Glued a 5/8 inch black ribbon around the side of the board. (We have video tutorials on woodgrain boards as well in our online school. Shameless plug #2, LOL)


DSC_7291 (B0830132xBC09D)-001

This photo shows the (broken) tassel laying on the board after we cut the cake. The tassel was made using a clay gun. I built it on an 18 gauge wire in the shape of an upside down L. That allowed me to insert the wire into the front of the cake, to give the illusion that the tassel was actually dangling in front of the cake. ( The wire was coated in white chocolate before being inserted into the cake.)

The bulldog was simply an edible image applied to a piece of fondant, and allowed to dry to create a plaque.


Now to cutting and serving:


DSC_7264 (B0830118xBC09D)-001

The first piece was cut where indicated.


DSC_7270 (B0830121xBC09D)-001

Then cut horizontally right along the top of the ¼ foamcore board that was holding up the top portion of the cake.


DSC_7274 (B0830124xBC09D)a

Continued to serve the top portion.


DSC_7285 (B0830129xBC09D) (2)

Then after the top foam core support board was removed, I just cut across to create pieces from the tall side of the cake. You can see the wooden dowel sticking out on the shorter side. All the cake has been served on that shorter side and right under that little bit of brown is the Styrofoam.


DSC_7286 (B0830130xBC09D) (2)

(I call this an action shot. I was moving so fast, the camera couldn’t keep up with me!) Terribly blurry picture, but you can see me removing a bubble tea straw as I came across it while serving.


DSC_7285 (B0830129xBC09D)-001

Cake to ganache ratio is ridiculous. I did have emergency syringes of insulin on standby.


DSC_7276 (B0830126xBC09D) (2)

And in case that wasn’t enough sugar, I served it with whipped cream and caramel sauce 🙂 I had 911 on speed dial.


DSC_7291 (B0830132xBC09D)-002

If you look close enough, you can see the patch on the top of the modeling chocolate where the other wooden dowel was inserted. They were  visible and it did bug me LOL. The way to avoid that would have been to stand up the cake and dowel it to the baseboard before any modeling chocolate was applied. But I did not want to cover the entire cake with modeling chocolate in the standing position, so I chose the lesser of two evils. (But the patches still bugged me, LOL)

_____________________________________________________________

And so that is it! I hope that this gave you enough information to help you to try to create your own tall, skinny standing cake.


Check out my online cake decorating school!

 $5 for 30 days of full membership. Use coupon code OFF50 


AD


www.sugaredproductions.com

Happy Caking!

Sharon


NOLA Photography http://bentzphotography.com/

How to color wafer paper and make a peony

June 15, 2015 by Sharon Zambito 2 Comments

Hi Y’all!  Wafer paper flowers are so trendy right now! We’ve had requests to repost this, so  today we have guest blogger, Summer Stone, from Cake Paper Party, here to teach us how to color our wafer paper and make this gorgeous poppy!  Take it away, Summer!

Wafer paper continues to gain popularity in cake decorating because of its low ticket price and ease of use for beginner and professional cake decorators. The trouble is that it comes in one color: white. While white is lovely for many projects it is often desirable to have other colors for your decorating repertoire. Some decorators color wafer paper by printing on it with food safe ink from a printer; but not all of us have access to such a printer or the cash to shell out for one. Thinking there had to be a better solution I came up with a way to color this medium for less.


wafer-poppy2web

Let’s get started coloring wafer paper for flower petals and other cake and cupcake decorations!


poppy-suppliesweb

Here are the supplies you will need:

  • wafer paper
  • scissors
  • cosmetic sponges
  • binder clips
  • candy food coloring (Wilton Candy Red and Americolor Oil Candy Color Orange used here). Candy color is essential because it is oil, not water based and therefore will not melt the wafer paper.
  • toothpicks
  • small container of water
  • small paint brush
  • wax paper


petal-drawweb


 petal-cutweb1

1. Start by preparing your wafer paper shapes. Here I hand drew petals on the wafer paper then cut them out with scissors.


   color-dropweb

2. Drop desired color of candy color on a piece of wax paper. Here is used red and a combination of orange and red mixed together and then straight red to create color gradient. If mixing colors use a toothpick to blend them together.


 sponge-colorweb

3. Make a sponge dauber. Cut cosmetic sponges into small pieces then fold and clip with binder clip.


 sponge-tampweb

4. Pick up color. Dip dauber into color and then tamp 15-20 times to ensure even distribution of color on the sponge.


start-spongingweb


 keep-spongingweb

5. Apply color to wafer paper.  Start dabbing the first color onto the smooth side of the  wafer paper petal with a light touch. Here I used a combination of two drops orange and one drop red. You will get the most even color if you add it lightly and gradually build the color up. Keep sponging until the color is even. Here I stopped 3/4 of the way up the petal so I could add a darker color at the petal tips.


done-petalweb

6. Add additional colors. To add gradient and shading apply a second darker color to the wafer paper. Let the petals sit for a couple of hours or overnight to absorb the color (they don’t exactly dry since it is oil color). Alternately you can use them immediately just try not to touch the petal surface.


petal-crossweb

7. Shape petals. Here I clipped a small line with scissors up from the bottom center of the petal. Then I applied a small amount of water with a damp paintbrush and crossed the petal over itself to create a cupped shape.


 wafer-poppy1web

8. Layer your petals. Layer the petals together using very small amounts of water to adhere. For the poppy I add a center of black thread  and modeling chocolate.


wafer-color-chartweb

Here is a chart of how different brands and mixes color onto water paper. The top is Americolor Candy Colors followed by Wilton Candy Color, Ateco Soft Gel Colors mixed with Flowcoat (3 drops Flow coat to 1 drop gel color) and on the bottom Wilton White Food Color mixed with candy color (1 to 1). Mixing the white with the candy color makes lovely opaque pastels.

Try this wafer paper coloring technique out and let me know what you think!


—————————————————————————————

Join SugarEd Productions Online School for only $1!

Use coupon code OneDollar

Join Now

Desktop45

_________________________________

New Easter Toppers Book by Naomi Hubert

March 15, 2015 by Sharon Zambito Leave a Comment

 IT’S HERE!

Our Sweet friend, Naomi Hubert of  Tea Party Cakes, has a new book!!  We’re so excited and it’s just in time for Easter!

The newest book from The Cake & Bake Academy is now out ready for Easter and I am so incredibly excited because our dear friend and contributor to our online school, Naomi, has step by step projects in the book.


Easter toppers book

I can personally assure you that this book is wonderful,
and all of the tutorials are top notch.

GREAT Spring and Easter projects.


The book is available in paperback on Amazon or if you can’t wait and want an instant copy you can order a pdf ebook here:

http://www.kyle-craig.com/buypdf.html

I hope you all love the book!

Congratulations, Naomi!!  We love the book too! 🙂 (and you!)


Easy Mardi Gras Masks by Lisa Bugeja

February 13, 2015 by Sharon Zambito 3 Comments

Hey everyone!  It’s almost that time of the year here again in the Big Easy!  Our guest blogger today is Lisa Bugeja of Flour Confections, and she’s here to share a quick and easy tutorial on Mardi Gras mask cupcake toppers.  Take it away Lisa!


IMG_7932


1

Supplies required:

Piping gel
Gumpaste (Confectioners Choice)
various Edible glitters (green, purple, gold and optional rainbow)
Mask cutter
Silpat mat
Flexible silicone container
Parchment paper
paintbrush
Isomalt
Airbrush color if needing to colour your own isomalt (Americolor)
Saran Wrap


 3

Roll out white gumpaste to a thin consistency (#2 on pasta machine). Cut out masks using cutter.


4

Place masks on silpat mat while you prepare isomalt.


5

Following manufacturers instructions, place pre-coloured isomalt nibs in silicone container and melt in microwave. CAUTION HOT! DO NOT TOUCH


6


8

9

When fully melted, carefully pour isomalt into eye cavities – be careful not to overfill. Let cool until hard and ok to touch.


10

Once cooled, gently bend gumpaste mask to give shape and place ball of plastic wrap in behind to help maintain shape while gumpaste dries.


12

13

When masks are dry, using a paintbrush, apply piping gel to sections of mask where you want to adhere the edible glitter.


14

17

18

In order to do tri-colour effect, paint each section separately and apply glitter immediately to painted areas BEFORE moving on to another colour.


IMG_7934

Once complete, place masks on top of iced cupcakes & enjoy!


*** Note: Isomalt will dull if placed in refrigerator or in high humidity – best to add to cupcakes just before serving.


Thank you Lisa!  These are so cute!

lisa

Lisa Bugeja is the award winning artist & creative force behind Flour Confections Inc. & Baked and Beloved in  Toronto, Ontario. Her work has been featured in numerous publications such as Brides magazine, Toronto Life,    Wedluxe Magazine, American Cake Decorating, Bakers Journal, People.com to name a few.  She has also been seen  on CTV’s Canada AM; and as assistant to Ashlee Perkins on Food Network Challenge, and assistant to Matthew  Somers on their winning episode of Cake Walk.

————————————————————————-


Pilgrim Pumpkin Mini Cake

November 9, 2014 by Sharon Zambito Leave a Comment

Hello Sugar Friends!
We are re-posting this cute guy from the archives…… lots of readers have been asking for him, so here we go!
–
–
–
I hope you are having a nice Fall so far, and are enjoying the anticipation and preparations leading up to the holidays.  Thanksgiving is my very favorite holiday, and I love making  fun treats for the occasion. And I have to tell you that this little dude has got to be  my all time favorite! I have been busting at the seams since I made him; I am so excited to share him with you!
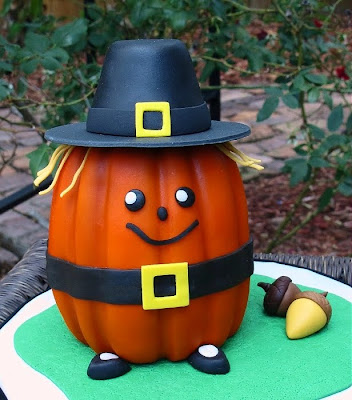
Meet my Pilgrim Pumpkin mini cake!
Don’t you just want to squeeze him?
Let me show you how I made him:
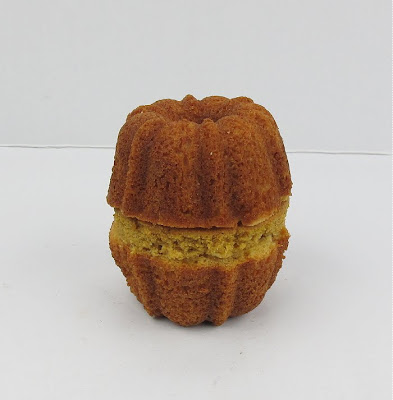
For his body I used two mini bundt cakes and a circle of cake I cut from a round layer with a cookie cutter. The height of the cut circle of cake was about 1/2 inch.
You need that extra height the circle of cake gives. Otherwise, he will be too squatty and you won’t have enough room for his belt and his face. If you want to spackle the seem with some stiffened buttercream to hide it more, you can do so.

 Crumb coat the cake with a  very thin layer of icing. Then cover the top half with orange fondant. Use a wooden dowel to impress in the grooves of the bundt pan to make them show up well. You will need a pretty thick layer of fondant or all the lumpy bumps  will show through. Or you can use two thinner layers of fondant, which is what I did. Once you get the top half covered, let it sit for a while to let the fondant set up some.
Then flip the cake over and do the exact same thing on the other half. Cut a clean seem between  both layers of fondant where they overlap in the middle, so that you get the result you see above.


Looking pumpkiny!

I airbrushed him just a little to help his colors pop, but that it optional. Cover the seem with a strip of black fondant to make his belt. Make his face with pieces of black fondant.

Cuteness emerging.
His hair is thin strips of a golden yellow fondant. Prop them away from his head  with  paper towels until they firm up. Make his adorable little pilgrim shoes from triangles of black fondant with an oval  piece of white fondant on top.At this point, just go ahead and squeal with delight. You will want you. You will need to. You have my blessing.
Cut a circle of black fondant for the brim of his hat, and fashion another piece in the tapered shape of a pilgrim hat. Let those both firm  up well. Attach the hat pieces together with  chocolate.
Once all is in place, add the  buckles to the belt and hat. I presented him on a little bit of fondant grass  with some acorns. At this point I called in all my family, my neighbors, the postman, and a stray cat to share my excitement with them.
Isn’t he just the cutest thing?
I heart him.
——————————

I often get asked where I get my ideas from, which can be all kinds of things. This project was inspired by this piece of  clip art I stumbled upon while searching on the internet for something:


My little guy came out pretty much how I envisioned in my head; which rarely happens. So I was very pleased.

Hope you give him a try, he was a lot  of fun to do!

Happy caking!
Sharon
www.sugaredproductions.com

—————————————————————————————

Join SugarEd Productions Online School for only $1!

Use coupon code ONE

Desktop45

Join Now

_________________________________


NOLA Photography http://bentzphotography.com/

Cake Lace with Wayne Steinkopf

October 28, 2014 by Sharon Zambito 2 Comments

Hi Sugar Friends!
Cake Lace is a new product taking the cake decorating world by storm. It’s an edible and flexible lace that has so many applications; to infinity and beyond! I have had a lot of members ask me for tutorials on this, but my  friend Wayne Steinkopf of Swank Cake Design  has beat me to it! He has two great videos that show you how to use Cake Lace in a couple of different applications. Enjoy!
swank1
Cake Lace Video 
swank2
Fantasy Flowers with Cake Lace Video
SHOP FOR CAKE LACE HERE

How to Color Wafer Paper

October 19, 2014 by Sharon Zambito 2 Comments

Hi Y’all!  Wafer paper flowers are so trendy right now!  Today we have guest blogger, Summer Stone, from Cake Paper Party, here to teach us how to color our wafer paper and make this gorgeous poppy!  Take it away, Summer!

Wafer paper continues to gain popularity in cake decorating because of its low ticket price and ease of use for beginner and professional cake decorators. The trouble is that it comes in one color: white. While white is lovely for many projects it is often desirable to have other colors for your decorating repertoire. Some decorators color wafer paper by printing on it with food safe ink from a printer; but not all of us have access to such a printer or the cash to shell out for one. Thinking there had to be a better solution I came up with a way to color this medium for less.


wafer-poppy2web

Let’s get started coloring wafer paper for flower petals and other cake and cupcake decorations!


poppy-suppliesweb

Here are the supplies you will need:

  • wafer paper
  • scissors
  • cosmetic sponges
  • binder clips
  • candy food coloring (Wilton Candy Red and Americolor Oil Candy Color Orange used here). Candy color is essential because it is oil, not water based and therefore will not melt the wafer paper.
  • toothpicks
  • small container of water
  • small paint brush
  • wax paper


petal-drawweb


 petal-cutweb1

1. Start by preparing your wafer paper shapes. Here I hand drew petals on the wafer paper then cut them out with scissors.


   color-dropweb

2. Drop desired color of candy color on a piece of wax paper. Here is used red and a combination of orange and red mixed together and then straight red to create color gradient. If mixing colors use a toothpick to blend them together.


 sponge-colorweb

3. Make a sponge dauber. Cut cosmetic sponges into small pieces then fold and clip with binder clip.


 sponge-tampweb

4. Pick up color. Dip dauber into color and then tamp 15-20 times to ensure even distribution of color on the sponge.


start-spongingweb


 keep-spongingweb

5. Apply color to wafer paper.  Start dabbing the first color onto the smooth side of the  wafer paper petal with a light touch. Here I used a combination of two drops orange and one drop red. You will get the most even color if you add it lightly and gradually build the color up. Keep sponging until the color is even. Here I stopped 3/4 of the way up the petal so I could add a darker color at the petal tips.


done-petalweb

6. Add additional colors. To add gradient and shading apply a second darker color to the wafer paper. Let the petals sit for a couple of hours or overnight to absorb the color (they don’t exactly dry since it is oil color). Alternately you can use them immediately just try not to touch the petal surface.


petal-crossweb

7. Shape petals. Here I clipped a small line with scissors up from the bottom center of the petal. Then I applied a small amount of water with a damp paintbrush and crossed the petal over itself to create a cupped shape.


 wafer-poppy1web

8. Layer your petals. Layer the petals together using very small amounts of water to adhere. For the poppy I add a center of black thread  and modeling chocolate.


wafer-color-chartweb

Here is a chart of how different brands and mixes color onto water paper. The top is Americolor Candy Colors followed by Wilton Candy Color, Ateco Soft Gel Colors mixed with Flowcoat (3 drops Flow coat to 1 drop gel color) and on the bottom Wilton White Food Color mixed with candy color (1 to 1). Mixing the white with the candy color makes lovely opaque pastels.

Try this wafer paper coloring technique out and let me know what you think!

—————————————————————————————

Join SugarEd Productions Online School for only $3!

Use coupon code 3MONTH

Desktop45

Join Now

_________________________________

White Chocolate vs. Candy Melts Part 3

October 2, 2014 by Sharon Zambito Leave a Comment

Guest Blogger, Summer Stone, from Cake Paper Party, shares more of her knowledge of modeling chocolate.  In this part, she explains the differences bewteen white chocolate and candy melts.  Have fun and take it away Summer!

Now that you have the ins and outs of how to make modeling chocolate (MC), let’s take a look at how to select the right product to make your MC out of.  Everyone has different needs, and budgets and availability so my goal is to explain my observations without deeming one product superior. That way you can make the best choice for you!


A-white-chocolate-web

For simplification I am going to analyze white chocolates and candy coatings at this time but understand that darker chocolates will also follow suit. The observations noted will include composition, price, color, ease to make, ease to fix, texture,  and taste and mouthfeel.

I tried to sample a variety of media (without going too crazy) that are widely available and you might be likely to use. They include Wilton candy melts, Ghiradelli baking chips, Wilton white chocolate, Ghiradelli baking bar and Callebaut callets (28% cocoa butter).

These are their differences as they relate to modeling chocolate.


 A-palm-and-cocoa-web

1. Composition. The greatest divide between theses products comes in their fat composition. Both candy coating and white chocolate contain sugar,  milk powder, lecithin and vanilla, but white chocolate uses cocoa butter for its fat while coatings and chips use palm oil. The palm oil is hydrogenated to make more solid at room temperature and more like cocoa butter. Above left is palm oil that is non-hydrogenated and remains creamy. It is likely that palm oil used in candy melts is more like the cocoa butter on the left. Cocoa butter is so solid at room temperature that it flakes rather than scoops.


A-Color-comp-web-words

2. Color. One of the most considerable factors in choosing a MC medium is color. Because cocoa butter is golden colored (see above) it imparts a pale yellow hue to white chocolate and the MC made from it. If you are looking for a natural color or a planning to tint your modeling chocolate a warm tone this is not a problem, but it can easily muddy and mute cool tones. Also, if you need a bright white it will have to be adjusted with white food coloring.

Palm oil on the other hand is white and produces a modeling chocolate in a tone that is easier to manipulate.  Moreover, candy melts and coatings come in a wide variety of colors which means they don’t require time to tint or money to invest in coloring products.


 A-chocolate-taste-web

3. Money. Cost is also an important consideration when choosing a product. Here is a list of approximate cost per ounce of the product that I used.

  • Wilton Candy Melts: $0.25/ounce
  • Ghiradelli White Baking Chips $0.30/ounce
  • Wilton White Chocolate $0.50/ounce
  • Ghiradelli White Chocolate Baking Bar $0.80/ounce
  • Callebaut White Chocolate Callets $0.75/ounce

White chocolate can cost more than three times what a confectionery coating does.


A-seized-web

4. Resistance to failure.  Due to the fact that coatings and melts contain palm oil which has a higher melting temperature than  cocoa butter it is less likely to break and leach fat than white chocolate it. Palm oil is also softer at room temperature than cocoa butter is so it is easier to work in fat that has leached out from the chocolate. For this reason candy melts are less likely to “fail” when mixed than white chocolate is.


 a-taste-chocolate-web

5. Fixability. Maybe correctable is the appropriate word?? Either way, for the same reasons that palm oil products are resistant to failure they are more difficult to correct. A broken MC made from white chocolate is easier to work back into a smooth product because of the fact that cocoa butter has a lower melting temperature than hydrogenated palm oil.


A-MC-squish-labels-web

6. Texture. Here is where we start comparing the actual MC product side by side. Above I have tried to give you a picture that indicates what the textures are like but in truth the differences are extremely subtle and can only be felt in hand (that is except for the white baking chips). Here are their properties:

  • Candy melts yield the most smooth, silky product by feel. They also have a stretchy quality that is not found in white chocolate.
  • Baking chips make a terrible modeling chocolate that is very dry crumbly. It barely holds together. This product, as well as “almond bark” coatings, can work in a pinch but add at least one more part corn syrup to keep it held together.
  • White chocolate modeling chocolate has beautiful moldibility but has an underlying graininess that I found with all types of white chocolate. It is very subtly like moon sand. Don’t let me deter you by saying this; it is extremely subtle but it is just not quite as stretchy as candy melts. All of the white chocolates that I tried behaved similarly and created a lovely final product.


A-taste-vanilla-web

7. Taste and mouthfeel. Not surprising, a modeling chocolate tastes like the product it is made from so it comes down to a matter of preference.  I, in  a shameful sort of way, liked the Wilton white chocolate. It was pleasant and simple and was not nearly as sweet as the Ghiradelli baking bar, which was so sweet that it sort of hurt my brain. Callebaut tasted more like cocoa butter but in a pungent way that was not for my taste buds. The candy coating and chips tasted sweet and vanilla-y. They were not unpleasant just lacking cocoa butter flavor; more neutral perhaps. This you will have to taste for yourself and decide.

Where candy melt MC was silky by feel, white chocolate MC is silky on the tongue. The lower melting temperature of cocoa butter allows the white chocolate MC to dissolve creamily in the mouth.  The candy melts and chips were slightly gritty like small sugar crystals remained present.  Again, these differences were barely perceptible but still there nonetheless.

So there you have it! All sorts of things to consider when choosing what to make your modeling chocolate from. I hope this helps your decision making process and you can move forward into modeling chocolate wonderfulness!


—————————————————————————————

Join SugarEd Productions Online School for only $3!

Use coupon code 3MONTH

Desktop45

Join Now

_________________________________

How to Color Modeling Chocolate Part 2

October 1, 2014 by Sharon Zambito Leave a Comment

Guest Blogger, Summer Stone, from Cake Paper Party, shares her knowledge of modeling chocolate.  In this part, she explains 21 different ways to color it.  Have fun and take it away Summer!

Finally color! I love color! With all of the products and techniques available to color cake related items, I wanted to run through the gamut and see which ones work best with modeling chocolate (MC) and its unique set of properties. Certain methods work well for a specific type of decorating and not for others; some colorants confer altered textures or consistencies. Here I will share with you my insights for picking the right coloring method for your project.


A-color-agents-web

I wanted to try a wide variety of products for coloring to get a feel for many of the possibilities available so I used everything from grocery store liquid food color to petal and luster dust. Some of the options may seem redundant but I wanted to try some of the colorants in a variety of ways to see if there was an advantage or disadvantage to doing it a certain way. I am going to list them all so that you have a complete picture and understanding of the choices.

For all of the examples I started with white modeling chocolate to have a true sense of each colorants ability to color but starting with a MC made from a basic colored coating or candy melt can be a great option as well.

I divided the coloring into three categories:

  • Pre-coloring: mixing before the modeling chocolate is made by adding color to either the melted chocolate or the corn syrup.
  • Mid-coloring: mixing color throughout the made modeling chocolate.
  • Post-coloring: Applying color to the surface of the modeling chocolate.

Let’s start with Pre-coloring techniques!


A-mid-color-web

Pre-coloring is probably the easiest way to color modeling chocolate. The color easily swirls into your liquid of choice and then all you have to do is mix up your modeling chocolate as usual.  The downside is that you end up with one full batch of a certain color and sometimes it is difficult to determine what color your final product will be until it is made in full.  For this reason, I recommend pre-coloring when you are going to use a large quantitiy of one color of modeling chocolate and if you have an idea of the intensity your food color will impart. The following is a list of ways to pre-color MC.


A-corn-syrup-color-web A-corn-syrup-chocolate-web

1. Liquid or gel into corn syrup. In this first method gel or even inexpensive liquid food coloring is added to your measurement of corn syrup or liquid glucose, mixed up and the stirred into melted  chocolate or candy melts.  Here I added 2 drops of liquid food coloring (which spread across the surface of the corn syrup). I did not notice any change in the texture of the modeling chocolate.


 A-gel-color-to-chocolate-we A-candy-color-melts-MC-web

2. Candy coloring into candy melts or chocolate. Oil based candy food coloring is stirred into the melted chocolate or candy melts and then blended with the corn syrup. This created a lovely silky final product but since I added so much coloring (oops, slip of the hand!) it was a little softer than that made with other colorings. I recommend making a firmer than usual MC if you plan to use candy coloring.


A-gel-color-to-chocolate-we A-gel-into-melts-web

3.Gel coloring into candy melts or chocolate. Gel coloring is dropped into melted candy melts or chocolate and stirred before corn syrup is blended in. I don’t recommend this method. The melts seize before the corn syrup is stirred in.  You can still make a modeling chocolate via this method but the MC is disjointed, losing all of its stretch (you can see the crackles in the MC if you look closely). It also cools very firm and is crumbly when returned to. If for some reason you feel the need to do this, add extra corn syrup to keep in smooth and together.


   A-powder-color-melt-web A-powder-color-MC-web

4. Powdered food coloring into melted candy melts. A small scoop of powdered food coloring was added to melted melts and stirred in before mixing with the corn syrup.  Using this method the powder did not dissolve completely leaving speckles in the final product even after it was kneaded.  Perhaps if you are making robin’s eggs this would be desirable but for uniform color another method is advisable.  If you choose to use powdered colors I suggest dissolving it in vodka or lemon extract and then adding it to the corn syrup if you wish to color in the pre-mixed phase.


A-pre-color-web

Next we will move on to the Mid-coloring methods. These methods are the most practical and applicable for every day needs. They allow you to color from a small amount to a large amount of modeling chocolate and enable you to adjust the colors easily as you go. They also provide uniform coloring for nice solid color applications.


A-liquid-into-MC1web A-candy-color-to-MC2web

5. Candy color into MC. Candy food coloring is blended into the mixed modeling chocolate. The candy colors give nice smooth saturated colors but they do soften the modeling chocolate a bit so it is best to start with a firm MC recipe if using the candy colors.


A-gel-into-MC1web A-gel-into-MC2web

6. Gel color into MC. Gel color blends into the MC nicely and in moderate amounts does not affect the texture of the modeling chocolate greatly. This is probably the best general method for coloring modeling chocolate.


  A-gel-plus-CstarchMC1web A-gel-plus-CstarchMC2web

7. Gel color plus cornstarch into MC. If you need to achieve a very saturated color that requires the addition of quite a lot of gel color, the addition of cornstarch can help maintain the texture of the modeling chocolate by absorbing some of the moisture from the food color. The addition of cornstarch does dry the MC some and it may require an extra bit of working or a touch of shortening after storage.


A-liquid-into-MC1web A-liquid-into-MC2web

8. Liquid color into MC. Basic grocery store liquid food coloring is kneaded into modeling chocolate. This is probably the method that surprised me the most. I expected the liquid to cause the MC to break, but it didn’t. It actually worked very well and generated a nice bold color. This is a great option if this is the type of food coloring you have on hand or need to buy some in the wee hours of the morning at your local market. If you are going to add large amounts you may need to add some cornstarch to counter act the softening effects of the liquid.


A-petal-dust-MC1web A-petal-dust-MC2web

9. Petal dust into MC. For this I scooped a small amount of petal dust onto the MC and kneaded it in. It didn’t work as well as some of the other methods as far as blending and saturation is concerned but I feel like this is a good option if you are coloring a base that is later going to be dusted with the same color petal dust. Such as for flower petals or other items to be shaded in gradient.


him him A-MC-to-MC2web

10. Coloring with colored MC. Use already made solid colors of modeling chocolate to blend or tint your base color. This is a nice option because you will not affect texture at all and you will have a fairly good idea of the direction you are going with the colors you are trying to achieve. I like to have brown or chocolate MC on hand to mute and soften my modeling chocolate colors as well. If you have a basic rainbow of modeling chocolate colors on hand you can blend at whim to achieve any color.


A-fondant-to-MC1web A-fondant-to-MC2web

11. Coloring with colored fondant. A small amount of commercial colored fondant is used to color the MC.  If you are working with a colored fondant sometimes it is advantageous to color your modeling chocolate with the fondant to reach a complimentary shade. This works well if you keep your fondant to around 25%. Much more than that and you will lose some of the lovely characteristics of MC and it will start to act more like fondant.


A-gel-to-fondant-to-MC1web A-gel-to-fondant-to-MC2web

12. Coloring fondant with gels and adding to MC. Gel color is added to a small amount of fondant which is then added to the modeling chocolate. Adding gel to fondant first serves two purposes. First, it offsets some of the effects of the adding excess liquid to modeling chocolate. Be sure your fondant is firm or add extra cornstarch before you start. Second, it enables you to create a hypersaturated target color that you can then blend with the MC. This reduces  the risk of color overshooting by directly adding color to your final product. Once again, it is advisable to add only 25% fondant to your modeling chocolate.


A-candy-to-fondantMC1web A-candy-to-fondantMC2web

13. Coloring fondant with candy color and adding to MC. Candy color is added to fondant and then added to the MC. The reasoning is the same as above with a similar result. Once again the candy color has a slight softening effect so start with firm modeling chocolate or add a touch of cornstarch.


A-after-color-web


Here are the Post-coloring effects. These methods are best used for artistic touches such as dusting petals, painting details or accentuating texture.


A-petal-topweb

14. Dusting with petal dust. Dust on a layer of petal dust over a rolled out, cut or shaped decoration. This method works well for solid color effects as well as gradients and soft shading. The oils in MC adhere well to the petal dust for both dramatic and subtle coloring. For strong color effects use freshly shaped MC which has oils on the surface.


A-luster-topweb

15. Dusting with luster dust. Luster dust works similarly well with MC as petal dust but the color saturation is not as strong due to the translucence of the shimmer particles. For solid color shimmer pieces, color the modeling chocolate first and then dust with a complimentary shade of luster dust.


A-petal-extractweb

16. Painting with petal dust and lemon extract. Mix a small amount of petal dust with lemon extract and paint onto a cut or shaped piece of modeling chocolate. I feel that dusting gives a smoother effect. I had some slight clumping when painting, but this is also an option and gives very solid saturation.


A-gel-topweb

17. Painting with gel color. Apply gel color directly to the modeling chocolate with a paint brush. It beads up initially but as you stroke across the surface repeatedly it starts to set. This might be advantageous for accentuating texture such as wood grain. You could paint the color on and wipe off the beaded gel from the raised points before it is absorbed into the MC.


A-candy-paintweb (1)

18. Painting with candy color. Brush candy color across the surface of the MC with a paint brush. Candy color smoothly coats the surface of the modeling chocolate. Some brush strokes are slightly noticeable but this might be desirable if you are going for an artistic painted look.


 A-gel-spongeweb

19. Sponging with gel color. Using a cosmetic sponge and a binder clip, dip into a small amount of gel and tamp to absorb (see Coloring Wafer Paper). Then sponge onto the MC for solid color or shading effects. This technique avoids the beading up associated with painting the gel on. The gel color seems to soften the modeling chocolate slightly.


A-candy-spongeweb (1)

20. Sponging with candy color. As above, load a cosmetic sponge with a small amount of candy color and sponge onto modeling chocolate. This gives a lovely solid finish, or you can sponge a blend of colors or achieve a gradient of color. This technique would work well on petals. The surface dries well after a few hours and does not soften the MC pieces.


A-food-writerweb

21. Coloring with food safe markers. Color on a set piece of modeling chocolate with food safe markers. Allow your modeling chocolate to dry for a few hours before using this coloring method. You will not achieve solid coloring but it can be used to add small details or achieve a coloring book look.  This may also work for adding wood grain texture or grass effects.


A-sprayMCweb

22. Spraying with food color spray. Can spray coloring can be used to lightly mist modeling chocolate that has been set to dry for a few hours (left). If you mist too heavily it will bead up (see right). This technique could be useful to accent texture or shade organic looking pieces. A similar effect could possibly be achieved using an airbrush but I did not explore this technique.


Phew! There they all are! I apologize for the longest post ever, but I wanted to provide as much information as possible. This is also the end of my current series on modeling chocolate. I hope this helps you on your way to many modeling chocolate adventures!


Smiles 🙂

—————————————————————————————

Join SugarEd Productions Online School for only $3!

Use coupon code 3MONTH

Desktop45

Join Now

_________________________________

Happy Caking!
Sharon

  • « Previous Page
  • 1
  • …
  • 4
  • 5
  • 6
  • 7
  • 8
  • …
  • 15
  • Next Page »

Sharon Zambito

Sharon Zambito

An RN turned SAHM turned cake maniac. Owner of SugarEd Productions Online School. Join me for some caking, baking, and all around sweet fun :)

Follow me..

  • Facebook
  • Instagram
  • Pinterest
  • YouTube

Pinterest

  • Autumn House Two Trees Machine Embroidery Design – Blasto Stitch
    Autumn House Two Trees Machine Embroidery Design – Blasto Stitch
  • Embroider  Sew :: Jelly Roll Purses - Embroidery Garden In the Hoop Machine Embroidery Designs
    Embroider Sew :: Jelly Roll Purses - Embroidery Garden In the Hoop Machine Embroidery Designs
  • (1) How to QUICKLY & SAFELY remove acrylic, gel, and dip powder polish | BAGGY METHOD - SO EASY! - YouTube
    (1) How to QUICKLY & SAFELY remove acrylic, gel, and dip powder polish | BAGGY METHOD - SO EASY! - YouTube
  • (1) Bouffant Surgical Cap - YouTube
    (1) Bouffant Surgical Cap - YouTube
Follow Me on Pinterest

Follow Me on Instagram

Instagram requires authorization to view a user profile. Use autorized account in widget settings

Recent Posts

  • Egg Safety Basics
  • Stable Mabel Support System Sale
  • Guest Post : 4 Vegan Cake Recipes No One Should Miss Out On!

Popular Posts

  • Ways To Make Your Cake Fluffy And Moist
  • How To Stencil on Cookies with Royal Icing
  • Doctored Cake Mix Recipes
  • Transferring an Image Without a Projector
  • All About Buttercream!
  • How to Fix Broken Ganache
  • Edible vs Non Toxic Gold Dusts

Categories

Search

Archives

Copyright © 2025 · Sharon Zambito and SugarEd Productions,LLC

Copyright © 2025 · Evangeline Theme on Genesis Framework · WordPress · Log in