Sugared Productions Blog

  • Blog Home
    • Home
  • Online Classes
  • Shop
  • Contact
  • About

Tips For Gravity Defying Cakes

March 11, 2016 by Sharon Z 3 Comments

Hey it’s Sharon —

I’m sure you’ve noticed the recent craze in cake decorating: the gravity defying cake!

The old days of the “simple” topsy turvy cakes like below are gone.

gravity defying cake tutorial

gravity defying cake tutorial
Now it’s been taken up a notch, with increasing tilt angles and the use of custom internal structures to achieve the seemingly impossible:

gravity defying cake tutorial

They can be intimidating; especially the first one you make. But with that also comes the fun of the challenge and the feeling of pride when you’re done.

I’m an advocate for all of us trying to push past our comfort zones. I encourage you to give them a try if you haven’t. You might be surprised at what you can do.

If you do foray into the anti-gravity cake world, here’s a few basic tips to keep in mind:

  •  Plan, plan, plan – Take a good amount of time to really think it through and design your structure. Use whatever tutorials you can find, and apply that info to your specific project.
  • Don’t push it – Keep your angles at about 10 degrees, no more than 15. You’d be surprised how “topsy” a 10 degree angle will look.
  • Do a test run – If it’s your first go at it, do a dry run with maybe two tiers, to ensure you’ve got all the basics nailed down. You may discover some issues you didn’t expect, and you can resolve them before you do the “real” version.
  • Ensure food safety – This is a biggie. Structure cakes use a lot of materials not intended for use with food. Find out what steps you need to take to make sure all parts are compliant with food safety rules. Example: disinfect all PVC pieces before use or paint metal pieces with a food safe paint
  • Think about weight – Consider how much weight your structure will need to hold and choose your materials accordingly. A small bag of M&M’s pouring out into a “bowl” would work using a thin wooden or plastic dowel, but a hefty project like the one below will need heavy duty metal rods, flanges, PVC, washers and nuts to keep it stable.
  • Support your support – Just like a traditional tiered wedding or party cake, you need super strong support boards under each tier of cake. Use something that won’t flex or bend, like 1/2 inch fomecore, plywood, or MDF (covered with plastic wrap to make it food safe.)
  • Break out the ganache – The tiers that make up a gravity defying cake are often sitting at a pretty steep angle. I recommend using ganache under fondant, rather than buttercream. That ganache shell sets up nice and firm to hold everything in place with much less chance of shifting or sliding.
  • Have fun! Go ahead and dive in and have a good time. Don’t let fear hold you back. Start small and work your way up to the big time like this beauty:

gravity defying cake tutorial gravity defying cake tutorial gravity defying cake tutorial


Full length video tutorial for this gravity defying Birthday Bash cake is available in my online school along with a special offer:

LEAN MORE HERE

Happy Caking!
Sharon


NOLA Photography http://bentzphotography.com/

Guest Post: Gum Paste Name Cake Topper Tutorial

February 23, 2016 by Sharon Z 7 Comments

Hi sugar babies! Today we have a guest post from Natalie over at Sweetness & Bite.

Today, she is going to show us how to make this super cute name topper!


Gumpaste-Name-Cake-Topper-Tutorial
You know that moment when a child does or says something that makes you suddenly feel really old? That was me a month or so ago when my niece Jazmyn told her mum (my best friend Katie) and I that she wanted “a Tumblr party”. I’ll admit, I had vaguely heard of Tumblr, but considering I can barely keep up with Facebook, I’m sporadic with Pinterest, and I’m only just slowly easing my way into Instagram, investigating this mysterious Tumblr thing was not on my list of priorities. After a bit of questioning, a few Google image searches, and a (for me) scarily perky YouTube video called “How To Be Tumblr” we eventually figured out that what Jaz liked about the Tumblr images she’d been looking at were the bright colours, room decor and, um, donuts. Sprinkles also seemed to feature heavily. That’s when I perked up, because sprinkles, I can do. Sprinkles, I understand. Sprinkles are kinda my thing.

The cakes we talked about were very sprinkly, and Jaz also liked the “drippy cake” trend inspired by Katherine Sabbath‘s fabulous cakes, so I threw those ideas together with a watercolour effect like some of the fanciful, pastel-y coloured Tumblr photos we’d been looking at.


Sprinkle-Watercolour-Drizzle-Cake tutorial


I’ve got a couple more tutorials coming up for the sprinkle tier of this cake, and also the watercolour effect I did on the top tier, but I thought we’d start right at the top and talk about the gumpaste name cake topper.

The easy route would have been to cut out individual letters in a block font, but I wanted a look similar to the gorgeous toppers made by businesses like Design at 409, Glistening Occasions and Communicake It, so I picked out a cursive font. I knew it would have some weak points where the letters joined together, so instead of cutting out one thick piece of icing, I decided to sandwich pieces of wire between two pieces of gum paste to reinforce the topper and make it less likely to crack. Clearly this means that despite being made from gum paste it’s not an edible cake topper, unless you enjoy flossing with wire, but it gives you the benefit of being able to use whatever font you like, make the topper whatever size you want, and colour-match it to the rest of your cake.

I haven’t yet tried this with a longer name, but my guess is that it will work best for names under 6 or so letters. That’s not to say it definitely won’t work for longer names, but if you do try it with one, make sure you add plenty of the reinforcing wires, make the support wires (the ones that you’ll insert into the cake) thicker or use florists tape to attach some skewers to the wires for extra support. And always, always make a backup topper.

You can also use the instructions for cutting the letters to make a name using individual letters in a block font, just cut each letter out from a thicker piece of gum paste (4mm or so is good) and insert a toothpick or skewer into the bottom of each letter.

There aren’t any terribly fancy tools needed for this, but a silicone-tipped colour shaper (from an art supply store) or the wedge tool from a set of Sugar Shapers (their new mini shapers are on my drool-list) will make smoothing the edges of the letters a lot easier.

I cut up a thin plastic document sleeve to make my template, but you can use any thin, flexible plastic that is similar in thickness to acetate (or, if this helps, like good old fashioned overhead projector sheets. Ahh, primary school memories.)

I should warn you that this is a real watch-the-work-in-progress tutorial, no prettily staged and photographed stunt-toppers here, all these photos were taken as I made the topper I used on the cake, and the back-up topper. The only way it could be more raw and even less professional is if I’d videoed myself making it whilst wearing my pajamas and then uploaded it to YouTube for you to watch.

But don’t worry. I’ll never make you suffer through anything like that. I’ll just let you read through it and look at the pictures. Of the topper, I mean. Not me in my pajamas.

What you need:

Thin plastic or acetate
Cutting mat
Waxed paper
Scalpel or craft knife
Small scissors
Isopropyl alcohol (or other strong alcohol like cake decorator’s alcohol/rose spirit)
Rolling pin and/or pasta machine
Gum paste (or fondant mixed with tylose). I have the best results with Satin Ice gum paste.
Shortening (I used Crisco)
Large resealable plastic bag
Paintbrush and sugar glue (I used glue made from tylose and water)
Silicone-tipped colour shaper – wedge shape (from an art store) or Sugar Shapers
Ruler
20 & 22 gauge paper-covered wire
Vodka
Foam pad
Thin straws or flower picks

What to do:

Choose your font and write out the name. I did this in Photoshop, but you can use Word, Pages or any other program that you’re comfortable using. For Jaz’s name, I used ‘Salamander’ font, and did the ‘J’ and ‘az’ on separate layers in Photoshop, so that I could move the ‘az’ lower to make sure the the end of ‘z’ was in line with the end of the ‘J’. Where the bottoms of those letters sit is where the name will sit against the cake, and where we will insert the supports. Don’t be put off, that’s just what I had to do to make these particular letters work. With most other fonts the bottoms of the letters will line up on their own.


Print out the name onto regular printer paper, then place it under the sheet of thin plastic, and use a permanent marker to trace the letters onto the plastic. Use small scissors and/or the scalpel to cut out the name. Rub the plastic with some strong alcohol to remove the ink from the edges (even though it’s ‘permanent’ I still find that it can come off on the icing, so I just remove it with alcohol.)


(Now is the part where I apologise for the amount of pink in this tutorial. I used a pink cutting board, pink gumpaste and (this is the really stupid bit) pink plastic for the template. So yeah, sorry about that. It makes it hard to see, but hopefully I can make up for that with some exceptionally well written instructions. Hopefully…)

Have a look at your lettering and pick out the places that you think will be the weakest and most likely to break. Here I figured it would just be the joins between the letters. Cut small pieces of 22 gauge wire and curve and bend them to shape, ensuring that you make them long enough to bridge the weak point and reach a thicker part of the letters, which won’t be so fragile. Then find the bottom points of your letters (here the tails of the J and Z.) where the base of the letters will sit against the cake. Curve the end of some longer, thicker pieces of wire to shape, then bend the wire so that it will go straight down into the cake. Set the wires aside.


Tape a piece of waxed paper to a cutting mat. Rub the surface of the paper lightly with shortening. (I’d already done this in the picture above.)

Roll out your gum paste, to about 2mm thick (I used #2 on my pasta machine). Make sure the piece is big enough to fit the name. Place it onto the Crisco rubbed paper.


Rub the back side of the plastic template with a very thin smear of Crisco, then place it onto the gumpaste. Gently run along the letters with your finger to make sure they’re stuck to the gumpaste. You can also rub over it very gently with a fondant smoother.


Begin cutting around your letters using a craft knife or scalpel. If you find your knife dragging or pulling at the gum paste too much, try applying a bit of shortening to the tip of the knife. Don’t panic too much about drag marks or pulling though, you can smooth them out later. Remember that as you cut you can move the whole board around to get the most comfortable angle.

As you finish a section, it’s good to cut away the excess paste from the outside. When it comes to fiddly bits like the tail of the ‘z’, trim around it so there is about 4mm remaining, then use lots of small vertical cuts to trim close around the point. You can then use a tool like a silicone tipped paint eraser or sugar shaper to smooth and round off the point.


Once you’ve cut all of the excess paste away, use your silicone tool to go around all of the edges, smoothing any rough spots. You can also go back with your scalpel and trim any little flappy bits.

To remove the template, loosen an edge and very gently pull it away. If it’s doesn’t come away easily, you can slide a soft paintbrush between the plastic and the gum paste and use that to gently ease it away.


Carefully remove the tape and remove the waxed paper from the board, leaving the name in place, still stuck to the paper. Rub a second piece of waxed paper very lightly with shortening (and I do mean lightly here, you can wipe over the paper with a piece of paper towel to remove any excess), place the sheet (shortening side down) over your gum paste letters and gently rub over it with a fondant smoother to further flatten the letters and adhere the paper.


Place the whole thing into a resealable plastic bag. If you think the gum paste has dried out too much as you cut the letters, you can place a slightly damp paper towel into the bag with the letters, just make sure it doesn’t touch the paper or the letters. This will help keep the gum paste soft.


Repeat the process to cut out a second set of letters. Once they’re cut, leave the plastic template on the letters and set this piece aside.

Remove the first set of letters from the plastic bag. Find your bits of wire, and stick them onto the top (front) of the letters, adhering with a little sugar glue. Press the wire down gently into the gum paste using a fondant smoother, aiming to embed them about halfway into the gum paste. Brush a little more glue over the top of the wire.


Name-Cake-Topper-Tutorial-13-640x896


Paint a small amount of vodka onto the rest of the letters, just enough to lightly dampen the gum paste, and making sure you go right to the edge. I like to use vodka as if any seeps out between the layers, it will evaporate. Sugar glue will dry shiny and look messy. If you don’t want to use vodka, then water is the second best option, but be very sparing.

Gently flip over the paper with the second set of letters, and peel off the paper from the back. Flip the letters right side up (the plastic template will keep the letters in place) and place it over the first set of letters, lining up all the edges.


You can use your silicone tool to gently nudge the letters into place so they line up and use it to smooth the joins. Leaving the template in place while you do this will stop the letters getting misshapen.


Use a ruler to make sure the bottoms of the letters line up nicely and that the wires point straight down. Or you could use the lines on your cutting mat, if you remember that they’re there, which I clearly didn’t.


Leave to firm up for half an hour or so, then remove the template from the top, smoothing around the top edge of the letters with your finger to remove any drag marks (use a little shortening on your finger if they’re stubborn marks). Leave for a few hours, then place a foam pad over the letters and flip the whole thing over, and remove the back piece of waxed paper. Leave for several days (a week is better) to dry, gently turning the letters over occasionally so they dry evenly.


Now here’s the bit you will either love or hate me for, but it is very important. Do it all again to make a second topper. And if you’re clumsy, or have less than a week for the topper to dry, do a third set. Remember that an extra half hour spent now making another set will be far better than breaking your only topper at the last minute and not having time to make a new one and have it dry in time. Trust me. One word: experience.

Place the toppers into a cardboard box, and store in a cool, dry place until you need to use them. If it’s humid where you live, add some silica gel packets or dry rice to the box to help absorb moisture.

To insert the topper into the cake, first decide where on the cake you want the topper to go. I don’t recommend inserting wire (even paper covered wire) directly into a cake, so you will need to use flower picks, small straws or as I used, plastic lollipop sticks with holes through the middle. Trim the wires on the topper slightly shorter than the length of your straw/pick/stick (which in turn should be slightly shorter than the height of your cake). Insert each straw/pick/stick into the cake using the guide markings. Once your cake is delivered and all set up, gently insert the topper into the straws/picks/sticks. I don’t recommend travelling with the topper on the cake – always wait until the cake is set up.

So there you have it, one (or more, you did make a spare, right?!) gum paste name cake topper. I’ll be back soon with a couple more tutorials for the sprinkle and watercolour tiers of this cake.

Happy, er… topper-ing.

~Natalie

Check out the other tutorials for this beautiful cake here!:

Sprinkle Tier

Watercolor Tier

Original Post

About Natalie:

Untitled-1

I love candlelit dinners and long walks on the beach… um, no. Not unless the sand on that beach happens to be crushed biscuits on their way to becoming a cheesecake crust.I love to bake. Ok, I’ll admit it, I’m addicted to baking. Not just baking, but creating anything that’s sweet/pretty/yummy and makes people go “Ooh!” While most of my recipes are gluten free, they are most definitely not glutton-free. I’m not into low-fat, sugar-free or everything but the kitchen sink-free. If I’m going to be naughty, I’m gonna do it properly. However, that’s not to say if you have further dietary needs you can’t adjust these recipes to fit! My hope with this blog is to throw my three baking loves {cake decorating, baking in general, and baking gluten free goodies that aren’t just “good for gluten free,” but just plain good!} into a bowl, mix them up with a spoonful or six of my own brand of crazy and come out with something wickedly good, quite possibly dripping in chocolate, and all going well, covered in sprinkles.


NOLA Photography http://bentzphotography.com/

Mardi Gras Give-away!

February 9, 2016 by Sharon Zambito 91 Comments

HAPPY MARDI GRAS EVERYONE!
Since it is Mardi Gras day down here in the Big Easy, I thought you might enjoy learning about another one of our unique culinary creations. I have recruited my big sister Barbara to do a guest blog entry on making a king cake. Barbara is the inventor of the original King Rock (more on that later). In addition to that, she is just the best big sister ever. She looks after me. She is an accountant by profession, so she helps with my business finances, taxes, and all that other icky stuff I have no clue about. She also comes on some of my cake trips with me to help me out with my demos and my vendor table. She is one of the most energetic, social, and fun to be with people I know. She is a very cool chick and I love her tons. So now I present to you… Barbara…..


—————————————-


Hi, I’m Barbara, Sharon’s sister, and she’s asked me to do a guest blog. This is me getting ready for Mardi Gras, which this year falls on February 24.


(Note from Sharon: I have this same outfit and yes we do wear this when we go parading.)

Speaking of Mardi Gras, that brings me to the topic of the day. I am not a cake decorator. I see some of the magnificent pieces of art that you all do and I am in complete awe. But, I am here today to talk about the king of all cakes – the King Cake.

If you are not from the New Orleans are, you might be asking yourself “what is a King Cake?” A king cake is a brioche-style cake similar to a coffee cake that is served throughout the carnival season in New Orleans. The carnival season begins on the 12th Day of Christmas, the Epiphany (January 6), which is the day the three kings visited the Baby Jesus. It is believed that it took the three kings 12 days to find their way to the stable. The carnival season ends on Mardi Gras Day, which is the Tuesday before Ash Wednesday.

The king cake is circular, representing the circular path the three kings had to take to ward off King Herod, who was seeking them so that he could kill the Christ Child. The king cake is typically decorated with colored icing and/or sugar. The three colors are purple, green and gold, the colors of Mardi Gras, which represent justice, faith and power. I’ve also heard that the three colors represent the three gifts presented by the Magi (gold, frankincense, and myrrh.) Within each cake is hidden a small plastic doll, which represents the Baby Jesus. (In olden times, it used to be a porcelain doll, or a bean or pea.)


King Cake parties where all the rage when I was growing up. Whoever was lucky enough to get the doll in their piece of cake would be named king (or queen) of that party and had to throw the next party. Today, this tradition is very prevalent in offices throughout the city where the person who gets the doll must bring the next cake. King cake sales are so prosperous that many bakeries in New Orleans are more profitable during the carnival season than they are for the entire rest of the year.


The making of a king cake should not be taken lightly. Since this is a yeast sweet bread, it has to be kneaded and left to rise twice, and is a day-long commitment. There are many bakeries that make excellent king cakes, so why in the world would anyone want to make their own? Just for the fun of it!!

My introduction into making home-made king cakes came many years ago. I found a recipe and tried it out on my family. Geez almighty, it was horrible. It came out heavy and hard as a rock, so much so that they called it the King Rock. My other sister, Janice, told her office mates about it and they accused her of exaggerating – that it couldn’t possibly have been that bad. So, they asked me to make a cake for their office party. Much to my dismay, it was just as horrible, but everyone was so polite and complimentary so as not to hurt my feelings, but I knew it was a bomb. I hope to think that I have gotten a little better at it over the years, but it is still tricky. I continue to try out new recipes and techniques, as I continue my search for perfection.

The recipe below is a really good one. It produces a light, but moist cinnamon cake. A few pointers for success: You have to get the yeast at just the right temperature (105 to 115 degrees) and let it foam for at least 10 minutes. You have to be careful not to add too much flour and not to over knead it. The dough should be slightly sticky, but elastic and able to hold its own shape, but never firm.


You have to be careful not to over bake it or it will be dry. I now use an instant-read thermometer, which should register 195 to 200 degrees for doneness.


The recipe is below. Basically, this is what you do. It’s much like making a bread dough. Let it rise till double in bulk and then roll out into a rectangle.


Here’s what it looks like rolled out with the cinnamon sugar sprinkled on:


Then roll up each piece into a long string.


Pinch the edges together so that the filling doesn’t ooze out. Flatten down the pinched edge afterwards so that it lays flat.

Twist the two strings together.


Form into a circle on a baking pan.

Let rise until double in bulk.

This is what it looks like right out of the oven.


Let cool and then decorate with a glaze and colored sprinkles.


See the baby’s head?


And that’s me with my cake.


You can do these in a variety of ways. You can divide the rectangle of dough into thirds and braid it like this. I rolled these strings in the cinnamon sugar to get it on the outside, rather than on the inside.


This is what it looked like after it was left to rise, baked and decorated. This one raised a lot and was very light and airy.


This one was filled with cinnamon sugar, raisins, and pecans. If you put a lot of “stuff” in your cake, it won’t rise as much.


You can also use other fillings, such as cream cheese filling, apple pie filling, lemon pie filling, cherry pie filling, etc. But I don’t like those. They turn out too sweet for my taste and the filling overpowers the taste of the cake. I’m a purist and like just a little cinnamon sugar.


So, that’s it. I hope that you all give it a try and bring a bit of New Orleans to wherever you might live. Also, if you ever have the chance to visit New Orleans during Mardi Gras, the city would love to have you. Let me just say that Mardi Gras is not only what you see in the media. Yes, there are some unmentionable things that go on in the French Quarter, but that is a very small piece of what our carnival season is about. Mardi Gras outside of the Quarter is very family oriented. The parade routes are filled with kids and families having fun. When we were little kids, my family did not miss a parade. We loved every minute of it. We would lift Sharon, the youngest, smallest and spryest of all of us, over barricades to get that all-elusive string of beads, trinket or doubloon out of our reach. Police were all over the place supposedly monitoring such infractions, but because she was so cute, the police would just look at her and us, and just shake their heads. We trained her young; you should see how she still scoops up the parade throws.


Happy Mardi Gras!


KING CAKE RECIPE:

(This recipe makes two medium size cakes.)

¼ cup warm water (105 to 115 degrees)
1 tablespoon (1 package) dry yeast
1/3 cup sugar
5 ¾ to 6 ¼ cups unbleached all-purpose flour
1 ½ teaspoons salt
½ cup warm milk (105 to 115 degrees)
1 cup sour cream
3 large eggs
finely grated zest of 1 lemon or orange
8 tablespoons (1 stick) unsalted butter, at room temperature, cut into small pieces

Cinnamon Sugar:
1 cup sugar
4 teaspoons ground cinnamon


Frosting:

4 cups powdered sugar
4 tablespoons butter, melted
7 tablespoons hot water, more as needed
1/4 teaspoon almond flavoring


1) Pour warm water into small bowl. Sprinkle yeast and a pinch of sugar over the surface. Stir to dissolve and let stand at room temperature until foamy; about 10 minutes.


2) Place 1 ½ cups of the flour, the remaining sugar, and the salt in mixer bowl. Make a well and add the milk, sour cream, eggs, and zest in the center. Beat until smooth on medium-low speed, about 1 minute.


3) Add the yeast mixture and beat for 1 minute more.


4) Stop the machine and add 1 cup more flour. Beat for 1 minute.


5) Add the butter pieces and beat on low speed until incorporated.


6) Add the remaining four, ½ cup at a time, until a soft, smooth dough that just clears the sides of the bowl is formed. Switch to the dough hook when the dough thickens, about two-thirds through adding the flour.


7) When all flour is added, knead with dough hook for about 5 minutes on medium speed. (If you don’t have a dough hook for your mixer, you’ll need to turn the dough out onto a lightly floured surface and knead for about 5-10 minutes.)


8) Turn dough out onto lightly floured surface. Knead until smooth and just able to hold its own shape, under 1 minute if you used the dough hook (6 to 10 kneads to smooth it out), dusting with flour only 1 tablespoon at a time, just enough to prevent sticking to your hands and the work surface. This dough will be very smooth, with a definite soft elastic quality, a little sticky, but never stiff, and will hold its shape.


9) Place the dough ball in a greased deep container, turn once to grease the top, and cover loosely with plastic wrap. Let rise in a warm place until double in bulk, 2 ½ to 3 hours. Do not allow the dough to rise over double.


10) Punch dough down with fist. Turn out onto lightly floured surface. Let rest 10 minutes.


11) Divide the dough in half with a bench scraper, pizza cutter or knife, never tearing the dough.


12) Divide each half into thirds. Roll out to a rectangle approx. 20 x 12 inches.


13) Divide in half with pizza cutter. Brush with melted butter keeping edges dry. Sprinkle with cinnamon sugar.


14) Roll up and pinch ends together so filling does not ooze out. Flatten pinched edge.


15) Twist two long rolled pieces together. Form into a circle and fold edges under.


16) You can insert baby trinket into cake at this point or wait until after it is baked. (I like to wait after it is baked if it is plastic.) Insert from underneath. (If you don’t have a baby trinket, use a whole pecan, walnut or other object; just be careful it is big enough that it cannot be swallowed whole.)


17) Cover with greased plastic wrap or light cloth towels and let rise in a warm place until double in size, about 1 to 1 ½ hours.


18) Preheat oven to 350 degrees. Bake 20-25 minutes. An instant-read thermometer will read 195 to 200 degrees.


19) Let cakes completely cool.


20) To prepare frosting, mix melted butter, powdered sugar and flavoring; add hot water 1 Tablespoon at a time until glaze reaches desired spreading consistency. You don’t want this too thin because it will run right off the cake or too thick because it won’t drip down the side of the cake.


21) Pour frosting over cake; sprinkle with purple, green and gold colored sprinkles or colored sugar.


—————————————-


Sharon again here. WOW! Was that great or what? Thanks Sis for showing me up on my own blog. Dang overachiever.  (Just kidding.) But seriously, I have been trying to convince Barb for months now to start her own food blog. She is a good cook, and photography has been a hobby of hers for a long time.

UPDATE : GIVE-AWAY WINNER IS VickiN!

THANKS ALL FOR ENTERING!


Good luck and Happy Mardi Gras Everyone!
Sharon


PS We’ve got a full video tutorial on making the King Cake in our online school:
http://www.sugaredproductions.com/


Visit our online school


Free Valentine Teddy Figure Tutorial

February 5, 2016 by Sharon Zambito Leave a Comment

Hey Sugar Babies!

Valentine’s Day is almost here. Love is in the air….. and I’m feelin’ it.

So I’ve got a free PDF tutorial for you of this cute Teddy topper:

free teddy tutorial

CLICK HERE TO REQUEST IT

In the interest of full disclosure, there will be an offer to join my online school for $1 after you sign up to get the PDF.

That’s totally optional and the PDF is yours for free no matter what.

I hope you enjoy it!

Sharon

Is your mixer head too high?

January 18, 2016 by Sharon Zambito Leave a Comment

Hello Sugar Friend–

We all strive for smooth and airless icing, but sometimes it can be a source of great angst. I know in my early caking days I was so frustrated because I couldn’t get it to look the way I wanted.

There were many days I wanted to throw my mixer, bowl, spatula, all out the window — and take up knitting.

But after lots of trial and error, I finally developed a recipe and a process that yields amazing results, like this:

how to get smooth buttercream

I’m sharing my experience in these last few posts with the hope that it’ll make things a little easier and prevent you from chucking stuff out the window 🙂

Half of the battle is in the making of the buttercream: to get it as airless and smooth as possible before icing the cake.

The fact is that if the head of your mixer is not adjusted correctly you’ll never get that airless batch of buttercream.

These photos below show what it can look like if the alignment is off.

These are taken at the time in the buttercream making process when just about all of the PS is added, still at low speed, but before I crank it up to high. If during the adding sugar process, you see the effect on the left (icing sticking to sides of bowl and creating a center ring of air), then something is wrong. Most likely the height of the paddle in your bowl is too high.

You’ll get air being pulled into the icing, and it won’t come out super smooth like in the video in this post.

adjusting your mixer head

See the photo in the middle? This is what the icing should look like at the same point in the process. NO air tunnels.

That photo was taken after I adjusted the paddle height to get it correct.

See that screw under the head of the mixer in photo 3? That’s how you adjust the height of the paddle. You use a screwdriver to adjust it right or left to raise or lower the head, which adjusts how close the beater comes to the bottom of the bowl.

There is a sweet spot for the beater, and this is how you can test it:

If a penny stays on the center hump as in this video below it’s juuust right. If the penny gets knocked around the bowl, then the paddle height is off.

This REALLY makes a difference in the quality of your icing.

Here’s a video showing the penny staying in place as it should.

My mixer is the KA Artisan, but the screw should be in a similar place for other models and brands.

Here’s a video showing where the screw is for the lift head.

** You’ll note that the 2nd video shows another way to test the penny (or dime in this case.) The beater is at the correct height if the dime is moved only 1/2 inch at each pass of the beater. If it stays in the same place or is moved all over the bowl, the adjustment is wrong. It’s the same principle as my “penny on the hump” test, just another way of testing the same thing.

If you don’t have a Kitchen Aid, check with the customer service of your brand, and they should be able to tell you how to adjust the beater height.

This little tweak can really have a HUGE impact on the smoothness of your icing.

And starting with smooth icing is one step closer to having a super smooth cake — which is what we all want, right?

So grab your pennies and go check yours now. I’m glad I did back in the day or I’d be knitting right now 🙂

Sharon

PS.  If you want to learn more about making and using buttercream, I have a detailed video course in my online school. It covers different types, the making of, applying and smoothing to cakes and much more.

Get access here:  https://www.sugaredproductions.com/subscribe/

How to Comb a Cake Video

January 14, 2016 by Sharon Zambito 2 Comments

Hello sugar friends

I have a secret.

I’ve rediscovered an old love.  A love I had forgotten all about.

The cake comb.

Lot’s of folks think it’s too “old fashioned” or “grocery store-ish” to use them on cakes these days. But I disagree.

They can absolutely work with today’s more simplistic styles:

how to comb a cake


Or ramped up a bit with trendy flowers on a cake pedestal:

how to comb a cake
There are many comb styles available. From the “traditional” thin lines to fun multi-faceted patterns.

And using a comb cake doesn’t have to look old fashioned. You can see how stylish it looks in the photos above using a crusting buttercream.

But they work just as well on meringue buttercream, ganache and royal icing.

PLUS they kill two birds with one stone: they ice and decorate the sides of the cake at the same time – a real labor and time saver for us.

There are some tricks, however, to using them with success. All combs are not created equal.

How you hold the comb and the consistency of the icing is key.

I teach all of that (and more) in my new video tutorial that was released in my online school last week.

The response to it has been amazing. I’m excited to see how interested folks are in learning this somewhat forgotten technique. I love bringing “old school” techniques into modern decorating trends.

I’ve had folks who missed my New Year’s special ask if I would run it again.

In fairness to those who took advantage of the offer at that time, I can’t run that offer again.

BUT I can offer you a discount on the combing video:

$3 to download a copy and keep forever.

As well as getting a full month of membership to the school and access to the over 300 tutorials on the inside. You can stay at the end of that month or leave; no commitment or risk.

Get your combing video download:

https://www.sugaredproductions.com/o1/

Brush off those old cake combs and let’s bring them into the 21st century together!I’d love to see what you do with them.

Talk soon,
Sharon

PS. Current members get to download the video too, along with all the other goodies and bonuses I give out on a regular basis 🙂


NOLA Photography http://bentzphotography.com/

Gingerbread Cottage Tutorial

December 17, 2015 by Sharon Z 2 Comments

Hi guys! Christmas is just around the corner! Today we have a guest post from Ella Sugar Boutique! Look at this utterly charming holiday gingerbread cottage. The best part? You can use a purchased kit and crank it up a big ole notch by using Ella’s decorating tutorial. My heart pitter patters……

cottage tutorial

Materials

  • any pre-made , pre-assembled ginger bread house or the one you baked.  This year you can find great variety of houses in Costco, Target, Wilton.com
  • Fondant
  • Icing colors (blue, pink, red, yellow, green, brown)
  • sharp knife or x-acto
  • Stiff but still sticky royal icing
  • pipin gel
  • ruler
  • small round cutters
  • fine tip decorators brush
  • flat tip decorators brush
  • rule
  • pizza/fondant cutter
  • yellow sour drops
  • 9 inch roller pin
  • small silicone molds (buttons, leafs, bows )
  • royal icing dots (multiple sizes)
  • Red Sugar Pearls
  • Scale cutter
  • christmas lights (optional)
  • Fine tip edible paint markers.

Instructions

  • If you bought a preassembled house cut out the frontal, and side windows. If you are making your own , before you bake it cut out all the windows.  You can cut them all out or just some of them.
1 2 3
  • Make some patterns in paper with the same measurements of your house
  • Using the circle cutters and brown fondant, cut out one ring to decorate your round widows if you have them.

4-550x778


Roll out white fondant and cut out the 2 pentagons or squares to cover the front and back of the house. Place the pieces on separated powder sugar-cornstarch dusted paper

5-550x409


Tint fondant in soft blue, roll it out 1/16 ” thick and cut out diamonds, then attach them to the front and back pieces

6 7
  • Use the house patterns to cut out the spaces for the windows .
8 9


  • Apply piping gel to the house front and back, and attach the fondant pieces.
10 11


  • *If you didn’t cut out all the windows: Roll out the yellow sour drops very thin, and attach them to the window spaces.

12


  • Cover the sides with white fondant and cut out the windows spaces,  procede to cover them with yellow sour drops if needed.

13


  • Roll out blue fondant as wide as your house sides and 1/16? thick. Cut strips 1/2 in tall.

14


  • Attach the strips to the house, starting from the bottom and trimming the excess.
15 16


  • Attach the house to a base using stiff royal icing. In my case I cut a hole in the cardboard base because I’m going to place a little light inside the house.
  • The house would look close to this at this point.

17


  • If your house has additional pieces like  a door or porch, continue the process decorating those.
  • Cut out the shape of the door and trimmings in red fondant
19 18 20
  • Attach those pieces to the house.

21

  • Decorate the round windows23


  • If you opened the  front and side windows, add fondant to the lower part of the frame or to the 4 sides if you like.

24

  • Attach the chimney to the roof if you have one and cover it with soft blue fondant.
  • Roll out white fondant and cut out scales. Attach them to the roof starting from the bottom edge cover it completely.

27


  • Use multiple small molds and make small figures to decorate de roof.
25 26
  • Finish the roof edges with 1/2 scales.

28


  • Decorate the door adding a little roof in fondant.

30


  • Cut out white fondant strips to cover the exposed ginger bread on the sides .
31 32


  • Add trimmings to the windows and poke little holes on the corners to simulate nails.
33 35
  • Finish your roof attaching the little fondant shapes and royal icing dots. Finish yor chimney if you attached one.

36

  • Cut out red fondant strips, cut the edges and attach them to the windows lower trim as ribbons

37

  • Mold or cut out little leaves in green fondant and attach the leafs and red sugar peals to the window ribbons, roof,  roof edges, and chimney. Add leaf to the edges of the roof in the front door too.
38 39
40 41
  • Add the final details like a bow in the top of the roof.

42


  • Insert the light (optional)
  • And add a bow to the door roof, use edible markers and pains the details in the windows and door.

44

  • Cover with stiff royal icing  and a spatula the house base and use sour drops to shape a little walkway.

46

  • Add decors to the landscape and a ribbon to cover the base’s edge.

47

And your done!

protrait11_2014_4

Ella Buitrago MS is an Engineer, Cake Decorator and Sugarpreneur owner of the Ella Sugar Boutique. She is a software engineer from Colombia, has a Master in Information Technology form Harvard University. Her love for the sugar arts started when she was a teenager; she took culinary clases in high school, she self-taught the fondant preparation, royal icing piping and more, until she came to UU.EE and took independent clases in the arts.  From 2010 to 2012 she worked as a freelance cake decorator at the Decorating Room for Wilton Inc before moving to the Boston area. Read more here…

———————————————————–

How seriously cute is this little house. All the similar gingerbread houses we make over the years; this is such a fun and new approach. I’d love to see yours!

Happy Holidays!
Sharon

Visit out online school

Christmas Treats Tutorials Roundup

December 9, 2015 by Sharon Z 2 Comments

Hi guys!

Are you thinking about your holiday sweets yet? I haven’t, but I just started looking around the inter-webs to see what I could see.  So while I was at it, I rounded up some fun ideas from around the net to help get you into the Christmas spirit!


Red Velvet Yule Log by Kraft


Christmas Tree Cupcakes bu Just a Taste


Marbled Christmas Ornament Cookies by Sweetopia


Bakerella’s Snowman Cake Pops by Bakerella


Easy Peppermint Marshmallows by Betty Crocker


Christmas Tree Cake Tutorial by i am baker


Peanut Butter Cup Christmas Tree by Chef by Night


Oh man, I don’t think I can choose.

I hope that these treats get you inspired for the holiday season!! Happy Baking!

Sharon

Visit out online school


Free Holiday Tutorial Bundle

December 6, 2015 by Sharon Zambito 2 Comments

Happy Holidays everyone!

I’ve really got the Christmas spirit, and I have a gift for you. Actually, I have two!

Free Holiday Tutorial Bundle

I’ve put together a FREE PDF tutorial bundle for two of the most popular ones in my online school.

The “famous” ruffled Christmas tree cake was a viral hit. You may have seen it floating around the internet. (It’s my most stolen cake photo 🙂

Free Holiday Tutorial Bundle


How about this squeezably cute Santa figure? I want to pinch his rosy cheeks! Created by the insanely talented and Cake International Gold Award winner, Rhu Strand, exclusively for our online school.

Free Holiday Tutorial Bundle

Just click on the red button below to request your copy. Please note that sometimes the email that delivers the PDF bounces or gets lost in cyberspace. Just drop me a note at support@sugaredproductions.com if yours doesn’t arrive.

You’ll see an offer for a $1 trial to my online school, and I hope you join me. But know that is totally optional, and the PDF is my gift to you whether you join or not 🙂

The PDF will arrive in your email inbox within 15 minutes, and I’ll also send you some emails over the course of the next week or so that are packed with even more tutorials, valuable cake decorating info, stories and a super special offer. It’s going to be a fun week, so keep an eye on your inbox! (You can opt out anytime you wish.)

Ready to get your holiday gifts?

Send My Free PDF!

Happy Holidays!!

Sharon
SugarEd Productions Online School


NOLA Photography http://bentzphotography.com/

Indian and Pilgrim Owl Cupcakes Tutorial

November 23, 2015 by Sharon Zambito Leave a Comment

Hey sugar friend! Thanksgiving is just a few days away. Need an idea for dessert? Here’s some easy but really cute cupcakes that you can put together really quickly. How adorable are these little owls dressed like Indian and Pilgrims?  I die from cuteness.

Thanksgiving owl cupcakes tutorial

Supplies:

1 Batch of Cupcakes
buttercream
6, 13, 30, 44, 64mm circle cutters
44mm & 64mm scalloped circle cutter
Non-stick rolling pin
Cocktail stick
Water brush for sticking
Sharp or craft knife
Windsor Clikstix small
Soft brush
Pair of white pop socks, cornstarch and a small plastic container
Spatula
Wilton 6B piping Nozzle
Piping bag
Tall glass to pop your piping bag into.
80g of gumpaste (I used Satin Ice)
50g of chocolate fondant
60g of white fondant
20g of Orange fondant
40g of black fondant
2g of yellow
Brown food color gel/paste
Wafer paper (various colors, I used what I had left over)

These toppers will take at least 12 hours to dry hard enough so they won’t sag onto your cupcakes, so make sure you give yourself plenty of time before you decide you want them.


Thanksgiving owl cupcakes tutorialTo start with, I’m going to teach you a trick to stop things sticking to your board, cutters etc. I can’t claim it as my own idea but it works a treat. Starting with a pair of white pop socks (stockings), put one inside the other. Open the socks up together and put 1 tablespoon of cornstarch in the socks. Hold the socks at each end making sure the cornstarch is in the center and tie the two ends together cutting the ends to tidy them up. Voila! A brand new dusting bag. Keep it in a little container to keep it fresh and clean. Why cornstarch? Well I know many people use icing sugar, but that for me just makes everything even stickier, so it’s just a preference thing.


Thanksgiving owl cupcakes tutorialMix 80g of gumpaste with 40g of chocolate fondant and knead well. I added a touch of brown food color gel just to bring it back to a darker brown color again. To make the owls – cut 8 x 68mm rounds, making sure you keep any paste you are not using in an airtight container so it doesn’t go hard while you are working.


Thanksgiving owl cupcakes tutorial To make the Owl’s ears, you’ll need the 44mm cutter. Use this to cut a small section away from the top of the round, like this.


Thanksgiving owl cupcakes tutorial To give the Owls a stitched look, I used a cocktail stick to emboss the outer edge. You can buy a stitch embossing tool, but using a cocktail stick is just a nice, quick, CHEAP way of getting the same effect.


Thanksgiving owl cupcakes tutorial Next, knead 10g of chocolate and 50g of white fondant together to get the nice beige tummy color for the Owls. Roll the paste out to 2mm thick and cut 8 x 30mm rounds out for the tummies. Remember to keep the spare paste wrapped up tight, so it doesn’t go dry.


Thanksgiving owl cupcakes tutorial Repeat the stitching effect with your cocktail stick again, just inside the outer edge of the rounds.


Thanksgiving owl cupcakes tutorial Using the water brush, gently brush under where you want the tummies to go, I placed mine in the center at the bottom but you can off set them if you like.


Thanksgiving owl cupcakes tutorial To make the eyes you’ll need the 13mm round cutter. Roll and cut 16 x 13mm rounds, trimming the tops like this.


Thanksgiving owl cupcakes tutorial Using the water brush, stick the white rounds above the tummies, and then using the 6mm round cutter, add the pupils to the whites of the eyes. You can make them crossed or looking in different directions; it’s fun to give them a bit of personality.


Thanksgiving owl cupcakes tutorial 
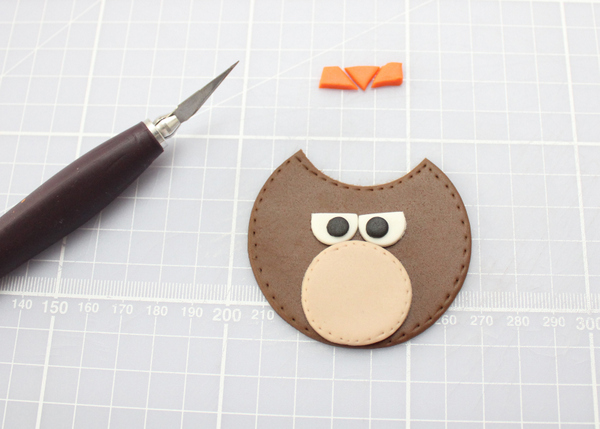
To make the beaks, roll and cut small triangles from the orange paste.


Thanksgiving owl cupcakes tutorial Using the water brush, stick the beaks just below the eyes.


Thanksgiving owl cupcakes tutorial To make the wings you will need the 44mm scalloped round cutter. Using the remainder of the brown paste, cut scalloped rounds, and then cut them into four. I made sure the wings were 4 x scallops wide.


Thanksgiving owl cupcakes tutorial Stick the wings to the side of the Owl’s body with the water brush.


Thanksgiving owl cupcakes tutorial To make the Native Owl’s headdress – roll the orange paste and cut a long thin strip. Use the cocktail stick to emboss a pattern into it. I chose triangles and dots, but you can do which ever pattern you like.


Thanksgiving owl cupcakes tutorial Stick the headdress on with a brush of water above the eyes and trim the excess off with a sharp knife.


Thanksgiving owl cupcakes tutorial To make the feathers I used wafer paper. I had some Autumn leaves left over from some previous cupcakes and thought they were the perfect colors. You can use plain edible paper and dust it with powder food color to get these sort of colors. You could also use colored gum paste and feather it with a sharp knife. I used a craft knife to cut feather shapes out of the wafer leaves, and then feathered the edge by cutting thin strip into the edges.


Thanksgiving owl cupcakes tutorial When you are sticking the feathers together with the water brush, you need to make the brush is quite dry as you don’t want to melt the paper. Once they are all stuck together, use a tiny brush of water to stick them to the back of the owl’s head.


Thanksgiving owl cupcakes tutorial To make the pilgrim’s hat I cut a 4cm triangle and cut 5mm of the tops.


Thanksgiving owl cupcakes tutorial Then fold the bottom edge upwards to make the hat rim.


Thanksgiving owl cupcakes tutorial To make the buckles, cut tiny yellow fondant rectangles, and then cut tiny black fondant squares, sticking them onto the yellow rectangles with a dot of water.


Thanksgiving owl cupcakes tutorial Then add the buckle to the hat like this. The hat can then be added to the Owl’s head with a small brush of water.


Thanksgiving owl cupcakes tutorial To make the ‘Give Thanks’ topper cut 4 x 64 mm scalloped round.


Thanksgiving owl cupcakes tutorial Use the 48 mm plain cutter to cut 4 x rounds for the center of the scalloped rounds.


Thanksgiving owl cupcakes tutorial Roll the orange fondant out, making sure the counter and cutters are well and truly dusted with your cornflour dusting bag. I used the Windsor Clikstix Small for these letters and committed a sin by popping the plunger backs out. I just prefer the look of the rounded letters without the plunger backs in the cutters. I then remove the letters from the cutter with a small soft brush so as not to mark them.


Thanksgiving owl cupcakes tutorial Arrange your message onto the plain toppers and stick down with a brush of water.


Thanksgiving owl cupcakes tutorial To ice the cupcakes I added a Wilton 6B to a small piping bag. I find it much easier to pop the piping bag into a tall glass so I have both hands free to add the buttercream to the bag.


Thanksgiving owl cupcakes tutorial Pipe the tops of the cupcakes by starting in the center, piping out towards the wrapper, using this as a guide to pipe round to where you started and then up once more, finishing in the center by pushing down slightly and pulling up quickly.


Thanksgiving owl cupcakes tutorial Add the dried topper to your cakes and they are ready to serve.


Thanksgiving owl cupcakes tutorial

Happy Thanksgiving everyone!!

———————————————————————————-

Thanks to Victoria Threader, a renowned cupcake artist from the UK. After watching her mother bake her beautiful birthday cakes (still to this day), Victoria waited until she had a family of her own to start baking. Victoria is self taught and currently has her own feature in goodtoknow recipes magazine, where she shows you how to create wonderful cupcakes.
You can follow Victoria on her Facebook page: Victorious Cupcakes and at goodtoknowrecipes.com.

———————————————————————————-

I hope you enjoyed the tutorial and Happy Thanksgiving everyone!

Sharon

visit our online school


  • « Previous Page
  • 1
  • 2
  • 3
  • 4
  • 5
  • 6
  • …
  • 15
  • Next Page »

Sharon Zambito

Sharon Zambito

An RN turned SAHM turned cake maniac. Owner of SugarEd Productions Online School. Join me for some caking, baking, and all around sweet fun :)

Follow me..

  • Facebook
  • Instagram
  • Pinterest
  • YouTube

Pinterest

  • Autumn House Two Trees Machine Embroidery Design – Blasto Stitch
    Autumn House Two Trees Machine Embroidery Design – Blasto Stitch
  • Embroider  Sew :: Jelly Roll Purses - Embroidery Garden In the Hoop Machine Embroidery Designs
    Embroider Sew :: Jelly Roll Purses - Embroidery Garden In the Hoop Machine Embroidery Designs
  • (1) How to QUICKLY & SAFELY remove acrylic, gel, and dip powder polish | BAGGY METHOD - SO EASY! - YouTube
    (1) How to QUICKLY & SAFELY remove acrylic, gel, and dip powder polish | BAGGY METHOD - SO EASY! - YouTube
  • (1) Bouffant Surgical Cap - YouTube
    (1) Bouffant Surgical Cap - YouTube
Follow Me on Pinterest

Follow Me on Instagram

Instagram requires authorization to view a user profile. Use autorized account in widget settings

Recent Posts

  • Egg Safety Basics
  • Stable Mabel Support System Sale
  • Guest Post : 4 Vegan Cake Recipes No One Should Miss Out On!

Popular Posts

  • Ways To Make Your Cake Fluffy And Moist
  • How To Stencil on Cookies with Royal Icing
  • Doctored Cake Mix Recipes
  • Transferring an Image Without a Projector
  • All About Buttercream!
  • How to Fix Broken Ganache
  • Edible vs Non Toxic Gold Dusts

Categories

Search

Archives

Copyright © 2025 · Sharon Zambito and SugarEd Productions,LLC

Copyright © 2025 · Evangeline Theme on Genesis Framework · WordPress · Log in