Sugared Productions Blog

  • Blog Home
    • Home
  • Online Classes
  • Shop
  • Contact
  • About

New Orleans Doberge Cake

January 7, 2009 by Sharon Zambito 21 Comments

What is Doberge, you say? You look it up in a french dictionary and the word is not there. How do you pronounce it? (I say dough-bearj; some say dough-bosh or dough-boj.)
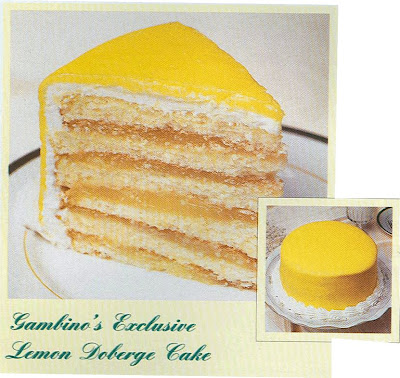
Doberge cake is an iconic staple of living in New Orleans. It is a yummy multi-layered cake with pastry cream inside and a poured glaze on the outside. You can order one for yourself here:

Traditional flavors are chocolate, lemon and caramel. But how did this deliciously delicate delight come to be? I did a little research and learned a few things myself.
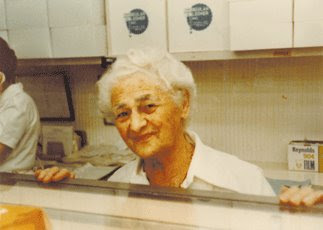
Back in the 1930’s there was a New Orleans woman named Beulah Ledner, who came from a baking family in Germany. She started baking during the Depression to supplement the income from her husband’s furniture business. Experimenting in her kitchen, she came up with a variation on the famed Hungarian-Austrian dobos torta, which was thin layers of sponge cake filled with butter cream. She changed that to thin layers of butter cake with a custard filling, either chocolate or lemon.
This was a cake that was subtly rich and lighter than the original, and better suited to the New Orleans climate. But its inventor recognized that “dobos” wouldn’t fly in New Orleans. She thought it should be “Frenchified” to fit the city’s style. And so the name “doberge” was born.
The business was first known as Mrs. Charles Ledner Bakery and was based in her home. Eventually she moved to a store front. A heart attack caused Beulah Ledner to sell the bakery, the name and the recipes to the Joe Gambino family in 1946. The agreement forbade her from operating another bakery in Orleans Parish for five years. But she could not stay away, and 2 years later opened another business in a neighboring parish (ie county) called Beulah Ledner Bakery. Beulah Ledner worked until she was 87 and sold Beulah Ledner Bakery in 1981. She died at 93, her culinary legacy intact.

Gambino’s Bakery is another icon of New Orleans, more famous for the doberge cake than Beulah. Many think that it originated there, but now we know better!

No one knows the original recipe except for Gambino’s , but here is a recipe we found on the Internet that my best friend Heather has made with good success. The only difference is that an authentic doberge cake has a poured glaze icing, not a spread on one:

CHOCOLATE DOBERGE CAKE

CAKE:

2 cups cake flour sifted
1 teaspoon baking soda
1 teaspoon salt
10 tablespoons butter
1-1/2 cups sugar
3 eggs separated whites beaten until stiff
1 cup buttermilk
2 squares unsweetened chocolate melted
1-1/4 teaspoons vanilla
1 teaspoon almond extract


FILLING:

2-1/2 cups evaporated milk
2 squares semisweet chocolate
1-1/4 cups granulated sugar
5 tablespoons flour
4 egg yolks
2 tablespoons butter
1-1/4 teaspoon vanilla
1/4 teaspoon almond extract


FROSTING:

3 cups sugar
1 cup evaporated milk
2 ounces bittersweet or unsweetened chocolate
4 tablespoons butter
1 teaspoon vanilla


DIRECTIONS:

Preheat oven to 300.
Grease and flour 2 round cake pans.
In a medium bowl sift flour, soda and salt 3 times.
Cream margarine and sugar in a large mixing bowl then add egg yolks one at a time.
Gradually alternate adding the flour mixture and buttermilk then add chocolate and mix well by beating about 3 minutes.
Fold in the three beaten egg whites, vanilla and almond extract.
Bake 45 minutes.
Allow cake to completely cool then split each layer into thirds to make six thin layers.
Put milk and chocolate in a saucepan and heat until chocolate is melted.
In a bowl combine sugar and flour.
Make a paste by adding hot milk chocolate by tablespoons to the sugar and flour and then return to saucepan.
Stir over medium heat until thick.
Add 4 egg yolks all at once and stir rapidly to completely blend.
Cook 3 minutes longer.
Remove from heat then and add butter, vanilla and almond extract.
Cool and spread on cake layering as you go.
Do not spread on top layer.
Combine sugar and milk in a heavy saucepan and bring to a boil stirring constantly.
Reduce heat and simmer 6 minutes without stirring.
Remove from heat and blend in chocolate.
Add butter and vanilla and return to medium low heat cooking 2 minutes.
Place in refrigerator to cool.
Beat well and then spread on top and sides of the cake.

——————————————————-

Now, we all know I am a fan of short cuts. Don’t get me wrong, taste is critically important to me, but if I can find a way to get excellent results with a little less work, I am all over that. So in my laziness, um, I mean, thriftiness, I have created a “doctored” version that Heather teasingly calls my Faux-berge cake.

Sharon’s Fauxberge Chocolate Cake
2 layers of your favorite doctored cake recipe in white or yellow
Jello pudding cups premade chocolate pudding
Chocolate buttercream icing
Chocolate ganache
Torte each cake layer into 3 thinner layers. Spread a thin layer of pudding in between each layer. (Premade cups have a better consistency than making the pudding in the box.) And it’s easier!! MWAHAHAHA.

Here are the 6 layers of cake on a 1/2 inch fomecore board. You will need to cover the fomecore with something appropriate to make it food safe. This was for family so I threw caution to the wind.


Ice to the edge of the fomecore with a layer of chocolate buttercream and chill in fridge until firm.


Now this next step is NOT necessary and I usually do not do it. However, this puppy was a huge 15 inch cake and rather unstable. So I gave it a coating of thick ganache (made with a 2:1 ratio of chocolate to cream.) You let the ganache thicken to a paste consistency and ice the cake with your spatula and bench scraper just like you do for buttercream. It sets up nice and firm to give you a stable chocolate “shell” encasing the layers. That top ledge of chocolate you can see in the picture was removed with my palette knife after the cake was fully chilled, but before I poured the thinner ganache layer on top.


Wanna see something scary?…………………….


Here is my ganache pouring set up. (Pretend you don’t see that pile of laundry on the chair, kay?) From bottom to top: cookie sheet lined with foil, fondant bucket wrapped in plastic wrap for food safety, piece of non skid stuff, cooling rack, piece of non-skid, and chilled cake on its fomecore board. When the iced cake is fully chilled, then you pour the final ganache coating on. That’s a LOT of ganache for this huge a$$ cake! My friend Jacque has a great tutorial on how to pour ganache on her fabulous blog Daisy Lane Cakes. Thanks Jacque, you rock!


OK, wanna see something even more scary?………………….

Moving that huge cake with wet ganache into the lowest shelf of my fridge where it barely fits without messing it up! Stress! I need a drink.


I let that ganache firm up overnight. Next day I took it out the fridge (fairly easy now that it is firm) and placed it on the display board, piped a border and placed the edible photo on top. This was for my sister in law’s dad’s 85th birthday bash. Everyone went nuts over this cake, in both looks and taste. I was even told it was better than Gambino’s! Shhh, don’t tell I cheated.


And here is a picture of the cake after serving. This photo was taken with D’s cell phone. Don’t think we’ll be getting any blog awards with this one! LOL


So there you have it, class. Your lesson on the New Orleans Doberge cake. Your assignment is to go make one of these beauties and tell me how you like it! Enjoy!

Sharon
http://www.sugaredproductions.com/

A Few of My Favorite Things

December 28, 2008 by Sharon Zambito 22 Comments

I hope you all had a wonderful Christmas!

Ours was wild, crazy, hectic, exhausting and super fun. Way too much eating go on for the last few weeks! (Going to have to diet a bit before we shoot the topsy turvy DVD, LOL) We had a big family party to attend on Christmas Eve and I hosted dinner at my house for 17 people on Xmas day. Now that I have slept for the better part of 3 days I am ready to roll! OK, maybe not quite yet.

What did you guys get? Santa was very good to me. I got a new macro lens and tripod for my camera, so I can try to kick my foody photos up a notch. I am so excited and cannot wait to try out my new stuff. But not quite yet. Still. Too. Tired.

J got Rock Band 2 for his X Box, and when he opened it he literally screamed and and ran around the house in circles. (I think that was a good gift choice.)

D got a nice winter coat and about 800 video games. (He likes video games.)
———————–
I’m still way too pooped to bake anything, or get my photo stuff out, so I thought I would blog about some of my favorite (cake) things. I get asked all the time for my favorite recipes, brands, tools, etc. So here are a few of my favorite things:
ICING RECIPES:
Sharon’s Crusting Buttercream:
** I make the following recipe to fill my 5 quart mixer. Adjust the recipe volume to fill your mixer properly as discussed in the video Perfecting the Art of Buttercream.
5 generous cups Sweetex shortening, or other brand of hi ratio shortening
5 pounds powdered sugar
4 TBS Wedding Bouquet flavoring (or substitute your flavoring of choice in the appropriate amount)
11-12 TBS hot coffee creamer liquid (as discussed in video)
Cream the shortening , flavorings, and hot liquid with paddle attachment until well combined and creamy. Then stream in first 3 pounds of powdered sugar with mixer running at speed one. When incorporated somewhat, stop and scrape down sides of bowl well. Stream in last 2 pounds of powdered sugar at speed one. When incorporated, turn the mixer up to speed 6 and let it beat for 5-7 minutes until very smooth. Scrape down the sides of the bowl very frequently while the mixer is going at speed 6. The goal is to get all of the icing down into the belly of the bowl and fill the bowl from side to side with no air gaps around the walls, as well as covering the paddle up to the springs. If the icing is making a sucking or “kissing” noise after all the sugar is in, add just a few drops more of liquid, while scraping down the sides,with the mixer running, until that stops. You should create a bowl full of icing side to side, where the paddle is completely submerged and beating in a vacuum under the icing. 5-7 minutes at speed 6 and you should have a smooth as silk and nearly airless icing. Cool before using. Keeps at room temp for weeks or fridge/freeze indefinitely.
Youtube clip of Sharon making icing: Video
Sharon’s Chocolate Crusting Buttercream:
2.5 cups butter
2.5 cups shortening
Splash of vanilla
Dump in cocoa and mix all of the above till very dark brown (I do not measure it)
5 pounds powdered sugar streamed in
Coffee creamer liquid (as shown in DVD) in amount needed
Good at room temp for several days to weeks. Fridge or freeze also.
Kathy Finholt’s Crusting Cream Cheese Icing:

1 cup butter
1/2 cup Crisco
16 oz. cream cheese
3 lbs powdered sugar
1 T vanilla
1/2 tsp salt

Kathy says:

Mix on low speed for a couple of minutes.
This makes a fairly stiff icing if you use 3-1/2 lb. Powdered sugar. For a softer one you can use 3 lbs. of powdered sugar. Can stay out of fridge for several days. Freezes well.

————————–
CAKE RECIPES:
WASC (white almond sour cream) by Rebecca Sutterby:

1 box mix (does not work well with DH since they changed their formula)
one cup sugar
one cup flour
1 1/3 cup water
1 tsp vanilla
1 tsp almond if desired
3 whole eggs or 4 whites
one cup sour cream
2 tbs oil

*you can make this into any flavor by starting with flavored mix, and adjust extracts as desired . Bake at 325.


Durable cake recipe from Cake Central:

**My favorite for chocolate cake and best for sculpting

This cake is moist yet very durable and will hold up to many shapes and designs. It is light in taste and stays moist if making a day or two ahead.

1 cake mix
4 egg whites
1/2 cup water
1/3 cup vegetable oil (add 2 more TBS for choc recipe)
1 small pkg of instant pudding mix
1 cup sour cream

Preheat oven to 325.
Incorporate all ingredients together one by one on low speed.
Make sure to mix thoroughly between each ingredient.
Once all ingredients are mixed turn mixer to medium and mix for approximately 2 minutes.


**Mixture is very very thick.

Contributed by: Heartsfire on Cake Central


————————–


FAVORITE FONDANT BRANDS (IN ORDER):
Massa Grischuna ** by far the best
Fondx
ChocoPan
Fondarific
Satin Ice / Pettinice
——————–


TOOLS I CANNOT LIVE WITHOUT:
Bench Scraper
Fondant Smoothers
Palette Knife
Clay Gun
Ribbon Cutter
Cardstock (to make templates; I luv to make templates)
Agbay Leveler
Exacto Knife
Pasta Roller
Cornstarch
Shortening
Viva paper towels
Turntable (#35-100 )
Fondant Mat
Rolling Pin
TOOLS I USE A HECK OF A LOT:
Pearl makers
Textured rolling pins
Crimpers
Piping gel
Melted chocolate (for glue)
Frill cutters
Edible dusts (FDA approved)
Impression mats
————————
MY FAVORITE PLACES TO SHOP:
(No particular order)
Global Sugar Art
Into the Oven
Sugarcraft
Country Kitchen Sweet Art
Get Suckered
Beryl’s
Coedru (baskets)
Pfeil and Holing
Cake Craft Shoppe
Kitchen Krafts
Decorate The Cake
Dallas Foam (cake dummies)
Art Supply (fomecore)
Baker’s Kitchen (Sweetex)
Sugarpaste
CK Products (wholesale only)
Jesters Cake Supply
SugarEd Productions (fabulous DVDs and supplies!)
————————-
That’s all my weary brain can think of right now. I think it is nap time. Maybe a little snack first. Tell me what your favorite cake things are!
HAPPY NEW YEAR EVERYONE!
Sharon

Twas the Week Before Christmas

December 20, 2008 by Sharon Zambito 20 Comments

When, what to my wondering eye should appear
But a miniature sleigh and eight tiny reindeer.
OK, so the reindeer went off to graze …..

Here is the big project I have been working on for weeks. I made this for my sister’s office party. She challenges me to raise the bar every year. I try to resist, but she gets me every time.
When she saw the Santa cake I made in Bronwen’s class, she asked for that for the party. Knowing that was not enough servings for 50 people, I had to think of a coordinating way to add servings.
Late at night in bed it came to me. I knew it would be very labor intensive and stressful, but I knew I just had to try. I would have never been able to live with myself if I did not.

I thought and thought and thought some more about how to go about doing this. I used dried fondant panels for the sleigh and cake made up the seat.
The loot bag was made from piled up cake scraps. Wendy made the packages for me from styro, and I threw in a few of my goodie basket candy cane cookies too.

I searched the Internet for sleigh images and clip art, and decided to use this as my template and model: Sleigh


I made my own template on card stock using this image as a guide. I cut 2 of each piece. I wanted to have extras in case of breakage. I cut them out about 10 days before I assembled the sleigh. I flipped them over every few days to enhance them drying.


After about one week, I put the scroll work on using layers of clay gun strings. (My arms and chest are still sore.) Then I painted it with gold highlighter mixed with vodka. ( Yeah, that took a while too, LOL)


My wonderful Wendy came over to help me assemble the sleigh. I was very nervous about breakage. I had invested way too much time and effort by this point to lose it all. And it certainly took 4 hands and 2 brains to get it together. We carved the cake and placed it on the bottom piece, then attached the back piece. (Melted chocolate was our glue for everything.)


Here it is just put together. I decided to double the side panels for strength, which was a very good idea. They may not have made it had I left them single. You can see the hole in the board in front of the sleigh where Santa’s stand will go down into. ( Thanks to Wendy’s dad for cutting the board for me.)
Wendy came with me to deliver it and assemble it. When we got there, we dropped Santa down into the hole, applied the buttercream snow and added the doo dads.

Here is my template. You can adjust the size of this, keeping the ratio proportion the same, to make any size you want. You could make cute little gumpaste or gingerbread sleighs too.

Side panels.
Back panel
Bottom panel (excuse the typo)
Front panel
Everyone at the party was just amazed and awed. It was a lot of work, and worrisome, but I am glad I rose to the challenge. I am also very glad it is over! LOL

Next on tap is assembling the goodie baskets I have been working on. I will post those pics over the weekend. Have to get my house clean for company tomorrow night. I could use a cocktail!

Happy Holiday Caking,
Sharon
http://www.sugaredproductions.com/


Oreo Madness

December 4, 2008 by Sharon Zambito 28 Comments

What could be better than Oreos? Maybe Oreos covered in chocolate!
This post is dedicated to my dear friend Suze, and she knows why. What’s that? You want to know why too? No, I really should not say. Oh, you really want to know that badly? Well, OK, you forced it out of me. But please don’t tell her I told you this: she stinks at chocolate dipping Oreos!

The beauti–licious, yet dipping impaired Suze.
Last year I made the snowmen cookies below for the themed gift baskets I make every year. (They were a total copy from the wonderful site, FavorZ.)
Well, Suze tried to make some too, but let’s just say they came out, um, …well, ….not as good as she hoped for. So I started to rib her about it, and that gave birth to a friendly and good natured rivalry between the 2 of us and our confectionery skills. We try to poke fun at each other whenever we can.
So of course, Suzie came first to my mind as I was working on these chocolate dipped Oreos for this year’s baskets. I figured if I snapped some pictures and put together a little tutorial here, it might help her out. (Doubtful, but hey, what are friends for?)
These cookies are dipped in super white candy melts and chocolate transfer sheets in a candy cane design applied to the top. Cut the transfer sheets into little squares that will fit on the top of your cookie. Melt the candy melts till very smooth and creamy. I prefer the Merken’s and Guittard brands, as they perform the best. If the chocolate is low quality, or old, it will not melt nor cover smoothly. Be careful not to overheat or get water in the candy; that will ruin it as well.
Brush the Oreos with a big fluffy food brush before you dip them to avoid excess crumbs from getting in your melted chocolate. I use a large 3 pronged fork to dip the cookies. I dip, then let most of the excess chocolate fall back into the bowl, then place them on parchment or wax paper.
Gently place the transfer sheet squares on top and gently press it into place on top to make sure that chocolate comes into contact with all of the design.

I do about 5-8 on a cookie sheet and then pop those in the freezer for 5 minutes. Chilling them makes the design transfer over fully and cleanly, as well as giving the surface a nice shine. Just pull the transfer sheet square off when you take them out of the freezer. Don’t worry about the little bit of chocolate mess at the base of your cookies. After they have come back to room temp, you can take your handy palette knife and clean up the bottom edges.


By the end of your dipping session, your chocolate is still probably going to be “contaminated” with chocolate cookie crumbs, making it not very useful for any other purpose. So I crumble up all the broken Oreos that I did not dip into the chocolate, spread that on the parchment, chill, and break it up into a cookies and cream bark. YUMMY!

All the items in my basket are going to have a candy cane/peppermint theme. I do a different theme every year.


I will bag each of these individually and tie with a red ribbon before I put them in the baskets. If I place them unwrapped into the baskets; the transfer surface might get scratched and marked up by other items, and we just can’t have that! Not after all this work!


Maybe if Suze reads this she can give it another go. Of course, if she does read this I am in big time trouble. LOL

I hope you all get a chance to try this. Send me pics of your projects if you do! Even better, send all your pics to Suze! Tee hee hee.

Have fun making all of your holiday treats! I will try to post pics of more of the things I am working on if time permits. Such a crazy time of year, isn’t it?


Happy Holidays Ya’ll!

Sharon
http://www.sugaredproductions.com/


Yum to the Oh!

November 24, 2008 by Sharon Zambito 14 Comments

That is hip talk for Yummo. I know, lame attempt. I may not be hip but I can sure make a mean cake ball.


Hail the cake ball in all its glory.


Cakes balls (also known as cake bites for the more demure) have been popular on the cake message boards for as long as I can remember. It’s a great way to use up the scraps you save in your freezer when you level and carve your cakes. What? You don’t freeze your scraps? Well, you must start to do so now so you can partake of this delightfully delicious delicacy.


I usually have a boat load of scraps in my freezer at any give time. Since we travel the globe on holidays (OK, we house hop, but traveling the globe sounds more glamorous), it is the perfect time to get those scraps out and do some rolling!


My son J said he would make them with me, but I got ditched for a playdate with a friend. So I was thrown into cake ball world all alone. No worries… I put a little music on, got a big fizzy Diet Coke from the gas station (fountain only of course!), and I went to town.


You will find many variations of how people make the balls. Some add icing or filling or liquid flavored coffee creamers to the scraps and then mash them all up. I find that makes a mushy ball with my cake recipe, and I don’t care for that. I find the cake to be moist enough that if I just squoosh and moosh the scraps together very well, they bind together perfectly and are wonderfully moist as is.


I roll the balls and dip them right away into melted chocolate. Some folks freeze/chill the balls before dipping, but when I do that the chocolate cracks from the cold. I just dip them right away and they hold their shape beautifully .


I use candy melts (also known as candy coating) rather than “normal” chocolate. Candy melts do not have to be tempered. Regular chocolate must be tempered or it will bloom (get terrible white spots all over it). Melts are not as high of a grade of chocolate, but they taste fine to me, plus you won’t see any tempering going on around these parts. ( Too lazy, um I mean overbooked). If the chocolate is a little old (or cheap), it might not melt to a very smooth liquid state. In that case, I add some melted paramount crystals to get it flowing nicely again. It also gives the shells a nice soft bite in the mouth and they do not crumble all in your hands.
So now I have about a bajillion cake balls in Tupperware ready to travel the globe with us on Thursday. Hope you guys try it out if you have not already.


YUM. OH.

Happy Thanksgiving Everyone!
Sharon
http://www.sugaredproductions.com/


Follow the Yellow Brick Road

November 19, 2008 by Sharon Zambito 30 Comments

What a great movie. Brings back such good childhood memories of watching it on TV with my big sisters. Last weekend I made a cake with the Wizard of Oz theme. I was cruising the photo gallery on Cake Central and saw one using a sheet cake as the yellow brick road and got my inspiration from that wonderful cake. I took some photos of it in progress to share with you some of the techniques I used.
Taylor’s Wizard of Oz cake.
I made a paper template of the shape I wanted the cake to be and used that to cut the shape from a 12×16 sheet cake.
Then it was filled and crumb coated.
I wanted to show you guys how airless my icing is. This batch was made 3 days ahead of time, covered in plastic wrap on the surface, and kept in a plastic container at room temp. (If you want to see a clip of me making my icing, look here.)

The fondant was colored yellow and a some powdered tylose was added to help it firm up. I rolled it out and then used my brick impression mat over it. I used the same paper template that I cut the cake with to cut out the fondant. I let it sit there for a good 20 minutes or so to firm up, so that when I transferred it to the cake it would not stretch or distort.


Top piece applied to the cake.
I then cut a long strip of fondant (long enough to go around entire cake) and rolled it up bandage style.

The sides of the cake were dampened with water, and the bandage unrolled around the cake and smoothed in place. I then trimmed it level with the top of the “bricks” with an exacto knife.


I applied pieces of green fondant around the perimeter of the road to make grass. I made a seam in the front that would later be covered by flowers. I put a 21 star tip on my finger (much like a thimble) and stippled the entire surface of the green fondant to mimic grass.


The rainbow was an edible icing sheet that was put on fondant and allowed to dry firm for a few days. That was attached to the back of the cake with some melted chocolate.
The lollipops were made ahead also, and sucker sticks glued to the back. I stuck the sucker sticks down into the fondant and secured them in place with melted chocolate. I propped them in place until the chocolate firmed up.
After they were secure, I covered the chocolate with a little more “grass”.
The shoes were white chocolate tinted red and made in a 3D mold. Here they are right out of the mold.
I cleaned up the seams, added a fondant bow and painted them with piping gel.
A skewer in the bottom let me rotate them without messing them up with my hands as I sprinkled red disco dust all over them. (Be advised that while disco dust is non toxic, it is not truly considered food safe.)
The ruby slippers. I’ll get them, my pretty!
I’m meltiiiiiingggg…..
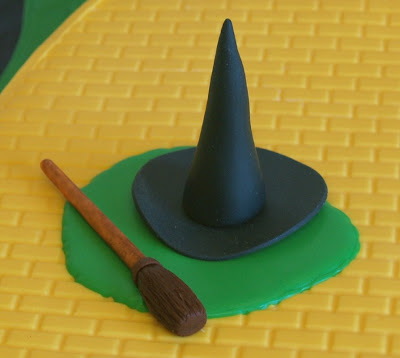
The hat and broom were hand modeled from fondant. A little puddle of green royal icing serves as the melted wicked witch. (She scared the bejeebers out of me…..you?)

I had a good time making this cake. None of the techniques are particularly difficult, just a little time consuming. I hope you have a chance to try it one day! Send me a pic if you do!

Happy Caking!
Sharon
http://www.sugaredproductions.com/

Making a Gumpaste Crown

October 21, 2008 by Sharon Zambito 19 Comments

Raise your hand if you love princess cakes. Yes, yes, I see a lot of hands going up! We love princess cakes! And our customers do too!

When I say Princess, you say Cakes…..


Me: Princess

You: Cakes!

Me: Princess


You: Cakes!


OK, so I get a little excited about cake. And princess cakes have been a very popular design for a few years now. I have made more than I can count. I get asked quite often how I make the gumpaste crowns, so here are some step by step pictures I took many years ago. The pictures are rather craptastic, due to the fact that I had a craptastic camera at the time, and had no idea how to take a good picture back then. But I think you can get the idea of what I am doing in them. (PS. Craptastic = if crap was fantastic, this would be it)

MAKING A GUMPASTE CROWN:
Paper template:


Cut the metal rim off one end of your can (like a shortening can; I use the gumpaste mix can):


Wrap parchment paper (or wax paper) around your can and tape it in place. The end with the metal lid still on goes down on the counter:


Tape parchment or wax paper down well on counter (you do not need the blue mat under it) and grease it well with shortening:


Roll out gumpaste onto the wax paper and lay the paper template over it and trace over it to cut out the crown shape:


Apply shortening to the surface of the cut out crown with a brush:


Cut the wax paper with a knife along the bottom edge of the crown, and proceed to cut out the rest of a rectangle around the crown. Do not cut out the wax paper along the exact shape of the crown, except along the bottom edge:


Take the can and roll it onto the crown, lining up the base of can with the bottom edge of the crown. The greased side of the crown is sticking to the parchment paper wrapped around the can:


After crown is in place, wrapped all the way around the can, stand it up. Wax paper is still in place on top of the crown:


Gently peel off the wax paper from the top side of the crown. The side of the crown that was face down on the counter, touching the wax paper, is now the upside of the crown and exposed to the air:


Let that sit and dry for 1-2 days. Do not rush it or you will surely break it. (Ask me how I know):


When the crown is dry enough to hold its shape, grab the top of the parchment paper extending above the can and gently slide all of it together off the can:

Sit that on a board and then gently peel the parchment paper off of the inside of the crown:
Let that sit and dry for a few more days. When the crown is really firm you may need to wipe the excess shortening off the inside of the crown, and then dust it with a tad of cornstarch:
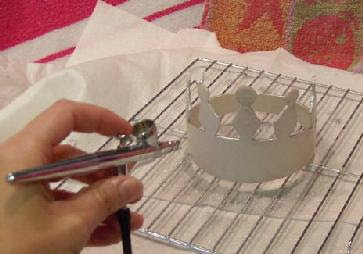
When fully dry, you can airbrush or paint it silver or gold. (This photo below is a lie. I was not actually airbrushing it at this time because I had to hold the airbrush with my left hand while my right hand took the picture. Impressive, eh?):
Then you can add plastic craft jewels, or even better, make edible ones!:


Pretty easy but you have to plan a few days ahead at least. Make 2, because if you make only one I guarantee you will break it. (Ask me how I know.) I like to use the Wilton gumpaste mix in the can for these because it not very elastic and rubbery, and that cuts easier than other types I have tried.

Here is a template for the crowns shown above. This is only one half of the crown. And you will have to enlarge this template to the right size for your cake:
Here is another template, the first one I ever made, an older design:


So there you have it! Now go get to making crowns!

Lots of crowns! All kinds of crowns!


We love Princess cakes!!

Happy crowning!
Sharon
http://www.sugaredproductions.com/

Cute Chocolate Cut Out Thingies

September 19, 2008 by Sharon Zambito 6 Comments

Yay for homework!

Two of our readers have sent in their chocolate favor projects, and I am excited to share them with you all.


Christie H. writes: While I haven’t made individual favors, I’ve used a similar technique to cut out plaques for a few cakes. I’ve added photos of two of them. In the first one, I melted white chocolate, then swirled black candy coloring to get a marbled effect. I love the layered look of yours and will definitely be trying that in the future!
Very clever technique, don’t you think?

Kim B. whipped out these beauties one evening after work for an office party. (Told ya no way she is a newbie.) Aren’t they gorgeous? She used the Funky Tappit cutters for her monogram.


Now as for the rest of you, get going on your homework projects and send them in! You don’t want to end up in confection detention!

Have a great weekend!

Sharon
http://www.sugaredproductions.com/


I Love it to the Core

September 7, 2008 by Sharon Zambito Leave a Comment

For as long as I have been around the Internet cake world, it seems that I must be the only caker on the face of the planet that actually likes to use the heating core when baking my layers. Most bakers I know use the rose nail as a heating element in the center of the pans to help them bake evenly. But I did not have much success with those. Once I tried the heating core, I have never looked back.

I use my Wilton Cake Release (squirt bottle, not spray) to coat my pans, as well as in the inside and outside of the core, using a pastry brush. I absolutely LUV the Wilton Cake Release. My cakes never stick, it is easy to use, and the pans are easy to clean up afterwards. I tried homemade pan grease, but wasn’t too fond of that either. Plus, I am always looking for ways to not have to make stuff. If I can find a product I like that prevents me from having to make something home made, I am a happy camper.


Fill your pans as usual after they and the core are prepped. Fill the core about half way with batter also.


Bake your cake as usual. The heating core will help the centers of the cake bake more quickly, keeping up with the edges (which bake faster than the middle). So the cake bakes more evenly across, and prevents dried out edges from occurring while waiting for the center to cook fully.

You will get a nice baked up cone of cake in the center. Take the pan out of the oven and let them cool for about 10 minutes (or follow your normal procedure.)

When you are ready to flip your cakes out of the pan, take the core out and set aside.

Then flip your cakes out to cool as you normally do. I suggest leaving the core to cool completely before you take the cake out. If I try to take it out while it is still warm, it breaks and some cake gets stuck in the metal core. To get the cake out of the core, just turn it over and shake really hard and it should pop out.


After your cakes are fully cooled and you are ready to fill your layers, place the core of cake right into the empty hole.


Level your cakes per usual.

You will hardly even be able to tell where the cake plug is. Fill and ice as usual.


Maybe you will choose to try this out. Who knows, I might even recruit a few of you over to the dark side. MWAHAHA.

 Beautiful maraschinos for the cherry chocolate cake.
PS. Please note that you can now subscribe to email alerts to our blog. Use the form in the right upper hand column of this page to enroll. You will be notified via email when there is a new blog entry. Feel free to post a comment or send an email to let us know how we are doing.

Happy caking!

Sharon
SugarEd Productions

Chocolate Monogram Favors

August 29, 2008 by Sharon Zambito Leave a Comment

Be gentle with me folks. I am not very computer savvy. No really. I am bad. Ask my 2 friends Heather and Kim. I am sure those 2 poor girls wish my PC and I had never met.

Heather, who is my BFF (we live close by but we met on a cake message board many years ago), is awesome with graphic arts. She is our Webmaster, logo designer, and is creating the covers for the upcoming DVDs. Heck, I can’t even log onto my own website to work on it. Sad, I know. She has to do it all. And all for very little pay. OK, OK, no pay.


Kim is a computer guru by profession, but an awesome caker as well. You may know her work. She calls herself a newbie, but we all think she is lying. Her cakes are too darn good. She helps me with all the technical/operational computer junk. Things like doing updates, backing up files, maneuvering windows, downloading, troubleshooting….all that kind of icky stuff.
 

Here is the lovely Kim (and me) at my Baton Rouge class I taught with Jen Dontz.

Not to mention that the SugarEd girls also listen to my non stop brainstorming, obscessing and generally constantly asking for advice. I honestly do not know what I would do without the help of my team. They are so good to me, and I do not deserve them. (You will meet more of them later.)


So, now that I am armed with the knowledge that these 2 wonderful women have imparted upon me, I am going to now dip my toes into the waters of blogging. Oooooooooooooh, it’s cold!…….. Deep breath. ……….Here I go:

A few weeks back, one of my all time best customers and ex-neighbor asked me to make a baby shower cake for her SIL. Well, turns out that MIL went and ordered a cake from somewhere else (GASP), so Tracy asked me to do the favors. She wanted me to make monogram favors out of chocolate to match the monogram on the invitation. (Not anticipating at the time that I would be blogging, I threw the invitation out, so I cannot show you how wonderfully I matched it . (Grin.)


I had no molds that would do for this job, so I decided to cut the candy discs with cookie cutters from poured out chocolate. I had never really done this before, so there was a little trial and error involved. I tried using parchment, plastic wrap, my silicone mat, and silpat under the chocolate but none worked well. I found that using plastic sheet protectors worked perfectly. Now, I cannot tell you if using those is food safe or not, so I am not telling you that it is. You will have to use your judgement on that one. You can however buy food grade acetate for chocolate work that would be fine. (I had none and no time to get any , so I decided to live dangerously this once.)

Here is a sheet protector on the counter with spacer strips on each side. These are called perfection strips and you can get them at Country Kitchen Sweet Art. They make sure you get the chocolate level all the way across your field. I placed them on the thinner sides and I think the chocolate was about 1/4 inch think, but do not quote me on that.


You melt your chocolate (I used candy coating cuz I am not about to temper anything in this life time) and pour it out on the sheet. Use a food grade ruler to spread the chocolate out, resting it on the spacer bars to make sure the chocolate is spread out evenly along the sheet. I could not take a picture of me doing this, because it took 2 hands to do it, and no one was here to take the pictures for me. Ah, such is the life of a lonely baker…..

Now go get a Diet Coke from the gas station soda fountain (because they have the perfect balance of carbonation and syrup), and wait for the chocolate to set up. You have to wait for the surface to turn dull and firm. If you tap it lightly with your finger you will not mark it, but if you press firmly you will. It will still be slightly warm to the touch. How long will this take? It depends upon how cool your room is, how hot the lights are, how fresh your chocolate is. I had my portable A/C on in my cake room (his name is Jack and I love him so) so it set up in probably 15-20 minutes.

Then take your cookie cutter (which I also failed to take a picture of) and cut into the chocolate. If it makes a nice clean cut, you are doing fine. If the edges of the cut are kind of squooshy, it is not ready yet. Press it hard so you cut all the way down to the bottom. If you are using crappy cheap chocolate like in this picture, it might be hard to get the cutter out. (Yes, I can say crappy . This is my blog and I can say it. Gotta love that. (Wink.) Hence all the fingerprints on the chocolate. I actually ended up doing these again a few days later when my good Merkens chocolate came in and it was clean and beautiful. The cutters came right out. No finger prints. It is amazing what a difference a good vs bad product can make. Again, I was only taking these pics to send to Kim (she is so needy, sheesh), and not expecting to use them on a blog tutorial, so I did not take pics with the good chocolate. Let’s just pretend this one looks pretty, kay?

Now, go to the gas station and get a refill on your Diet Coke. Yes, I drink that much Diet Coke. Doesn’t everyone? Then get on the computer and IM with your buddies for a while until the chocolate sets up nice and firm and is totally cooled off. I guess you could do other things like clean the kitchen or help your kid with homework, if you are into that sort of thing. (J/K, I do those things too.)


Then take the cutters and go back in again, into the same cuts, to make sure the bottom is cut all the way through. I found that if I did not do this, the underneath side had kind of melded back together and the pieces would not break off clean. Now transfer the sheet to a cardboard and score the chocolate around the blossoms with a sharp knife. Pop that in the freezer for 6-9 minutes until set up totally. The blossoms will just pop right out perfectly clean with beautiful edges. Do not touch the tops or you will get finger marks. Let them sit at room temp, and all condensation must dry before you work with them again.

I did the exact same thing with the white chocolate to make the circle discs. Merkens, not the crappy stuff. Attach the 2 pieces together with some chocolate and pipe the monogram with royal icing. I used a clay gun to make the pink string border. The party theme was pink, brown and white, so I wanted to get all 3 colors in there. So here is the finished product. They were about 3.5 inches in diameter.


And just for fun, here is a pic of the coordinating cookie favors. Sugar cookies with textured fondant, candy pearls and luster dust. Tracy loved them. Hmm, I wonder if their cake was dry.

OK class, your homework assignment is to go make some cute chocolate cut out thingies. Email me the pictures of your creations and I will post them here.


Happy Caking!


or should I say Happy Chocolating


or Happy Chocolatiering


Happy ……um…… Messing with Chocolate

Whatever……….get going!!


Sharon

SugarEd Productions

  • « Previous Page
  • 1
  • …
  • 13
  • 14
  • 15

Sharon Zambito

Sharon Zambito

An RN turned SAHM turned cake maniac. Owner of SugarEd Productions Online School. Join me for some caking, baking, and all around sweet fun :)

Follow me..

  • Facebook
  • Instagram
  • Pinterest
  • YouTube

Pinterest

  • Autumn House Two Trees Machine Embroidery Design – Blasto Stitch
    Autumn House Two Trees Machine Embroidery Design – Blasto Stitch
  • Embroider  Sew :: Jelly Roll Purses - Embroidery Garden In the Hoop Machine Embroidery Designs
    Embroider Sew :: Jelly Roll Purses - Embroidery Garden In the Hoop Machine Embroidery Designs
  • (1) How to QUICKLY & SAFELY remove acrylic, gel, and dip powder polish | BAGGY METHOD - SO EASY! - YouTube
    (1) How to QUICKLY & SAFELY remove acrylic, gel, and dip powder polish | BAGGY METHOD - SO EASY! - YouTube
  • (1) Bouffant Surgical Cap - YouTube
    (1) Bouffant Surgical Cap - YouTube
Follow Me on Pinterest

Follow Me on Instagram

Instagram requires authorization to view a user profile. Use autorized account in widget settings

Recent Posts

  • Egg Safety Basics
  • Stable Mabel Support System Sale
  • Guest Post : 4 Vegan Cake Recipes No One Should Miss Out On!

Popular Posts

  • Ways To Make Your Cake Fluffy And Moist
  • How To Stencil on Cookies with Royal Icing
  • Doctored Cake Mix Recipes
  • Transferring an Image Without a Projector
  • All About Buttercream!
  • How to Fix Broken Ganache
  • Edible vs Non Toxic Gold Dusts

Categories

Search

Archives

Copyright © 2025 · Sharon Zambito and SugarEd Productions,LLC

Copyright © 2025 · Evangeline Theme on Genesis Framework · WordPress · Log in