Sugared Productions Blog

  • Blog Home
    • Home
  • Online Classes
  • Shop
  • Contact
  • About

Mardi Gras King Cake

February 17, 2009 by Sharon Zambito 38 Comments

HAPPY MARDI GRAS EVERYONE!


Since it is Mardi Gras season right now down here in the Big Easy, I thought you might enjoy learning about another one of our unique culinary creations. I have recruited my big sister Barbara to do a guest blog entry on making a king cake. Barbara is the inventor of the original King Rock (more on that later). In addition to that, she is just the best big sister ever. She looks after me. She is an accountant by profession, so she helps with my business finances, taxes, and all that other icky stuff I have no clue about. She also comes on some of my cake trips with me to help me out with my demos and my vendor table. She is one of the most energetic, social, and fun to be with people I know. She is a very cool chick and I love her tons. So now I present to you… Barbara…..


—————————————-


Hi, I’m Barbara, Sharon’s sister, and she’s asked me to do a guest blog. This is me getting ready for Mardi Gras, which this year falls on February 24.


(Note from Sharon: I have this same outfit and yes we do wear this when we go parading.)

Speaking of Mardi Gras, that brings me to the topic of the day. I am not a cake decorator. I see some of the magnificent pieces of art that you all do and I am in complete awe. But, I am here today to talk about the king of all cakes – the King Cake.

If you are not from the New Orleans are, you might be asking yourself “what is a King Cake?” A king cake is a brioche-style cake similar to a coffee cake that is served throughout the carnival season in New Orleans. The carnival season begins on the 12th Day of Christmas, the Epiphany (January 6), which is the day the three kings visited the Baby Jesus. It is believed that it took the three kings 12 days to find their way to the stable. The carnival season ends on Mardi Gras Day, which is the Tuesday before Ash Wednesday.

The king cake is circular, representing the circular path the three kings had to take to ward off King Herod, who was seeking them so that he could kill the Christ Child. The king cake is typically decorated with colored icing and/or sugar. The three colors are purple, green and gold, the colors of Mardi Gras, which represent justice, faith and power. I’ve also heard that the three colors represent the three gifts presented by the Magi (gold, frankincense, and myrrh.) Within each cake is hidden a small plastic doll, which represents the Baby Jesus. (In olden times, it used to be a porcelain doll, or a bean or pea.)


King Cake parties where all the rage when I was growing up. Whoever was lucky enough to get the doll in their piece of cake would be named king (or queen) of that party and had to throw the next party. Today, this tradition is very prevalent in offices throughout the city where the person who gets the doll must bring the next cake. King cake sales are so prosperous that many bakeries in New Orleans are more profitable during the carnival season than they are for the entire rest of the year.


The making of a king cake should not be taken lightly. Since this is a yeast sweet bread, it has to be kneaded and left to rise twice, and is a day-long commitment. There are many bakeries that make excellent king cakes, so why in the world would anyone want to make their own? Just for the fun of it!!

My introduction into making home-made king cakes came many years ago. I found a recipe and tried it out on my family. Geez almighty, it was horrible. It came out heavy and hard as a rock, so much so that they called it the King Rock. My other sister, Janice, told her office mates about it and they accused her of exaggerating – that it couldn’t possibly have been that bad. So, they asked me to make a cake for their office party. Much to my dismay, it was just as horrible, but everyone was so polite and complimentary so as not to hurt my feelings, but I knew it was a bomb. I hope to think that I have gotten a little better at it over the years, but it is still tricky. I continue to try out new recipes and techniques, as I continue my search for perfection.

The recipe below is a really good one. It produces a light, but moist cinnamon cake. A few pointers for success: You have to get the yeast at just the right temperature (105 to 115 degrees) and let it foam for at least 10 minutes. You have to be careful not to add too much flour and not to over knead it. The dough should be slightly sticky, but elastic and able to hold its own shape, but never firm.


You have to be careful not to over bake it or it will be dry. I now use an instant-read thermometer, which should register 195 to 200 degrees for doneness.


The recipe is below. Basically, this is what you do. It’s much like making a bread dough. Let it rise till double in bulk and then roll out into a rectangle.


Here’s what it looks like rolled out with the cinnamon sugar sprinkled on:


Then roll up each piece into a long string.


Pinch the edges together so that the filling doesn’t ooze out. Flatten down the pinched edge afterwards so that it lays flat.


Twist the two strings together.


Form into a circle on a baking pan.


Let rise until double in bulk.

This is what it looks like right out of the oven.


Let cool and then decorate with a glaze and colored sprinkles.


See the baby’s head?


And that’s me with my cake.


You can do these in a variety of ways. You can divide the rectangle of dough into thirds and braid it like this. I rolled these strings in the cinnamon sugar to get it on the outside, rather than on the inside.


This is what it looked like after it was left to rise, baked and decorated. This one raised a lot and was very light and airy.


This one was filled with cinnamon sugar, raisins, and pecans. If you put a lot of “stuff” in your cake, it won’t rise as much.


You can also use other fillings, such as cream cheese filling, apple pie filling, lemon pie filling, cherry pie filling, etc. But I don’t like those. They turn out too sweet for my taste and the filling overpowers the taste of the cake. I’m a purist and like just a little cinnamon sugar.


So, that’s it. I hope that you all give it a try and bring a bit of New Orleans to wherever you might live. Also, if you ever have the chance to visit New Orleans during Mardi Gras, the city would love to have you. Let me just say that Mardi Gras is not only what you see in the media. Yes, there are some unmentionable things that go on in the French Quarter, but that is a very small piece of what our carnival season is about. Mardi Gras outside of the Quarter is very family oriented. The parade routes are filled with kids and families having fun. When we were little kids, my family did not miss a parade. We loved every minute of it. We would lift Sharon, the youngest, smallest and spryest of all of us, over barricades to get that all-elusive string of beads, trinket or doubloon out of our reach. Police were all over the place supposedly monitoring such infractions, but because she was so cute, the police would just look at her and us, and just shake their heads. We trained her young; you should see how she still scoops up the parade throws.


Happy Mardi Gras!


KING CAKE RECIPE:
(This recipe makes two medium size cakes.)

¼ cup warm water (105 to 115 degrees)
1 tablespoon (1 package) dry yeast
1/3 cup sugar
5 ¾ to 6 ¼ cups unbleached all-purpose flour
1 ½ teaspoons salt
½ cup warm milk (105 to 115 degrees)
1 cup sour cream
3 large eggs
finely grated zest of 1 lemon or orange
8 tablespoons (1 stick) unsalted butter, at room temperature, cut into small pieces

Cinnamon Sugar:
1 cup sugar
4 teaspoons ground cinnamon


Frosting:

4 cups powdered sugar
4 tablespoons butter, melted
7 tablespoons hot water, more as needed
1/4 teaspoon almond flavoring


1) Pour warm water into small bowl. Sprinkle yeast and a pinch of sugar over the surface. Stir to dissolve and let stand at room temperature until foamy; about 10 minutes.


2) Place 1 ½ cups of the flour, the remaining sugar, and the salt in mixer bowl. Make a well and add the milk, sour cream, eggs, and zest in the center. Beat until smooth on medium-low speed, about 1 minute.


3) Add the yeast mixture and beat for 1 minute more.


4) Stop the machine and add 1 cup more flour. Beat for 1 minute.


5) Add the butter pieces and beat on low speed until incorporated.


6) Add the remaining four, ½ cup at a time, until a soft, smooth dough that just clears the sides of the bowl is formed. Switch to the dough hook when the dough thickens, about two-thirds through adding the flour.


7) When all flour is added, knead with dough hook for about 5 minutes on medium speed. (If you don’t have a dough hook for your mixer, you’ll need to turn the dough out onto a lightly floured surface and knead for about 5-10 minutes.)


8) Turn dough out onto lightly floured surface. Knead until smooth and just able to hold its own shape, under 1 minute if you used the dough hook (6 to 10 kneads to smooth it out), dusting with flour only 1 tablespoon at a time, just enough to prevent sticking to your hands and the work surface. This dough will be very smooth, with a definite soft elastic quality, a little sticky, but never stiff, and will hold its shape.


9) Place the dough ball in a greased deep container, turn once to grease the top, and cover loosely with plastic wrap. Let rise in a warm place until double in bulk, 2 ½ to 3 hours. Do not allow the dough to rise over double.


10) Punch dough down with fist. Turn out onto lightly floured surface. Let rest 10 minutes.


11) Divide the dough in half with a bench scraper, pizza cutter or knife, never tearing the dough.


12) Divide each half into thirds. Roll out to a rectangle approx. 20 x 12 inches.


13) Divide in half with pizza cutter. Brush with melted butter keeping edges dry. Sprinkle with cinnamon sugar.


14) Roll up and pinch ends together so filling does not ooze out. Flatten pinched edge.


15) Twist two long rolled pieces together. Form into a circle and fold edges under.


16) You can insert baby trinket into cake at this point or wait until after it is baked. (I like to wait after it is baked if it is plastic.) Insert from underneath. (If you don’t have a baby trinket, use a whole pecan, walnut or other object; just be careful it is big enough that it cannot be swallowed whole.)


17) Cover with greased plastic wrap or light cloth towels and let rise in a warm place until double in size, about 1 to 1 ½ hours.


18) Preheat oven to 350 degrees. Bake 20-25 minutes. An instant-read thermometer will read 195 to 200 degrees.


19) Let cakes completely cool.


20) To prepare frosting, mix melted butter, powdered sugar and flavoring; add hot water 1 Tablespoon at a time until glaze reaches desired spreading consistency. You don’t want this too thin because it will run right off the cake or too thick because it won’t drip down the side of the cake.


21) Pour frosting over cake; sprinkle with purple, green and gold colored sprinkles or colored sugar.


—————————————-


Sharon again here. WOW! Was that great or what? Thanks Sis for showing me up on my own blog. Dang overachiever.  (Just kidding.) But seriously, I have been trying to convince Barb for months now to start her own food blog. She is a good cook, and photography has been a hobby of hers for a long time. What do you guys think? If you think she needs to start her own blog, leave a note in the comment section below ……


Then you can pretend you are down here with us having a great time while you sip your Mardi Gras martinis.


Mardi Gras Martini:


This festive concoction will add color to your celebration and your cheeks. To make purple sugar, add a few drops of red and blue food coloring to granulated sugar and mix. Rim glasses with a cut lemon and dredge in colored sugar, add a lemon twist and enjoy this purple, green and gold treat.


 2 ounces vodka
1 ounce triple sec
1 drop creme de menthe dark
Lemon twist, optional


In a martini shaker, combine vodka, triple sec and creme de menthe with ice and shake until well chilled. Strain into a martini glass, preferably one rimmed with purple sugar. Garnish with a lemon twist.(*from acj.com)


Happy Mardi Gras Everyone!

Sharon
PS We’ve got a full video tutorial on making the King Cake in our online school:
http://www.sugaredproductions.com/
Visit our online school


Daring Bakers: Tuiles

January 28, 2009 by Sharon Zambito 12 Comments


After missing two Daring Bakers challenges during the holidays I needed to put up or shut up this month. One more miss and I would have been kicked out! LOL. Luckily this one was pretty easy and not too time consuming, as once again I am pressed for time. Ain’t I always? Aren’t we all?
This month’s project was tuiles. Tuiles? What the heck is tuile? I thought it was that meshy fabric you made bows out of for the pews at weddings. Shows how much of a baking sophisticate I am. Not.

Traditionally, tuiles are thin, crisp almond cookies that are gently molded over a rolling pin or arched form while they are still warm. Once set, their shape resembles the curved French roofing tiles for which they’re named.

This month’s challenge is brought to us by Karen of Bake My Day and Zorra of 1x umruehren bitte aka Kochtopf. They have chosen Tuiles from The Chocolate Book by Angélique Schmeink and Nougatine and Chocolate Tuiles from Michel Roux.
Recipe:
Preparation time batter 10 minutes, waiting time 30 minutes, baking time: 5-10 minutes per batch
65 grams / ¼ cup / 2.3 ounces softened butter (not melted but soft)
60 grams / ½ cup / 2.1 ounces sifted confectioner’s sugar
1 sachet vanilla sugar (7 grams or substitute with a dash of vanilla extract)
2 large egg whites (slightly whisked with a fork)
65 grams / 1/2 cup / 2.3 ounces sifted all purpose flour
1 table spoon cocoa powder/or food coloring of choice
Butter/spray to grease baking sheet
Oven: 180C / 350F
Using a hand whisk or a stand mixer fitted with the paddle (low speed) and cream butter, sugar and vanilla to a paste. Keep stirring while you gradually add the egg whites. Continue to add the flour in small batches and stir to achieve a homogeneous and smooth batter/paste. Be careful to not over mix.Cover the bowl with plastic wrap and chill in the fridge for at least 30 minutes to firm up. (This batter will keep in the fridge for up to a week, take it out 30 minutes before you plan to use it).Line a baking sheet with parchment paper or grease with either butter/spray and chill in the fridge for at least 15 minutes. This will help spread the batter more easily if using a stencil/cardboard template such as the butterfly. Press the stencil on the baking sheet and use an off sided spatula to spread batter. Leave some room in between your shapes. Mix a small part of the batter with the cocoa and a few drops of warm water until evenly colored. Use this colored batter in a paper piping bag and proceed to pipe decorations on the wings and body of the butterfly.Bake butterflies in a preheated oven (180C/350F) for about 5-10 minutes or until the edges turn golden brown. Immediately release from baking sheet and proceed to shape/bend the cookies in the desired shape.
These cookies have to be shaped when still warm, you might want to bake a small amount at a time or maybe put them in the oven to warm them up again. Or: place a baking sheet toward the front of the warm oven, leaving the door half open. The warmth will keep the cookies malleable.If you don’t want to do stencil shapes, you might want to transfer the batter into a piping bag fitted with a small plain tip. Pipe the desired shapes and bake. Shape immediately after baking using for instance a rolling pin, a broom handle, cups, cones….

I chose the regular flavor tuile and served them on pistachinilla mousse with specialty cream. ( AKA I screwed up the boxed pistachio mouse by adding too much liquid and had to add a box of vanilla Jello pudding to make it set up. And while I am confessing, that specialty cream is Cool Whip.) I know. I know. I am such a cheater.
But hey, in my own defense, I have a wedding order this week, am working furiously to get the Boxes and Bows DVD ready, and my chronic reflux is flared up bad. Had to set my priorities and I figured the wedding cake and getting the DVD to you guys was more important than home made mousse. Yeah. That sounds good. I’m sticking with that story.

J said the cookies looked like the flowers in Bikini Bottom on Sponge Bob. He is right! They are a delightfully thin, light , not too sweet cookie. Perfect with mouse, pudding, sorbet ice cream or a spot o tea. Easy and fast too, and fun to shape while they are warm. Give them a try!

____________________________________

Speaking of reflux, I have not had a Diet Coke in about 6 weeks and I feel like this:
J had a close encounter with the hair dryer. He is such a goofball. Gawd I love that kid.
I will try to post early next week before I go to the Owensboro class (still have openings, hint hint). If I don’t, I will surely check back in early the following week. If all goes well, Boxes and Bows will ship that week too!

Happy Cooky-ing,
Sharon
http://www.sugaredproductions.com/


New Orleans Doberge Cake

January 7, 2009 by Sharon Zambito 21 Comments

What is Doberge, you say? You look it up in a french dictionary and the word is not there. How do you pronounce it? (I say dough-bearj; some say dough-bosh or dough-boj.)
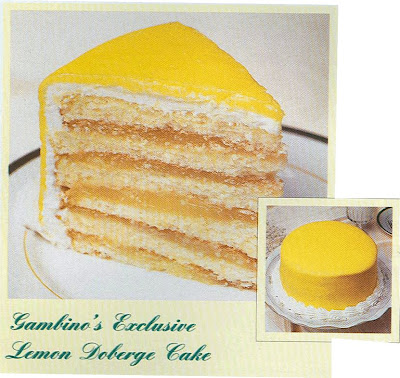
Doberge cake is an iconic staple of living in New Orleans. It is a yummy multi-layered cake with pastry cream inside and a poured glaze on the outside. You can order one for yourself here:

Traditional flavors are chocolate, lemon and caramel. But how did this deliciously delicate delight come to be? I did a little research and learned a few things myself.

Back in the 1930’s there was a New Orleans woman named Beulah Ledner, who came from a baking family in Germany. She started baking during the Depression to supplement the income from her husband’s furniture business. Experimenting in her kitchen, she came up with a variation on the famed Hungarian-Austrian dobos torta, which was thin layers of sponge cake filled with butter cream. She changed that to thin layers of butter cake with a custard filling, either chocolate or lemon.
This was a cake that was subtly rich and lighter than the original, and better suited to the New Orleans climate. But its inventor recognized that “dobos” wouldn’t fly in New Orleans. She thought it should be “Frenchified” to fit the city’s style. And so the name “doberge” was born.
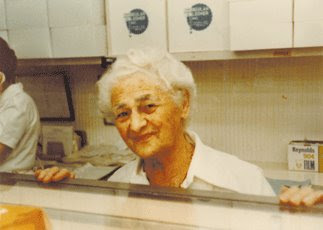
The business was first known as Mrs. Charles Ledner Bakery and was based in her home. Eventually she moved to a store front. A heart attack caused Beulah Ledner to sell the bakery, the name and the recipes to the Joe Gambino family in 1946. The agreement forbade her from operating another bakery in Orleans Parish for five years. But she could not stay away, and 2 years later opened another business in a neighboring parish (ie county) called Beulah Ledner Bakery. Beulah Ledner worked until she was 87 and sold Beulah Ledner Bakery in 1981. She died at 93, her culinary legacy intact.

Gambino’s Bakery is another icon of New Orleans, more famous for the doberge cake than Beulah. Many think that it originated there, but now we know better!

No one knows the original recipe except for Gambino’s , but here is a recipe we found on the Internet that my best friend Heather has made with good success. The only difference is that an authentic doberge cake has a poured glaze icing, not a spread on one:

CHOCOLATE DOBERGE CAKE

CAKE:

2 cups cake flour sifted
1 teaspoon baking soda
1 teaspoon salt
10 tablespoons butter
1-1/2 cups sugar
3 eggs separated whites beaten until stiff
1 cup buttermilk
2 squares unsweetened chocolate melted
1-1/4 teaspoons vanilla
1 teaspoon almond extract


FILLING:

2-1/2 cups evaporated milk
2 squares semisweet chocolate
1-1/4 cups granulated sugar
5 tablespoons flour
4 egg yolks
2 tablespoons butter
1-1/4 teaspoon vanilla
1/4 teaspoon almond extract


FROSTING:

3 cups sugar
1 cup evaporated milk
2 ounces bittersweet or unsweetened chocolate
4 tablespoons butter
1 teaspoon vanilla


DIRECTIONS:

Preheat oven to 300.
Grease and flour 2 round cake pans.
In a medium bowl sift flour, soda and salt 3 times.
Cream margarine and sugar in a large mixing bowl then add egg yolks one at a time.
Gradually alternate adding the flour mixture and buttermilk then add chocolate and mix well by beating about 3 minutes.
Fold in the three beaten egg whites, vanilla and almond extract.
Bake 45 minutes.
Allow cake to completely cool then split each layer into thirds to make six thin layers.
Put milk and chocolate in a saucepan and heat until chocolate is melted.
In a bowl combine sugar and flour.
Make a paste by adding hot milk chocolate by tablespoons to the sugar and flour and then return to saucepan.
Stir over medium heat until thick.
Add 4 egg yolks all at once and stir rapidly to completely blend.
Cook 3 minutes longer.
Remove from heat then and add butter, vanilla and almond extract.
Cool and spread on cake layering as you go.
Do not spread on top layer.
Combine sugar and milk in a heavy saucepan and bring to a boil stirring constantly.
Reduce heat and simmer 6 minutes without stirring.
Remove from heat and blend in chocolate.
Add butter and vanilla and return to medium low heat cooking 2 minutes.
Place in refrigerator to cool.
Beat well and then spread on top and sides of the cake.

——————————————————-

Now, we all know I am a fan of short cuts. Don’t get me wrong, taste is critically important to me, but if I can find a way to get excellent results with a little less work, I am all over that. So in my laziness, um, I mean, thriftiness, I have created a “doctored” version that Heather teasingly calls my Faux-berge cake.

Sharon’s Fauxberge Chocolate Cake
2 layers of your favorite doctored cake recipe in white or yellow
Jello pudding cups premade chocolate pudding
Chocolate buttercream icing
Chocolate ganache
Torte each cake layer into 3 thinner layers. Spread a thin layer of pudding in between each layer. (Premade cups have a better consistency than making the pudding in the box.) And it’s easier!! MWAHAHAHA.

Here are the 6 layers of cake on a 1/2 inch fomecore board. You will need to cover the fomecore with something appropriate to make it food safe. This was for family so I threw caution to the wind.


Ice to the edge of the fomecore with a layer of chocolate buttercream and chill in fridge until firm.


Now this next step is NOT necessary and I usually do not do it. However, this puppy was a huge 15 inch cake and rather unstable. So I gave it a coating of thick ganache (made with a 2:1 ratio of chocolate to cream.) You let the ganache thicken to a paste consistency and ice the cake with your spatula and bench scraper just like you do for buttercream. It sets up nice and firm to give you a stable chocolate “shell” encasing the layers. That top ledge of chocolate you can see in the picture was removed with my palette knife after the cake was fully chilled, but before I poured the thinner ganache layer on top.


Wanna see something scary?…………………….


Here is my ganache pouring set up. (Pretend you don’t see that pile of laundry on the chair, kay?) From bottom to top: cookie sheet lined with foil, fondant bucket wrapped in plastic wrap for food safety, piece of non skid stuff, cooling rack, piece of non-skid, and chilled cake on its fomecore board. When the iced cake is fully chilled, then you pour the final ganache coating on. That’s a LOT of ganache for this huge a$$ cake! My friend Jacque has a great tutorial on how to pour ganache on her fabulous blog Daisy Lane Cakes. Thanks Jacque, you rock!


OK, wanna see something even more scary?………………….

Moving that huge cake with wet ganache into the lowest shelf of my fridge where it barely fits without messing it up! Stress! I need a drink.


I let that ganache firm up overnight. Next day I took it out the fridge (fairly easy now that it is firm) and placed it on the display board, piped a border and placed the edible photo on top. This was for my sister in law’s dad’s 85th birthday bash. Everyone went nuts over this cake, in both looks and taste. I was even told it was better than Gambino’s! Shhh, don’t tell I cheated.


And here is a picture of the cake after serving. This photo was taken with D’s cell phone. Don’t think we’ll be getting any blog awards with this one! LOL


So there you have it, class. Your lesson on the New Orleans Doberge cake. Your assignment is to go make one of these beauties and tell me how you like it! Enjoy!

Sharon
http://www.sugaredproductions.com/

A Few of My Favorite Things

December 28, 2008 by Sharon Zambito 22 Comments

I hope you all had a wonderful Christmas!

Ours was wild, crazy, hectic, exhausting and super fun. Way too much eating go on for the last few weeks! (Going to have to diet a bit before we shoot the topsy turvy DVD, LOL) We had a big family party to attend on Christmas Eve and I hosted dinner at my house for 17 people on Xmas day. Now that I have slept for the better part of 3 days I am ready to roll! OK, maybe not quite yet.

What did you guys get? Santa was very good to me. I got a new macro lens and tripod for my camera, so I can try to kick my foody photos up a notch. I am so excited and cannot wait to try out my new stuff. But not quite yet. Still. Too. Tired.

J got Rock Band 2 for his X Box, and when he opened it he literally screamed and and ran around the house in circles. (I think that was a good gift choice.)

D got a nice winter coat and about 800 video games. (He likes video games.)
———————–
I’m still way too pooped to bake anything, or get my photo stuff out, so I thought I would blog about some of my favorite (cake) things. I get asked all the time for my favorite recipes, brands, tools, etc. So here are a few of my favorite things:
ICING RECIPES:
Sharon’s Crusting Buttercream:
** I make the following recipe to fill my 5 quart mixer. Adjust the recipe volume to fill your mixer properly as discussed in the video Perfecting the Art of Buttercream.
5 generous cups Sweetex shortening, or other brand of hi ratio shortening
5 pounds powdered sugar
4 TBS Wedding Bouquet flavoring (or substitute your flavoring of choice in the appropriate amount)
11-12 TBS hot coffee creamer liquid (as discussed in video)
Cream the shortening , flavorings, and hot liquid with paddle attachment until well combined and creamy. Then stream in first 3 pounds of powdered sugar with mixer running at speed one. When incorporated somewhat, stop and scrape down sides of bowl well. Stream in last 2 pounds of powdered sugar at speed one. When incorporated, turn the mixer up to speed 6 and let it beat for 5-7 minutes until very smooth. Scrape down the sides of the bowl very frequently while the mixer is going at speed 6. The goal is to get all of the icing down into the belly of the bowl and fill the bowl from side to side with no air gaps around the walls, as well as covering the paddle up to the springs. If the icing is making a sucking or “kissing” noise after all the sugar is in, add just a few drops more of liquid, while scraping down the sides,with the mixer running, until that stops. You should create a bowl full of icing side to side, where the paddle is completely submerged and beating in a vacuum under the icing. 5-7 minutes at speed 6 and you should have a smooth as silk and nearly airless icing. Cool before using. Keeps at room temp for weeks or fridge/freeze indefinitely.
Youtube clip of Sharon making icing: Video
Sharon’s Chocolate Crusting Buttercream:
2.5 cups butter
2.5 cups shortening
Splash of vanilla
Dump in cocoa and mix all of the above till very dark brown (I do not measure it)
5 pounds powdered sugar streamed in
Coffee creamer liquid (as shown in DVD) in amount needed
Good at room temp for several days to weeks. Fridge or freeze also.
Kathy Finholt’s Crusting Cream Cheese Icing:

1 cup butter
1/2 cup Crisco
16 oz. cream cheese
3 lbs powdered sugar
1 T vanilla
1/2 tsp salt

Kathy says:

Mix on low speed for a couple of minutes.
This makes a fairly stiff icing if you use 3-1/2 lb. Powdered sugar. For a softer one you can use 3 lbs. of powdered sugar. Can stay out of fridge for several days. Freezes well.

————————–
CAKE RECIPES:
WASC (white almond sour cream) by Rebecca Sutterby:

1 box mix (does not work well with DH since they changed their formula)
one cup sugar
one cup flour
1 1/3 cup water
1 tsp vanilla
1 tsp almond if desired
3 whole eggs or 4 whites
one cup sour cream
2 tbs oil

*you can make this into any flavor by starting with flavored mix, and adjust extracts as desired . Bake at 325.


Durable cake recipe from Cake Central:

**My favorite for chocolate cake and best for sculpting

This cake is moist yet very durable and will hold up to many shapes and designs. It is light in taste and stays moist if making a day or two ahead.

1 cake mix
4 egg whites
1/2 cup water
1/3 cup vegetable oil (add 2 more TBS for choc recipe)
1 small pkg of instant pudding mix
1 cup sour cream

Preheat oven to 325.
Incorporate all ingredients together one by one on low speed.
Make sure to mix thoroughly between each ingredient.
Once all ingredients are mixed turn mixer to medium and mix for approximately 2 minutes.


**Mixture is very very thick.

Contributed by: Heartsfire on Cake Central


————————–


FAVORITE FONDANT BRANDS (IN ORDER):
Massa Grischuna ** by far the best
Fondx
ChocoPan
Fondarific
Satin Ice / Pettinice
——————–


TOOLS I CANNOT LIVE WITHOUT:
Bench Scraper
Fondant Smoothers
Palette Knife
Clay Gun
Ribbon Cutter
Cardstock (to make templates; I luv to make templates)
Agbay Leveler
Exacto Knife
Pasta Roller
Cornstarch
Shortening
Viva paper towels
Turntable (#35-100 )
Fondant Mat
Rolling Pin
TOOLS I USE A HECK OF A LOT:
Pearl makers
Textured rolling pins
Crimpers
Piping gel
Melted chocolate (for glue)
Frill cutters
Edible dusts (FDA approved)
Impression mats
————————
MY FAVORITE PLACES TO SHOP:
(No particular order)
Global Sugar Art
Into the Oven
Sugarcraft
Country Kitchen Sweet Art
Get Suckered
Beryl’s
Coedru (baskets)
Pfeil and Holing
Cake Craft Shoppe
Kitchen Krafts
Decorate The Cake
Dallas Foam (cake dummies)
Art Supply (fomecore)
Baker’s Kitchen (Sweetex)
Sugarpaste
CK Products (wholesale only)
Jesters Cake Supply
SugarEd Productions (fabulous DVDs and supplies!)
————————-
That’s all my weary brain can think of right now. I think it is nap time. Maybe a little snack first. Tell me what your favorite cake things are!
HAPPY NEW YEAR EVERYONE!
Sharon

Yum to the Oh!

November 24, 2008 by Sharon Zambito 14 Comments

That is hip talk for Yummo. I know, lame attempt. I may not be hip but I can sure make a mean cake ball.


Hail the cake ball in all its glory.


Cakes balls (also known as cake bites for the more demure) have been popular on the cake message boards for as long as I can remember. It’s a great way to use up the scraps you save in your freezer when you level and carve your cakes. What? You don’t freeze your scraps? Well, you must start to do so now so you can partake of this delightfully delicious delicacy.


I usually have a boat load of scraps in my freezer at any give time. Since we travel the globe on holidays (OK, we house hop, but traveling the globe sounds more glamorous), it is the perfect time to get those scraps out and do some rolling!


My son J said he would make them with me, but I got ditched for a playdate with a friend. So I was thrown into cake ball world all alone. No worries… I put a little music on, got a big fizzy Diet Coke from the gas station (fountain only of course!), and I went to town.


You will find many variations of how people make the balls. Some add icing or filling or liquid flavored coffee creamers to the scraps and then mash them all up. I find that makes a mushy ball with my cake recipe, and I don’t care for that. I find the cake to be moist enough that if I just squoosh and moosh the scraps together very well, they bind together perfectly and are wonderfully moist as is.


I roll the balls and dip them right away into melted chocolate. Some folks freeze/chill the balls before dipping, but when I do that the chocolate cracks from the cold. I just dip them right away and they hold their shape beautifully .


I use candy melts (also known as candy coating) rather than “normal” chocolate. Candy melts do not have to be tempered. Regular chocolate must be tempered or it will bloom (get terrible white spots all over it). Melts are not as high of a grade of chocolate, but they taste fine to me, plus you won’t see any tempering going on around these parts. ( Too lazy, um I mean overbooked). If the chocolate is a little old (or cheap), it might not melt to a very smooth liquid state. In that case, I add some melted paramount crystals to get it flowing nicely again. It also gives the shells a nice soft bite in the mouth and they do not crumble all in your hands.
So now I have about a bajillion cake balls in Tupperware ready to travel the globe with us on Thursday. Hope you guys try it out if you have not already.


YUM. OH.

Happy Thanksgiving Everyone!
Sharon
http://www.sugaredproductions.com/


Iced Pumpkin Cookies

November 7, 2008 by Sharon Zambito 14 Comments

I saw these cookies on a wonderful blog, The Repressed Pastry Chef, and knew I had to make them soon. So, in my quest to procrastinate from doing my cake prep last night, I figured that was the perfect time to make them. J and I both love pumpkin, and he likes to bake, so we made these together.


I am taking a little break from caking right now to eat my dinner, so I figured I would make a little blog entry on them for you guys. It gave me another chance to practice my photography, but I am not sure if I like these pictures are not. (I am always open to suggestions from you photography buffs, BTW.)


Iced Pumpkin Cookies

Ingredients

1 cup shortening
1 cup granulated sugar
1 cup canned pumpkin
1 egg
1 teaspoon baking soda
3/4 teaspoon ground cinnamon
1/2 teaspoon ground nutmeg
1/2 teaspoon salt
2 cups all-purpose flour
3 tablespoons butter
4 tablespoons milk
1 cup confectioners’ sugar
3/4 teaspoon vanilla extract
1/2 cup packed brown sugar


Method

Preheat oven to 350°F, line cookie sheet with silicone mat
Cream shortening, granulated sugar and pumpkin. Add egg and mix well. Add the baking soda, ground cinnamon, nutmeg, salt and flour and mix well. Using a small-to-medium sized disher (cookie scoop) or generous tablespoon, scoop batter onto cookie sheet. Using a wet finger, smooth points/peaks and gently press down tops. Bake 15-18 minutes then remove from oven and transfer to cooling rack and cool about 10-15 minutes before icing. To Make Icing: Cook butter, milk, and brown sugar until dissolved. Cool and add confectioners’ sugar and vanilla. Place a sheet of waxed paper under the cooling rack, take the cooled cookies and holding one at a time dip upside down into the icing, invert and place on cooling rack. Decorate with sprinkles while icing is still wet.


I made some a little larger than others, and I liked those better, as they were more moist. I liked them even better the next day, as they softened up a little. These are seriously dangerous to have around. They are very soft, cake-like and almost melt in your mouth. Very quick and easy to make too. Hope you try them!

OK, back to work for me! Have a great weekend!
Sharon
www.sugaredproductions.com

Brotherly Love

November 5, 2008 by Sharon Zambito 11 Comments

Family. Ya gotta love ’em. What would we do without them?
I was blessed (or sentenced, depending upon how look at it, LOL) to be born into a large family, the last of 5 siblings. The age gap between my older siblings and I was large enough that they really were too old to be my playmates. In fact, I think I was more an object for their entertainment by harassing and torturing me for their own evil pleasure. All of them but my brother Michael. He was never mean to me. He never stung me with rubber bands, beat up my teddy bear, or forced me to look at skeleton pictures. He never scared me with a vampire face, or tricked me by wrapping rocks to look like candy just to see me cry from disappointment. He never talked on the phone late at night when I was trying to sleep, pulled me off the desk chair to do “college work”, or eat all the fresh cherries at the beach so I got none. Nope, not Mike. (You others know who you are and what you have done. I wonder how you sleep at night.) Michael does not have a mean bone in his body. I don’t think I have ever heard him utter a cross word. He taught me to play chess, did word Jumble puzzles with me, and took me on vacation to the Grand Canyon. He is the most gentle, kind and selfless person I know.
Left to right: John, Mike, Janice, Barbara, and me.

And he’s good to me still to this day. Whenever my PC gets all bogged down with junk and viruses, and starts to run badly, I can always take it in to him for a full clean out and tune up. He gets it running fast and clean for me again. Just like he did this week. So how do I thank him for his help? By doing the only thing I know how to do: bake!

Mike can’t have sugar, so I make him sugar free cakes. Gives me a chance to try out some new recipes. He seems to like anything though; he is not picky.


This recipe I had saved on my PC, and I do not know the source to give credit. The cake was a tad dry to me, but I may have baked it a little bit too long. I would advise to take it out the oven before the toothpick comes out fully clean to prevent over baking. The icing was delicious. Squirt-the-piping-bag-right-into-your-mouth delicious. And yes, I did do that. 3 times. But not until I was finished with the cake.

Sugar-free Chocolate Cake

2 cups flour
1½ cups Splenda (granular no calorie sweetener)
3/4-cup non-dairy creamer powder
¼ tsp salt
1 ¼ tsp baking soda
½ cup + 2 Tbsp cocoa
¾ cup applesauce or vegetable oil
1 cup + 2 Tbsp milk
2 tsp baking powder
3 eggs
1 ½ tsp vanilla

Measure the dry ingredients into a bowl reserving ¼ cup Splenda. In another bowl mix the applesauce (or substitute ¾ cup vegetable oil),Milk, vanilla, and 3 egg yolks. Beat the egg whites until fluffy, slowly adding the remaining ¼ cup of Splenda. Whisk together the dry ingredients with the liquid making a smooth batter. Beat for 2 minutes until color lightens. Then fold in the egg whites. Bake in two greased and floured 8 –inch cake pans, at 350 degrees about 20 – 30 minutes. When Baking with Splenda, products bake quicker so test to see when cake springs back or when a toothpick comes out clean. They also do not rise very much. Each layer was about 1-1.5 inches tall, so I torted them and filled.

Sugar-free Chocolate Frosting

1 Large box Vanilla or chocolate instant sugar free Jell-O pudding mix
1-cup low fat milk
2 cups heavy cream

In a mixing bowl pour the milk. Measure out the heavy cream and open the pudding box. Quickly pour the pudding into the milk beating just until absorbed, add the heavy cream and continue to beat until light and fluffy.(I doubled this recipe to fill and ice my cake as shown.)
It made a nice cake and I would make it again. Janice is the real sugar free baker in the family. She doesn’t know it yet, but I am going to recruit her to contribute to my blog when she tries out all her new recipes. It’s the least she can do after all that childhood misery she caused me. I know how much I love sweets and cannot imagine not being able to have them because of dietary restrictions. So from time to time I will post some sugar free recipes.
What mean things did your sibs do to you?
Happy Baking!
Sharon,
http://www.sugaredproductions.com/
  • « Previous Page
  • 1
  • …
  • 5
  • 6
  • 7

Sharon Zambito

Sharon Zambito

An RN turned SAHM turned cake maniac. Owner of SugarEd Productions Online School. Join me for some caking, baking, and all around sweet fun :)

Follow me..

  • Facebook
  • Instagram
  • Pinterest
  • YouTube

Pinterest

  • Autumn House Two Trees Machine Embroidery Design – Blasto Stitch
    Autumn House Two Trees Machine Embroidery Design – Blasto Stitch
  • Embroider  Sew :: Jelly Roll Purses - Embroidery Garden In the Hoop Machine Embroidery Designs
    Embroider Sew :: Jelly Roll Purses - Embroidery Garden In the Hoop Machine Embroidery Designs
  • (1) How to QUICKLY & SAFELY remove acrylic, gel, and dip powder polish | BAGGY METHOD - SO EASY! - YouTube
    (1) How to QUICKLY & SAFELY remove acrylic, gel, and dip powder polish | BAGGY METHOD - SO EASY! - YouTube
  • (1) Bouffant Surgical Cap - YouTube
    (1) Bouffant Surgical Cap - YouTube
Follow Me on Pinterest

Follow Me on Instagram

Instagram requires authorization to view a user profile. Use autorized account in widget settings

Recent Posts

  • Egg Safety Basics
  • Stable Mabel Support System Sale
  • Guest Post : 4 Vegan Cake Recipes No One Should Miss Out On!

Popular Posts

  • Ways To Make Your Cake Fluffy And Moist
  • How To Stencil on Cookies with Royal Icing
  • Doctored Cake Mix Recipes
  • Transferring an Image Without a Projector
  • All About Buttercream!
  • How to Fix Broken Ganache
  • Edible vs Non Toxic Gold Dusts

Categories

Search

Archives

Copyright © 2025 · Sharon Zambito and SugarEd Productions,LLC

Copyright © 2025 · Evangeline Theme on Genesis Framework · WordPress · Log in