Sugared Productions Blog

  • Blog Home
    • Home
  • Online Classes
  • Shop
  • Contact
  • About

Lazy Halloween Cheesecake

October 17, 2012 by Sharon Zambito 18 Comments

 Hello Sugar Friends!

Those of you who have followed my blog for a while know that I am a very lazy busy woman. I am all for making things easier on ourselves when possible. I think everything has its place: scratch, doctored, handmade, pre made. Whatever works works for me!

Since I am especially lazy busy right now, I was brainstorming a really easy dessert I could bring to a Halloween function. I wasn’t in the mood for cake, or cupcakes, or cake balls, or pie, or donuts…… but cheesecake, yes!

 easy pumpkin cheesecake


However, I am way too lazy busy right now to make cheesecake from scratch. So I decided to experiment with my idea using boxed no bake cheesecake. Yep, I went there. 🙂


easy pumpkin cheesecake

 I used 3 mixes for the cheesecake I made.


easy pumpkin cheesecake

I used an 8 inch spring form pan. I used almost two of the three packs of the crust mix because I like a really thick crust on my cheesecake. After I packed in the crust, I went over the outer edges with the back of a spoon to pack it all down evenly. I wanted the crust to look very uniform and even when the cake was unmolded. (Just cuz I am being lazy using shortcuts doesn’t mean I don’t want it to look good!)

Next I mixed up 2 packs of cheesecake and colored it orange with gel colors. You could also add some orange flavoring to jazz it up if you like.


easy pumpkin cheesecake

 In went the orange cheesecake, estimating one third up the pan.


easy pumpkin cheesecake

I used a paper towel to wipe the inside edges clean of any smears. I was trying to keep the layers of the cake as clean as level as possible so it would be pretty when unmolded.

Third pack of cheesecake mix was colored black. Yep, I went there! It’s Halloween; what’s more fun than a black mouth! You could start with chocolate mix if you desire, and then you would have chocolate and orange flavored cheesecake. That would be yummy.


easy pumpkin cheesecake

In went a layer of black cheesecake mix.


easy pumpkin cheesecake

Third layer is orange again. Bang the pan well and clean up the top edges again. Into the freezer overnight. We need it to be rock solid to unmold it.


easy pumpkin cheesecake

The next day (or week, or whenever you get around to it like me), unlatch the spring and take off the outer ring of the pan. It will release easily and cleanly from the cake. Immediately put a piece of parchment and cake cardboard on top and flip it over. Then remove the bottom of the pan. It also came off super easily.


easy pumpkin cheesecake

 Then quickly put your cake plate on top and flip it back over.

Now guys, this cake is going to sweat profusely if you leave it out at room temp. It’s going to sweat buckets. It’s going to pool and drip black streaks down the sides. And yes, I do know this from first hand experience. 😯  So you need to let this thaw in the fridge, preferably inside a box. That way the condensation will collect outside the box and not on the surface of the cake.


 easy pumpkin cheesecake


If you are lazy a minimalist like me, a simple presentation on a cake platter is all it needs. It’s pretty enough to stand alone.


easy pumpkin cheesecake

Yummy cheesecakey deliciousness. And it really did taste pretty good for coming from a box.

BUT, if you really want to get your Halloween on, you can pipe some super easy buttercream ghosts around the side this :


easy pumpkin cheesecake


 Wooooooooo…………. (not really sure how you type scary ghost sounds)


easy pumpkin cheesecake


Since it’s too hard to explain how I piped these ghosts, I have a teeny tiny little video to show how I did it.  Disclaimer: My son filmed this using my phone;don’t expect too much:

Piped Ghost Video


easy pumpkin cheesecake


 Wasn’t that fun?


easy pumpkin cheesecake


 And lazy easy!


easy pumpkin cheesecake


Just in case you can’t bring yourself to use a box, here is an easy no bake cheesecake recipe:

Crust:

1 1/4 c. graham cracker crumbs
3 tbsp. sugar
1/3 c. butter, melted

Mix crust ingredients and press into bottom and sides of 9-inch pie plate.

Filling:

 
1 (8 oz.) pkg. softened cream cheese
1 can sweetened condensed milk
1/3 c. lemon juice
1/2 c. sour cream

In medium size bowl beat cream cheese until fluffy. Add condensed milk, stir in lemon juice and sour cream; blend ingredients well. Chill 20 minutes then fill pie crust. Chill 2 hours.

Hope you guys try it! Send me pics of the black mouths! :mrgreen:

Happy Halloweening,

Sharon

Visit our online school

Christmas Tree Mini Cakes

December 14, 2011 by Sharon Zambito 22 Comments

Oh Christmas Tree!


Oh Christmas Tree!


I have a serious weakness for mini and individual confection cuteness. I saw a mini cake on the Family Fun website that spurred the idea for these. Come along with me and I will show you how to make ‘em!


I used frozen pound cake in this case because I was too lazy too pressed for time to bake. You can certainly use your own recipe and cut these from sheet cakes. Just be sure to use a very sturdy cake or they will not hold up under the weight of the icing.


I used my Ateco nesting blossom cutters for these trees, but you could also use squares and stagger the shapes, or even hexagons might be cute. (Ignore the marshmallows in this photo. I ended up not using them but forget to retake this photo. Oopsie.)


Level the cake and create a layer the height you want each tier of your tree to be. My layers were right at one inch high each. Use your three sizes of cutters and cut out the shapes.


This next thing I am going to tell you is very important, so lean closer to the monitor so you can hear me. Closer. Still a little closer. I do not want you to miss this, because the success of your entire project may depend upon this!


Are you close? Ok, good. Notice how I am cutting the cake with the crust side up. Please be sure NOT to do this. Cut it with the crust side down. And then push the cake up through the top of the cutter to get it out. You will see why in just a little bit.


Pull the rest of the cake away and then remove the cake from the cutters. It is much easier to work with firm cold cake.


Now you have the three tiers of your tree and the extra cake can be used to make cake balls, or do what I do and just throw them in a Ziplock for the hubby and kids to snack on.


Now take the layers of cake, and stack them up, but alternate the alignment of the petals as shown above. Run a skewer through all three layers for stability. This is the only cake you may ever make where one tiny skewer is the only dowel you will need for the whole cake!


Sit the  cake on top of one of the cookie cutters, and place this on a cookie sheet lined with plastic wrap or wax paper.


Cut the skewer off right below the top surface of the cake.


Now time to make the icing to pour. In this case I used glace icing because it gives more coverage than poured fondant, is not as translucent, dries with more of a gloss, and I was too lazy is easier to make and use.


Glace icing:
one pound powdered sugar
6 TBS milk
6 TBS light corn syrup

flavorings as desired (I use 1tsp each of vanilla and almond)

Whisk all of the above together vigorously by hand with gel or paste food coloring until totally smooth. Cover the surface with plastic wrap and let it settle a while until the air bubbles rise to the surface. Then you can take the plastic off and pop the bubbles on the surface with the back of a spoon or spatula. Do not re-stir. (Keep icing covered in plastic when not in use.)


Now you are ready to pour:


You need to pour a large amount over the cake. Way more than what will end up staying on the cake. This will insure that every little nook and cranny of the cake will be covered. I took this picture right after I poured the icing and put the bowl down. It should run down the cake very fast, about the consistency a chocolate fountain would be.


Within just a minute or two , most of it will run off the cake. You can see how it is getting thinner on the sides now.


When the dripping slows down to just a few drops (this will be just a few minutes), pick up the cookie cutter with cake still on top and move it to another surface to dry fully. You need to do this right away so you can scrape up all the excess poured icing, put it back in your bowl and use it again. The glace has to be scraped up quickly before it starts to crystallize and firm up.

You may want to let this layer of icing firm for about an hour, and then give the whole cake another pour. I did two coats on mine, because it made the finished cake look a lot smoother and more polished than just one coat.


Ok, remember that I told you about cutting the cake crust side down ? The reason for this is because you want the flow of the icing to be going in the same direction as the grain of the cut of the cookie cutter. You want the icing to flow down the cut sides of the layers in the same direction that the cookie cutter cut them.


And this is why:


Can you say ugly? This cake was poured with the layers stacked in the opposite direction of how they were cut. So the weight of the icing flowing down pulled down the cut sides of the cake (against the grain), and made the cake sides separate and stick out, not stay flush and tight. So I got this really ugly surface on the cake. Blech.

Pretty:


Pretty ugly:


—————————————————–


So, now you have to let the icing dry for 18-24 hours until the surface is nice and firm in order to be able to decorate it.


To decorate: strings from the clay gun for the garland, little rolled balls of fondant for the ornaments, and a fondant star for the top. I used sanding sugar in the white icing snow and threw some white disco dust over everything, because disco dust makes everything look better! Note: not all dusts are considered edible, so choose wisely.

Ta dah!! I also made some little fondant packages and a cute teeny weeny snowman.


Say it with me: awwwwww


And a picture just for size reference.


So, do remember this hideous nightmare disaster of ugliness the likes the Earth has never seen before?


I hated the thought of throwing it away, so I tried to disguise its mutant repulsiveness by painting some white buttercream snow on the branches of the cake, and adding some colored balls and edible sparkle dust:


What do you think? I think it’s not too bad now! And the plus side is that this one takes way less time to decorate than the first one.


——————————————————


 Back to that purchased frozen fresh baked cake you made:


You will have a layer of cake left over from leveling that will not be tall enough to use for tiers of the tree. You can use other holiday shaped cookie cutters.


They are the perfect height for little petit fours. Just pour icing over them them and let dry. Easy.


Then treat yourself to them on nice china with a hot cup of your favorite holiday flavored coffee. You worked hard; you deserve it.

Oh Christmas Tree!


Sing along with me everyone:
Oh Christmas Tree! Oh Christmas Tree!
They leaves are so unchanging.
Not only green with icing here.
But also sweet and cuteness near.
Oh Christmas Tree! Oh Christmas Tree!
Thy leaves are so……(Fill in the blank)


Happy Holidays!
Sharon


Perfect Pumpkin Roll

November 20, 2011 by Sharon Zambito 31 Comments

Thanksgiving Blog Blitz Post #5

Welcome to the 5th and final installment of my Thanksgiving Blog Blitz. I gotta tell ya I am plum wore out. Been burning the candle at both ends over here, as I am sure many of you are too. I am just flat busted exhausted. So this post is going to be a little bare bones. I don’t have any ideas for witty commentary or fancy photos. But I still want to give you the information for this project as promised:

How to make a perfect pumpkin roll:


Make the recipe and bake it.


Add some filling, roll it up, and it should look like this:


Enjoy! Hope you try it!
Happy Thanksgiving everybody!


JUST KIDDING!


 You guys know I would never do that to you!

I was just messin’ with ya! Tee hee hee.


Here we go:


How to make this most gorgeous and beautiful pumpkin roll:


 perfect pumpkin roll


Make the recipe as directed (given below). Line a 10×15 jelly roll pan with wax paper or parchment paper, spray with pan spray, pour in the batter and bake as directed. Do not over bake. Take it out as soon as the top springs back when touched.


While the cake is baking, take a clean kitchen towel that does not have a very loopy surface and dust it liberally with powdered sugar.


As soon as the cake is done, flip it out onto the towel and peel off the wax paper. Do this right out of the oven. Do not cool it. Do not go get a sip of diet coke and then forget about it. (Just sayin’; that does not work.)


Immediately roll up the cake and towel together, then place on a cooling rack for about one hour. Now you can go get something to drink.


Once the cake is almost completely cool, but just barely warm, unroll it and spread an even thickness of the cream cheese filling across the cake. (Recipe below.)


Roll it up, somewhat tight. If the cake was not over baked or over cooled, it should not crack. If it cracks, do not freak out. No freaking out over pumpkin rolls allowed. You can cover it with powdered sugar or icing later.


Wrap this in plastic and keep in fridge at least a couple of hours or until a short time before serving. It is easier to cut while cold. The slices come out cleaner and prettier, but you do not have to serve it cold. (Please ignore the fact that there is more diet coke in my fridge than milk.)


Take it out the fridge and cut off the two rough ends of the roll, as the ends are not too pretty. Those are your quality control portions. You have to test it before serving it to others, of course!


Sprinkle with more sifted powdered sugar once on your serving platter. Is that not gorgeous?


Incredibly yummy too.


Please do not be afraid to try this. I was afraid the first time I did one that it would be a disaster. It is actually a very easy process, and you should get perfect results each time. The recipe is quick to do and tastes great. This is a perfect last minute holiday dessert that you can whip up in no time. And of course, you will impress everyone with this stunner.

Cake:

1/4 cup powdered sugar (to sprinkle on towel)
3/4 cup all-purpose flour
1/2 teaspoon baking powder
1/2 teaspoon baking soda
1/2 teaspoon ground cinnamon
1/2 teaspoon ground cloves
1/4 teaspoon salt
3 large eggs
1 cup granulated sugar
2/3 cup LIBBY’S® 100% Pure Pumpkin
1 cup walnuts, chopped (optional)

Filling:

1 pkg. (8 oz.) cream cheese, at room temperature
1 cup powdered sugar, sifted
6 tablespoons butter or margarine, softened
1 teaspoon vanilla extract
Powdered sugar (optional for decoration)

FOR CAKE:

PREHEAT oven to 375° F. Grease 15 x 10-inch jelly-roll pan; line with wax paper. Grease and flour paper. Sprinkle a thin, cotton kitchen towel with powdered sugar.

COMBINE flour, baking powder, baking soda, cinnamon, cloves and salt in small bowl. Beat eggs and granulated sugar in large mixer bowl until thick. Beat in pumpkin. Stir in flour mixture. Spread evenly into prepared pan. Sprinkle with nuts.


BAKE for 13 to 15 minutes or until top of cake springs back when touched. (If using a dark-colored pan, begin checking for doneness at 11 minutes.) Immediately loosen and turn cake onto prepared towel. Carefully peel off paper. Roll up cake and towel together, starting with narrow end. Cool on wire rack.


FOR FILLING:

BEAT cream cheese, 1 cup powdered sugar, butter and vanilla extract in small mixer bowl until smooth. Carefully unroll cake. Spread cream cheese mixture over cake. Reroll cake. Wrap in plastic wrap and refrigerate at least one hour. Sprinkle with powdered sugar before serving, if desired.

COOKING TIP:

Be sure to put enough powdered sugar on the towel when rolling up the cake so it will not stick.

And here is a video of the process that might help:

Video
———————————————————–

I’d  like to tell you all how thankful I am to have the honor and privilege to interact with you here on my blog and in my videos. As a token of thanks, I’ve got 3 free baking and cake serving charts that I have put together in a PDF file. Just click on the button below to request it.

Free cake baking and serving charts

Send My Free PDF


Happy baking and Happy Thanksgiving,
Sharon
Visit our online school


NOLA Photography http://bentzphotography.com/

Turkey 3D Cookies

November 18, 2011 by Sharon Zambito 3 Comments

Thanksgiving Blog Blitz Post #4!


Gobble! Gobble!


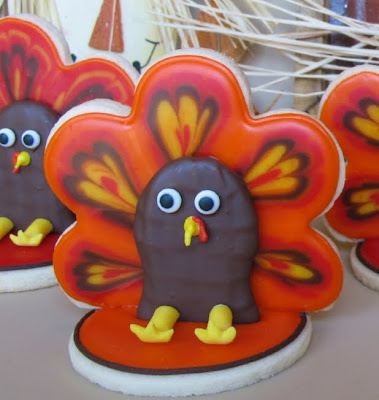
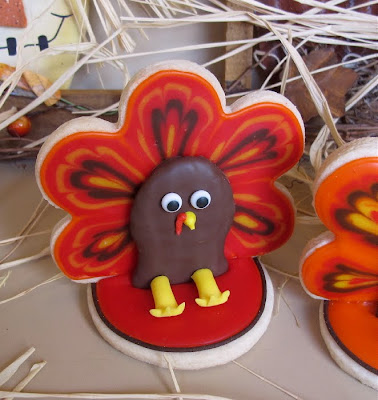
How about some 3D turkey cookies?


As I have mentioned before, I have a weakness for cute little turkey confections. Here is another take on turkey cookies:


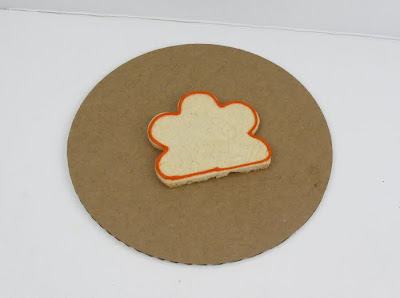
Bake your  favorite  cookie recipe and cut out large blossom shapes. After cooling, cut a portion off the bottom to make a flat  bottom edge. Outline your cookie with thickened icing and flood in your main color. I used glace icing here, but you can also use royal.


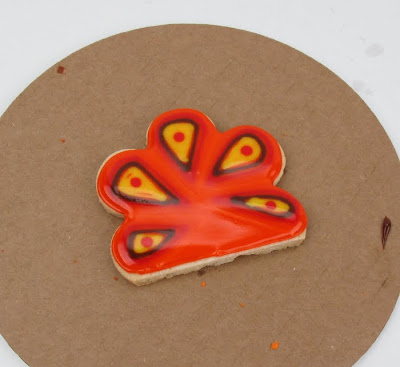
Immediately pipe in the above pattern with the other colors in flood consistency icing. It will sink right in. Then take a toothpick and drag it through that pattern, starting from the outer edge of the cookie, in toward the center.


Do this 3-5 times in each section of the blossom. You will create the feather pattern you see above. Let that fully dry, about 24 hours.


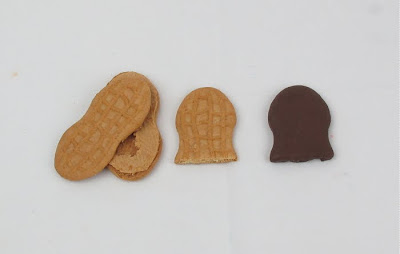
Use Nutter Butter cookies to make the turkey body. Take the cookies apart, scrape off the peanut butter, happily eat that, and then cut the  bottom portion of the cookie off. Happily eat that too. Dip the cookie in melted chocolate and let dry fully.


Use candy eyes, and royal icing to pipe the beak and red jiggly neck thingy. (Been getting a lot of use out of those candy eyes lately too. They rock.)


When you are ready to assemble, outline and flood a circle shaped cookie for the base. Let that set up for a few hours, but not until it is fully dried through. At this point you can put the feather cookie and body cookie on top of the base cookie. It will sink down a little bit into the still partially wet icing. When that fully dries, it will hold the whole cookie together. You might have to prop up the  back of the cookie with a little something while it is drying to  keep it perfectly upright.  Let that  base surface dry very well.


Use a clay gun to extrude a thick string of yellow fondant. Smash down  one  end with your finger and then cut out notches to make the feet.


Bend the feet up at the ankles and put them in place. I also used a very thin clay gun string in black to outline the base cookie to give it a little pop.


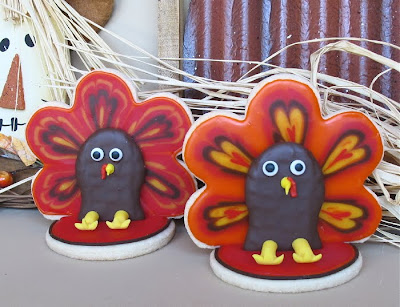
Turkey time!  How cute would these be on your Thanksgiving place setting? Or lined up on a dessert buffet.

I hope you try these. You will seriously impress your family and friends!


Sugar Cookie Recipe:

one cup sugar
one cup butter
one egg
1 tsp each vanilla and almond flavoring as desired
3 cups all purpose flour, sifted

Cream sugar and softened butter. Add egg and flavorings and beat for a minute or so. Add flour one cup at a time until just incorporated. Knead gently for a minute. Ready to roll out and use right away. Bake at 325.


Glace icing:

one pound powdered sugar
6 TBS light corn syrup
6TBS milk
clear flavorings as desired

Combine in bowl and mix well with a whisk. Adjust with more sugar or milk to create outline and flooding consistencies.


MAKE US PLEASE!

Happy Turkeys!
Sharon
www.sugaredproductions.com


Have Your Pie and Eat It Too

November 7, 2011 by Sharon Zambito 8 Comments

Thanksgiving means one thing to everyone I am sure:


Pumpkin Pie!


I love all things pumpkin flavored: muffins, breads, shakes, martinis (oops, did I admit that?)…. except for one thing….. pie. I just do not care for it for some reason. But I cannot imagine having a Thanksgiving spread without that iconic pie on the table. So I thought I would try to have the best of both worlds this year, and maybe even play a little trickery on my unsuspecting family at the same time. (devilish  grin)


Oh that beautiful symbol of fall, gratitude, good food, and precious time with family and friends…..
 

Let’s make ours!


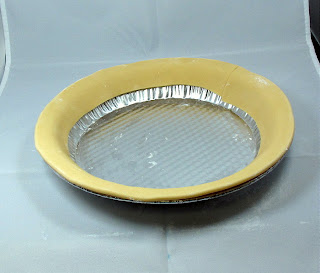
Start with a pie tin and line the edge with a strip of ivory fondant. Use some shortening to glue it on or it will not stay in place.


Flute the edges with  your fingers just as you would do a regular pie crust.


Airbrush color gives this “pie” its magic. A little yellow base coat, then followed by ivory (which comes out light brown for some reason). If you do not have an airbrush you can use the color mists in the can as well.


After the crust is dry, then add a layer of pumpkin cake. You can split and fill the cake if you want, but it is a pretty short layer, so I find the icing on the top to be enough for me.


Ice the  top of the cake with colored icing. I used orange, brown and a little red to get this color. Some pumpkin pies are more brown, and others more orange, so go for the look you like. Sprinkle some cinnamon on top of the icing. If you get big clumps like you see in this photo, just spread it out with your spatula, let the icing crust, and then smooth it out with your Viva paper  towel.


A little bit more airbrushing on the top. I used a combo of yellow and ivory to give it that  yummy custard-y baked look.


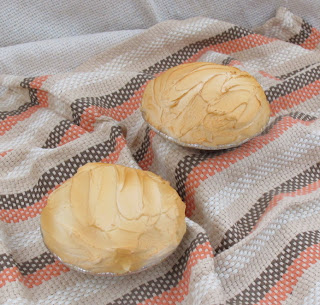
How about some mini meringue “pies” on the side ? (wink wink)


Follow the same process using mini pie shells. Pile on white icing  with a spatula and hit it with a light coat of ivory airbrush color.


They have that beautiful just baked meringue look.


Mmmmm.


Watch your guests’ faces as they cut into this pie and find out your secret surprise! (You might want to bring along a real pumpkin pie as back up, just in case. You don’t want an angry crowd caused by being deprived of pumpkin pie at Thanksgiving.)


This cake was SO easy and fast to do. You can make several and trick all of your neighbors we well. And your coworkers and boss. And the kids’ teachers. The fun could go one for weeks!


Here is an easy pumpkin cake recipe I used. It is super moist and yummy:


Ingredients

  • 1 (18.25 ounce) package spice cake mix
  •  3 eggs
  • 1/3 vegetable oil
  • 1 (15 ounce) can pumpkin puree
  • 1  TBS pumpkin pie spice
  • 1/3 cup white sugar

Directions

  • Combine everything in mixer at speed two until combined. Pour into prepared pan and bake at 325 until  done.
  • Cool completely. Level off the top, put the scraps in a ziplock bag, and hide them in your office so no one else can get to them.
  • Split layer into the height needed to fill your pie pan.


I really hope you guys give this fun cake a try and send me photos so I can post them!

Happy caking!
Sharon
www.sugaredproductions.com


Sugar Free Yule Log

December 21, 2010 by Sharon Zambito 4 Comments

MERRY CHRISTMAS EVERYONE!
We at SugarEd hope you have the most wonderful of holiday seasons. We want to take this opportunity to thank our loyal customers. We value and appreciate you, and hope to bring you more products in 2011 that you desire.
This year’s holiday blog is a guest entry by my beautiful sister Janice. Those of you that follow this blog know that she is the adventurer of the family. This past year she ziplined in the Nantahala Gorge in North Carolina, and whitewater rafted the Ocoee River where they had the Olympics. Her goal for 2011 is to skydive, and plans to take a two week motorcycle trip through the western U.S. in July. She also has a new granddaughter due on my birthday in May! It exhausts me just typing all that.
So with no further adieu, take it away Janice:

Christmas 2009 is near, and as always, I am assigned the task of providing a sugar-free dessert for my family on Christmas Day. Having done this for quite a few years now, and being easily bored, I am once again looking for something new and different; the same old apple and pumpkin pies seem so ordinary. (Although I do have a fabulous recipe for sugar-free apple pie that I may share with you in a future blog.) But Christmas seems to call for something a little more special, a little more decorative, a little more elegant. And as it usually turns out – a little more of a pain in the patootie.

As the festive season draws nigh, I begin to ponder how I will top last year’s spectacular creation, and I ask my sister Sharon, who you all know and love, to suggest something impressive and “bloggable.” She emails me a recipe for a Buche de Noel, or Yule Log. “What do you think about this?” I ask Pepper Marie. “It looks pretty difficult but I think I can adapt the recipe to sugar-free.” Pepper Marie is my 16-year old Pomeranian, and she helps me do everything. I seek her opinion in all things, great and small, and never make a move without her. She is to me as Wendy is to Sharon. Pepper Marie says that I should scrap the whole cake idea and serve a rotisserie chicken instead. “Chicken for dessert?” I ask. “Sounds like a winner to me!” she says. (Every year, her Christmas wish list is the same: a rotisserie chicken, whole, and no sharing, please.)

There are many theories about the origin of this decorative holiday dessert, but it seems clear that the Buche de Noel dates back to the time of Napoleon. One legend has it that Napoleon issued a decree that on the coldest nights, the peasants had to keep their chimneys closed to keep the cold air from coming in. (What a control freak!) That meant that the fireplaces could not be lit, so the patisseries (French bakeries) made these cakes in the shape of logs, and it became a French tradition. My question is how did they make these cakes if the fireplaces could not be lit? They didn’t have electric ovens back then, did they?

Be that as it may, since I am planning a trip to France in May/June of 2010, I think this is the perfect selection for this year’s confection. Since it’s going to be sugar-free, I guess I will call it my Buche de Noel sans Sucre. So on Christmas Eve, I take the day off, and right after breakfast (oatmeal for me, chicken for Pepper Marie), I pop my trustee IPOD into the dock, hit the shuffle, and as Pink declares that it is time to “Get the Party Started,” Pepper Marie and I begin this year’s culinary creation.


The Buche de Noel sans Sucre consists of four parts: the cake, the filling, the icing and the decorations. As Fats begins “Walkin’ To New Orleans,” Pepper Marie and I begin to assemble our ingredients for the first part – the cake:


Ingredients:

Three large eggs
Three tbs sugar-free strawberry jam
150g (5 oz) cocoa powder
A few squares of very dark, high cocoa content chocolate (I bought mine at Whole Foods)
One tsp cornflour
200g (7 oz) raspberries
300ml whipping cream (I used sugar-free Cool Whip)

The recipe says to start by preheating the oven to 375 degrees. That seems high to me, so I set it to 350. I grease a standard oblong fudge tin (or jelly roll pan), and separate the eggs. In one bowl, I whisk the egg yolks and two tablespoons of the sugar-free strawberry jam. Kenny is begging Ruby not to take her love to town, as I sieve the cocoa powder and cornflour and gently stir in. The recipe does not say to add water, but the batter seems very dry to me, so I add some water. “Tootsie Roll, does this look right to you?” I ask Pepper Marie. She sniffs it and says, “I think it needs some chicken broth.”


I place the egg whites in another bowl and beat with a mixer on high speed until they form stiff peaks. I slowly fold the egg white mixture into the chocolaty batter, spoon into the greased tin and place in the oven for about 15 minutes or until firm. I remove and allow to cool.


I wash and hull and the raspberries while Sting pleads with Roxanne not to put on the red light. I place the raspberries in a food processor and puree, adding a little Splenda to sweeten them just a tad.


I stir the pureed raspberries into the cream one-quarter at a time and it turns a beautiful pink shade. Of course, at this point, I cannot resist a little taste. That’s the best part about making sugar-free desserts – I get to taste!


The Village People extol the benefits of joining the YMCA as I sprinkle some cocoa powder onto a clean surface (I use a clean, smooth dish towel, but I imagine you can use parchment paper just as well). I carefully remove the sponge from the tin and lay it on the cocoa, and spread the remaining sugar-free jam all over the sponge.

I then spoon the raspberry cream on and spread.

Michael swears that Billie Jean is not his lover as I carefully roll up the sponge. “Think he’s telling the truth?” I ask Pepper Marie. She doesn’t care.

Now, the hardest part about making a Yule Log is getting the cake light and spongy enough to roll it up without cracking. Remember before when I said I thought the batter was too dry so I added water? I now believe I did not add quite enough. I am not a baker, however. I am a legal assistant. I can e-file a brief with the Federal court, set up a corporate deposition, and arrange a multi-party international conference call, all at the same time and in the blink of an eye. But make a judgment call about what looks right and what doesn’t when baking? Well, that is just not my area of expertise. “I think it needed more liquid,” I tell Pepper Marie. “It’s not too late to go with the chicken idea,” she says. “I may regret not taking your advice,” I say as I roll up the sponge. To my dismay, it cracked substantially upon rolling. “OMG!” I say. “I hope the icing covers this mess up.” “This baking stuff is too stressful,” says Pepper Marie. “I need a little nap.”

It’s time for me to get ready for church anyway. So I go get dressed, and as I am about to leave, My Special Angel is playing on the IPOD. “How appropriate,” I think to myself as I pause and take a long look at my Sweetie sleeping like a little angel. She is getting very old. I will say a special prayer for my own Special Angel at church tonight.

When I return, Pepper Marie and I are both refreshed – she physically, and I spiritually – and we are both ready for some victuals and libations. So I fix her some dinner (yes, this involves chicken), and mix myself a martini. Grey Goose, up and dirty, with two olives! Ahhh, this is good!

Now it is time to get back to work. This cake is taking longer than I thought it would. As I begin to assemble the ingredients for the icing, Prince is partying like it’s 1999. “He’s been partying for ten years now! He’s going to have a heck of a hangover!” I tell Pepper Marie, but she is too busy scarfing down chicken to worry about Prince.

The recipe I use for the icing comes from one of my diabetic cookbooks, and I must tell you that I do not love it. It is made with chocolate and butter, and that’s what it tastes like – butter. There is no cream in the buttercream, if you know what I mean. It calls for a substantial amount of salt which common sense should tell me is a flaw in the recipe, and maybe if I baked more often this would register with me. But like I said before, I am no Sharon Zambito. I make the first batch and it tastes incredibly salty. Now I am getting stressed again! “I knew that was too much salt!” I say. Pepper suggests that it would actually taste pretty good on top of some chicken. Once again, she’s probably right, but I am not to be defeated. I draw strength from Gloria’s assurances that I Will Survive. (Well, that and the martini.) “I will survive this cake,” I say, as I throw out the whole batch of icing and remake it without the salt. Thank God I have enough ingredients to make a second batch.

It is better without the salt, but still has a strong taste of butter. Since I would not recommend this recipe, I am giving you another one for the icing. This is what I would do next time.

1 envelope Dream Whip
½ teaspoon vanilla
½ cup milk
1 box sugar-free chocolate Jello pudding

Blend together milk, vanilla, and Dream Whip. Beat until stiff. Add pudding mix and continue to beat until light and fluffy. Add milk as needed until desired consistency is reached.

I’m thinking that if you want to simply things, you could probably use the sugar-free Cool Whip and just eliminate the milk. Or maybe use the milk to make the pudding and then mix that with the Cool Whip? Dream Whip, Cool Whip, Kool and the Gang? What do you think? I don’t know. Just don’t use the recipe that I used unless you like eating sticks of butter.

Speaking of Kool and the Gang, it’s time to Get Down On It, and I spread my new batch of icing onto the cake. One of Sharon’s palette knives would come in handy about now, but since I don’t have one of those [hint to Sharon for a Christmas gift], I use a small spatula or butter knife to form bark-like ridges on the icing. I use a toothpick to make the rings on the sides to look like a log.

Well that hid the cracks pretty well. So far so good. Now it is time for the decorations.

I was looking at pictures online trying to get ideas on how to decorate the Buche de Noel sans Sucre. You could really just use some store-bought holly, twigs, etc., and that would look very nice, But while I was surfing the web, I saw one that was decorated with meringue mushrooms. Cute! And luckily for me, a recipe was included.

Ingredients:

2 large egg whites, room temperature
1/4 tsp cream of tartar
½ superfine sugar (This is hard to find. You can use regular granulated sugar and process it for about 30 seconds in a food processor. I used Splenda, but I think meringue comes out better with real sugar. The Splenda did work, though.)

I line a baking sheet with parchment paper and set up a pastry bag with a No. 6 (½ inch diameter) round plain tip. I preheat the oven to 200 degrees, beat the room temperature egg whites with an electric mixer at slow speed until foamy. Then I add the cream of tartar and beat at medium speed until soft peaks form. I continue beating (increasing speed to high), gradually adding the sugar until the whites are stiff and glossy. I rub a little of the meringue between my fingers to make sure all the sugar has dissolved.

With a rubber spatula, I place the meringue into the pastry bag.

To pipe the caps, I hold the pastry bag upright and close to the parchment paper. I pipe the meringue with even pressure into even rounds building up the meringue to form a round. You can adjust the size of the caps depending on the size of your cake. I sharply twist the bag and stop the pressure as I slowly move the tip off the meringue. Try to make the top as smooth as possible but you can use a wet fingertip to smooth out any bumps. This takes practice, and the finished product is fragile. Make way more than you think you need.

To pipe the stems, I hold the pastry bag upright and close to the parchment paper. I pipe the meringue with even pressure into a cone shape, making the base of the stem a little larger than the top. I try to keep the stems as straight as possible. Again, make more than you need.

I bake the meringues for approximately one hour or until the mushrooms are firm enough that they can be lifted from the baking sheet without sticking.


To glue the caps to the stems, I use a little melting chocolate. I take a mushroom cap and spread some of the melted chocolate on the underside, and then press the stem onto it. You have to be very careful when you are doing this because the meringue is so fragile, if you use too much pressure, you can easily crush the mushroom. The first one I tried, the mushroom disintegrated into dust in my fingers. Actually, that happened a few times before I got the hang of it. I thought that Pepper Marie was making fun of me until I realized that Queen was singing Another One Bites The Dust on the IPOD.

The mushrooms look pretty cute, but too clean. I lightly brush them with a little cocoa powder to give them an “earthy” look. “Well, Sweet Cake, I think this all looks pretty good,” I say to Pepper Marie. “I really think your guests would rather have chicken,” she says. “But we’re having turkey for dinner,” I inform her. “Well, that’s even more better,” she replies. “Turkey for dinner, chicken for dessert. It’s a theme dinner.” That dog has a one-track mind.

Willie is pining to be On the Road Again, which reminds me that I need to take this concoction on the road tomorrow. I am tortured by memories of last year’s unexpected three-hour trek across the Causeway with my “needs refrigeration” cake melting in the back seat, and my “needs frequent potty stops” Aunt in the front seat. Luckily, this year I don’t need to go quite that far; our family celebration is being hosted by my son and daughter-in-law, who live five minutes from my apartment. Also, blessedly, my brother and his family are picking up my Aunt from her assisted living home, so I am relieved of that responsibility as well. I have only the Yule Log to worry about. Nevertheless, just to be on the safe side, I opt to transport the cake undecorated. So as Aaron Neville reserves his spot in that number When the Saints Go Marching In, Pepper Marie and I march off to bed to await the arrival of Santa Paws.

Our family celebration the next day is not until 5:00 p.m. I am able to spend the morning with Pepper Marie before I go to a friend’s house for Christmas dinner. (FYI – my contribution to this Christmas dinner is the aforementioned sugar-free apple pie which is a huge hit. It does not taste like sticks of chocolate butter.) I return home in the afternoon, with just enough time to load up my Honda Civic with gifts, kiss my precious Old Lady Dog on her soft, furry head, and I am off to my son’s house. This year, the Christmas Confection can ride in the front seat with me. I go slow, slow, slow, with one hand always on the dessert plate. I have horrible images of some reckless driver who has spent the last two days in an alcoholic stupor pulling out in front of me, causing me to slam on my breaks, and sending my Buche de Noel sans Sucre flying into the dashboard. “Good thing I don’t do this for a living,” I say out loud although there is no one to hear. “I’d have a ulcer.”

Upon arrival at the home of my son and daughter-in-law, I assemble the Yule Log. I have brought the meringue mushrooms in a plastic container lined with paper towels (for shock absorption!), and some of those store-bought holly and pine cones for embellishment. I arrange them all on the dessert dish. I sprinkle some Splenda “snow” on top of the log. “Wow, that looks great!” I say. “I’m a genius! A gourmet baker! I could be on the bleepin’ Ultimate Cake Off!” Unfortunately, as I am standing there expounding on my own creativity, the Splenda “snow” dissolves into the icing before my very eyes, and is soon gone from sight. Well, who knew? “That’s OK,” I say, “it’s just like a snowfall in New Orleans. It melts as soon as it hits the ground.”

The dish looks fantastic, and in spite of my disappointment with the taste of the icing, my family seems to like the Buche de Noel sans Sucre. Are they just being polite? Perhaps it is more appealing to the taste buds because it is so pretty, and they didn’t have the experience of that awful first batch of salty icing? Maybe they really DO like eating sticks of butter? I don’t know, but everyone tries it, even those who are not sugar restricted. If they mind the taste of the creamless buttercream icing, they don’t let on. In any event, the entire cake is soon gone. I guess that’s a good sign.

If any of you want the recipe for the creamless chocolate buttercream, let Sharon know and I’ll have her post it on the blog. Perhaps you know of a way to improve it. Maybe with a little chicken broth?

Well, here’s wishing all of you in Blogland a very Merry Christmas and a Super[bowl] New Year, from all of us down here in the Who Dat Nation! Talk to you soon.

————————————
EPILOGUE:

In Memoriam –

I dedicate this blog entry to my beloved Pepper Marie, my Baby, my Special Angel, my Tootsie Roll, my Helper, who passed from this life on May 14, 2010, just shy of her 17th birthday. No words can ever express the loss that I feel. I am forever grateful for every day I had with her, for the many years that she was at my side, for her unconditional love. She truly was my helper. She helped me do everything from the minute I woke up in the morning until the second I fell asleep at night. And even in between – I slept peacefully just knowing she was there. Many times she was my “glue” – she held me together through some really hard times. And we had lots of good times, too. We traveled all over the U.S. together. But whatever life brought our way, it was always she and I. We took it all on together. I carry her in my heart now, and always will. On what would have been her 17th birthday, I celebrated her life with a rotisserie chicken and champagne. And what a life it is to celebrate. I love you, Baby.


Pepper Marie
August 25, 1993 – May 14, 2010

Poured Fondant Pumpkin Cookies

October 8, 2009 by Sharon Zambito 29 Comments


Fall is here! Fall is here!
 
Don’t you just love fall? It is my favorite time of year. More than Spring, more than Summer vacation, more than the Christmas holidays. I love the cooler temps and lower humidity (what little of that we get where I live, LOL.) I love fall colors , pumpkins and turning leaves. I love the promise of the time to be spent with family and friends during the upcoming months.
 
I especially love fall baking. I adore fall themed cakes, cookies and cupcakes. Just love everything about it!


Recently I used the pumpkin cutter set we featured in a SugarEd free gift promotion to make some cookies using poured fondant and rolled fondant. I cannot locate this exact set anywhere retail, but set 1872 here looks to be very similar.


After baking the cookies, I made poured fondant:


6 cups confectioners’ sugar (I often add 1-2 cups more sugar to make it a bit thicker, optional)
1/2 cup water
2 tablespoons light corn syrup
1 teaspoon almond extract ,optional
1 teaspoon vanilla, optional


DIRECTIONS:
In a saucepan, combine confectioner’s sugar, water and corn syrup. Cook over low heat, stirring constantly, until it reaches a temperature of 92 degrees F (33 degrees C.) Mixture should be thin enough to pour, but thick enough to coat cookie. Add food coloring to desired color and stir thoroughly.


Make sure not to overheat. Overheating will cause the mixture to crystallize and show sugar crystals once dried. It may also become too thick to flow well.


I take it off the heat to pour over the cookies. It will thicken up as it cools. If it gets too thick to flow well, gently heat it back up until it is thin enough again. Again, be careful not to overheat it at any time. If you do it will give you trouble. You will get mad. You will say bad words. You might throw cookies across the room. …..Just sayin’.


I hold the cookie in one hand over the pot and spoon the icing over it, allowing the excess to flow back into the pot.


Coat entire cookie. (I do normally wear gloves for this but was so excited to do this tutorial it slipped my mind.)


Let all the excess drip off and then slide your spoon under the cookie.


Slide the bottom of the cookie across the edge of the pot to scrape the excess off.


Lay it on wax paper or parchment. I do not like to put my cookies on cooling/cookie racks because the icing hardens and sticks to the rack. Then when you release the cookie from the rack it messes up your pretty cookie edge.


See that pool of icing? No worries. When it is all dry and hardened, you scrape that excess off with a palette or exacto knife and you end up with a perfectly clean edged cookie.


For the big kahuna cookies, the process is close to the same.


Use several spoonfuls to get the entire cookie coated well.


Let the excess drip back into the pot.


Hold the large cookie with both hands and tap the sides of your hands on the edge of the pot to get all the excess icing flowing off the cookie.


Slide the bottom of the cookie along the edge of the pot as you take it out to scrape off any more excess.


This is where you get so excited because you have this adorable Jack o’ lantern cookie looking back at you! Place him on the parchment too and leave them alone for a while till fully hardened. I leave them for at least a few hours before I clean them up.
 

                                               Rolled fondant covered:


Roll out your orange fondant and cut out the shape with the cookie cutter you used to make the cookie. Smear a little thinned buttercream onto the cookie to make it stick.


                          I used a large oval cutter to make indentations into the fondant.


I did this four times to make the indent lines that pumpkins have.


                                                                  Airbrushing:

Airbrushing adds more depth and dimension and interest to your cookies. It is not necessary to do this, but I like what it adds to the look. I gave it a light overall coating of orange color.


Then I did more pinpoint lines in the grooves with orange.


I did the same thing on the poured fondant cookies.


You can vary the colors if you like. You can add some yellow to give it bright highlights or add some brown to make it more rustic.
 
 
                        Let that dry fully and then add your fondant leaves and arrange!


A beautiful bounty of fall pumpkins!


I love fall stuff!


Here is the fondant one. I even dusted just a tad of pearl dust on this one. Not too much or it will be ugly; trust me on this one.


Punkies, punkies everywhere!


Mr. and Mrs. Happy Patch


Mr. Grouchy Gourd


Cuteness factor overload!


Now go make some of these.
 
Now.
 
Hurry.
 
Then send me some.
 
Please.


Happy Fall!
 
Sharon
www.sugaredproductions.com


NOLA Photography http://bentzphotography.com/

Daring Bakers: Cheescake

April 27, 2009 by Sharon Zambito 8 Comments

Finally!

After a couple of savory challenges, we are finally back to sweets for the Daring Bakers group! Now that’s what I’m talkin bout!

I know I have made no bake cheescakes before, but I do not recall if I have made a baked one from scratch. So if I can’t remember, it really means it has been to long to count anyway. This was a really easy, straightforward recipe that even the kitchen challenged like myself could do. And I am proud to say mine had no cracks on top! Zero. Nada. But I have no pictures to prove it, so you will have to take my word for it.
The April 2009 challenge is hosted by Jenny from Jenny Bakes. She has chosen Abbey’s Infamous Cheesecake as the challenge.

I dressed mine up with tinted coconut grass and a fondant bunny looking for his carrots. It was one of the desserts for our family Easter dinner.

It was tasty, but not the best cheesecake I have ever had. It was very creamy and mild in flavor. I like my cheesecake to have bit more twang to it. My piece was also very soft from sitting out for for a few hours. I think it would have been better cold from the fridge.


Abbey’s Infamous Cheesecake:

Crust:

2 cups / 180 g graham cracker crumbs

1 stick / 4 oz butter, melted

2 tbsp. / 24 g sugar

1 tsp. vanilla extract


Cheesecake:

3 sticks of cream cheese, 8 oz each (total of 24 oz) room temperature

1 cup / 210 g sugar

3 large eggs

1 cup / 8 oz heavy cream

1 tbsp. lemon juice

1 tbsp. vanilla extract (or the innards of a vanilla bean)

1 tbsp liqueur, optional, but choose what will work well with your cheesecake


DIRECTIONS:

1. Preheat oven to 350 degrees F (Gas Mark 4 = 180C = Moderate heat). Begin to boil a large pot of water for the water bath.

2. Mix together the crust ingredients and press into your preferred pan. You can press the crust just into the bottom, or up the sides of the pan too – baker’s choice. Set crust aside.

3. Combine cream cheese and sugar in the bowl of a stand-mixer (or in a large bowl if using a hand-mixer) and cream together until smooth. Add eggs, one at a time, fully incorporating each before adding the next. Make sure to scrape down the bowl in between each egg. Add heavy cream, vanilla, lemon juice, and alcohol and blend until smooth and creamy.

4. Pour batter into prepared crust and tap the pan on the counter a few times to bring all air bubbles to the surface. Place pan into a larger pan and pour boiling water into the larger pan until halfway up the side of the cheesecake pan. If cheesecake pan is not airtight, cover bottom securely with foil before adding water.

5. Bake 45 to 55 minutes, until it is almost done – this can be hard to judge, but you’re looking for the cake to hold together, but still have a lot of jiggle to it in the center. You don’t want it to be completely firm at this stage. Close the oven door, turn the heat off, and let rest in the cooling oven for one hour. This lets the cake finish cooking and cool down gently enough so that it won’t crack on the top. After one hour, remove cheesecake from oven and lift carefully out of water bath. Let it finish cooling on the counter, and then cover and put in the fridge to chill. Once fully chilled, it is ready to serve.


Pan note: The creator of this recipe used to use a spring form pan, but no matter how well she wrapped the thing in tin foil, water would always seep in and make the crust soggy. Now she uses one of those 1-use foil “casserole” shaped pans from the grocery store. They’re 8 or 9 inches wide and really deep, and best of all, water-tight. When it comes time to serve, just cut the foil away.


Prep notes: While the actual making of this cheesecake is a minimal time commitment, it does need to bake for almost an hour, cool in the oven for an hour, and chill overnight before it is served. Please plan accordingly!


Some variations from the recipe creator:

** Lavender-scented cheesecake w/ blueberries – heat the cup of heavy cream in the microwave or a saucepan until hot but not boiling. Add 2 tbsp of lavender flowers and stir. Let lavender steep in the cream for about 10-15 minutes, then strain the flowers out. Add strained cream to cheesecake batter as normal. Top with fresh blueberries, or make a quick stove top blueberry sauce (splash of orange juice, blueberries, a little bit of sugar, and a dash of cinnamon – cook until berries burst, then cool)


** Cafe au lait cheesecake with caramel – take 1/4 cup of the heavy cream and heat it in the microwave for a short amount of time until very hot. Add 1-2 tbsp. instant espresso or instant coffee; stir to dissolve. Add this to the remainder of cream and use as normal. Top cheesecake with homemade caramel sauce (I usually find one on the food network website – just make sure it has heavy cream in it. You can use store-bought in a pinch, but the flavor is just not the same since its usually just sugar and corn syrup with no dairy).


** Tropical – add about a half cup of chopped macadamias to the crust, then top the cake with a mango-raspberry-mandarin orange puree.


** Mexican Turtle – add a bar of melted dark chocolate (between 3 and 5 oz., to taste) to the batter, along with a teaspoon of cinnamon and a dash of cayenne pepper (about 1/8 tsp.). Top it with pecan halves and a homemade caramel sauce.


** Honey-cinnamon with port-pomegranate poached pears – replace 1/2 cup of the sugar with 1/2 cup of honey, add about a teaspoon or more (to taste) of cinnamon. Take 2 pears (any variety you like or whatever is in season), peeled and cored, and poach them in a boiling poaching liquid of port wine, pomegranate juice/seeds, a couple of “coins” of fresh ginger, a cinnamon stick, and about a 1/4 cup of sugar. Poach them until tender, then let cool. Strain the poaching liquid and simmer until reduced to a syrupy-glaze consistency, then cool. Thinly slice the cooled pears and fan them out atop the cooled cheesecake. Pour the cooled poaching syrup over the pears, then sprinkle the top with chopped walnuts and fresh pomegranate seeds.


Some variations from Jenny (from JennyBakes):

**Key lime – add zest from one lime to sugar before mixing with cream cheese. Substitute lemon juice, alcohol, and vanilla with key lime juice.


**Cheesecakelets – put in muffin tins, ramekins, or custard cups. Try baking 20-35 minutes, or until still a little jiggly, and cool as before.


Overall it was a very good and easy recipe and I would like to try some of the other variations in the future. If you make it, let me know how you like it. And check out the Daring Bakers’ blog roll to see what creations other members have come up with.

Happy baking!

Sharon
http://www.sugaredproductions.com/


Sugar Free Celebration Cake

March 11, 2009 by Sharon Zambito 39 Comments

Today we have a guest blog entry by my other big sister Janice. You have met my other sister, Barbara, already. Janice is 7 years older than me, and Barb just 1-2 older than her. Since there was such a gap in our ages, they were not really my playmates when I was a kid. In fact, I think I was their play-thing, but that is a whole therapy session in and of itself. Once we reached adulthood, that gap in years has faded away and we three have become very close. Don’t get me wrong; they still take care of me and look out for me and spoil me. Some things just should not change in life.
Janice is the adventurer of us three. She rides Harley’s with her boyfriend, and has para sailed with my dear hubby as Barb and I fried on the beach watching. She has traveled the country and has a bucket list of things to do that scares the bejeesus out of me and Barb. This was her bright idea:

Janice is a crackerjack legal secretary, and my secretary as well. ( I call her CJ.) One day when I can start paying her, she is going to leave that huge corporate law firm down in the city that she works for. She takes care of all my invoicing and PO’s for wholesale orders, and keeps me in line with business law issues. She also comes on cake trips with me and Barb to help me vendor. And let me tell you; that girl could sell ice to an Eskimo. That girl has a gift for sales! She is beautiful, skinny, funny, and just damn near perfect. Another overachieving sister, sheesh. Hard to keep up with those two! But I love them both so.
So without further adieu, I present to you Janice……
—————————————-
Since I am a diabetic and several other members of my family adhere to a sugar-free diet, I am always responsible for providing a sugar-free dessert at all of our family gatherings. Thanks to the invention of Splenda, I’ve come up with some pretty good ones over the years.
A few months back, my sister Sharon, the professional cake baker/decorator, sent me an email with a recipe for a knock-your-socks off sugar-free cake, and asked me to make it for the holidays. It looked just beautiful in the picture – much more elegant than anything I had made in the past. Since I am not one to shy away from a challenge, I said I would give it a try.
 
As Christmas got closer, I started to stress out over it. I wanted it to be perfect. That’s just the German in me. I decided that I needed to take the whole day off on Christmas Eve to work on this cake so that I could take my time and not be rushed. Good thing I did that because as it turns out, it took me all day to make it and I finished it at 9:00 p.m. that night. Of course, I did take a break to run a few miles that morning, and to go to church that evening.
Because cake layers baked with Splenda don’t rise very much like cakes with regular sugar, I decided that I wanted to double the recipe to make the cake taller. But I only had two cake pans, so I had to bake the layers in two batches. That took a little extra time, and as it turned out, when I started to construct the cake, I only used three layers, instead of four. Four would have been too tall.


Mascarpone cheese was a challenge to find, but my daughter-in-law, the health nut vegetarian, found it for me at the Whole Foods Market. I let the cream cheese sit out at room temperature to soften it, but I actually think it was a little too soft. Next time, I think I would not leave it out as long because when I went to spread the filling, it was a little drippy over the sides. I think it would go on better if it were a little bit firmer. When you add the vermouth, that softens it too. But the best part was that since it was sugar-free, I got to sample it as I was making it! And since I had the vermouth out anyway, I decided to make myself a little martini. What the heck, it’s Christmas Eve, right?

I splurged on organic strawberries, also bought at the Whole Food Market. Expensive, but I figured if you’re going to create something special, you should buy only the best ingredients.


Chopped hazelnuts are not easy to find either. I went to three different stores before I found them at a Winn Dixie. I thought they needed to be a little bit finer, so I put them in a food processor just to chop them up a bit more.


I could not find a paper doily with a design that was open enough to use as a stencil for the powdered cocoa. So my sister, Sharon, found some snowflake coloring pages online and emailed them to me. I printed one of those and cut it out with a razor knife, and used that as the stencil.


The whole strawberries on the top of the cake are dipped in sugar-free chocolate melting wafers that my sister ordered for me from one of her suppliers.


Here’s what went into the filling:

1 tub (something like 250grams) mascarpone cheese
1/2 tub (about 100grams) light cream cheese

About 5 tablespoons Red Martini (sweet red vermouth)
1 teaspoon vanilla extract
1/4 cup Splenda
About 2 cups small strawberries, cleaned and halved


First cake layer.
 

First cake layer with sugar free strawberry jam on top.

Add some mascarpone filling.

Add fresh strawberry slices and repeat with each layer.

I used the sugar-free Cool Whip for the frosting.

Chopped nuts were pressed onto outside and design stenciled on top with cocoa.
 
The finished cake!

When the cake was finally done, I was exhausted, but I was happy with the end result. I put the whole thing in the refrigerator to firm up overnight. But as I flopped down on the sofa and sipped on my dirty martini, I immediately started stressing over how I was going to transport this masterpiece the next day from my house in Kenner to my sister’s house in Mandeville – about a 50 minute trip.

The next morning, I had to pick up my 95-year old aunt who lives nearby in an assisted living home. She’s in a wheelchair and it takes a while to get her situated in the car. I wanted my confectionery creation to be off the ice for as little time as possible, so I loaded up my car with all my gifts, but left the cake in my refrigerator, went and picked up my aunt, and then went back home to get the cake. I put a towel on the backseat to level it (center seat, of course – that’s the safest seat, right?), strapped it in with the seat belt, gave it a little kiss and jumped into the car and headed out. I figured I would speed just a little bit and the most my cake would be off the ice was 45 minutes.
So here I am, zipping along, with my old aunt in the front seat, and my award-worthy culinary delicacy in the back seat. Can’t wait to get to Sharon’s house so everybody can see it. (The cake, I mean, not my aunt. They see her all the time.)
Well, how could I have foreseen that when I turned onto Causeway Boulevard, it would be a freaking parking lot! Fog on the bridge! What?! Fog on Lake Pontchartrain. It’s a warm day, 1:00 o’clock in the afternoon, how can there be fog on the bridge? I could not believe it. Traffic was limited to one-lane, speed limits were greatly reduced, and that 50 minute trip turned into a three-hour trip. It took me three hours to get to my sister’s house in Mandeville! I was so upset because I had spent all day making this cake and I just knew it was in the backseat melting! And I also knew that my 95-year old aunt was going to have to use the bathroom very soon, and boy, was I going to be in trouble!
When I finally got to my sister’s house, I had to have my nephew, Daniel, open the lid and look at the cake. I couldn’t bear to do it. He said it looked fine, but I said, “Put the damn thing in the refrigerator and get me a martini!” He said, “Okay, but it won’t do much good because the power is out.” The power was out! It’s a conspiracy, I thought. There are terrorists working behind the scenes here to assure that my delectable piece of culinary craftsmanship would turn into a melted mess of vermouth-laced drippy cheese, strawberry juice and Cool-Whip. This cake baking stuff is not my thing! Sharon, I don’t know how you do it. This is too stressful! I am a legal assistant. Someone give me a brief to type! That I can do.
Well, the power came back on shortly, the cake was still firm and beautiful, and tasted delicious when we served it. It’s a good recipe and I highly recommend it.

————————————————-


Sharon here again. Whew, I am stressed out just reading that! Now I want a martini too. That was a crazy Christmas Day. Our 3PM lunch did not get served until 6:30 due to the power outage and late guests. In perfectly fine weather too!
Well, I think Janice did a fabulous job on her cake, and it did taste wonderful too. Thank you for the entry sis, and helping me out on my blog.
Speaking of blogs, if you guys like mine, just leave me a note in the comment section below, and you will be entered into a drawing to win this fabulous prize! :

Isn’t it great?! There are only 2 hats like this in existence, and I own the other one. So if you want a little piece of SugarEd to call your very own, let me know how great and fabulous and amazing and wonderful my blog is! Oh yeah, you can also leave a comment about Janice’s great post too, yadda yadda yadda.
I will announce the winner by random drawing sometime next week, when the spirit moves me. Gotta keep you guys on your toes, don’t I?
Happy Sugar Free Caking!
Sharon the baby sister Zambito
http://www.sugaredproductions.com/

Valentine Flourless Chocolate Cake

February 27, 2009 by Sharon Zambito 9 Comments


 I had never made a flourless chocolate cake before so this was new to me. It was very easy to do as well. Since I am such a loser wife, and did not get dear hubby a real gift, this was his Valentine’s day treat. And being a double loser, he did not even get it until the day after Valentines. Poor shmuck.


It is extremely dense and rich, soft on the inside, and basically tastes like ganache. I served mine on a pool of raspberry coulis. OK, we all know I did not make coulis from scratch. I used sleeved raspberry pastry filling and blended it with water and some granulated sugar in my food processor. Worked and tasted great!


Hubby, who is a very picky dessert eater, liked this one very much.


I was way too busy to make ice cream, so I chose the option to use whipped cream (aka Cool Whip). Hey, I am a very busy lady!


Chocolate Valentino
 Preparation Time: 20 minutes


16 ounces (1 pound) (454 grams) of semisweet chocolate, roughly chopped
½ cup (1 stick) plus 2 tablespoons (146 grams total) of unsalted butter
5 large eggs separated


1. Put chocolate and butter in a heatproof bowl and set over a pan of simmering water (the bottom of the bowl should not touch the water) and melt, stirring often


2. While your chocolate butter mixture is cooling. Butter your pan and line with a parchment circle then butter the parchment.


3. Separate the egg yolks from the egg whites and put into two medium/large bowls.


4. Whip the egg whites in a medium/large grease free bowl until stiff peaks are formed (do not over-whip or the cake will be dry).


5. With the same beater beat the egg yolks together.


6. Add the egg yolks to the cooled chocolate.


7. Fold in 1/3 of the egg whites into the chocolate mixture and follow with remaining 2/3rds. Fold until no white remains without deflating the batter.


8. Pour batter into prepared pan, the batter should fill the pan 3/4 of the way full, and bake at 375F/190C


9. Bake for 25 minutes until an instant read thermometer reads 140F/60C. Note – If you do not have an instant read thermometer, the top of the cake will look similar to a brownie and a cake tester will appear wet.


10. Cool cake on a rack for 10 minutes then unmold.


It was easy and delish and I recommend you give it a try!


Until next time,
Sharon


http://www.sugaredproductions.com/


Visit the Online Sugar Art School
  • « Previous Page
  • 1
  • …
  • 4
  • 5
  • 6
  • 7
  • Next Page »

Sharon Zambito

Sharon Zambito

An RN turned SAHM turned cake maniac. Owner of SugarEd Productions Online School. Join me for some caking, baking, and all around sweet fun :)

Follow me..

  • Facebook
  • Instagram
  • Pinterest
  • YouTube

Pinterest

  • Autumn House Two Trees Machine Embroidery Design – Blasto Stitch
    Autumn House Two Trees Machine Embroidery Design – Blasto Stitch
  • Embroider  Sew :: Jelly Roll Purses - Embroidery Garden In the Hoop Machine Embroidery Designs
    Embroider Sew :: Jelly Roll Purses - Embroidery Garden In the Hoop Machine Embroidery Designs
  • (1) How to QUICKLY & SAFELY remove acrylic, gel, and dip powder polish | BAGGY METHOD - SO EASY! - YouTube
    (1) How to QUICKLY & SAFELY remove acrylic, gel, and dip powder polish | BAGGY METHOD - SO EASY! - YouTube
  • (1) Bouffant Surgical Cap - YouTube
    (1) Bouffant Surgical Cap - YouTube
Follow Me on Pinterest

Follow Me on Instagram

Instagram requires authorization to view a user profile. Use autorized account in widget settings

Recent Posts

  • Egg Safety Basics
  • Stable Mabel Support System Sale
  • Guest Post : 4 Vegan Cake Recipes No One Should Miss Out On!

Popular Posts

  • Ways To Make Your Cake Fluffy And Moist
  • How To Stencil on Cookies with Royal Icing
  • Doctored Cake Mix Recipes
  • Transferring an Image Without a Projector
  • All About Buttercream!
  • How to Fix Broken Ganache
  • Edible vs Non Toxic Gold Dusts

Categories

Search

Archives

Copyright © 2025 · Sharon Zambito and SugarEd Productions,LLC

Copyright © 2025 · Evangeline Theme on Genesis Framework · WordPress · Log in