Sugared Productions Blog

  • Blog Home
    • Home
  • Online Classes
  • Shop
  • Contact
  • About

Thanksgiving Tutorials

November 15, 2012 by Sharon Zambito Leave a Comment


Gobble Gobble my sugary friends! 


Thanksgiving is next week!  ACK! I am not ready!  So much to do between now and then, and then we go right into the Christmas rush. ACK! I am not ready!  😯


I thought it might be helpful to you guys to put together a post here with Thanksgiving tutorials from the archives. Might spark a few ideas as you crank up for all the T-day festivities. Click on the title below each photo to get to the tutorial:


TURKEY CAKE BALLS


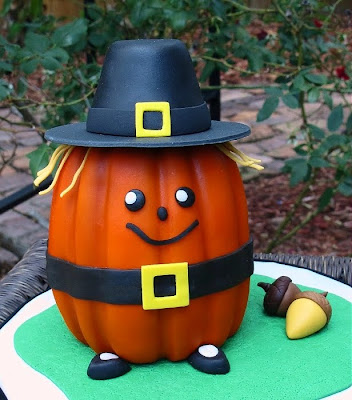
PILGRIM PUMPKIN MINI CAKE


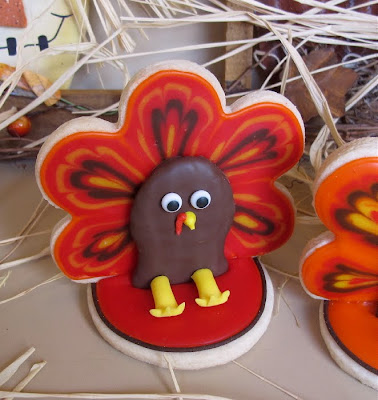
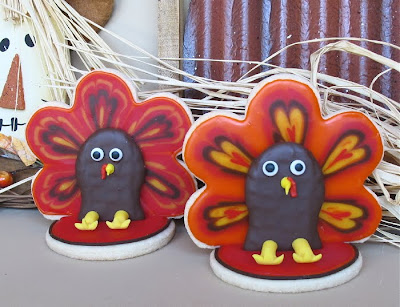
3D TURKEY COOKIES


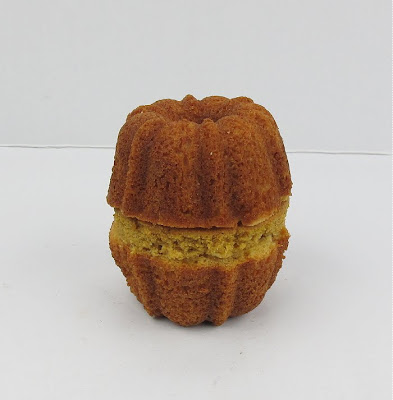
PUMPKIN PIE CAKE


PERFECT PUMPKIN ROLL

TURKEY CAKE TOPPER (LINK)


TIPS FOR PERFECT CAKE BALLS

I want to take this opportunity to tell you how thankful I am for all of you. For your business, your encouragement and loyalty, but mostly for your friendship. You all have enriched my life in ways I could never adequately explain. I wish you and yours a beautiful, peaceful and Happy Thanksgiving.

Sharon

www.sugaredproductions.com

Turkey Cupcake Cake

November 13, 2012 by Sharon Zambito 22 Comments

It’s almost turkey day!

Are you guys ready? Ready for the holidays?  

It’s that time of year when we have to come up with oodles of cute ideas for cakes and confections for our families, friends, and businesses. I personally spend so much time trying to think of new and interesting things to do, it makes my brain hurt. (Although, it doesn’t take much to do that. :mrgreen: )  Every now and then I like to go back to some good old school decorating. The basics we build our skills on.

At the end of every one of my DVDs I tell you guys to practice, not be too hard on yourselves, and to always have fun. That is what this project and this post is all about. This quick cupcake cake is a great way to practice some basic techniques, but not to take it so seriously that we stress ourselves out. There are times we need to be really precise and worry about all the little details of a cake. But sometimes it is fun and  liberating to not have to do that, and just have some good ole fun.


So let’s make this cute Turkey Tom cake. Do you guys recall the cupcake pull apart cake that was all the rage a few years back? It has kind of died out in popularity, but I think we need to bring it back! It’s a great item to send to school for all the kids’ holiday parties. It’s easy to make and easy for them to serve.


And it’s a great vehicle to practice on. It goes together quickly, and if you mess up, who cares? It’s just cupcakes!


Let’s do this!

Find a clip art or coloring book page that you like. Enlarge it to the size you need and print it out. Note that in my Print Shop program, I had to print it out on 4 pages to make it big enough. Tape the pieces together in alignment and cut it out. (Note: you really should transfer the pattern onto a food safe paper like parchment. But I was too lazy short on time to do that for this blog post.)


Use the paper template to arrange your cupcakes in the desired shape on the cake board.  Secure each one down to the board with a smear of buttercream under the liner.


I had some spaces after I arranged the cupcakes. I stuck some rice crispy treat pieces into those holes to take up some room and support the buttercream I was going to put on top. I wanted to prevent sink holes in the top of the icing. Each cupcake also got a little crumb coat of icing on top just to seal it for freshness.


Ice the whole top of the cupcakes and use your favorite smoothing method. I used the viva paper towel and fondant smoother. This is good practice for smoothing, but don’t stress over it! If it’s not perfect, IT IS OK. I promise! It’s just cupcakes! 


Now we are going to use the pin prick method. Put the template over some Styrofoam (food safe dummy here) and use a toothpick to prick thru the paper along the entire outline of the image and all the details. That will create raised bumps on the back of the paper that will serve as an impression mat on the icing.


Put the template in place and gently smooth over the entire surface with your hands. Be sure to press along the outer edges so that you get an outer outline of the graphic in the icing. I took a photo after I did this, but the camera could not pick up the impression marks on the white icing, so please trust me when I tell you that it leaves you a nice outline to follow for your piping. You guys know I won’t lie to you! I promise you will be able to see it. 🙂


I also used the same method to imprint the message I wanted to pipe on the sign.


Now let’s talk about piping the outline. For this, I highly suggest you make some glace icing. For two reasons: 1) it’s easier to pipe a nice outline because of the glace’s elasticity, and 2) it is going to secure itself to the icing and not blow away when you airbrush the sections of the image. A regular buttercream piped outline is going to blow off the cake when you airbrush. (Been there, done that. 😆 ) If you do not want to bother with making glace icing, you can surely airbrush the entire image first, and then pipe the outline on top of that last. I have done it both ways.

To make a little bit of glace icing, just throw a couple of cups of powdered sugar into a bowl. Mix in equal parts of water and corn syrup into it, about a Tbs of each at a time, blending with a whisk, until you get a smooth but very stiff icing. I used super black gel to tint it, and piped the outlines with a PME tip 2. Note: PME tips are some of the best tips for piping. You get a nice smooth string with no curling. PME’s tip 2 has a bit smaller hole than Wilton tip 2, and I like that size better for outlines. That’s just my personal preference; you can use an even bigger tip if you like a fatter outline. 

Remember when you are piping outlines to not drag the tip across the cake. Hold the tip above the surface of the cake, and let the icing drop onto the cake as you apply pressure to the bag, guiding it by moving the piping bag along as you go. This will give you a very smooth and fluent outline.

Now you just got some great practice on outlining, which can be used both for images on cakes and also for decorated cookies. Yay for practice! But are we going to get upset if our outline is not perfect?  No way! Are we going to scrape it all off and redo it? No way!  IT IS OK! It’s just cupcakes!

————————————


So now on to airbrushing.  I get lots of emails asking for help with this, but it is pretty difficult to make a photo tutorial on airbrushing. But have no fear, because I have already filmed several videos for the new online membership area that are going to cover airbrushing. From the basics of the different types of brushes, basic skills and practice drills, cleaning the gun, to full cake projects that use airbrushing in them. So be sure to stay tuned for that coming in a few months!

If you have an airbrush, this is a great cake to practice coloring on, because you basically are just going to fill in each section of the image with airbrush color. (Like a coloring book.) It gives you practice on fine control of outlines, following lines, and varying the width of the spray. And if we mess up a bit, will we freak out? No way! Are we going to cry if we get some over spray? No way! Are we going to call the airbrush police if we get some blotches or spurts? No way Jose! IT IS OK!  It’s just cupcakes!


 So here you see the first sections of blue color airbrushed in.


 And now some more sections.


Here is the whole thing airbrushed. Note that I did not outline the sign with black before I airbrushed. I thought it would be better to do that afterwards on such a large rectangle, but really I do not think it matters much either way. You could pipe that outline before or after airbrushing.

If you look closely you can see the imprint of the Happy Thanksgiving message on the sign, which I later piped over with black buttercream and a tip 3. Again, here we have the opportunity for some great practice on piping words directly on a cake. I used the Tinker Toy font, which is a nice easy one to follow. It is just a series of straight lines and dots. If we mess up a little are we going to have a nervous breakdown? No way! Are we going to point out to everyone who sees the cake that our writing could have been better? No way! Are we going to scrape it off and re-pipe it? OK, yes we might. (Gotcha on that one!) If we really screw a letter up, we may have to. I in fact scraped two letters off and re-piped them. Can you tell which two in the next photo?  BUT beware that if you do that you are going to scrape off your airbrushing and reveal white icing again. So you will need to touch up that spot with a little more airbrush color. The patch will never match exactly, which works fine for a design like this that is not precise and is variegated by nature. But keep in mind for other cakes that anytime you patch airbrush color it will not match, and that might not work for every cake you do.


So here he is all done. Go back and look at the first photo I posted and note that I had originally forgotten to pipe the rest of the details on the sign. Oopsie! Here you can see I added the extra lines and cracks to make it look even more better.


And here is a super close up. Do you see that little bit of over spray on the outer portion of the black outline? Do you see a few impression holes peaking out from behind the black lines? See a few spots where the icing is not super duper smooth? Do we care? No way! Are we  freaked out? No way! IT IS OK! It’s just cupcakes!


Let’s step back to normal viewing distance and have a look:


Is it cute? Yes way! Do we love it? Yes way! Will the kids love it? Yes way! Did we get some great low stress practice on some basic skills? Yes way! It’s just cupcakes and we are very happy with it!


Here are just a few more things I want to note:

1) The airbrush colors I used for this were:

  • turquoise
  • sky blue
  • orange
  • egg and lemon yellow
  • black
  • dusty rose
  • brown (face and body)
  • warm brown (arms)
  • purple made by mixing pink with sky blue
  • ivory (sign)

2) To make the eyes I piped fat dots of black and then white icing, let it crust, and patted it down with the tip of my finger.

3) If you do not have an airbrush, or do not want to do it that way, you can use any other easy fill in technique for this cake, such as run sugar, star tip fill in, or piped buttercream fill in. Run sugar uses the same glace icing in a flood consistency to create the image. Here are two cakes where the image was done with run sugar:


(If you are interested in learning more, our online school teaches in great detail all these techniques: pin prick method, outlining, run sugar, frozen buttercream transfers, chocolate transfers, royal icing transfers, some basic airbrushing, piped borders and more.)


I hope this post inspires you to get out your tools and go back to some old school decorating. Be sure to share a photo of your cakes on our Facebook page if you do. In fact, let’s start a grass roots movement to bring back the cupcake cake! Who is with me??


HAPPY THANKSGIVING!

Sharon

www.sugaredproductions.com


Perfect Pumpkin Roll

November 20, 2011 by Sharon Zambito 31 Comments

Thanksgiving Blog Blitz Post #5

Welcome to the 5th and final installment of my Thanksgiving Blog Blitz. I gotta tell ya I am plum wore out. Been burning the candle at both ends over here, as I am sure many of you are too. I am just flat busted exhausted. So this post is going to be a little bare bones. I don’t have any ideas for witty commentary or fancy photos. But I still want to give you the information for this project as promised:

How to make a perfect pumpkin roll:


Make the recipe and bake it.


Add some filling, roll it up, and it should look like this:


Enjoy! Hope you try it!
Happy Thanksgiving everybody!


JUST KIDDING!


 You guys know I would never do that to you!

I was just messin’ with ya! Tee hee hee.


Here we go:


How to make this most gorgeous and beautiful pumpkin roll:


 perfect pumpkin roll


Make the recipe as directed (given below). Line a 10×15 jelly roll pan with wax paper or parchment paper, spray with pan spray, pour in the batter and bake as directed. Do not over bake. Take it out as soon as the top springs back when touched.


While the cake is baking, take a clean kitchen towel that does not have a very loopy surface and dust it liberally with powdered sugar.


As soon as the cake is done, flip it out onto the towel and peel off the wax paper. Do this right out of the oven. Do not cool it. Do not go get a sip of diet coke and then forget about it. (Just sayin’; that does not work.)


Immediately roll up the cake and towel together, then place on a cooling rack for about one hour. Now you can go get something to drink.


Once the cake is almost completely cool, but just barely warm, unroll it and spread an even thickness of the cream cheese filling across the cake. (Recipe below.)


Roll it up, somewhat tight. If the cake was not over baked or over cooled, it should not crack. If it cracks, do not freak out. No freaking out over pumpkin rolls allowed. You can cover it with powdered sugar or icing later.


Wrap this in plastic and keep in fridge at least a couple of hours or until a short time before serving. It is easier to cut while cold. The slices come out cleaner and prettier, but you do not have to serve it cold. (Please ignore the fact that there is more diet coke in my fridge than milk.)


Take it out the fridge and cut off the two rough ends of the roll, as the ends are not too pretty. Those are your quality control portions. You have to test it before serving it to others, of course!


Sprinkle with more sifted powdered sugar once on your serving platter. Is that not gorgeous?


Incredibly yummy too.


Please do not be afraid to try this. I was afraid the first time I did one that it would be a disaster. It is actually a very easy process, and you should get perfect results each time. The recipe is quick to do and tastes great. This is a perfect last minute holiday dessert that you can whip up in no time. And of course, you will impress everyone with this stunner.

Cake:

1/4 cup powdered sugar (to sprinkle on towel)
3/4 cup all-purpose flour
1/2 teaspoon baking powder
1/2 teaspoon baking soda
1/2 teaspoon ground cinnamon
1/2 teaspoon ground cloves
1/4 teaspoon salt
3 large eggs
1 cup granulated sugar
2/3 cup LIBBY’S® 100% Pure Pumpkin
1 cup walnuts, chopped (optional)

Filling:

1 pkg. (8 oz.) cream cheese, at room temperature
1 cup powdered sugar, sifted
6 tablespoons butter or margarine, softened
1 teaspoon vanilla extract
Powdered sugar (optional for decoration)

FOR CAKE:

PREHEAT oven to 375° F. Grease 15 x 10-inch jelly-roll pan; line with wax paper. Grease and flour paper. Sprinkle a thin, cotton kitchen towel with powdered sugar.

COMBINE flour, baking powder, baking soda, cinnamon, cloves and salt in small bowl. Beat eggs and granulated sugar in large mixer bowl until thick. Beat in pumpkin. Stir in flour mixture. Spread evenly into prepared pan. Sprinkle with nuts.


BAKE for 13 to 15 minutes or until top of cake springs back when touched. (If using a dark-colored pan, begin checking for doneness at 11 minutes.) Immediately loosen and turn cake onto prepared towel. Carefully peel off paper. Roll up cake and towel together, starting with narrow end. Cool on wire rack.


FOR FILLING:

BEAT cream cheese, 1 cup powdered sugar, butter and vanilla extract in small mixer bowl until smooth. Carefully unroll cake. Spread cream cheese mixture over cake. Reroll cake. Wrap in plastic wrap and refrigerate at least one hour. Sprinkle with powdered sugar before serving, if desired.

COOKING TIP:

Be sure to put enough powdered sugar on the towel when rolling up the cake so it will not stick.

And here is a video of the process that might help:

Video
———————————————————–

I’d  like to tell you all how thankful I am to have the honor and privilege to interact with you here on my blog and in my videos. As a token of thanks, I’ve got 3 free baking and cake serving charts that I have put together in a PDF file. Just click on the button below to request it.

Free cake baking and serving charts

Send My Free PDF


Happy baking and Happy Thanksgiving,
Sharon
Visit our online school


NOLA Photography http://bentzphotography.com/

Turkey 3D Cookies

November 18, 2011 by Sharon Zambito 3 Comments

Thanksgiving Blog Blitz Post #4!


Gobble! Gobble!


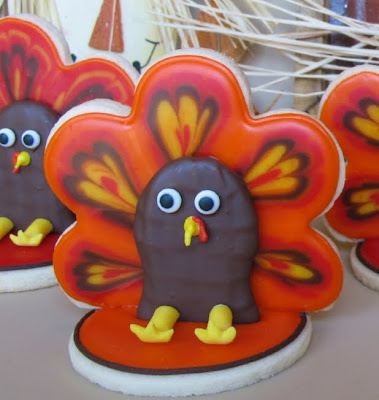
How about some 3D turkey cookies?


As I have mentioned before, I have a weakness for cute little turkey confections. Here is another take on turkey cookies:


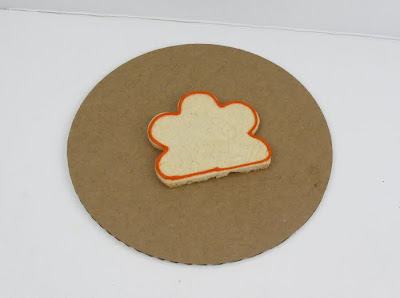
Bake your  favorite  cookie recipe and cut out large blossom shapes. After cooling, cut a portion off the bottom to make a flat  bottom edge. Outline your cookie with thickened icing and flood in your main color. I used glace icing here, but you can also use royal.


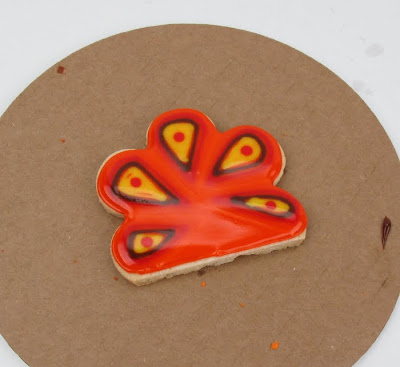
Immediately pipe in the above pattern with the other colors in flood consistency icing. It will sink right in. Then take a toothpick and drag it through that pattern, starting from the outer edge of the cookie, in toward the center.


Do this 3-5 times in each section of the blossom. You will create the feather pattern you see above. Let that fully dry, about 24 hours.


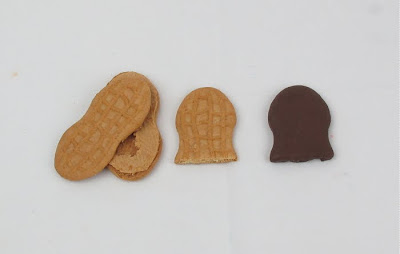
Use Nutter Butter cookies to make the turkey body. Take the cookies apart, scrape off the peanut butter, happily eat that, and then cut the  bottom portion of the cookie off. Happily eat that too. Dip the cookie in melted chocolate and let dry fully.


Use candy eyes, and royal icing to pipe the beak and red jiggly neck thingy. (Been getting a lot of use out of those candy eyes lately too. They rock.)


When you are ready to assemble, outline and flood a circle shaped cookie for the base. Let that set up for a few hours, but not until it is fully dried through. At this point you can put the feather cookie and body cookie on top of the base cookie. It will sink down a little bit into the still partially wet icing. When that fully dries, it will hold the whole cookie together. You might have to prop up the  back of the cookie with a little something while it is drying to  keep it perfectly upright.  Let that  base surface dry very well.


Use a clay gun to extrude a thick string of yellow fondant. Smash down  one  end with your finger and then cut out notches to make the feet.


Bend the feet up at the ankles and put them in place. I also used a very thin clay gun string in black to outline the base cookie to give it a little pop.


Turkey time!  How cute would these be on your Thanksgiving place setting? Or lined up on a dessert buffet.

I hope you try these. You will seriously impress your family and friends!


Sugar Cookie Recipe:

one cup sugar
one cup butter
one egg
1 tsp each vanilla and almond flavoring as desired
3 cups all purpose flour, sifted

Cream sugar and softened butter. Add egg and flavorings and beat for a minute or so. Add flour one cup at a time until just incorporated. Knead gently for a minute. Ready to roll out and use right away. Bake at 325.


Glace icing:

one pound powdered sugar
6 TBS light corn syrup
6TBS milk
clear flavorings as desired

Combine in bowl and mix well with a whisk. Adjust with more sugar or milk to create outline and flooding consistencies.


MAKE US PLEASE!

Happy Turkeys!
Sharon
www.sugaredproductions.com


Pilgrim Pumpkin

November 16, 2011 by Sharon Zambito 14 Comments

Thanksgiving Blog Blitz Post #3!
I hope you are having a nice Fall so far, and are enjoying the anticipation and preparations leading up to the holidays.  Thanksgiving is my very favorite holiday, and I love making  fun treats for the occasion. And I have to tell you that this little dude has got to be  my all time favorite! I have been busting at the seams since I made him; I am so excited to share him with you!
Meet my Pilgrim Pumpkin mini cake!
Don’t you just want to squeeze him?
Let me show you how I made him:
For his body I used two mini bundt cakes and a circle of cake I cut from a round layer with a cookie cutter. The height of the cut circle of cake was about 1/2 inch.
You need that extra height the circle of cake gives. Otherwise, he will be too squatty and you won’t have enough room for his belt and his face. If you want to spackle the seem with some stiffened buttercream to hide it more, you can do so.

 Crumb coat the cake with a  very thin layer of icing. Then cover the top half with orange fondant. Use a wooden dowel to impress in the grooves of the bundt pan to make them show up well. You will need a pretty thick layer of fondant or all the lumpy bumps  will show through. Or you can use two thinner layers of fondant, which is what I did. Once you get the top half covered, let it sit for a while to let the fondant set up some.
Then flip the cake over and do the exact same thing on the other half. Cut a clean seem between  both layers of fondant where they overlap in the middle, so that you get the result you see above.

Looking pumpkiny!

I airbrushed him just a little to help his colors pop, but that it optional. Cover the seem with a strip of black fondant to make his belt. Make his face with pieces of black fondant.

Cuteness emerging.
His hair is thin strips of a golden yellow fondant. Prop them away from his head  with  paper towels until they firm up. Make his adorable little pilgrim shoes from triangles of black fondant with an oval  piece of white fondant on top.At this point, just go ahead and squeal with delight. You will want you. You will need to. You have my blessing.
Cut a circle of black fondant for the brim of his hat, and fashion another piece in the tapered shape of a pilgrim hat. Let those both firm  up well. Attach the hat pieces together with  chocolate.
Once all is in place, add the  buckles to the belt and hat. I presented him on a little bit of fondant grass  with some acorns. At this point I called in all my family, my neighbors, the postman, and a stray cat to share my excitement with them.
Isn’t he just the cutest thing?
I heart him.
——————————

I often get asked where I get my ideas from, which can be all kinds of things. This project was inspired by this piece of  clip art I stumbled upon while searching on the internet for something:


My little guy came out pretty much how I envisioned in my head; which rarely happens. So I was very pleased.

Hope you give him a try, he was a lot  of fun to do!

Stray tuned for the next installment of my Thanksgiving Blog Blitz coming Friday!

Happy caking!
Sharon
www.sugaredproductions.com


Turkey Cake Balls!

November 14, 2011 by Sharon Zambito 20 Comments

Welcome to post #2 of my Thanksgiving Blog Blitz!  I will have a new blog post for you every few days from now until Turkey day. I hope you enjoy.


It’s Turkey Season!
Yay!


I don’t know about you guys, but I have  serious crush on cute little turkey themed treats. I love seeing all the adorable confections that people come up with  this time of year. I did a post a couple of years ago about Thanksgiving cake balls, which we make every year. But I wanted to kick them up a notch this year, and turn them into something  more fun and eye catching.


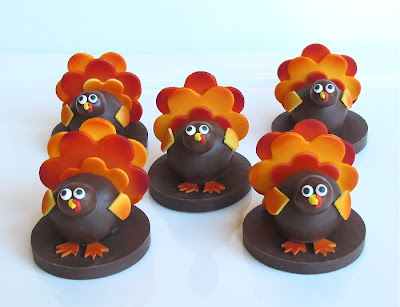
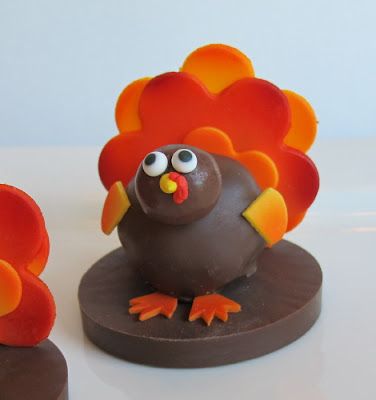
And here is what I came up with:


Tee hee hee.


They tickle me pink. Well, they tickle me orange and yellow, anyway.


Here is how you make ’em:


You will need Whopper candies and your dipped cake balls in the flavor of your choice.


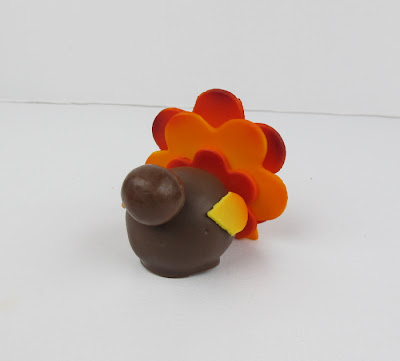
Cut the fondant  “feathers” by  using 3 sizes of blossom cutters. See the brown ones? Ignore those. I decided later that I did not like the brown feathers so I  left them off.


If you like, hit the edges of them with some airbrush color to make them pop and give them dimension.


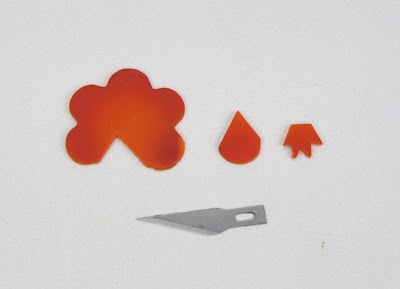
To make the little front wings,  cut two petals out of a blossom with an exacto knife.


Attach a whopper for his head, 3 blossoms for his fan of feathers, and his side wings with melted chocolate.


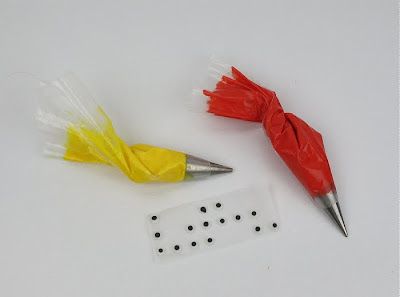
Attach candy googly eyes, and pipe his beak and that jiggly red thing with royal icing.


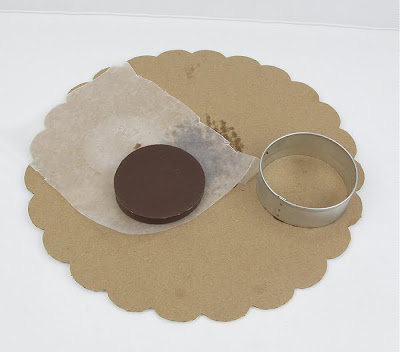
To make the base he is standing on, pour some melted chocolate into a round cookie cutter that has some wax or parchment paper under it.


Pop it into the freezer until fully firm and release it from the cutter.


Use two more petals cut and carved out with a knife to make his feet.


Attach the turkey and his feet with chocolate to the base.


SO STINKIN ‘CUTE!


What you lookin’ at Willis?


I simply adore these turkey cake balls. I can see them sitting on top of a bread plate at each place setting on the Thanksgiving dining table.  Your guests will simply go nuts over them, and you will get rave reviews for being such a clever confectionery creator.

;

I hope you try them out!


Happy turkey-ing,
Sharon
www.sugaredproductions.com


PS. You can learn how to make perfect cake balls step by step in our online school.


Have Your Pie and Eat It Too

November 7, 2011 by Sharon Zambito 8 Comments

Thanksgiving means one thing to everyone I am sure:


Pumpkin Pie!


I love all things pumpkin flavored: muffins, breads, shakes, martinis (oops, did I admit that?)…. except for one thing….. pie. I just do not care for it for some reason. But I cannot imagine having a Thanksgiving spread without that iconic pie on the table. So I thought I would try to have the best of both worlds this year, and maybe even play a little trickery on my unsuspecting family at the same time. (devilish  grin)


Oh that beautiful symbol of fall, gratitude, good food, and precious time with family and friends…..
 

Let’s make ours!


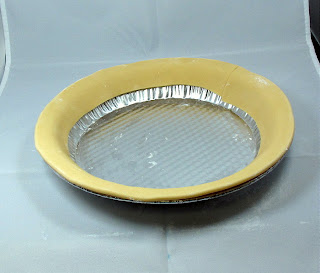
Start with a pie tin and line the edge with a strip of ivory fondant. Use some shortening to glue it on or it will not stay in place.


Flute the edges with  your fingers just as you would do a regular pie crust.


Airbrush color gives this “pie” its magic. A little yellow base coat, then followed by ivory (which comes out light brown for some reason). If you do not have an airbrush you can use the color mists in the can as well.


After the crust is dry, then add a layer of pumpkin cake. You can split and fill the cake if you want, but it is a pretty short layer, so I find the icing on the top to be enough for me.


Ice the  top of the cake with colored icing. I used orange, brown and a little red to get this color. Some pumpkin pies are more brown, and others more orange, so go for the look you like. Sprinkle some cinnamon on top of the icing. If you get big clumps like you see in this photo, just spread it out with your spatula, let the icing crust, and then smooth it out with your Viva paper  towel.


A little bit more airbrushing on the top. I used a combo of yellow and ivory to give it that  yummy custard-y baked look.


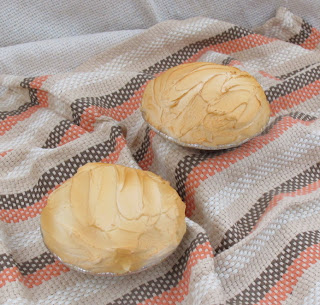
How about some mini meringue “pies” on the side ? (wink wink)


Follow the same process using mini pie shells. Pile on white icing  with a spatula and hit it with a light coat of ivory airbrush color.


They have that beautiful just baked meringue look.


Mmmmm.


Watch your guests’ faces as they cut into this pie and find out your secret surprise! (You might want to bring along a real pumpkin pie as back up, just in case. You don’t want an angry crowd caused by being deprived of pumpkin pie at Thanksgiving.)


This cake was SO easy and fast to do. You can make several and trick all of your neighbors we well. And your coworkers and boss. And the kids’ teachers. The fun could go one for weeks!


Here is an easy pumpkin cake recipe I used. It is super moist and yummy:


Ingredients

  • 1 (18.25 ounce) package spice cake mix
  •  3 eggs
  • 1/3 vegetable oil
  • 1 (15 ounce) can pumpkin puree
  • 1  TBS pumpkin pie spice
  • 1/3 cup white sugar

Directions

  • Combine everything in mixer at speed two until combined. Pour into prepared pan and bake at 325 until  done.
  • Cool completely. Level off the top, put the scraps in a ziplock bag, and hide them in your office so no one else can get to them.
  • Split layer into the height needed to fill your pie pan.


I really hope you guys give this fun cake a try and send me photos so I can post them!

Happy caking!
Sharon
www.sugaredproductions.com


Eat More Chicken

November 27, 2008 by Sharon Zambito 8 Comments

At least that is what Tom Turkey wants you to do!


I made this little topsy for our family dinner tomorrow at my sis’s. I used this tutorial from the great site, Pastry Whiz, to make Tom.


Steak is good for Thanksgiving, no?

Look at that scared little face!


Giving Thanks.

Today I give thanks for all the wonderful blessings in my life, namely my incredible family and friends, without whom life would have no meaning. I also give thanks for all of you. You have all enriched my life in ways I cannot explain. I thank you for your business, your friendship, and your talent. I wish each and every one of you a blessed and beautiful Thanksgiving day.

Sharon


Yum to the Oh!

November 24, 2008 by Sharon Zambito 14 Comments

That is hip talk for Yummo. I know, lame attempt. I may not be hip but I can sure make a mean cake ball.


Hail the cake ball in all its glory.


Cakes balls (also known as cake bites for the more demure) have been popular on the cake message boards for as long as I can remember. It’s a great way to use up the scraps you save in your freezer when you level and carve your cakes. What? You don’t freeze your scraps? Well, you must start to do so now so you can partake of this delightfully delicious delicacy.


I usually have a boat load of scraps in my freezer at any give time. Since we travel the globe on holidays (OK, we house hop, but traveling the globe sounds more glamorous), it is the perfect time to get those scraps out and do some rolling!


My son J said he would make them with me, but I got ditched for a playdate with a friend. So I was thrown into cake ball world all alone. No worries… I put a little music on, got a big fizzy Diet Coke from the gas station (fountain only of course!), and I went to town.


You will find many variations of how people make the balls. Some add icing or filling or liquid flavored coffee creamers to the scraps and then mash them all up. I find that makes a mushy ball with my cake recipe, and I don’t care for that. I find the cake to be moist enough that if I just squoosh and moosh the scraps together very well, they bind together perfectly and are wonderfully moist as is.


I roll the balls and dip them right away into melted chocolate. Some folks freeze/chill the balls before dipping, but when I do that the chocolate cracks from the cold. I just dip them right away and they hold their shape beautifully .


I use candy melts (also known as candy coating) rather than “normal” chocolate. Candy melts do not have to be tempered. Regular chocolate must be tempered or it will bloom (get terrible white spots all over it). Melts are not as high of a grade of chocolate, but they taste fine to me, plus you won’t see any tempering going on around these parts. ( Too lazy, um I mean overbooked). If the chocolate is a little old (or cheap), it might not melt to a very smooth liquid state. In that case, I add some melted paramount crystals to get it flowing nicely again. It also gives the shells a nice soft bite in the mouth and they do not crumble all in your hands.
So now I have about a bajillion cake balls in Tupperware ready to travel the globe with us on Thursday. Hope you guys try it out if you have not already.


YUM. OH.

Happy Thanksgiving Everyone!
Sharon
http://www.sugaredproductions.com/


Iced Pumpkin Cookies

November 7, 2008 by Sharon Zambito 14 Comments

I saw these cookies on a wonderful blog, The Repressed Pastry Chef, and knew I had to make them soon. So, in my quest to procrastinate from doing my cake prep last night, I figured that was the perfect time to make them. J and I both love pumpkin, and he likes to bake, so we made these together.


I am taking a little break from caking right now to eat my dinner, so I figured I would make a little blog entry on them for you guys. It gave me another chance to practice my photography, but I am not sure if I like these pictures are not. (I am always open to suggestions from you photography buffs, BTW.)
 

Iced Pumpkin Cookies

Ingredients

1 cup shortening
1 cup granulated sugar
1 cup canned pumpkin
1 egg
1 teaspoon baking soda
3/4 teaspoon ground cinnamon
1/2 teaspoon ground nutmeg
1/2 teaspoon salt
2 cups all-purpose flour
3 tablespoons butter
4 tablespoons milk
1 cup confectioners’ sugar
3/4 teaspoon vanilla extract
1/2 cup packed brown sugar


Method

Preheat oven to 350°F, line cookie sheet with silicone mat
Cream shortening, granulated sugar and pumpkin. Add egg and mix well. Add the baking soda, ground cinnamon, nutmeg, salt and flour and mix well. Using a small-to-medium sized disher (cookie scoop) or generous tablespoon, scoop batter onto cookie sheet. Using a wet finger, smooth points/peaks and gently press down tops. Bake 15-18 minutes then remove from oven and transfer to cooling rack and cool about 10-15 minutes before icing. To Make Icing: Cook butter, milk, and brown sugar until dissolved. Cool and add confectioners’ sugar and vanilla. Place a sheet of waxed paper under the cooling rack, take the cooled cookies and holding one at a time dip upside down into the icing, invert and place on cooling rack. Decorate with sprinkles while icing is still wet.


I made some a little larger than others, and I liked those better, as they were more moist. I liked them even better the next day, as they softened up a little. These are seriously dangerous to have around. They are very soft, cake-like and almost melt in your mouth. Very quick and easy to make too. Hope you try them!

OK, back to work for me! Have a great weekend!
Sharon
www.sugaredproductions.com
  • « Previous Page
  • 1
  • 2

Sharon Zambito

Sharon Zambito

An RN turned SAHM turned cake maniac. Owner of SugarEd Productions Online School. Join me for some caking, baking, and all around sweet fun :)

Follow me..

  • Facebook
  • Instagram
  • Pinterest
  • YouTube

Pinterest

  • Autumn House Two Trees Machine Embroidery Design – Blasto Stitch
    Autumn House Two Trees Machine Embroidery Design – Blasto Stitch
  • Embroider  Sew :: Jelly Roll Purses - Embroidery Garden In the Hoop Machine Embroidery Designs
    Embroider Sew :: Jelly Roll Purses - Embroidery Garden In the Hoop Machine Embroidery Designs
  • (1) How to QUICKLY & SAFELY remove acrylic, gel, and dip powder polish | BAGGY METHOD - SO EASY! - YouTube
    (1) How to QUICKLY & SAFELY remove acrylic, gel, and dip powder polish | BAGGY METHOD - SO EASY! - YouTube
  • (1) Bouffant Surgical Cap - YouTube
    (1) Bouffant Surgical Cap - YouTube
Follow Me on Pinterest

Follow Me on Instagram

Instagram requires authorization to view a user profile. Use autorized account in widget settings

Recent Posts

  • Egg Safety Basics
  • Stable Mabel Support System Sale
  • Guest Post : 4 Vegan Cake Recipes No One Should Miss Out On!

Popular Posts

  • Ways To Make Your Cake Fluffy And Moist
  • How To Stencil on Cookies with Royal Icing
  • Doctored Cake Mix Recipes
  • Transferring an Image Without a Projector
  • All About Buttercream!
  • How to Fix Broken Ganache
  • Edible vs Non Toxic Gold Dusts

Categories

Search

Archives

Copyright © 2025 · Sharon Zambito and SugarEd Productions,LLC

Copyright © 2025 · Evangeline Theme on Genesis Framework · WordPress · Log in