Sugared Productions Blog

  • Blog Home
    • Home
  • Online Classes
  • Shop
  • Contact
  • About

Thanksgiving Tutorial Round Up

November 22, 2016 by Sharon Z Leave a Comment

Hey there! Turkey Day USA is just a few days away!

Here’s a few of our favorite Thanksgiving  treats from around the web to get you inspired!


Mini-Pumpkin-Pies

Mini Pumpkin Pies


021e398ffb8a52d57ecd0c2389db6c42

Hidden Turkey Cake


exps86694_TH1999449A03_16_2bC

Turkey Dinner Cupcakes


Fall Cookies 


c53504962c1f1caf7d0605f3e24ebc82

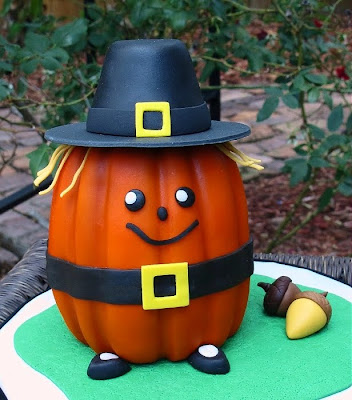
Pilgrim Pumpkin


Reeses-Nutter-Butter-Cookie-Truffles

Nutter Butter Truffles


b1f8912377879b4a46255607477c8d2b

Silly Turkey Cookies


24563538cb610911cf31c351d9523ad2

Buttercream Turkey Cake


pumpkin-pie-rice-krispies-treats-recipe

Pumpkin Rice Krispies Treats


That’s it for the round up! And I hope you got some inspiration from these tutorials.

I wish you a very Happy Thanksgiving!

Sharon

visit our online school

Fall Scarecrow Tutorial

October 24, 2016 by Sharon Z 3 Comments

Fall is my favorite of year. A little reprieve from the heat and humidity den here in the South. The promise of holidays, family gatherings and great food to come.

And I love Fall colors and decor. And Fall cakes.

So here’s a little tutorial for you for this cute and easy Scarecrow figure.   By our very own Rhu Strand, Sugarcraft Teacher, for SugarEd Productions.


scarecrow tutorial


Supplies:

dresden tool
scalpel
ball tool
shell tool
stitching tool
bamboo skewer or similar
cocktail sticks
circle cutters
scissors
paint brushes
ruler
6” cake drum
superglue
small piping nozzles for cutting circles
something to help you make a hole in the board – braddle or maybe a small screw that can be screwed in and out
blue sugarpaste – 100g
white paste – 150g
dark brown sugarpaste – 20g
mid brown sugarpaste – 50g
light brown sugarpaste (straw) – 70g
small amounts of black / red / green sugarpaste
food colouring for painting shirt
Edible glue

note: all sugarpaste has a stiffening agent added – tylose, gum trag, cmc etc


Cover the cake drum with paste. Make a hole in the middle with either a dowel or screw. Fix the bamboo skewer with super glue firmly into the hole on the underside.


Roll two 10g balls from the dark brown paste. Mark a line of stitching and glue to the board on either side of the skewer. These will be the shoes. Roll a 2” x 3/4” rectangle and use the shell tool to texture and cut into paste.


Fan the straw into small circles and place onto the shoes.


Roll 2 x 100g of blue paste into 4 1/2” sausages, or one long sausage and cut it in half. Mark creases into the bottom of the trousers with the veiner end of the dresden tool.


Insert cocktail sticks into the feet to help support the leg. Place leg onto cocktail sticks and glue to the Scarecrow support post (skewer).


Repeat for other leg. Glue top parts of legs together, only using a small amount of glue so that the paste is tacky. Put a stitching detail down the side of the legs – leave to dry.


Tear-drop 50g of white paste to about 21/2” long x 2/1/2” wide at the top. Flatten with the palm of your hand. Mark in creases with the dresden tool, put stitching detail down the front and add buttons with a small piping nozzle. Starting at the neck, gently twist a skewer down through the body to create a cavity.


Slide the body down onto the legs.


Paint a criss-cross of lines onto the shirt body to create a checkered effect, Do not worry over the painting; it does not need to be perfect – it will give movement to the shirt.


Make some more straw and arrange around the neck in a few layers.


Roll a pea-size ball of light brown and pop over the skewer to make a neck. Roll a small rectangle of white and wrap around for the collar; trim to right size. Paint the collar – you will see that I have now decided to paint over the shirt to give a base color too – leave to dry.


Roll 2 x 30g of white for the arms to about 21/2” long – trim these down if necessary. Use the ball tool to make a cavity at the wrist end of the sleeve.


Dip a cocktail stick into some glue and insert into the body at shoulder height. Leave to dry to give it some strength. Glue the remaining cocktail stick and insert arm onto it; glue at body.


Repeat the paint effect on the arm and insert straw into the wrist cavity.


Roll and cut some small rectangles for the dungaree bib and pocket. Add stitching detail and glue to body. Cut three narrow strips, add stitching detail, and glue two for the straps. Then add on the waistband. Make two buttons with a piping nozzle.


Roll 40g of light brown paste into a ball. Add eyes cut from black with a piping nozzle – the white dots are also cut from a piping nozzle. A red nose – very small triangle and mouth from finely rolled black. Add in stitches and pink dusting powder to the cheeks.


Cut skewer down to accommodate the head. Add more straw around neck if necessary. Add a strip of straw around the head for hair. Choose a circle cutter larger than the head and cut a circle from the mid brown colored paste. Shape over the head and add a strip to define the crown.


Cut some squares and add as patches.


Have fun using these techniques to create your own scarecrow!!


————————————————————————–


Self taught with a background in creative crafts, sugarpaste became Rhu’s chosen medium after rediscovering it making her children’s birthday cakes. Founding Pimp my Cake with Mama Rhu in 2009, Rhu was soon asked to teach at a local college, and this progressed to teaching from home in 2011. She now teaches full-time in the UK, as well as being invited to teach internationally.

Rhu’s pages: Facebook, Website, French Cake Breaks

————————————————-

Visit our online school

Fall Tutorial Roundup

October 5, 2016 by Sharon Z 1 Comment

Hi sugar babies! It’s Fall!! Here are some of our favorite treats from around the web to get you inspired for the season!


Fall-Leaves61

Fall Leaves from Sweet Ambs


 10938473505_a17308bdf7_o

Scarecrow Cake Pops from Bakerella


Pumpkin-Kiss-Brownie-Bites-title

Pumpkin Spice Bites from Bru Crew Life


pies9

Pumpkin Pie Cake from SugarEd Productions


pumpkincinnamon-339x1024

Pumpkin Cinammon Chips from Baker By Nature


frosted-pumpkin-bars-1

Frosted Pumpkin Bars from Liluna


Sugared-Candycorn-Cookies

Candy Corn Sugar Cookies from Our Best Bites


fall baskets video tutorial

Autumn Basket Cake from SugarEd Productions


I hope these tutorials inspire you to get into the season!

Happy Baking!
Sharon

Visit our online school

Indian and Pilgrim Owl Cupcakes Tutorial

November 23, 2015 by Sharon Zambito Leave a Comment

Hey sugar friend! Thanksgiving is just a few days away. Need an idea for dessert? Here’s some easy but really cute cupcakes that you can put together really quickly. How adorable are these little owls dressed like Indian and Pilgrims?  I die from cuteness.

Thanksgiving owl cupcakes tutorial

Supplies:

1 Batch of Cupcakes
buttercream
6, 13, 30, 44, 64mm circle cutters
44mm & 64mm scalloped circle cutter
Non-stick rolling pin
Cocktail stick
Water brush for sticking
Sharp or craft knife
Windsor Clikstix small
Soft brush
Pair of white pop socks, cornstarch and a small plastic container
Spatula
Wilton 6B piping Nozzle
Piping bag
Tall glass to pop your piping bag into.
80g of gumpaste (I used Satin Ice)
50g of chocolate fondant
60g of white fondant
20g of Orange fondant
40g of black fondant
2g of yellow
Brown food color gel/paste
Wafer paper (various colors, I used what I had left over)

These toppers will take at least 12 hours to dry hard enough so they won’t sag onto your cupcakes, so make sure you give yourself plenty of time before you decide you want them.


Thanksgiving owl cupcakes tutorialTo start with, I’m going to teach you a trick to stop things sticking to your board, cutters etc. I can’t claim it as my own idea but it works a treat. Starting with a pair of white pop socks (stockings), put one inside the other. Open the socks up together and put 1 tablespoon of cornstarch in the socks. Hold the socks at each end making sure the cornstarch is in the center and tie the two ends together cutting the ends to tidy them up. Voila! A brand new dusting bag. Keep it in a little container to keep it fresh and clean. Why cornstarch? Well I know many people use icing sugar, but that for me just makes everything even stickier, so it’s just a preference thing.


Thanksgiving owl cupcakes tutorialMix 80g of gumpaste with 40g of chocolate fondant and knead well. I added a touch of brown food color gel just to bring it back to a darker brown color again. To make the owls – cut 8 x 68mm rounds, making sure you keep any paste you are not using in an airtight container so it doesn’t go hard while you are working.


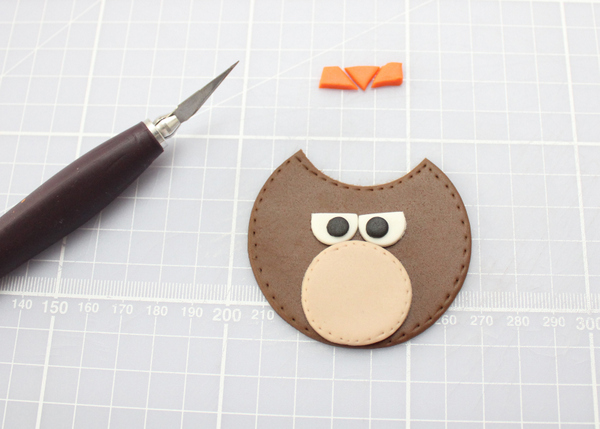
Thanksgiving owl cupcakes tutorial To make the Owl’s ears, you’ll need the 44mm cutter. Use this to cut a small section away from the top of the round, like this.


Thanksgiving owl cupcakes tutorial To give the Owls a stitched look, I used a cocktail stick to emboss the outer edge. You can buy a stitch embossing tool, but using a cocktail stick is just a nice, quick, CHEAP way of getting the same effect.


Thanksgiving owl cupcakes tutorial Next, knead 10g of chocolate and 50g of white fondant together to get the nice beige tummy color for the Owls. Roll the paste out to 2mm thick and cut 8 x 30mm rounds out for the tummies. Remember to keep the spare paste wrapped up tight, so it doesn’t go dry.


Thanksgiving owl cupcakes tutorial Repeat the stitching effect with your cocktail stick again, just inside the outer edge of the rounds.


Thanksgiving owl cupcakes tutorial Using the water brush, gently brush under where you want the tummies to go, I placed mine in the center at the bottom but you can off set them if you like.


Thanksgiving owl cupcakes tutorial To make the eyes you’ll need the 13mm round cutter. Roll and cut 16 x 13mm rounds, trimming the tops like this.


Thanksgiving owl cupcakes tutorial Using the water brush, stick the white rounds above the tummies, and then using the 6mm round cutter, add the pupils to the whites of the eyes. You can make them crossed or looking in different directions; it’s fun to give them a bit of personality.


Thanksgiving owl cupcakes tutorial To make the beaks, roll and cut small triangles from the orange paste.


Thanksgiving owl cupcakes tutorial Using the water brush, stick the beaks just below the eyes.


Thanksgiving owl cupcakes tutorial To make the wings you will need the 44mm scalloped round cutter. Using the remainder of the brown paste, cut scalloped rounds, and then cut them into four. I made sure the wings were 4 x scallops wide.


Thanksgiving owl cupcakes tutorial Stick the wings to the side of the Owl’s body with the water brush.


Thanksgiving owl cupcakes tutorial To make the Native Owl’s headdress – roll the orange paste and cut a long thin strip. Use the cocktail stick to emboss a pattern into it. I chose triangles and dots, but you can do which ever pattern you like.


Thanksgiving owl cupcakes tutorial Stick the headdress on with a brush of water above the eyes and trim the excess off with a sharp knife.


Thanksgiving owl cupcakes tutorial To make the feathers I used wafer paper. I had some Autumn leaves left over from some previous cupcakes and thought they were the perfect colors. You can use plain edible paper and dust it with powder food color to get these sort of colors. You could also use colored gum paste and feather it with a sharp knife. I used a craft knife to cut feather shapes out of the wafer leaves, and then feathered the edge by cutting thin strip into the edges.


Thanksgiving owl cupcakes tutorial When you are sticking the feathers together with the water brush, you need to make the brush is quite dry as you don’t want to melt the paper. Once they are all stuck together, use a tiny brush of water to stick them to the back of the owl’s head.


Thanksgiving owl cupcakes tutorial To make the pilgrim’s hat I cut a 4cm triangle and cut 5mm of the tops.


Thanksgiving owl cupcakes tutorial Then fold the bottom edge upwards to make the hat rim.


Thanksgiving owl cupcakes tutorial To make the buckles, cut tiny yellow fondant rectangles, and then cut tiny black fondant squares, sticking them onto the yellow rectangles with a dot of water.


Thanksgiving owl cupcakes tutorial Then add the buckle to the hat like this. The hat can then be added to the Owl’s head with a small brush of water.


Thanksgiving owl cupcakes tutorial To make the ‘Give Thanks’ topper cut 4 x 64 mm scalloped round.


Thanksgiving owl cupcakes tutorial Use the 48 mm plain cutter to cut 4 x rounds for the center of the scalloped rounds.


Thanksgiving owl cupcakes tutorial Roll the orange fondant out, making sure the counter and cutters are well and truly dusted with your cornflour dusting bag. I used the Windsor Clikstix Small for these letters and committed a sin by popping the plunger backs out. I just prefer the look of the rounded letters without the plunger backs in the cutters. I then remove the letters from the cutter with a small soft brush so as not to mark them.


Thanksgiving owl cupcakes tutorial Arrange your message onto the plain toppers and stick down with a brush of water.


Thanksgiving owl cupcakes tutorial To ice the cupcakes I added a Wilton 6B to a small piping bag. I find it much easier to pop the piping bag into a tall glass so I have both hands free to add the buttercream to the bag.


Thanksgiving owl cupcakes tutorial Pipe the tops of the cupcakes by starting in the center, piping out towards the wrapper, using this as a guide to pipe round to where you started and then up once more, finishing in the center by pushing down slightly and pulling up quickly.


Thanksgiving owl cupcakes tutorial Add the dried topper to your cakes and they are ready to serve.


Thanksgiving owl cupcakes tutorial

Happy Thanksgiving everyone!!

———————————————————————————-

Thanks to Victoria Threader, a renowned cupcake artist from the UK. After watching her mother bake her beautiful birthday cakes (still to this day), Victoria waited until she had a family of her own to start baking. Victoria is self taught and currently has her own feature in goodtoknow recipes magazine, where she shows you how to create wonderful cupcakes.
You can follow Victoria on her Facebook page: Victorious Cupcakes and at goodtoknowrecipes.com.

———————————————————————————-

I hope you enjoyed the tutorial and Happy Thanksgiving everyone!

Sharon

visit our online school


Thanksgiving Tutorial Round Up

November 20, 2015 by Sharon Zambito 2 Comments

Hey Y’all!  It’s almost here – TURKEY time!  If you’re like me and running short on time, you might like some help coming up with something creative  🙂  I’ve rounded up some super cute and easy ideas to dress up your Thanksgiving table. I’ll be using a few of these cute ideas myself:


peekaboo-pumpkin-pound-cake

Peekaboo Pumpkin Pound Cake by SheKnows


pumpkin pie cookies Pumpkin Pie Cookies by Munchkin Munchies


turkey-cupcakesTurkey and Stuffing Cupcakes by Saucy Sprinkles


Pumpkin-Pie-CupcakesPumpkin Pie Cupcakes by Hoosier Homemade


pumpkin cheesecakePumpkin Cheesecake Pie by Just A Pinch


cheesecake leavesFestive Fall Cheesecake Leaves by Hungry Happenings


Perfect Pumpkin Roll

Perfect Pumpkin Roll by SugarEd Productions


acorn cakeAcorn Cake by The Celebration Shoppe


turkey cake ballsTurkey Cake Balls by SugarEd Productions


turkey pilgrim cakeHave Mercy Turkey Cake Topper by Crazy Cool Cakes by Linda


pretzel-turkeysTurkey Pretzels by Candiquik

I hope some of these ideas help you come up with your own pretty table.  I’d love to hear what you guys are making. I’m always in charge of all the desserts for my extended family gathering, cuz ….well…. I don’t cook very well. They let me do the only thing I do well, haha!

Happy Thanksgiving from all of us at SugarEd Productions!

XX

Sharon

visit our online school


Pilgrim Pumpkin Mini Cake

November 9, 2014 by Sharon Zambito Leave a Comment

Hello Sugar Friends!
We are re-posting this cute guy from the archives…… lots of readers have been asking for him, so here we go!
–
–
–
I hope you are having a nice Fall so far, and are enjoying the anticipation and preparations leading up to the holidays.  Thanksgiving is my very favorite holiday, and I love making  fun treats for the occasion. And I have to tell you that this little dude has got to be  my all time favorite! I have been busting at the seams since I made him; I am so excited to share him with you!
Meet my Pilgrim Pumpkin mini cake!
Don’t you just want to squeeze him?
Let me show you how I made him:
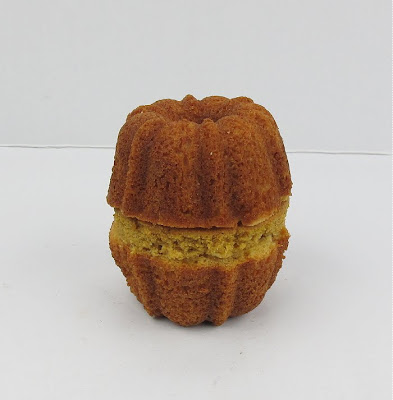
For his body I used two mini bundt cakes and a circle of cake I cut from a round layer with a cookie cutter. The height of the cut circle of cake was about 1/2 inch.
You need that extra height the circle of cake gives. Otherwise, he will be too squatty and you won’t have enough room for his belt and his face. If you want to spackle the seem with some stiffened buttercream to hide it more, you can do so.

 Crumb coat the cake with a  very thin layer of icing. Then cover the top half with orange fondant. Use a wooden dowel to impress in the grooves of the bundt pan to make them show up well. You will need a pretty thick layer of fondant or all the lumpy bumps  will show through. Or you can use two thinner layers of fondant, which is what I did. Once you get the top half covered, let it sit for a while to let the fondant set up some.
Then flip the cake over and do the exact same thing on the other half. Cut a clean seem between  both layers of fondant where they overlap in the middle, so that you get the result you see above.


Looking pumpkiny!

I airbrushed him just a little to help his colors pop, but that it optional. Cover the seem with a strip of black fondant to make his belt. Make his face with pieces of black fondant.

Cuteness emerging.
His hair is thin strips of a golden yellow fondant. Prop them away from his head  with  paper towels until they firm up. Make his adorable little pilgrim shoes from triangles of black fondant with an oval  piece of white fondant on top.At this point, just go ahead and squeal with delight. You will want you. You will need to. You have my blessing.
Cut a circle of black fondant for the brim of his hat, and fashion another piece in the tapered shape of a pilgrim hat. Let those both firm  up well. Attach the hat pieces together with  chocolate.
Once all is in place, add the  buckles to the belt and hat. I presented him on a little bit of fondant grass  with some acorns. At this point I called in all my family, my neighbors, the postman, and a stray cat to share my excitement with them.
Isn’t he just the cutest thing?
I heart him.
——————————

I often get asked where I get my ideas from, which can be all kinds of things. This project was inspired by this piece of  clip art I stumbled upon while searching on the internet for something:


My little guy came out pretty much how I envisioned in my head; which rarely happens. So I was very pleased.

Hope you give him a try, he was a lot  of fun to do!

Happy caking!
Sharon
www.sugaredproductions.com

—————————————————————————————

Join SugarEd Productions Online School for only $1!

Use coupon code ONE

Desktop45

Join Now

_________________________________


NOLA Photography http://bentzphotography.com/

Our Thanksgiving Roasted Turkey Cakes!

December 12, 2013 by Sharon Zambito Leave a Comment

Hi Sugar Friends!

Here at SugarEd Productions Online Sugar Art School, we have some very talented members.  We are proud to showcase this amazing talent with all the Roasted Turkey Cakes that these members have eagerly made using the techniques they learned in our Roast Turkey Video.  Great job by all!


4DEF1377 - Copy

9ACFA814


261CE033


815CE7B1 - Copy


921C0CBA


9C22C259


94F8EAC2


99C41F91


CA6BD9BF


A197B3DD


AA411626


8B36B6A4 - Copy


7E0F929C

Thank you again to our valued members who shared their wonderful Roasted Turkey Cake photos with us!  We’re so glad you enjoyed the video, and we look forward to seeing more of your creations!

Happy Caking!

Sharon 🙂

 —————————————————————————————————————————

1395852_10151880173025999_1776676030_n

 Our Roast Turkey Cake video is available three ways:

1) Online Sugar Art School – this and dozens more tutorials are available 24/7 online to members.

2) Video On Demand – the individual video can be rented or purchased for online viewing.

3) DVD – the roast turkey cake DVD can be purchased in our online store.

Thanksgiving Tutorial Round Up

November 25, 2013 by Sharon Zambito 5 Comments

Hi Sugar Friends!

Don’t you all just love the fall colors, the cooler temperatures and the crispness in the air?  It’s my favorite time of the year!  And with Thanksgiving literally around the corner, I’ve found some great tutorials for you to help make your table more festive!  Some are from SugarEd and some are from our featured contributors on our new Online Sugar Art School!

From SugarEd Productions:

Pilgrim Pumpkin (1)
Pilgrim Pumpkin Mini Cakes


Turkey Cake Balls (1)
Turkey Cake Balls

Turkey 3D Cookies (1)

Turkey 3D Cookies


From The Partiologist:

55

Pumpkin Fudge


5

Pumpkin Pie Cake Pops


8

Turkey Cake Pops


From Hungry Happenings:

Chocolate-rice-krispies-treats-turkey-pops

Chocolate Dipped Rice Krispie Treat Pops


leaf shaped crescent rolls with shredded cheese, paprika, and parsley for Thanksgiving dinner copy

Cheesy Crescent Roll Leaves


Chocolate Pilgrim Hats, Thanksgiving dessert, recipe, sweets

Chocolate Pilgrim Hats


From LilaLoa:

Harvest 1

Cookie Cornucopia


IMG_2042wm

Thanksgiving Cookies

From i heart baking!:

cupcakesThanksgiving_DSC_0837

Thanksgiving Cupcakes

From Sweet Pea’s Kitchen:

gingerbread-cupcakes

Gingerbread Cupcakes with Cinnamon Cream Cheese Frosting

From Just A Taste:

Pecan-Pie-Bars_447

Pecan Pie Bars

I hope you will find some inspiration from these cute and yummy tutorials to decorate your table this Thanksgiving!  From all of us at SugarEd Productions, we wish you a happy and blessed Thanksgiving, and we are Thankful for each and every one of you!

Sharon

www.sugaredproductions.com

Chocolate Dipped Rice Krispies Treat Turkey Pops

Lil’ Fondant Pumpkins

October 8, 2013 by Sharon Zambito 3 Comments

Hello my Sugar Friends!

Today we have a wonderful guest blog tutorial by the very talented Brittany Rumohr of Edible Details. She is a very accomplished sugar artist and pasty chef, and specializes in the cutest little fondant toppers you have ever seen. Please visit her full biography here. 

Brittany is a regular contributor to the SugarEd Online Sugar Art School. You can find more of her tutorials in the photo tutorial section here.


fondant pumpkin tutorial


Thank you, Brittany, for sharing your talent with us!

So now, I turn it over to Brittany:

 fondant pumpkin tutorial


I am so happy to be here, sharing with you how to make these cute little fall pumpkins. Let’s get started!

Supplies you will need:

  • Orange, black, white, green and brown fondant
  • Black food coloring
  • small dish to mix edible paint in
  • cotton swab
  • petal dust (color of choice)
  • double ball end tool
  • veining or dresden tool
  • container of water
  • knife
  • larger paint brush for painting on water for gluing
  • fine tip paint brush for painting pumpkin mouth and eyes


fondant pumpkin tutorial

Roll out 5oz of orange fondant into an egg shape. Use a veining tool to make lines down the pumpkin starting from the top and pulling the tool downward.


fondant pumpkin tutorial

Cut out the desired mouth shape with a sharp knife. NOTE: This will look rough at first cut and when the excess fondant is pulled from the mouth.


fondant pumpkin tutorial

 Use a desired tool to press and smooth out the inside of the mouth.


fondant pumpkin tutorial

 Press 2 indentations (to create eye positioning) using your finger or a ball tool.


fondant pumpkin tutorial

Use a ball tool to make 2 oval holes to inset the eyes. Use the sharp end of a veining or dresden tool to indent slight “bags” under the eyes.


fondant pumpkin tutorial

 Roll out a tear shape for the nose. Attach it with a dab of water.


fondant pumpkin tutorial

Mold 2 white ovals and press them together. You can use a little water to adhere them together if desired.  Attach the eyes into the sockets with water.


fondant pumpkin tutorial

Use a round piping tip to cut out 2 black fondant circles. Attach them to the eyes.


fondant pumpkin tutorial

Cut out an orange circle using the round piping tip. Cut it in half and attach one half to the top of each eye to create an eyelid.


fondant pumpkin tutorial

Roll out approximately 1gr of chocolate brown fondant into a long cone shape. Flatten the tip of the cone by pulling it across the worktop surface.


fondant pumpkin tutorial

 Make a hole in the top of the pumpkin.


fondant pumpkin tutorial

Attach the stem to the pumpkin while still soft (as shown in this example), or let it dry before attaching to have it stand upright.


fondant pumpkin tutorial

Roll out 2 thin strands of green fondant (aprox 2” in length) and curl around a wooden skewer.


fondant pumpkin tutorial

 Let them dry completely on the skewer, then carefully attach them to pumpkin.


fondant pumpkin tutorial

You now have a cutie little pumpkin. If you desire, you can proceed to color the mouth black:


fondant pumpkin tutorial

Combine black food coloring with a small amount of water to create an edible paint. Paint the inside of mouth (and the black pupils if shine is desired). Let that dry a few hours before touching the painted areas.


fondant pumpkin tutorial

Use desired shade of red, pink or dusty orange petal dust – apply to cotton swab and shade the cheeks of the pumpkin. NOTE: Make sure the surface you dust with color is completely dry to prevent over coloring.


fondant pumpkin tutorial

 Final product!  Perfect little cake or cupcake topper!


fondant pumpkin tutorial

I hope you enjoy making your own!

 ——————————————————————-

Thank you, Brittany, for this wonderful tutorial! I can’t wait to see all the cute little pumpkins appearing on the internet. 🙂

We also have a Halloween Tutorial Blitz going on in the Sugar Art School


fondant pumpkin tutorial


COME HAVE A PEAK HERE!

Happy caking!

Sharon

Owl Cupcake Toppers

January 30, 2013 by Sharon Zambito 3 Comments

Hello Sugar friends!

I hope your new year is getting off to a great start! I have hit the ground running in 2013, with many new projects in progress. We are still working on our new membership area that we hope to open in a few months. It is a huge  project to build, and it is taking a bit longer than we anticipated, but I promise it will be worth the wait!  I am also eyeball deep into preparation for our next DVD filming date next month. It is going to be another DVD on some gorgeous gumpaste flowers, buds, and leaves. Stay tuned to our blog and newsletter for all the scoop!

Since I am so swamped under, I have not had time to work on any blog projects. My dear friend Vik the Chef has come to my rescue by putting together this wonderful guest blog project for owl cupcake toppers. So with no further delay, take it away Vik :


These cute Fondant Owls are perfect for decorating cupcakes or cookies.

They utilize common cutter shapes and the sizes can be customized to suit any project.

Cut the bodies of the owls with a round cutter from light brown fondant mixed with a bit of Tylose. Let dry overnight. Allowing these to harden overnight will keep the grease content of your buttercream on the cupcake from softening the fondant owl upon contact.

Using a Food marker make wavy lines to suggest feathers.

Attach two teardrop shapes cut from dark brown fondant for the wings.

Attach the two white fondant circles for eyes.

Use a small piping tip to cut circles from blue fondant for the irises.

A small triangle shaped piece of Yellow fondant forms the beak.

Create female owls by adding a small flower shape with a non pareil center.

Use an edible food marker to finish the eye with a pupil.

Place on your cupcakes or cookies!

————————————————————————————

Vik The Chef is a Sugar artist from Toronto Ontario with a background in Professional Culinary cuisine. Her cakes feature hand made fondant, sugar flowers and highly detailed custom designs. In 2011 she participated as an assistant on the Canadian filmed Cake Walk series, achieving a first place win against two other teams. Please visit www.vikthechef.ca to view more of her beautiful work.

————————————————————

How cute are those owl toppers?  

Thank you Vik for such a fun and easy cupcake idea!

If any of you would like to submit a project for a guest blog post, please contact us at sugaredinfo@aol.com

Happy caking!

Sharon

www.sugaredproductons.com

  • 1
  • 2
  • Next Page »

Sharon Zambito

Sharon Zambito

An RN turned SAHM turned cake maniac. Owner of SugarEd Productions Online School. Join me for some caking, baking, and all around sweet fun :)

Follow me..

  • Facebook
  • Instagram
  • Pinterest
  • YouTube

Pinterest

  • Autumn House Two Trees Machine Embroidery Design – Blasto Stitch
    Autumn House Two Trees Machine Embroidery Design – Blasto Stitch
  • Embroider  Sew :: Jelly Roll Purses - Embroidery Garden In the Hoop Machine Embroidery Designs
    Embroider Sew :: Jelly Roll Purses - Embroidery Garden In the Hoop Machine Embroidery Designs
  • (1) How to QUICKLY & SAFELY remove acrylic, gel, and dip powder polish | BAGGY METHOD - SO EASY! - YouTube
    (1) How to QUICKLY & SAFELY remove acrylic, gel, and dip powder polish | BAGGY METHOD - SO EASY! - YouTube
  • (1) Bouffant Surgical Cap - YouTube
    (1) Bouffant Surgical Cap - YouTube
Follow Me on Pinterest

Follow Me on Instagram

Instagram requires authorization to view a user profile. Use autorized account in widget settings

Recent Posts

  • Egg Safety Basics
  • Stable Mabel Support System Sale
  • Guest Post : 4 Vegan Cake Recipes No One Should Miss Out On!

Popular Posts

  • Ways To Make Your Cake Fluffy And Moist
  • How To Stencil on Cookies with Royal Icing
  • Doctored Cake Mix Recipes
  • Transferring an Image Without a Projector
  • All About Buttercream!
  • How to Fix Broken Ganache
  • Edible vs Non Toxic Gold Dusts

Categories

Search

Archives

Copyright © 2025 · Sharon Zambito and SugarEd Productions,LLC

Copyright © 2025 · Evangeline Theme on Genesis Framework · WordPress · Log in