Sugared Productions Blog

  • Blog Home
    • Home
  • Online Classes
  • Shop
  • Contact
  • About

More Basket Goodies

December 9, 2008 by Sharon Zambito 9 Comments

Here it is 2 AM. I am exhausted, but I am so pumped up on caffeine and have so many things running through my mind I can’t sleep. I am burning the candle at both ends here trying to get everything done that needs to get done before Christmas. I am sure you guys are going though the same thing. Between working on these basket items, shopping for gifts, trying to get the house ready to host Christmas dinner, along with the normal daily chores of laundry, dishes, and homework, I feel like I need a clone! I love the holidays but they are are a lot of work!

I promised some more pics of the things I am making for my candy cane themed gift baskets this year. Here are sugar cookies decorated in fondant. You can see how tall that cookie is next to the ice cream dish. I got the cutter here.

White chocolate covered pretzels and Keebler shortbread cookies. After the white chocolate was dry, the red chocolate was piped on and red sanding sugar sprinkled on.


The artist in me thinks the basket goodies should only be done in red and white in order to really keep with the theme. But I know everyone does not like white chocolate, so I incorporate some milk chocolate items as well. Again, here we have pretzels and shortbread cookies in the back. In the front are dipped Oreos with crushed peppermint.

Marshmallows dipped in white chocolate with peppermint crunch and peppermint powder. Of course you could make your own with peppermint candies but I am way to lazy..um… busy for that!


I am still not done! I have a few more things to make for the baskets, and I am working on a big cake project too for my sister’s office party. But I can’t tell you what it is because she reads my blog. Stay tuned for pics next week.

So tell me what kinds of things you guys are working on for the holidays.

_____________________________________
Also just wanted to drop a reminder that the Design Gallery DVD will be shipping Wednesday! YAY! Finally! And this week I am going to announce another give-a-way, so stay tuned!

Happy Holidays!

Sharon
http://www.sugaredproductions.com/


Oreo Madness

December 4, 2008 by Sharon Zambito 28 Comments

What could be better than Oreos? Maybe Oreos covered in chocolate!
This post is dedicated to my dear friend Suze, and she knows why. What’s that? You want to know why too? No, I really should not say. Oh, you really want to know that badly? Well, OK, you forced it out of me. But please don’t tell her I told you this: she stinks at chocolate dipping Oreos!

The beauti–licious, yet dipping impaired Suze.
Last year I made the snowmen cookies below for the themed gift baskets I make every year. (They were a total copy from the wonderful site, FavorZ.)
Well, Suze tried to make some too, but let’s just say they came out, um, …well, ….not as good as she hoped for. So I started to rib her about it, and that gave birth to a friendly and good natured rivalry between the 2 of us and our confectionery skills. We try to poke fun at each other whenever we can.
So of course, Suzie came first to my mind as I was working on these chocolate dipped Oreos for this year’s baskets. I figured if I snapped some pictures and put together a little tutorial here, it might help her out. (Doubtful, but hey, what are friends for?)
These cookies are dipped in super white candy melts and chocolate transfer sheets in a candy cane design applied to the top. Cut the transfer sheets into little squares that will fit on the top of your cookie. Melt the candy melts till very smooth and creamy. I prefer the Merken’s and Guittard brands, as they perform the best. If the chocolate is low quality, or old, it will not melt nor cover smoothly. Be careful not to overheat or get water in the candy; that will ruin it as well.
Brush the Oreos with a big fluffy food brush before you dip them to avoid excess crumbs from getting in your melted chocolate. I use a large 3 pronged fork to dip the cookies. I dip, then let most of the excess chocolate fall back into the bowl, then place them on parchment or wax paper.
Gently place the transfer sheet squares on top and gently press it into place on top to make sure that chocolate comes into contact with all of the design.

I do about 5-8 on a cookie sheet and then pop those in the freezer for 5 minutes. Chilling them makes the design transfer over fully and cleanly, as well as giving the surface a nice shine. Just pull the transfer sheet square off when you take them out of the freezer. Don’t worry about the little bit of chocolate mess at the base of your cookies. After they have come back to room temp, you can take your handy palette knife and clean up the bottom edges.


By the end of your dipping session, your chocolate is still probably going to be “contaminated” with chocolate cookie crumbs, making it not very useful for any other purpose. So I crumble up all the broken Oreos that I did not dip into the chocolate, spread that on the parchment, chill, and break it up into a cookies and cream bark. YUMMY!

All the items in my basket are going to have a candy cane/peppermint theme. I do a different theme every year.


I will bag each of these individually and tie with a red ribbon before I put them in the baskets. If I place them unwrapped into the baskets; the transfer surface might get scratched and marked up by other items, and we just can’t have that! Not after all this work!


Maybe if Suze reads this she can give it another go. Of course, if she does read this I am in big time trouble. LOL

I hope you all get a chance to try this. Send me pics of your projects if you do! Even better, send all your pics to Suze! Tee hee hee.

Have fun making all of your holiday treats! I will try to post pics of more of the things I am working on if time permits. Such a crazy time of year, isn’t it?


Happy Holidays Ya’ll!

Sharon
http://www.sugaredproductions.com/


Eat More Chicken

November 27, 2008 by Sharon Zambito 8 Comments

At least that is what Tom Turkey wants you to do!


I made this little topsy for our family dinner tomorrow at my sis’s. I used this tutorial from the great site, Pastry Whiz, to make Tom.


Steak is good for Thanksgiving, no?

Look at that scared little face!


Giving Thanks.

Today I give thanks for all the wonderful blessings in my life, namely my incredible family and friends, without whom life would have no meaning. I also give thanks for all of you. You have all enriched my life in ways I cannot explain. I thank you for your business, your friendship, and your talent. I wish each and every one of you a blessed and beautiful Thanksgiving day.

Sharon


Yum to the Oh!

November 24, 2008 by Sharon Zambito 14 Comments

That is hip talk for Yummo. I know, lame attempt. I may not be hip but I can sure make a mean cake ball.


Hail the cake ball in all its glory.


Cakes balls (also known as cake bites for the more demure) have been popular on the cake message boards for as long as I can remember. It’s a great way to use up the scraps you save in your freezer when you level and carve your cakes. What? You don’t freeze your scraps? Well, you must start to do so now so you can partake of this delightfully delicious delicacy.


I usually have a boat load of scraps in my freezer at any give time. Since we travel the globe on holidays (OK, we house hop, but traveling the globe sounds more glamorous), it is the perfect time to get those scraps out and do some rolling!


My son J said he would make them with me, but I got ditched for a playdate with a friend. So I was thrown into cake ball world all alone. No worries… I put a little music on, got a big fizzy Diet Coke from the gas station (fountain only of course!), and I went to town.


You will find many variations of how people make the balls. Some add icing or filling or liquid flavored coffee creamers to the scraps and then mash them all up. I find that makes a mushy ball with my cake recipe, and I don’t care for that. I find the cake to be moist enough that if I just squoosh and moosh the scraps together very well, they bind together perfectly and are wonderfully moist as is.


I roll the balls and dip them right away into melted chocolate. Some folks freeze/chill the balls before dipping, but when I do that the chocolate cracks from the cold. I just dip them right away and they hold their shape beautifully .


I use candy melts (also known as candy coating) rather than “normal” chocolate. Candy melts do not have to be tempered. Regular chocolate must be tempered or it will bloom (get terrible white spots all over it). Melts are not as high of a grade of chocolate, but they taste fine to me, plus you won’t see any tempering going on around these parts. ( Too lazy, um I mean overbooked). If the chocolate is a little old (or cheap), it might not melt to a very smooth liquid state. In that case, I add some melted paramount crystals to get it flowing nicely again. It also gives the shells a nice soft bite in the mouth and they do not crumble all in your hands.
So now I have about a bajillion cake balls in Tupperware ready to travel the globe with us on Thursday. Hope you guys try it out if you have not already.


YUM. OH.

Happy Thanksgiving Everyone!
Sharon
http://www.sugaredproductions.com/


Here Comes Santa Claus!

November 12, 2008 by Sharon Zambito 14 Comments

WOW. PERIOD.
That just about sums up the class we hosted with Bronwen Weber last Sunday. She and her crew came and taught the 3D Standing Santa to 34 very eager students. They brought all the supplies and tools; all we had to do was show up. And each and every one of us left with a completed Santa cake. Very cool.
Bronwen and her assistants Heather and Francois (who is also her new hubby). All 3 of them were super nice, fun and helpful. Bronwen is total kick in the pants fun. Very positive, encouraging, relaxed and a great teacher.
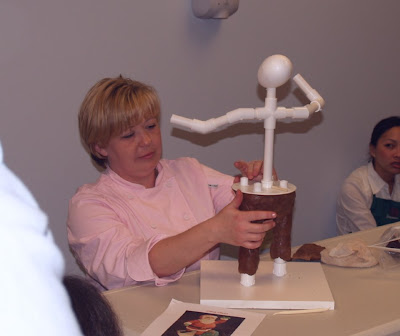
The Santa starts with a skeleton of PVC piping screwed into the base board. Arms and legs are formed with modeling chocolate.
We all went up to her demo table to see each technique and then went back to our seats to do it ourselves. We had immediate assistance if we needed it.

Wendy and I were goofing off here. Santa’s belly is cake supported by an acrylic plate.


Students busy at work.

A little army of Santas in the making.


Wendy kneading her fondant.

Working on my guy’s coat. Of all the techniques, I found the coat pieces to be the hardest to do .
Silly girls.
Bronwen showed us 2 ways to do the face. The one on the left would be the sculpted realistic face, but it is not complete. In addition, his mouth is all messed up from Bronwen getting goofy with him , but you get the general idea. The one on the right is the more cartoonish, and easier face, as there is no real sculpting involved. I chose the easier one, mostly because I wanted the cartoonishface for the kids, but I would like to try the sculpted face one day.
This is Bronwen’s Santa, with just the trim on his hat brim missing. Awesome huh?
Me, Bronwen, and my Santa. He is still wet from his vodka bath in this photo.

My Santa before his vodka bath. I still have to do a few finishing trim touches to him , and when I do, I will post some good shots of him.


I think he looks cute! I was thrilled with my cake. I never thought I could make a cake like this. I learned so many great new techniques I can apply to other cakes. It was a fabulous class and we will be hosting her here back again next year.

Gotta give a shout out to my hubby for getting us the big conference room at his place of work. Thanks Hun! And thank you to all of the students who attended and made it a great success!


Deedra’s Santa flew coach home! She said everyone on the plane went nuts over him and the pilot took a picture of him!

If you guys ever get a chance to take class with her, do it. Just do it.


Happy Holiday Caking Ya’ll!

Sharon
http://www.sugaredproductions.com/


Iced Pumpkin Cookies

November 7, 2008 by Sharon Zambito 14 Comments

I saw these cookies on a wonderful blog, The Repressed Pastry Chef, and knew I had to make them soon. So, in my quest to procrastinate from doing my cake prep last night, I figured that was the perfect time to make them. J and I both love pumpkin, and he likes to bake, so we made these together.


I am taking a little break from caking right now to eat my dinner, so I figured I would make a little blog entry on them for you guys. It gave me another chance to practice my photography, but I am not sure if I like these pictures are not. (I am always open to suggestions from you photography buffs, BTW.)


Iced Pumpkin Cookies

Ingredients

1 cup shortening
1 cup granulated sugar
1 cup canned pumpkin
1 egg
1 teaspoon baking soda
3/4 teaspoon ground cinnamon
1/2 teaspoon ground nutmeg
1/2 teaspoon salt
2 cups all-purpose flour
3 tablespoons butter
4 tablespoons milk
1 cup confectioners’ sugar
3/4 teaspoon vanilla extract
1/2 cup packed brown sugar


Method

Preheat oven to 350°F, line cookie sheet with silicone mat
Cream shortening, granulated sugar and pumpkin. Add egg and mix well. Add the baking soda, ground cinnamon, nutmeg, salt and flour and mix well. Using a small-to-medium sized disher (cookie scoop) or generous tablespoon, scoop batter onto cookie sheet. Using a wet finger, smooth points/peaks and gently press down tops. Bake 15-18 minutes then remove from oven and transfer to cooling rack and cool about 10-15 minutes before icing. To Make Icing: Cook butter, milk, and brown sugar until dissolved. Cool and add confectioners’ sugar and vanilla. Place a sheet of waxed paper under the cooling rack, take the cooled cookies and holding one at a time dip upside down into the icing, invert and place on cooling rack. Decorate with sprinkles while icing is still wet.


I made some a little larger than others, and I liked those better, as they were more moist. I liked them even better the next day, as they softened up a little. These are seriously dangerous to have around. They are very soft, cake-like and almost melt in your mouth. Very quick and easy to make too. Hope you try them!

OK, back to work for me! Have a great weekend!
Sharon
www.sugaredproductions.com

Trick or Treat!

October 31, 2008 by Sharon Zambito 18 Comments

Happy Halloween everyone!

Hope you have a wonderful day with your kids and families. Don’t get sick eating too much of their candy like I always do!

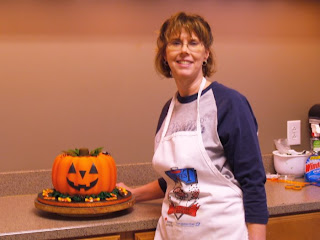
My sister Barbara, who has never decorated a cake in her life, came over for me to help her make a cake for her office Halloween goody contest. She has been a huge help to me with SugarEd over the last year, and has come with me to several of my demos and vendor shows, so she has been exposed to a lot this last year. (Some of you have met her! I also have another fabulous sister that you will meet later on.) She baked the cake herself and brought it over. I showed her how to do each technique (basically off the cake) and then she did the rest herself. She was quite a quick learner. She colored and rolled out the fondant, applied it (I helped her smooth one side while she did the other in the interest of drying out time.) She airbrushed it, made her own leaves and stem, piped the grass, and made the words. I helped her just a little bit with the face and spider.

We used 2 bundt cakes and spackled the seam with stiffened buttercream. Cream cheese filling was piped down into the center hole and a circle of cardboard sits on the top to support the stem.


Here is Barbara airbrushing her masterpiece. Do you dig the fancy taped up towels?

Piping the grass.

Finished!

Hers came out better than mine! And she won first place too! I am so proud, congrats Barb!

I also want to share with you the cookies I did yesterday for my bestest client.

All flooded with royal icing and candy eyes.

These were huge! The web was about 6 inches across.


The big bats are royal icing stenciled onto royal.

Pumpkins are royal stenciled on royal, ghosts are royal with fondant face.

Fondant face on airbrushed royal icing.
These were my favorite! They make me giggle.
Have a nice night everyone; have fun and stay safe!
Sharon
http://www.sugaredproductions.com/
  • « Previous Page
  • 1
  • …
  • 7
  • 8
  • 9

Sharon Zambito

Sharon Zambito

An RN turned SAHM turned cake maniac. Owner of SugarEd Productions Online School. Join me for some caking, baking, and all around sweet fun :)

Follow me..

  • Facebook
  • Instagram
  • Pinterest
  • YouTube

Pinterest

  • Autumn House Two Trees Machine Embroidery Design – Blasto Stitch
    Autumn House Two Trees Machine Embroidery Design – Blasto Stitch
  • Embroider  Sew :: Jelly Roll Purses - Embroidery Garden In the Hoop Machine Embroidery Designs
    Embroider Sew :: Jelly Roll Purses - Embroidery Garden In the Hoop Machine Embroidery Designs
  • (1) How to QUICKLY & SAFELY remove acrylic, gel, and dip powder polish | BAGGY METHOD - SO EASY! - YouTube
    (1) How to QUICKLY & SAFELY remove acrylic, gel, and dip powder polish | BAGGY METHOD - SO EASY! - YouTube
  • (1) Bouffant Surgical Cap - YouTube
    (1) Bouffant Surgical Cap - YouTube
Follow Me on Pinterest

Follow Me on Instagram

Instagram requires authorization to view a user profile. Use autorized account in widget settings

Recent Posts

  • Egg Safety Basics
  • Stable Mabel Support System Sale
  • Guest Post : 4 Vegan Cake Recipes No One Should Miss Out On!

Popular Posts

  • Ways To Make Your Cake Fluffy And Moist
  • How To Stencil on Cookies with Royal Icing
  • Doctored Cake Mix Recipes
  • Transferring an Image Without a Projector
  • All About Buttercream!
  • How to Fix Broken Ganache
  • Edible vs Non Toxic Gold Dusts

Categories

Search

Archives

Copyright © 2025 · Sharon Zambito and SugarEd Productions,LLC

Copyright © 2025 · Evangeline Theme on Genesis Framework · WordPress · Log in