Sugared Productions Blog

  • Blog Home
    • Home
  • Online Classes
  • Shop
  • Contact
  • About

Perfect Pumpkin Roll

November 20, 2011 by Sharon Zambito 31 Comments

Thanksgiving Blog Blitz Post #5

Welcome to the 5th and final installment of my Thanksgiving Blog Blitz. I gotta tell ya I am plum wore out. Been burning the candle at both ends over here, as I am sure many of you are too. I am just flat busted exhausted. So this post is going to be a little bare bones. I don’t have any ideas for witty commentary or fancy photos. But I still want to give you the information for this project as promised:

How to make a perfect pumpkin roll:


Make the recipe and bake it.


Add some filling, roll it up, and it should look like this:


Enjoy! Hope you try it!
Happy Thanksgiving everybody!


JUST KIDDING!


 You guys know I would never do that to you!

I was just messin’ with ya! Tee hee hee.


Here we go:


How to make this most gorgeous and beautiful pumpkin roll:


 perfect pumpkin roll


Make the recipe as directed (given below). Line a 10×15 jelly roll pan with wax paper or parchment paper, spray with pan spray, pour in the batter and bake as directed. Do not over bake. Take it out as soon as the top springs back when touched.


While the cake is baking, take a clean kitchen towel that does not have a very loopy surface and dust it liberally with powdered sugar.


As soon as the cake is done, flip it out onto the towel and peel off the wax paper. Do this right out of the oven. Do not cool it. Do not go get a sip of diet coke and then forget about it. (Just sayin’; that does not work.)


Immediately roll up the cake and towel together, then place on a cooling rack for about one hour. Now you can go get something to drink.


Once the cake is almost completely cool, but just barely warm, unroll it and spread an even thickness of the cream cheese filling across the cake. (Recipe below.)


Roll it up, somewhat tight. If the cake was not over baked or over cooled, it should not crack. If it cracks, do not freak out. No freaking out over pumpkin rolls allowed. You can cover it with powdered sugar or icing later.


Wrap this in plastic and keep in fridge at least a couple of hours or until a short time before serving. It is easier to cut while cold. The slices come out cleaner and prettier, but you do not have to serve it cold. (Please ignore the fact that there is more diet coke in my fridge than milk.)


Take it out the fridge and cut off the two rough ends of the roll, as the ends are not too pretty. Those are your quality control portions. You have to test it before serving it to others, of course!


Sprinkle with more sifted powdered sugar once on your serving platter. Is that not gorgeous?


Incredibly yummy too.


Please do not be afraid to try this. I was afraid the first time I did one that it would be a disaster. It is actually a very easy process, and you should get perfect results each time. The recipe is quick to do and tastes great. This is a perfect last minute holiday dessert that you can whip up in no time. And of course, you will impress everyone with this stunner.

Cake:

1/4 cup powdered sugar (to sprinkle on towel)
3/4 cup all-purpose flour
1/2 teaspoon baking powder
1/2 teaspoon baking soda
1/2 teaspoon ground cinnamon
1/2 teaspoon ground cloves
1/4 teaspoon salt
3 large eggs
1 cup granulated sugar
2/3 cup LIBBY’S® 100% Pure Pumpkin
1 cup walnuts, chopped (optional)

Filling:

1 pkg. (8 oz.) cream cheese, at room temperature
1 cup powdered sugar, sifted
6 tablespoons butter or margarine, softened
1 teaspoon vanilla extract
Powdered sugar (optional for decoration)

FOR CAKE:

PREHEAT oven to 375° F. Grease 15 x 10-inch jelly-roll pan; line with wax paper. Grease and flour paper. Sprinkle a thin, cotton kitchen towel with powdered sugar.

COMBINE flour, baking powder, baking soda, cinnamon, cloves and salt in small bowl. Beat eggs and granulated sugar in large mixer bowl until thick. Beat in pumpkin. Stir in flour mixture. Spread evenly into prepared pan. Sprinkle with nuts.


BAKE for 13 to 15 minutes or until top of cake springs back when touched. (If using a dark-colored pan, begin checking for doneness at 11 minutes.) Immediately loosen and turn cake onto prepared towel. Carefully peel off paper. Roll up cake and towel together, starting with narrow end. Cool on wire rack.


FOR FILLING:

BEAT cream cheese, 1 cup powdered sugar, butter and vanilla extract in small mixer bowl until smooth. Carefully unroll cake. Spread cream cheese mixture over cake. Reroll cake. Wrap in plastic wrap and refrigerate at least one hour. Sprinkle with powdered sugar before serving, if desired.

COOKING TIP:

Be sure to put enough powdered sugar on the towel when rolling up the cake so it will not stick.

And here is a video of the process that might help:

Video
———————————————————–

I’d  like to tell you all how thankful I am to have the honor and privilege to interact with you here on my blog and in my videos. As a token of thanks, I’ve got 3 free baking and cake serving charts that I have put together in a PDF file. Just click on the button below to request it.

Free cake baking and serving charts

Send My Free PDF


Happy baking and Happy Thanksgiving,
Sharon
Visit our online school


NOLA Photography http://bentzphotography.com/

Turkey 3D Cookies

November 18, 2011 by Sharon Zambito 3 Comments

Thanksgiving Blog Blitz Post #4!


Gobble! Gobble!


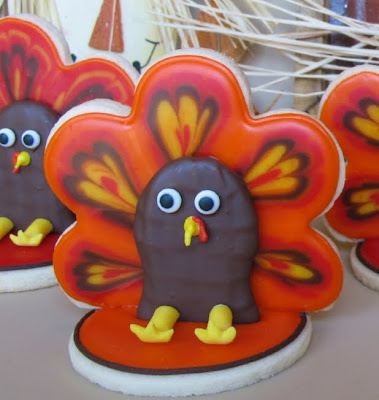
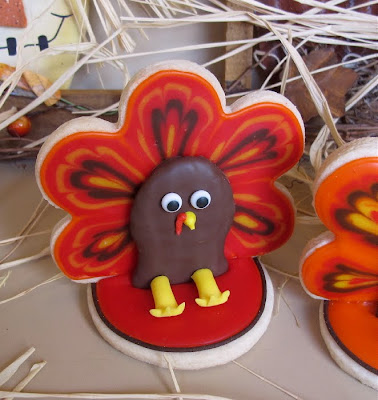
How about some 3D turkey cookies?


As I have mentioned before, I have a weakness for cute little turkey confections. Here is another take on turkey cookies:


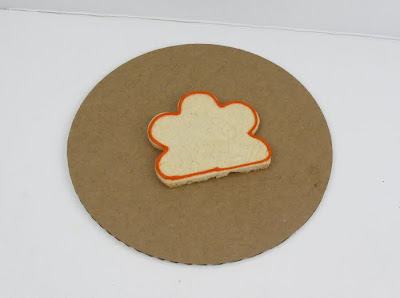
Bake your  favorite  cookie recipe and cut out large blossom shapes. After cooling, cut a portion off the bottom to make a flat  bottom edge. Outline your cookie with thickened icing and flood in your main color. I used glace icing here, but you can also use royal.


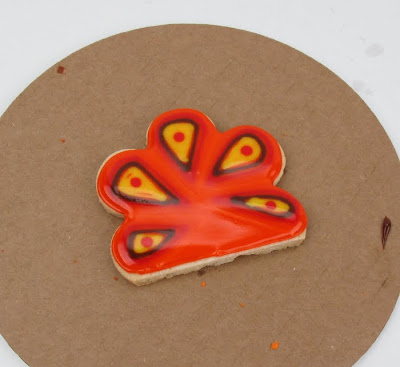
Immediately pipe in the above pattern with the other colors in flood consistency icing. It will sink right in. Then take a toothpick and drag it through that pattern, starting from the outer edge of the cookie, in toward the center.


Do this 3-5 times in each section of the blossom. You will create the feather pattern you see above. Let that fully dry, about 24 hours.


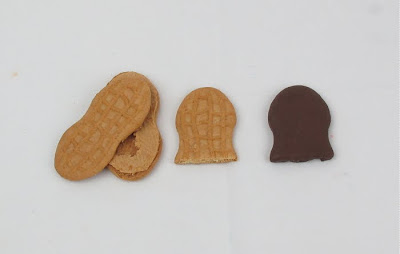
Use Nutter Butter cookies to make the turkey body. Take the cookies apart, scrape off the peanut butter, happily eat that, and then cut the  bottom portion of the cookie off. Happily eat that too. Dip the cookie in melted chocolate and let dry fully.


Use candy eyes, and royal icing to pipe the beak and red jiggly neck thingy. (Been getting a lot of use out of those candy eyes lately too. They rock.)


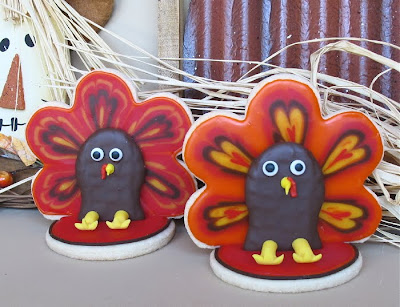
When you are ready to assemble, outline and flood a circle shaped cookie for the base. Let that set up for a few hours, but not until it is fully dried through. At this point you can put the feather cookie and body cookie on top of the base cookie. It will sink down a little bit into the still partially wet icing. When that fully dries, it will hold the whole cookie together. You might have to prop up the  back of the cookie with a little something while it is drying to  keep it perfectly upright.  Let that  base surface dry very well.


Use a clay gun to extrude a thick string of yellow fondant. Smash down  one  end with your finger and then cut out notches to make the feet.


Bend the feet up at the ankles and put them in place. I also used a very thin clay gun string in black to outline the base cookie to give it a little pop.


Turkey time!  How cute would these be on your Thanksgiving place setting? Or lined up on a dessert buffet.

I hope you try these. You will seriously impress your family and friends!


Sugar Cookie Recipe:

one cup sugar
one cup butter
one egg
1 tsp each vanilla and almond flavoring as desired
3 cups all purpose flour, sifted

Cream sugar and softened butter. Add egg and flavorings and beat for a minute or so. Add flour one cup at a time until just incorporated. Knead gently for a minute. Ready to roll out and use right away. Bake at 325.


Glace icing:

one pound powdered sugar
6 TBS light corn syrup
6TBS milk
clear flavorings as desired

Combine in bowl and mix well with a whisk. Adjust with more sugar or milk to create outline and flooding consistencies.


MAKE US PLEASE!

Happy Turkeys!
Sharon
www.sugaredproductions.com


Pilgrim Pumpkin

November 16, 2011 by Sharon Zambito 14 Comments

Thanksgiving Blog Blitz Post #3!
I hope you are having a nice Fall so far, and are enjoying the anticipation and preparations leading up to the holidays.  Thanksgiving is my very favorite holiday, and I love making  fun treats for the occasion. And I have to tell you that this little dude has got to be  my all time favorite! I have been busting at the seams since I made him; I am so excited to share him with you!
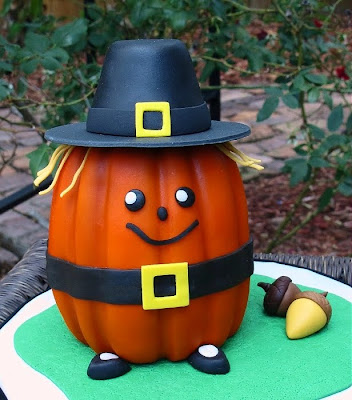
Meet my Pilgrim Pumpkin mini cake!
Don’t you just want to squeeze him?
Let me show you how I made him:
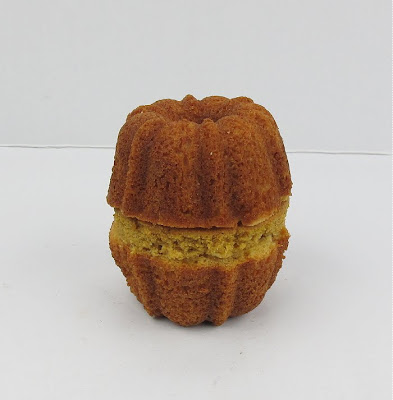
For his body I used two mini bundt cakes and a circle of cake I cut from a round layer with a cookie cutter. The height of the cut circle of cake was about 1/2 inch.
You need that extra height the circle of cake gives. Otherwise, he will be too squatty and you won’t have enough room for his belt and his face. If you want to spackle the seem with some stiffened buttercream to hide it more, you can do so.

 Crumb coat the cake with a  very thin layer of icing. Then cover the top half with orange fondant. Use a wooden dowel to impress in the grooves of the bundt pan to make them show up well. You will need a pretty thick layer of fondant or all the lumpy bumps  will show through. Or you can use two thinner layers of fondant, which is what I did. Once you get the top half covered, let it sit for a while to let the fondant set up some.
Then flip the cake over and do the exact same thing on the other half. Cut a clean seem between  both layers of fondant where they overlap in the middle, so that you get the result you see above.

Looking pumpkiny!

I airbrushed him just a little to help his colors pop, but that it optional. Cover the seem with a strip of black fondant to make his belt. Make his face with pieces of black fondant.

Cuteness emerging.
His hair is thin strips of a golden yellow fondant. Prop them away from his head  with  paper towels until they firm up. Make his adorable little pilgrim shoes from triangles of black fondant with an oval  piece of white fondant on top.At this point, just go ahead and squeal with delight. You will want you. You will need to. You have my blessing.
Cut a circle of black fondant for the brim of his hat, and fashion another piece in the tapered shape of a pilgrim hat. Let those both firm  up well. Attach the hat pieces together with  chocolate.
Once all is in place, add the  buckles to the belt and hat. I presented him on a little bit of fondant grass  with some acorns. At this point I called in all my family, my neighbors, the postman, and a stray cat to share my excitement with them.
Isn’t he just the cutest thing?
I heart him.
——————————

I often get asked where I get my ideas from, which can be all kinds of things. This project was inspired by this piece of  clip art I stumbled upon while searching on the internet for something:


My little guy came out pretty much how I envisioned in my head; which rarely happens. So I was very pleased.

Hope you give him a try, he was a lot  of fun to do!

Stray tuned for the next installment of my Thanksgiving Blog Blitz coming Friday!

Happy caking!
Sharon
www.sugaredproductions.com


Turkey Cake Balls!

November 14, 2011 by Sharon Zambito 20 Comments

Welcome to post #2 of my Thanksgiving Blog Blitz!  I will have a new blog post for you every few days from now until Turkey day. I hope you enjoy.


It’s Turkey Season!
Yay!


I don’t know about you guys, but I have  serious crush on cute little turkey themed treats. I love seeing all the adorable confections that people come up with  this time of year. I did a post a couple of years ago about Thanksgiving cake balls, which we make every year. But I wanted to kick them up a notch this year, and turn them into something  more fun and eye catching.


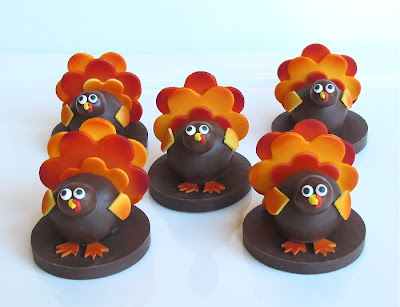
And here is what I came up with:


Tee hee hee.


They tickle me pink. Well, they tickle me orange and yellow, anyway.


Here is how you make ’em:


You will need Whopper candies and your dipped cake balls in the flavor of your choice.


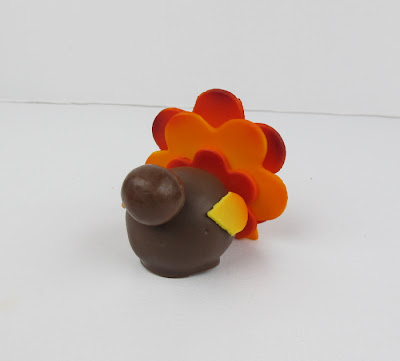
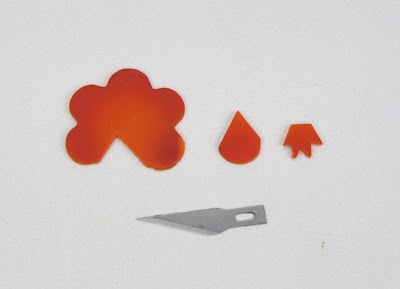
Cut the fondant  “feathers” by  using 3 sizes of blossom cutters. See the brown ones? Ignore those. I decided later that I did not like the brown feathers so I  left them off.


If you like, hit the edges of them with some airbrush color to make them pop and give them dimension.


To make the little front wings,  cut two petals out of a blossom with an exacto knife.


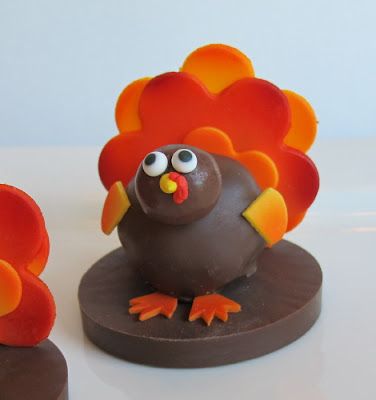
Attach a whopper for his head, 3 blossoms for his fan of feathers, and his side wings with melted chocolate.


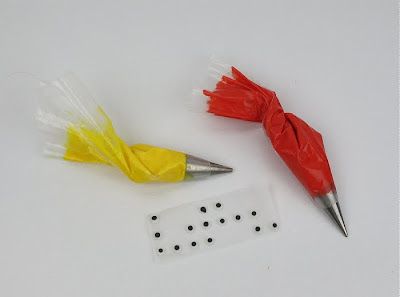
Attach candy googly eyes, and pipe his beak and that jiggly red thing with royal icing.


To make the base he is standing on, pour some melted chocolate into a round cookie cutter that has some wax or parchment paper under it.
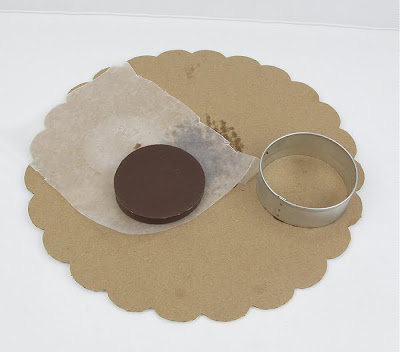


Pop it into the freezer until fully firm and release it from the cutter.


Use two more petals cut and carved out with a knife to make his feet.


Attach the turkey and his feet with chocolate to the base.


SO STINKIN ‘CUTE!


What you lookin’ at Willis?


I simply adore these turkey cake balls. I can see them sitting on top of a bread plate at each place setting on the Thanksgiving dining table.  Your guests will simply go nuts over them, and you will get rave reviews for being such a clever confectionery creator.

;

I hope you try them out!


Happy turkey-ing,
Sharon
www.sugaredproductions.com


PS. You can learn how to make perfect cake balls step by step in our online school.


Have Your Pie and Eat It Too

November 7, 2011 by Sharon Zambito 8 Comments

Thanksgiving means one thing to everyone I am sure:


Pumpkin Pie!


I love all things pumpkin flavored: muffins, breads, shakes, martinis (oops, did I admit that?)…. except for one thing….. pie. I just do not care for it for some reason. But I cannot imagine having a Thanksgiving spread without that iconic pie on the table. So I thought I would try to have the best of both worlds this year, and maybe even play a little trickery on my unsuspecting family at the same time. (devilish  grin)


Oh that beautiful symbol of fall, gratitude, good food, and precious time with family and friends…..
 

Let’s make ours!


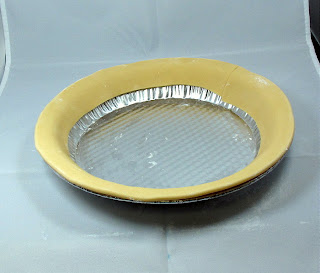
Start with a pie tin and line the edge with a strip of ivory fondant. Use some shortening to glue it on or it will not stay in place.


Flute the edges with  your fingers just as you would do a regular pie crust.


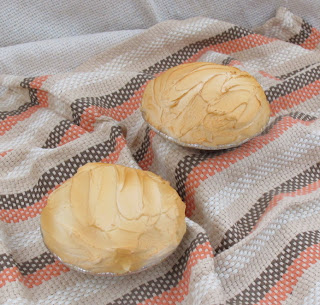
Airbrush color gives this “pie” its magic. A little yellow base coat, then followed by ivory (which comes out light brown for some reason). If you do not have an airbrush you can use the color mists in the can as well.


After the crust is dry, then add a layer of pumpkin cake. You can split and fill the cake if you want, but it is a pretty short layer, so I find the icing on the top to be enough for me.


Ice the  top of the cake with colored icing. I used orange, brown and a little red to get this color. Some pumpkin pies are more brown, and others more orange, so go for the look you like. Sprinkle some cinnamon on top of the icing. If you get big clumps like you see in this photo, just spread it out with your spatula, let the icing crust, and then smooth it out with your Viva paper  towel.


A little bit more airbrushing on the top. I used a combo of yellow and ivory to give it that  yummy custard-y baked look.


How about some mini meringue “pies” on the side ? (wink wink)


Follow the same process using mini pie shells. Pile on white icing  with a spatula and hit it with a light coat of ivory airbrush color.


They have that beautiful just baked meringue look.


Mmmmm.


Watch your guests’ faces as they cut into this pie and find out your secret surprise! (You might want to bring along a real pumpkin pie as back up, just in case. You don’t want an angry crowd caused by being deprived of pumpkin pie at Thanksgiving.)


This cake was SO easy and fast to do. You can make several and trick all of your neighbors we well. And your coworkers and boss. And the kids’ teachers. The fun could go one for weeks!


Here is an easy pumpkin cake recipe I used. It is super moist and yummy:


Ingredients

  • 1 (18.25 ounce) package spice cake mix
  •  3 eggs
  • 1/3 vegetable oil
  • 1 (15 ounce) can pumpkin puree
  • 1  TBS pumpkin pie spice
  • 1/3 cup white sugar

Directions

  • Combine everything in mixer at speed two until combined. Pour into prepared pan and bake at 325 until  done.
  • Cool completely. Level off the top, put the scraps in a ziplock bag, and hide them in your office so no one else can get to them.
  • Split layer into the height needed to fill your pie pan.


I really hope you guys give this fun cake a try and send me photos so I can post them!

Happy caking!
Sharon
www.sugaredproductions.com


Easy Halloween Cupcakes

October 25, 2011 by Sharon Zambito 19 Comments

Halloween is almost here!
Are you ready? No?
Well I am here to help!


This post is for all you procrastinators out there. And I say this with the utmost love and respect. For I am a champion, card carrying, flag waving procrastinator. I even joined a support group, but it hasn’t been much help:

I feel your pain. You had all these great delusions of grandeur of all the amazing treats you were going to make for Halloween. Maybe a haunted gingerbread house. Or a topsy turvy Tim Burton style. Or a batch of fabulously custom decorated cookies. You had it all planned in your head. You laid awake at night with excitement thinking of the joy you were going to experience while creating your incredible Halloween confections.


And here we are, just a few days before Halloween and…… nothing….. nada…… crickets. Where did the time go? What will we do? The kids are looking up at you with those sad longing eyes, asking what you will be making for their class or neighborhood party. Crikey! Why did we wait so long? Your heart starts to race; sweat forms on your brow; the room is going white. Pure unadulterated panic.

Raise your hand if you are with me so far. I have been in this situation more times than I count.

Well, have no fear. Queen Procrastinator is here to help you.

Oops wrong queen. I will fix that. Later.


So let me share with you these super duper easy Halloween cupcakes that you can whip out in no time, but still impress even the most discerning goblins and ghouls.

Ghosts and skeletons and graveyards, oh my!


Let’s start with the standing skeleton:


You will need white chocolate covered pretzels, sucker sticks, and marshmallows.


Draw a face on the flat side of a marshmallow that has been cut in half with an edible food marker. Three of the pretzels need to be glued to the sucker stick with some melted chocolate to make the rib cage.


And that was the tricky part. I spent a good 20 minutes trying to get those finicky pretzels to line up correctly on the sucker stick without flopping over or getting out of alignment. I found the above method worked the best. I used gravity to hold the back edges of the pretzels onto the stick while the chocolate hardened. Worked great and was very easy.


You use another pretzel cut as shown above to make the arms. You use the piece on the left, and eat the piece on the right. It’s a win/win for everybody.


After you pipe your icing swirl, just stick the sucker stuck in and lay the arm bones into the holes of the upper rib cage pretzel. Done. Fast. Easy. Cute. ( I must give credit to Woman’s Day for this idea. I saw it online and copied it.)


Now to the spooky graveyards:


I found these adorable sugar skulls at Wal Mart In the Wilton isle.


They appear to me to be gumpaste, and they were a very nice shape with good details.


To kick them up a notch, bring out a couple of brown petal dusts and give them a roughing up.


That took all of about 30 seconds, and they look awesome!


To make the tombstone, just cut a rectangular piece of fondant (with tylose added) and impress the RIP with your favorite alphabet cutters.   The cute cupcake wrappers were also made by Wilton.


Once the tombstones dry, hit them with a little luster dust. Pipe a swirl onto your cupcake, and slap a tombstone and skull on top. Done. How easy was that?


Crazy easy ghosts:


A Dum Dum lollipop.


Drape a circle of white fondant over it.


Add two eyes made from either fondant or your edible ink pen. Stick into cupcake icing. Woooooooo.


And you are done!


Group shot!


Cuteness overload.


Tread only if you dare!


He is a happy little fellow.


I don’t know what came over me. I lost my head.


And you saved the day! You have created this wonderful spread of amazing cupcakes, and it was fast and easy. You can take convenient pre-made products, do a little doctoring, and turn them into a custom made and impressive result:

HAPPY HALLOWEEN EVERYBODY!


Happy baking,
Sharon
Visit the SugarEd Online School

Halloween Marshmallow Pops

October 13, 2011 by Sharon Zambito 24 Comments

Boo!


Did I scare ya?


Probably not, as you intentionally logged onto this post. 🙂
 

Monster Marshmallow Pops Tutorial


One of my very favorite holidays is upon us. Halloween is a confectioner’s dream, as it provides an opportunity to make some of the cutest tasty treats evah. Let me share with you some I made this week. These were a lot of fun, and not very difficult nor time consuming. They get extra points for that!
 

Halloween marshmallow pops

Meet Broomelda and Franque. (He is French).


Initial supplies used to make our cozy candy couple include yellow candy melts, green oil based candy color, marshmallows and sucker sticks. I highly recommend Merkens brand melts for optimum dipping performance. In this case I used the campfire roasting marshmallows. Have you seen those things? They are hugantic! They are as big as…..as ……as a giant marshmallow! I also suggest using the thicker sucker sticks, as these bad boys are heavy once they are done.


Big bowl of green melty chocolate.


Other supplies used will be these candies and pre-made googly eyes, that you can get at most cake decorating places.


For Broomelda, we have to cut angles off each side of the gargantu-mallow. Run your knife under hot water, and dry it off before each cut. This will make the cutting of the freakishly large marshmallow much easier.


Stick and dip. Place on wax paper to dry fully.


Let’s do Franque first:

Cut out a circle of black fondant and cut out notches along the outer edge. Do not cut them evenly or symmetrically. Franque does not have the most couture coif I have ever seen. Just sayin’.


Lay the toupee over his head and just press down all around the sides. (Hint: use shortening as your glue. Trust me. You will thank me for this later.) Glue on his googly eyes with melted chocolate. Cut a white Good & Plenty in half and glue in place for his bolts. Give the rest of the box to hubby because he loves those nasty candies. Oh wait, that is my hubby. Ignore that. Next use a paintbrush to drop a dollop of the same green chocolate on his handsome face to make a nose.


Next we need to bring out the big guns. OK just one small gun. Anyway, get your clay gun out, and using the smallest size circle disc, extrude a string of black fondant. Use that to make eyebrows and mouth. Again, using shortening on his face as glue will save you many bad words. And if you just cannot help yourself (like me), use silver luster dust mixed with vodka to paint his bolts. An edible marker (not shown) can be used to make his scar.

You mad confectionery scientists will have
created a marshmallow monster!


MWAHAHAHA!

Now on to Broomelda:


Marshmallow pops


As with all ladies, we need to spend some time on the hair. Use your clay gun with the largest muti hole disc.


Extrude a length of purple fondant and apply to the side of her head.


Repeat process on each side until her head is covered.


Cut a few short pieces to make her bangs. The bob is very in this season in the witch world.


Now to make her face. Clay gun string again for the brows and mouth. Half of the green Mike and Ike candy for the nose. (Keep that box cuz we like those.) Another pair of google eyes.


Well hello my pretty!


To make the pointy part of her hat, start with a ball of black fondant.


Roll it into a cone shape initially, and then continue to elongate and shape it into a witch hat shape.


A circle of black fondant laid on her head, and then the cone part of the hat is attached to the top of that. A couple of purple clay gun strings will create a perfect hat band.


marshmallow pops

 And they are done!


marshmallow pops

Franque: Hey good lookin’. You want to go for a drink?
Broomelda: Why yes, thank you. I will have a Bloody Mary.


marshmallow pops

Double date!


Happy Halloween everybody! Send me pics if you make these and I will post them on Facebook. Please tell all your friends to like our Facebook page.

Sharon
Sugared Productions Online School

visit our online school


Easter Egg Basket Cake

April 29, 2011 by Sharon Zambito 24 Comments

HELLO SUGAR FRIENDS!!
I know it has been a long time. I apologize for my neglect of the blog. We have been so very busy behind the scenes, working on new and exciting projects for SugarEd that have been very time consuming. We are planning our next DVD releases, a website upgrade and expansion, and more fun surprises that you will learn more about at the end of this year. (Good things come to those who wait, LOL)
Things are starting to settle down just a bit, so I am going to do my best to get back to blogging regularly. And I thought you might enjoy a tutorial on the basket cake I made last week for an Easter order. I know Easter is over, but you can use these techniques for many types of other cake themes.
Disclaimer: There seems to be something amiss with my camera (or there is the very remote possibility it is user ignorance), so the quality of these photos is not great, but I think you can still see them pretty well. I so want to take photography classes but there is just no time!
Today we are going to make a big ole beautiful Easter basket full of pastel chocolate eggs!
The basket handle was made about 5 days ahead of time. I used half chocolate and half white fondant, adding a very liberal amount of powdered tylose. I formed two thick sausages, then twisted them together, and curved them into the shape I needed for the handle. Make a wire handle that custom fits your cake in width and height, and use that as a guide to form the shape of your fondant handle. Insert sucker sticks into the two ends of the handle. I put it on a cooling rack so the air could get to the under side to aid drying. I have done this many times with success, but I think next time I might try 50/50 gumpaste. More on that later.
Now to make the chocolate eggs. I like Merkens brand super white candy melts. I used candy colors to tint it a few pastel shades. I used a large 3D egg chocolate mold to form the eggs. The molds are clipped together with strong office clamps, and the chocolate is poured into a hole cut out on the underside of the mold. The mold was put in a small cup to hold it straight and put in the freezer for about 15 minutes. Then the mold was removed from the cup and placed back in the freezer, allowing the cold air to fully reach all sides of it. It was ready to be unmolded at about 20-25 minutes total freezing time.

Here are some eggs fresh out of the molds. Oh no!! Look at those ugly seems! What shall we do?? No worries, we can clean that up easily.


Here they are all cleaned up. Use your palette knife or exacto knife to scrape off all the excess. Then use the heat of your gloved hand to smooth and buff out any lines and imperfections. This will cause the egg to lose its shine from the mold, but I have never seen a super shiny dyed Easter egg anyway. We are going for realism here!
However, we do want just a little bit of sheen to bring our eggs up a notch in elegance and refinement. So I used the edible lacquer spray an gave them 2 or 3 thin coats, allowing them to dry in between coats.
Here are the eggs right after spraying. Once dry, they will not be nearly this shiny.
Then the fun part of decorating the eggs! I used a variety of pastel colored fondant, strip, circle and flower cutters to decorate them in a variety of designs. You can use water, piping gel, or shortening as the glue for your fondant trims.
Aren’t they pretty? Try to get your fondant thin, as thick bulky appliques do not looks a nice on the eggs. Now back to the basket….. ( after a fountain Diet Coke run, of course.)
Ahhhhh, now that we are all refreshed, it is time to carve the cake into a slightly tapered basket shape. I have three 2 inch layers of cake here with one layer of filling. The cakes are 12 inch diameter. If you need to see the detailed method for carving this shape, you can check out our Tosy Turvy DVD.
Once the cake was carved, I used the thickened ganache method (also shown in the Topsy Turvy DVD) to coat our cake. Here it is shown all nice and smoothed. The top edge of excess ganache is removed the next day after the ganache has set up to a nice firm shell.
Now we have time to go play on Facebook, have some coffee and a snack, watch tonight’s rerun of the Young and the Restless, and then go to bed. Tomorrow we put our basket all together!
*
*
*
*
*
*
*
*
*
Good morning! Did you have a nice rest? Oh, who am I kidding. I never cake in the morning. I never cake before 3PM. Not a morning person, it takes me half the day to get fully awake and functioning.
So now we must roll out a very long piece of fondant (half chocolate and half white for this shade of brown) that is long enough to wrap around our cake, with a little extra on the end.
I used the PME basketweave roller to make the basketweave impression. I. love. this. roller. The end.
Measure how tall you want your piece of fondant to be and cut a strip that exact height, and roll it up bandage style.
I smeared shortening all over the ganached cake (with a gloved hand) in a light coat for glue. Shortening is excellent glue. Then I started at the back of my cake, and unrolled the wrap as I went around the cake. (I was taking my own photos, so I had to step away from the cake to take the picture.)
Do not pull or stretch it as you unroll. Just gently unroll it as you smooth it onto the cake with your hand. You do not want to erase or distort the basketweave pattern.
I used a clay gun to make a rope border for both the top edge and the bottom of the basket. Here you can see two large bubble tea straws inserted into the cake where the sucker sticks at the base of the handle will go.
I filled the straws with melted chocolate using a piping bag.
Then the sucker sticks were inserted into the straws . I propped the handle in place with a roll of Viva until the chocolate set.
I added more chocolate around the base of the handles to add more stability to them and let that fully firm up. Lookin’ good!
Now I have to insert four support straws…..
………that will hold up the cake circle that will support the weight of the heavy chocolate eggs.
Looks like an Easter basket now! I just added pieces of rolled out ivory fondant in a free form blanket shape and placed the eggs on top. So pretty! But hmmm……. that handle does not look quite as straight as it did when I put it in. Oh well, I am sure it will be fine.
I added a pink gumpaste ribbon and bow, and piped buttercream grass to complete my project. Boy, that handle is getting wonkier looking. I checked it; it seems solidly in place and stable. Well, it is time to go deliver. I am going to drive because hubby has been banned from driving with cakes after that last episode we will not speak of.
*
*
*
*
As I pull into the neighborhood of the client, I hear a big thump in the back of the vehicle. I knew what it was. I knew what had happened. I could not look. I said to Hubby, it happened didn’t it? He said, Yep.
Ok, now what to do? Surprisingly , I did not freak out. I called the customer, explained to her what happened, and that I was going back home to to do repairs. Unfortunately I had only one handle (I always make two, always…. but not this time for some unkown reason). I explained to her that it will not have a handle, but it will be a pretty cake anyway. She was incredibly understanding and not upset in the least. Thank goodness for easy-going clients , right?
So back home we go. I should have taken a photo of it with the broken handle. It broke off clean on both sides, about 6 inches up from the blanket. There was no fixing it.
Here you can see where I clipped the broken handle down as low as I could to the top of the cake without disturbing the other decorations. I dare not attempt to take the pieces out of the cake that were embedded. My plan was just to cover these spots with a little bit more blanket, that is until a lightbulb went off! I had an idea!
I would make small side handles! I could do this over wire, and it would not require the handles to have any drying time before I applied them. I bent some floral wire into the desired shape, and simply wrapped a clay gun string around it.
I coated the ends of the wire with chocolate, and after that was dry, I inserted the handles into both sides of the cake. I used melted chocolate to close in any holes or gaps where fresh cake was exposed, and also to secure the new handles in place.
I added some more blanket pieces to cover all the oopsies, and here is the final product:
What do you think?

I think I might even like it better than the first version. Whew, so glad that worked out, because who ever heard of an Easter basket with no handles?

So all is well that ends well! I hope you guys give this basket technique a try. I would suggest using a lot of tylose or gumpaste in your handle, and give it at least a week to dry if not longer. Or possibly even form it over very sturdy wire that can provide some support. I have made large handles using this method many times with success; I think this time it had not dried long/hard enough.


Oh and make TWO of everything!

Happy Caking Everyone!

Sharon
http://www.sugaredproductions.com/


Sugar Free Yule Log

December 21, 2010 by Sharon Zambito 4 Comments

MERRY CHRISTMAS EVERYONE!
We at SugarEd hope you have the most wonderful of holiday seasons. We want to take this opportunity to thank our loyal customers. We value and appreciate you, and hope to bring you more products in 2011 that you desire.
This year’s holiday blog is a guest entry by my beautiful sister Janice. Those of you that follow this blog know that she is the adventurer of the family. This past year she ziplined in the Nantahala Gorge in North Carolina, and whitewater rafted the Ocoee River where they had the Olympics. Her goal for 2011 is to skydive, and plans to take a two week motorcycle trip through the western U.S. in July. She also has a new granddaughter due on my birthday in May! It exhausts me just typing all that.
So with no further adieu, take it away Janice:

Christmas 2009 is near, and as always, I am assigned the task of providing a sugar-free dessert for my family on Christmas Day. Having done this for quite a few years now, and being easily bored, I am once again looking for something new and different; the same old apple and pumpkin pies seem so ordinary. (Although I do have a fabulous recipe for sugar-free apple pie that I may share with you in a future blog.) But Christmas seems to call for something a little more special, a little more decorative, a little more elegant. And as it usually turns out – a little more of a pain in the patootie.

As the festive season draws nigh, I begin to ponder how I will top last year’s spectacular creation, and I ask my sister Sharon, who you all know and love, to suggest something impressive and “bloggable.” She emails me a recipe for a Buche de Noel, or Yule Log. “What do you think about this?” I ask Pepper Marie. “It looks pretty difficult but I think I can adapt the recipe to sugar-free.” Pepper Marie is my 16-year old Pomeranian, and she helps me do everything. I seek her opinion in all things, great and small, and never make a move without her. She is to me as Wendy is to Sharon. Pepper Marie says that I should scrap the whole cake idea and serve a rotisserie chicken instead. “Chicken for dessert?” I ask. “Sounds like a winner to me!” she says. (Every year, her Christmas wish list is the same: a rotisserie chicken, whole, and no sharing, please.)

There are many theories about the origin of this decorative holiday dessert, but it seems clear that the Buche de Noel dates back to the time of Napoleon. One legend has it that Napoleon issued a decree that on the coldest nights, the peasants had to keep their chimneys closed to keep the cold air from coming in. (What a control freak!) That meant that the fireplaces could not be lit, so the patisseries (French bakeries) made these cakes in the shape of logs, and it became a French tradition. My question is how did they make these cakes if the fireplaces could not be lit? They didn’t have electric ovens back then, did they?

Be that as it may, since I am planning a trip to France in May/June of 2010, I think this is the perfect selection for this year’s confection. Since it’s going to be sugar-free, I guess I will call it my Buche de Noel sans Sucre. So on Christmas Eve, I take the day off, and right after breakfast (oatmeal for me, chicken for Pepper Marie), I pop my trustee IPOD into the dock, hit the shuffle, and as Pink declares that it is time to “Get the Party Started,” Pepper Marie and I begin this year’s culinary creation.


The Buche de Noel sans Sucre consists of four parts: the cake, the filling, the icing and the decorations. As Fats begins “Walkin’ To New Orleans,” Pepper Marie and I begin to assemble our ingredients for the first part – the cake:


Ingredients:

Three large eggs
Three tbs sugar-free strawberry jam
150g (5 oz) cocoa powder
A few squares of very dark, high cocoa content chocolate (I bought mine at Whole Foods)
One tsp cornflour
200g (7 oz) raspberries
300ml whipping cream (I used sugar-free Cool Whip)

The recipe says to start by preheating the oven to 375 degrees. That seems high to me, so I set it to 350. I grease a standard oblong fudge tin (or jelly roll pan), and separate the eggs. In one bowl, I whisk the egg yolks and two tablespoons of the sugar-free strawberry jam. Kenny is begging Ruby not to take her love to town, as I sieve the cocoa powder and cornflour and gently stir in. The recipe does not say to add water, but the batter seems very dry to me, so I add some water. “Tootsie Roll, does this look right to you?” I ask Pepper Marie. She sniffs it and says, “I think it needs some chicken broth.”


I place the egg whites in another bowl and beat with a mixer on high speed until they form stiff peaks. I slowly fold the egg white mixture into the chocolaty batter, spoon into the greased tin and place in the oven for about 15 minutes or until firm. I remove and allow to cool.


I wash and hull and the raspberries while Sting pleads with Roxanne not to put on the red light. I place the raspberries in a food processor and puree, adding a little Splenda to sweeten them just a tad.


I stir the pureed raspberries into the cream one-quarter at a time and it turns a beautiful pink shade. Of course, at this point, I cannot resist a little taste. That’s the best part about making sugar-free desserts – I get to taste!


The Village People extol the benefits of joining the YMCA as I sprinkle some cocoa powder onto a clean surface (I use a clean, smooth dish towel, but I imagine you can use parchment paper just as well). I carefully remove the sponge from the tin and lay it on the cocoa, and spread the remaining sugar-free jam all over the sponge.

I then spoon the raspberry cream on and spread.

Michael swears that Billie Jean is not his lover as I carefully roll up the sponge. “Think he’s telling the truth?” I ask Pepper Marie. She doesn’t care.

Now, the hardest part about making a Yule Log is getting the cake light and spongy enough to roll it up without cracking. Remember before when I said I thought the batter was too dry so I added water? I now believe I did not add quite enough. I am not a baker, however. I am a legal assistant. I can e-file a brief with the Federal court, set up a corporate deposition, and arrange a multi-party international conference call, all at the same time and in the blink of an eye. But make a judgment call about what looks right and what doesn’t when baking? Well, that is just not my area of expertise. “I think it needed more liquid,” I tell Pepper Marie. “It’s not too late to go with the chicken idea,” she says. “I may regret not taking your advice,” I say as I roll up the sponge. To my dismay, it cracked substantially upon rolling. “OMG!” I say. “I hope the icing covers this mess up.” “This baking stuff is too stressful,” says Pepper Marie. “I need a little nap.”

It’s time for me to get ready for church anyway. So I go get dressed, and as I am about to leave, My Special Angel is playing on the IPOD. “How appropriate,” I think to myself as I pause and take a long look at my Sweetie sleeping like a little angel. She is getting very old. I will say a special prayer for my own Special Angel at church tonight.

When I return, Pepper Marie and I are both refreshed – she physically, and I spiritually – and we are both ready for some victuals and libations. So I fix her some dinner (yes, this involves chicken), and mix myself a martini. Grey Goose, up and dirty, with two olives! Ahhh, this is good!

Now it is time to get back to work. This cake is taking longer than I thought it would. As I begin to assemble the ingredients for the icing, Prince is partying like it’s 1999. “He’s been partying for ten years now! He’s going to have a heck of a hangover!” I tell Pepper Marie, but she is too busy scarfing down chicken to worry about Prince.

The recipe I use for the icing comes from one of my diabetic cookbooks, and I must tell you that I do not love it. It is made with chocolate and butter, and that’s what it tastes like – butter. There is no cream in the buttercream, if you know what I mean. It calls for a substantial amount of salt which common sense should tell me is a flaw in the recipe, and maybe if I baked more often this would register with me. But like I said before, I am no Sharon Zambito. I make the first batch and it tastes incredibly salty. Now I am getting stressed again! “I knew that was too much salt!” I say. Pepper suggests that it would actually taste pretty good on top of some chicken. Once again, she’s probably right, but I am not to be defeated. I draw strength from Gloria’s assurances that I Will Survive. (Well, that and the martini.) “I will survive this cake,” I say, as I throw out the whole batch of icing and remake it without the salt. Thank God I have enough ingredients to make a second batch.

It is better without the salt, but still has a strong taste of butter. Since I would not recommend this recipe, I am giving you another one for the icing. This is what I would do next time.

1 envelope Dream Whip
½ teaspoon vanilla
½ cup milk
1 box sugar-free chocolate Jello pudding

Blend together milk, vanilla, and Dream Whip. Beat until stiff. Add pudding mix and continue to beat until light and fluffy. Add milk as needed until desired consistency is reached.

I’m thinking that if you want to simply things, you could probably use the sugar-free Cool Whip and just eliminate the milk. Or maybe use the milk to make the pudding and then mix that with the Cool Whip? Dream Whip, Cool Whip, Kool and the Gang? What do you think? I don’t know. Just don’t use the recipe that I used unless you like eating sticks of butter.

Speaking of Kool and the Gang, it’s time to Get Down On It, and I spread my new batch of icing onto the cake. One of Sharon’s palette knives would come in handy about now, but since I don’t have one of those [hint to Sharon for a Christmas gift], I use a small spatula or butter knife to form bark-like ridges on the icing. I use a toothpick to make the rings on the sides to look like a log.

Well that hid the cracks pretty well. So far so good. Now it is time for the decorations.

I was looking at pictures online trying to get ideas on how to decorate the Buche de Noel sans Sucre. You could really just use some store-bought holly, twigs, etc., and that would look very nice, But while I was surfing the web, I saw one that was decorated with meringue mushrooms. Cute! And luckily for me, a recipe was included.

Ingredients:

2 large egg whites, room temperature
1/4 tsp cream of tartar
½ superfine sugar (This is hard to find. You can use regular granulated sugar and process it for about 30 seconds in a food processor. I used Splenda, but I think meringue comes out better with real sugar. The Splenda did work, though.)

I line a baking sheet with parchment paper and set up a pastry bag with a No. 6 (½ inch diameter) round plain tip. I preheat the oven to 200 degrees, beat the room temperature egg whites with an electric mixer at slow speed until foamy. Then I add the cream of tartar and beat at medium speed until soft peaks form. I continue beating (increasing speed to high), gradually adding the sugar until the whites are stiff and glossy. I rub a little of the meringue between my fingers to make sure all the sugar has dissolved.

With a rubber spatula, I place the meringue into the pastry bag.

To pipe the caps, I hold the pastry bag upright and close to the parchment paper. I pipe the meringue with even pressure into even rounds building up the meringue to form a round. You can adjust the size of the caps depending on the size of your cake. I sharply twist the bag and stop the pressure as I slowly move the tip off the meringue. Try to make the top as smooth as possible but you can use a wet fingertip to smooth out any bumps. This takes practice, and the finished product is fragile. Make way more than you think you need.

To pipe the stems, I hold the pastry bag upright and close to the parchment paper. I pipe the meringue with even pressure into a cone shape, making the base of the stem a little larger than the top. I try to keep the stems as straight as possible. Again, make more than you need.

I bake the meringues for approximately one hour or until the mushrooms are firm enough that they can be lifted from the baking sheet without sticking.


To glue the caps to the stems, I use a little melting chocolate. I take a mushroom cap and spread some of the melted chocolate on the underside, and then press the stem onto it. You have to be very careful when you are doing this because the meringue is so fragile, if you use too much pressure, you can easily crush the mushroom. The first one I tried, the mushroom disintegrated into dust in my fingers. Actually, that happened a few times before I got the hang of it. I thought that Pepper Marie was making fun of me until I realized that Queen was singing Another One Bites The Dust on the IPOD.

The mushrooms look pretty cute, but too clean. I lightly brush them with a little cocoa powder to give them an “earthy” look. “Well, Sweet Cake, I think this all looks pretty good,” I say to Pepper Marie. “I really think your guests would rather have chicken,” she says. “But we’re having turkey for dinner,” I inform her. “Well, that’s even more better,” she replies. “Turkey for dinner, chicken for dessert. It’s a theme dinner.” That dog has a one-track mind.

Willie is pining to be On the Road Again, which reminds me that I need to take this concoction on the road tomorrow. I am tortured by memories of last year’s unexpected three-hour trek across the Causeway with my “needs refrigeration” cake melting in the back seat, and my “needs frequent potty stops” Aunt in the front seat. Luckily, this year I don’t need to go quite that far; our family celebration is being hosted by my son and daughter-in-law, who live five minutes from my apartment. Also, blessedly, my brother and his family are picking up my Aunt from her assisted living home, so I am relieved of that responsibility as well. I have only the Yule Log to worry about. Nevertheless, just to be on the safe side, I opt to transport the cake undecorated. So as Aaron Neville reserves his spot in that number When the Saints Go Marching In, Pepper Marie and I march off to bed to await the arrival of Santa Paws.

Our family celebration the next day is not until 5:00 p.m. I am able to spend the morning with Pepper Marie before I go to a friend’s house for Christmas dinner. (FYI – my contribution to this Christmas dinner is the aforementioned sugar-free apple pie which is a huge hit. It does not taste like sticks of chocolate butter.) I return home in the afternoon, with just enough time to load up my Honda Civic with gifts, kiss my precious Old Lady Dog on her soft, furry head, and I am off to my son’s house. This year, the Christmas Confection can ride in the front seat with me. I go slow, slow, slow, with one hand always on the dessert plate. I have horrible images of some reckless driver who has spent the last two days in an alcoholic stupor pulling out in front of me, causing me to slam on my breaks, and sending my Buche de Noel sans Sucre flying into the dashboard. “Good thing I don’t do this for a living,” I say out loud although there is no one to hear. “I’d have a ulcer.”

Upon arrival at the home of my son and daughter-in-law, I assemble the Yule Log. I have brought the meringue mushrooms in a plastic container lined with paper towels (for shock absorption!), and some of those store-bought holly and pine cones for embellishment. I arrange them all on the dessert dish. I sprinkle some Splenda “snow” on top of the log. “Wow, that looks great!” I say. “I’m a genius! A gourmet baker! I could be on the bleepin’ Ultimate Cake Off!” Unfortunately, as I am standing there expounding on my own creativity, the Splenda “snow” dissolves into the icing before my very eyes, and is soon gone from sight. Well, who knew? “That’s OK,” I say, “it’s just like a snowfall in New Orleans. It melts as soon as it hits the ground.”

The dish looks fantastic, and in spite of my disappointment with the taste of the icing, my family seems to like the Buche de Noel sans Sucre. Are they just being polite? Perhaps it is more appealing to the taste buds because it is so pretty, and they didn’t have the experience of that awful first batch of salty icing? Maybe they really DO like eating sticks of butter? I don’t know, but everyone tries it, even those who are not sugar restricted. If they mind the taste of the creamless buttercream icing, they don’t let on. In any event, the entire cake is soon gone. I guess that’s a good sign.

If any of you want the recipe for the creamless chocolate buttercream, let Sharon know and I’ll have her post it on the blog. Perhaps you know of a way to improve it. Maybe with a little chicken broth?

Well, here’s wishing all of you in Blogland a very Merry Christmas and a Super[bowl] New Year, from all of us down here in the Who Dat Nation! Talk to you soon.

————————————
EPILOGUE:

In Memoriam –

I dedicate this blog entry to my beloved Pepper Marie, my Baby, my Special Angel, my Tootsie Roll, my Helper, who passed from this life on May 14, 2010, just shy of her 17th birthday. No words can ever express the loss that I feel. I am forever grateful for every day I had with her, for the many years that she was at my side, for her unconditional love. She truly was my helper. She helped me do everything from the minute I woke up in the morning until the second I fell asleep at night. And even in between – I slept peacefully just knowing she was there. Many times she was my “glue” – she held me together through some really hard times. And we had lots of good times, too. We traveled all over the U.S. together. But whatever life brought our way, it was always she and I. We took it all on together. I carry her in my heart now, and always will. On what would have been her 17th birthday, I celebrated her life with a rotisserie chicken and champagne. And what a life it is to celebrate. I love you, Baby.


Pepper Marie
August 25, 1993 – May 14, 2010

Fleur de Lis Candy Baskets

February 20, 2010 by Sharon Zambito 55 Comments

HELLO DEAR SUGAR FRIENDS!
I have missed you all so much, and I am sorry I have been MIA on the blog. Preparing for the Ultimate Cake Off show, during the Christmas holidays, trying to get both the new DVD and website launched, and the chores of daily life took over for a while. It has been a crazy few months for sure. But things are settling down now, and I will be back to posting regularly.
The new Sheet Cake Secrets and Bonus Lagniappe DVDs are ready to ship. Sadly, the new website launched Wednesday for all of 30 minutes before we had to pull it due to a technical problem. I am frustrated and regretful about the delay; but I assure you that the web techies are working on it as we speak. My gut tells me it is going to be a few more days before it is fixed. Please hang tight because I promise the new DVDs will be worth the wait!
AND we are shooting our next DVD this coming Monday! You ask for ’em, we make ’em!
In fact, we are looking for suggestions for topics for our next 2 DVDs. So if you post a suggestion in the comment section here, you will be entered into a drawing for a free gift! I will give away one of the new tools featured in the sheet cake DVDs! Yay! I love give-aways!
So post your ideas and good luck!
————————————————
In honor of the Saints big Superbowl win (WHO DAT!), and it just ending Mardi Gras season here, I want to share with you these fabulous fleur de lis candies that my talented and awesome sister Barbara made. She made these beautiful baskets as Christmas gifts this year. But fleur de lis are always in style, and always in season!
My beautiful sister with her baskets.
These are made with the Spinning Leaf Oreo cookie molds. They have all kinds of molds for different shaped cookies, in many fun designs. The molds are very easy to use as well, and they work great.


These were made with molded white chocolate. The molds can be found here. The gold color was achieved by using the PME gold luster spray in the can.


Each cookie was put into an individual bag and tied with a ribbon.
Beautiful.
Just a gorgeous gift basket.
Get yourself some of those molds and give it a try.
It really is a lot of fun!
I hope to be back this next week with the announcement that our new DVDs are ready to order. Stay tuned!
Sharon
www.sugaredproductions.com


  • « Previous Page
  • 1
  • …
  • 5
  • 6
  • 7
  • 8
  • 9
  • Next Page »

Sharon Zambito

Sharon Zambito

An RN turned SAHM turned cake maniac. Owner of SugarEd Productions Online School. Join me for some caking, baking, and all around sweet fun :)

Follow me..

  • Facebook
  • Instagram
  • Pinterest
  • YouTube

Pinterest

  • Autumn House Two Trees Machine Embroidery Design – Blasto Stitch
    Autumn House Two Trees Machine Embroidery Design – Blasto Stitch
  • Embroider  Sew :: Jelly Roll Purses - Embroidery Garden In the Hoop Machine Embroidery Designs
    Embroider Sew :: Jelly Roll Purses - Embroidery Garden In the Hoop Machine Embroidery Designs
  • (1) How to QUICKLY & SAFELY remove acrylic, gel, and dip powder polish | BAGGY METHOD - SO EASY! - YouTube
    (1) How to QUICKLY & SAFELY remove acrylic, gel, and dip powder polish | BAGGY METHOD - SO EASY! - YouTube
  • (1) Bouffant Surgical Cap - YouTube
    (1) Bouffant Surgical Cap - YouTube
Follow Me on Pinterest

Follow Me on Instagram

Instagram requires authorization to view a user profile. Use autorized account in widget settings

Recent Posts

  • Egg Safety Basics
  • Stable Mabel Support System Sale
  • Guest Post : 4 Vegan Cake Recipes No One Should Miss Out On!

Popular Posts

  • Ways To Make Your Cake Fluffy And Moist
  • How To Stencil on Cookies with Royal Icing
  • Doctored Cake Mix Recipes
  • Transferring an Image Without a Projector
  • All About Buttercream!
  • How to Fix Broken Ganache
  • Edible vs Non Toxic Gold Dusts

Categories

Search

Archives

Copyright © 2025 · Sharon Zambito and SugarEd Productions,LLC

Copyright © 2025 · Evangeline Theme on Genesis Framework · WordPress · Log in