Sugared Productions Blog

  • Blog Home
    • Home
  • Online Classes
  • Shop
  • Contact
  • About

Free Holiday Tutorial Bundle

December 6, 2015 by Sharon Zambito 2 Comments

Happy Holidays everyone!

I’ve really got the Christmas spirit, and I have a gift for you. Actually, I have two!

Free Holiday Tutorial Bundle

I’ve put together a FREE PDF tutorial bundle for two of the most popular ones in my online school.

The “famous” ruffled Christmas tree cake was a viral hit. You may have seen it floating around the internet. (It’s my most stolen cake photo 🙂

Free Holiday Tutorial Bundle


How about this squeezably cute Santa figure? I want to pinch his rosy cheeks! Created by the insanely talented and Cake International Gold Award winner, Rhu Strand, exclusively for our online school.

Free Holiday Tutorial Bundle

Just click on the red button below to request your copy. Please note that sometimes the email that delivers the PDF bounces or gets lost in cyberspace. Just drop me a note at support@sugaredproductions.com if yours doesn’t arrive.

You’ll see an offer for a $1 trial to my online school, and I hope you join me. But know that is totally optional, and the PDF is my gift to you whether you join or not 🙂

The PDF will arrive in your email inbox within 15 minutes, and I’ll also send you some emails over the course of the next week or so that are packed with even more tutorials, valuable cake decorating info, stories and a super special offer. It’s going to be a fun week, so keep an eye on your inbox! (You can opt out anytime you wish.)

Ready to get your holiday gifts?

Send My Free PDF!

Happy Holidays!!

Sharon
SugarEd Productions Online School


NOLA Photography http://bentzphotography.com/

Indian and Pilgrim Owl Cupcakes Tutorial

November 23, 2015 by Sharon Zambito Leave a Comment

Hey sugar friend! Thanksgiving is just a few days away. Need an idea for dessert? Here’s some easy but really cute cupcakes that you can put together really quickly. How adorable are these little owls dressed like Indian and Pilgrims?  I die from cuteness.

Thanksgiving owl cupcakes tutorial

Supplies:

1 Batch of Cupcakes
buttercream
6, 13, 30, 44, 64mm circle cutters
44mm & 64mm scalloped circle cutter
Non-stick rolling pin
Cocktail stick
Water brush for sticking
Sharp or craft knife
Windsor Clikstix small
Soft brush
Pair of white pop socks, cornstarch and a small plastic container
Spatula
Wilton 6B piping Nozzle
Piping bag
Tall glass to pop your piping bag into.
80g of gumpaste (I used Satin Ice)
50g of chocolate fondant
60g of white fondant
20g of Orange fondant
40g of black fondant
2g of yellow
Brown food color gel/paste
Wafer paper (various colors, I used what I had left over)

These toppers will take at least 12 hours to dry hard enough so they won’t sag onto your cupcakes, so make sure you give yourself plenty of time before you decide you want them.


Thanksgiving owl cupcakes tutorialTo start with, I’m going to teach you a trick to stop things sticking to your board, cutters etc. I can’t claim it as my own idea but it works a treat. Starting with a pair of white pop socks (stockings), put one inside the other. Open the socks up together and put 1 tablespoon of cornstarch in the socks. Hold the socks at each end making sure the cornstarch is in the center and tie the two ends together cutting the ends to tidy them up. Voila! A brand new dusting bag. Keep it in a little container to keep it fresh and clean. Why cornstarch? Well I know many people use icing sugar, but that for me just makes everything even stickier, so it’s just a preference thing.


Thanksgiving owl cupcakes tutorialMix 80g of gumpaste with 40g of chocolate fondant and knead well. I added a touch of brown food color gel just to bring it back to a darker brown color again. To make the owls – cut 8 x 68mm rounds, making sure you keep any paste you are not using in an airtight container so it doesn’t go hard while you are working.


Thanksgiving owl cupcakes tutorial To make the Owl’s ears, you’ll need the 44mm cutter. Use this to cut a small section away from the top of the round, like this.


Thanksgiving owl cupcakes tutorial To give the Owls a stitched look, I used a cocktail stick to emboss the outer edge. You can buy a stitch embossing tool, but using a cocktail stick is just a nice, quick, CHEAP way of getting the same effect.


Thanksgiving owl cupcakes tutorial Next, knead 10g of chocolate and 50g of white fondant together to get the nice beige tummy color for the Owls. Roll the paste out to 2mm thick and cut 8 x 30mm rounds out for the tummies. Remember to keep the spare paste wrapped up tight, so it doesn’t go dry.


Thanksgiving owl cupcakes tutorial Repeat the stitching effect with your cocktail stick again, just inside the outer edge of the rounds.


Thanksgiving owl cupcakes tutorial Using the water brush, gently brush under where you want the tummies to go, I placed mine in the center at the bottom but you can off set them if you like.


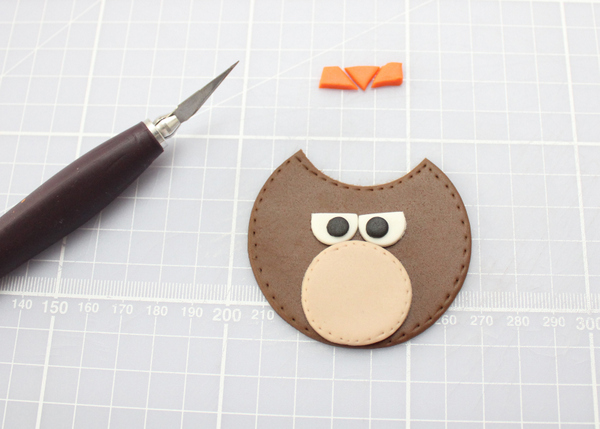
Thanksgiving owl cupcakes tutorial To make the eyes you’ll need the 13mm round cutter. Roll and cut 16 x 13mm rounds, trimming the tops like this.


Thanksgiving owl cupcakes tutorial Using the water brush, stick the white rounds above the tummies, and then using the 6mm round cutter, add the pupils to the whites of the eyes. You can make them crossed or looking in different directions; it’s fun to give them a bit of personality.


Thanksgiving owl cupcakes tutorial To make the beaks, roll and cut small triangles from the orange paste.


Thanksgiving owl cupcakes tutorial Using the water brush, stick the beaks just below the eyes.


Thanksgiving owl cupcakes tutorial To make the wings you will need the 44mm scalloped round cutter. Using the remainder of the brown paste, cut scalloped rounds, and then cut them into four. I made sure the wings were 4 x scallops wide.


Thanksgiving owl cupcakes tutorial Stick the wings to the side of the Owl’s body with the water brush.


Thanksgiving owl cupcakes tutorial To make the Native Owl’s headdress – roll the orange paste and cut a long thin strip. Use the cocktail stick to emboss a pattern into it. I chose triangles and dots, but you can do which ever pattern you like.


Thanksgiving owl cupcakes tutorial Stick the headdress on with a brush of water above the eyes and trim the excess off with a sharp knife.


Thanksgiving owl cupcakes tutorial To make the feathers I used wafer paper. I had some Autumn leaves left over from some previous cupcakes and thought they were the perfect colors. You can use plain edible paper and dust it with powder food color to get these sort of colors. You could also use colored gum paste and feather it with a sharp knife. I used a craft knife to cut feather shapes out of the wafer leaves, and then feathered the edge by cutting thin strip into the edges.


Thanksgiving owl cupcakes tutorial When you are sticking the feathers together with the water brush, you need to make the brush is quite dry as you don’t want to melt the paper. Once they are all stuck together, use a tiny brush of water to stick them to the back of the owl’s head.


Thanksgiving owl cupcakes tutorial To make the pilgrim’s hat I cut a 4cm triangle and cut 5mm of the tops.


Thanksgiving owl cupcakes tutorial Then fold the bottom edge upwards to make the hat rim.


Thanksgiving owl cupcakes tutorial To make the buckles, cut tiny yellow fondant rectangles, and then cut tiny black fondant squares, sticking them onto the yellow rectangles with a dot of water.


Thanksgiving owl cupcakes tutorial Then add the buckle to the hat like this. The hat can then be added to the Owl’s head with a small brush of water.


Thanksgiving owl cupcakes tutorial To make the ‘Give Thanks’ topper cut 4 x 64 mm scalloped round.


Thanksgiving owl cupcakes tutorial Use the 48 mm plain cutter to cut 4 x rounds for the center of the scalloped rounds.


Thanksgiving owl cupcakes tutorial Roll the orange fondant out, making sure the counter and cutters are well and truly dusted with your cornflour dusting bag. I used the Windsor Clikstix Small for these letters and committed a sin by popping the plunger backs out. I just prefer the look of the rounded letters without the plunger backs in the cutters. I then remove the letters from the cutter with a small soft brush so as not to mark them.


Thanksgiving owl cupcakes tutorial Arrange your message onto the plain toppers and stick down with a brush of water.


Thanksgiving owl cupcakes tutorial To ice the cupcakes I added a Wilton 6B to a small piping bag. I find it much easier to pop the piping bag into a tall glass so I have both hands free to add the buttercream to the bag.


Thanksgiving owl cupcakes tutorial Pipe the tops of the cupcakes by starting in the center, piping out towards the wrapper, using this as a guide to pipe round to where you started and then up once more, finishing in the center by pushing down slightly and pulling up quickly.


Thanksgiving owl cupcakes tutorial Add the dried topper to your cakes and they are ready to serve.


Thanksgiving owl cupcakes tutorial

Happy Thanksgiving everyone!!

———————————————————————————-

Thanks to Victoria Threader, a renowned cupcake artist from the UK. After watching her mother bake her beautiful birthday cakes (still to this day), Victoria waited until she had a family of her own to start baking. Victoria is self taught and currently has her own feature in goodtoknow recipes magazine, where she shows you how to create wonderful cupcakes.
You can follow Victoria on her Facebook page: Victorious Cupcakes and at goodtoknowrecipes.com.

———————————————————————————-

I hope you enjoyed the tutorial and Happy Thanksgiving everyone!

Sharon

visit our online school


Thanksgiving Tutorial Round Up

November 20, 2015 by Sharon Zambito 2 Comments

Hey Y’all!  It’s almost here – TURKEY time!  If you’re like me and running short on time, you might like some help coming up with something creative  🙂  I’ve rounded up some super cute and easy ideas to dress up your Thanksgiving table. I’ll be using a few of these cute ideas myself:


peekaboo-pumpkin-pound-cake

Peekaboo Pumpkin Pound Cake by SheKnows


pumpkin pie cookies Pumpkin Pie Cookies by Munchkin Munchies


turkey-cupcakesTurkey and Stuffing Cupcakes by Saucy Sprinkles


Pumpkin-Pie-CupcakesPumpkin Pie Cupcakes by Hoosier Homemade


pumpkin cheesecakePumpkin Cheesecake Pie by Just A Pinch


cheesecake leavesFestive Fall Cheesecake Leaves by Hungry Happenings


Perfect Pumpkin Roll

Perfect Pumpkin Roll by SugarEd Productions


acorn cakeAcorn Cake by The Celebration Shoppe


turkey cake ballsTurkey Cake Balls by SugarEd Productions


turkey pilgrim cakeHave Mercy Turkey Cake Topper by Crazy Cool Cakes by Linda


pretzel-turkeysTurkey Pretzels by Candiquik

I hope some of these ideas help you come up with your own pretty table.  I’d love to hear what you guys are making. I’m always in charge of all the desserts for my extended family gathering, cuz ….well…. I don’t cook very well. They let me do the only thing I do well, haha!

Happy Thanksgiving from all of us at SugarEd Productions!

XX

Sharon

visit our online school


Halloween Tutorial Round Up

October 21, 2015 by Sharon Z Leave a Comment

Hi guys! Today we have a few tutorials from our online school to share with you.

I hope these give you some inspiration for your Halloween projects !!

(You can join us for only $1 HERE to access all of these and over 300 more.)

–

–

Broomelda the Jack O’ Lantern Witch is a perfect center piece cake for Halloween! This 4 hour video covers a ton of techniques that will be useful across many cakes styles:

Broomelda video tutorial for $1

The 4 hour video course includes:

  • creating pumpkin shape from cake
  • covering pumpkin in fondant
  • fondant underlay method
  • airbrushing pumpkin
  • creating hat (from cake) and brim
  • structural support
  • using edible lace product to create striped bow and tulle sash on hat
  • creating and painting brooch
  • creating facial features
  • flashing eyes
  • creating broom
  • embossed fondant presentation board

Video sneak peek here:

LEARN MORE ABOUT BROOMELDA HERE

———————————————–


glowing skull cake tutorial

This skull cake is so spooky, and the electric lights in the eyes add an amazing touch.

———————————————–


halloween  figure tutorial

Next is this adorable fondant cat wizard and his book of spells.
The perfect balance of spooky and cute.

———————————————–


wizard figure tutorial

How cute is this wizard and his apprentice?
All modeled from fondant.

———————————————–


witchy cupcake toppers

These witch cupcakes are easy to make, add candy spiders for an extra spooky touch.


I hope that these tutorials get you inspired and ready for Halloween!!

Thanks to our school contributors Naomi Hubert, Rhu Strand, and Brittany Rumohr
for their wonderfully deatiled tutorials!

Remember you can join our online school for only$1 for a full month.

DETAILS HERE

Until next time; happy caking!

Sharon
Sugared Productions Online School

visit our online school


Halloween Chocolate Covered Pears

October 17, 2015 by Sharon Zambito Leave a Comment

Hey guys! Today we have a guest post from the ever creative Kim Heimbuck of The Partiologist blog. She has the best ideas (be sure to check out her blog for serious cuteness), and this one is so clever! A unique spin on the traditional candy apple:


Halloween pears

Beware of Pirates?  Not this kind.

You probably didn’t know that there was such a thing as chocolate covered pears.  Well, if I can help it, there will be chocolate covered everything, including pears.

Chocolate Covered Pirate Pear:

Start with as many pears as you plan to make.


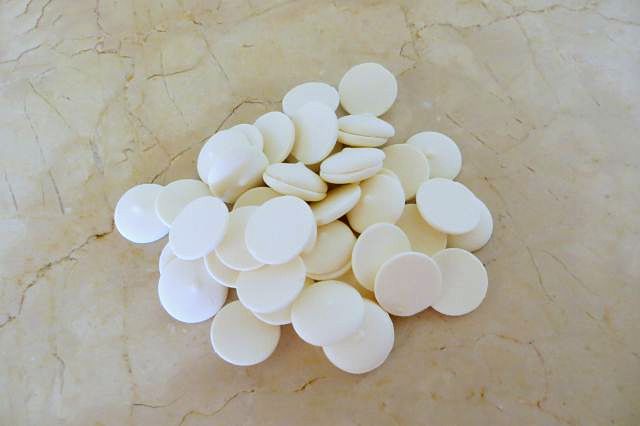
Use white candy melts for dipping your pear.


Use the caramel apple sticks.


Insert sticks into the pears and dip into both white and green melted candy melts.


For the pirate, use a round cookie cutter to cut the headpiece.


Also cut an oval piece of fondant for the scarf.


Pinch the oval piece together for the tie.


Fold it in half.


For the eye patch, roll and cut black fondant with a No. 1 strip cutter.


Use a small oval cutter and cut another piece of fondant to make the patch and trim the top.


Layer the patch on top of the strip.


Using number tappits, cut zero’s and pull out the inside for the teeth.


First add the eye patch and then wrap the red fondant around the top of the pear and pinch together the side, add the additional red fondant piece.  Also add the other eye, nose and teeth.


Cut out several white dots and place on the scarf.


Using the large number tappits, cut out a zero and use it for the earring.


Form it into a circle and let dry.


Halloween pears

Add the earring to the pear, cover the wooden stick with a decorative straw and you’ve got yourself a pirate!


Chocolate Covered Frankenstein Pear:

Dip your pear in green candy melts and set aside.


Roll and cut a large piece of black fondant into a circle.  Use a small oval cutter and cut pieces out around the edge of the fondant. Add the black fondant piece to the top of the pear for Frank’s hair.


Add candy eyes to the pear by sticking them on with a bit of frosting or melted candy melts.


Cut a strip for the mouth.  Add a piece of the black fondant strip to the pear for the mouth.  With black frosting, pipe frosting on the pear for stitches and eyebrows. Add a mini orange M&M for the nose and mini marshmallows to the sides.


Halloween pears


Now you can do the monster mash!


HAPPY HALLOWEEN!

——————————————————————

The Partiologist BlogKim has a love for unusual and over the top parties. In 2011 she started her blog, The Partiologist, where she shares her unique and creative ideas. From cakes and cookies, to favors and tablescapes, her inspiring ideas flow freely. Forever fun loving, her mantra is “Life is short; party accordingly!” You can follow Kim on her blog  or Facebook page.
  • Kim’s Full Bio here
Visit out online school


Franque and Broomelda Marshmallow Pops

October 8, 2015 by Sharon Zambito Leave a Comment

Boo!


Did I scare ya?


Probably not, as you intentionally logged onto this post. 🙂


Monster Marshmallow Pops Tutorial


One of my very favorite holidays is upon us. Halloween is a confectioner’s dream, as it provides an opportunity to make some of the cutest tasty treats evah. Let me share with you some I made this week. These were a lot of fun, and not very difficult nor time consuming. They get extra points for that!


Halloween marshmallow pops

Meet Broomelda and Franque. (He is French).


Initial supplies used to make our cozy candy couple include yellow candy melts, green oil based candy color, marshmallows and sucker sticks. I highly recommend Merkens brand melts for optimum dipping performance. In this case I used the campfire roasting marshmallows. Have you seen those things? They are hugantic! They are as big as…..as ……as a giant marshmallow! I also suggest using the thicker sucker sticks, as these bad boys are heavy once they are done.


Big bowl of green melty chocolate.


Other supplies used will be these candies and pre-made googly eyes, that you can get at most cake decorating places.


For Broomelda, we have to cut angles off each side of the gargantu-mallow. Run your knife under hot water, and dry it off before each cut. This will make the cutting of the freakishly large marshmallow much easier.


Stick and dip. Place on wax paper to dry fully.


Let’s do Franque first:

Cut out a circle of black fondant and cut out notches along the outer edge. Do not cut them evenly or symmetrically. Franque does not have the most couture coif I have ever seen. Just sayin’.


Lay the toupee over his head and just press down all around the sides. (Hint: use shortening as your glue. Trust me. You will thank me for this later.) Glue on his googly eyes with melted chocolate. Cut a white Good & Plenty in half and glue in place for his bolts. Give the rest of the box to hubby because he loves those nasty candies. Oh wait, that is my hubby. Ignore that. Next use a paintbrush to drop a dollop of the same green chocolate on his handsome face to make a nose.


Next we need to bring out the big guns. OK just one small gun. Anyway, get your clay gun out, and using the smallest size circle disc, extrude a string of black fondant. Use that to make eyebrows and mouth. Again, using shortening on his face as glue will save you many bad words. And if you just cannot help yourself (like me), use silver luster dust mixed with vodka to paint his bolts. An edible marker (not shown) can be used to make his scar.

You mad confectionery scientists will have
created a marshmallow monster!


MWAHAHAHA!

Now on to Broomelda:


Marshmallow pops


As with all ladies, we need to spend some time on the hair. Use your clay gun with the largest muti hole disc.


Extrude a length of purple fondant and apply to the side of her head.


Repeat process on each side until her head is covered.


Cut a few short pieces to make her bangs. The bob is very in this season in the witch world.


Now to make her face. Clay gun string again for the brows and mouth. Half of the green Mike and Ike candy for the nose. (Keep that box cuz we like those.) Another pair of google eyes.


Well hello my pretty!


To make the pointy part of her hat, start with a ball of black fondant.


Roll it into a cone shape initially, and then continue to elongate and shape it into a witch hat shape.


A circle of black fondant laid on her head, and then the cone part of the hat is attached to the top of that. A couple of purple clay gun strings will create a perfect hat band.


marshmallow pops

 And they are done!


marshmallow pops

Franque: Hey good lookin’. You want to go for a drink?
Broomelda: Why yes, thank you. I will have a Bloody Mary.


marshmallow pops

Double date!


Happy Halloween everybody! Send me pics if you make these and I will post them on Facebook. Please tell all your friends to like our Facebook page.

Sharon
Sugared Productions Online School

visit our online school


  • original post from 2011


NOLA Photography http://bentzphotography.com/

Halloween Treat Ideas and Tutorials

October 7, 2015 by Sharon Z Leave a Comment

Hi friends!

It’s almost that spooky fun time of year! Halloween is such a great holiday for making fun and creative sweets and treats. The possibilities are endless. It’s not to early to start planning, so here’s some ideas and tutorials you help get you kick started:


Mummy cake with edible gauze

Mummy Cake by The Partiologist


Mummy-Pumpkin-Cookies

Mummy Pumpkin Cookies by OMG Chocolate Desserts


oreo bat truffles

Oreo Bat Truffles by One Sweet Appetite


halloween bundt cake

Halloween Bundt Cake by Love Bakes Good Cakes


Reeses Frankenstein Cupcakes

Reese’s Frankenstein Cupcakes by Your Cup of Cake


Haunted Cupcakes

Haunted Cupcakes by Today’s Parent


Cake Ball Brains

Cake Ball Brains by Hungry Happenings


vampiresVampire Cake Pops from Bakerella


R158188.jpg.rendition.largestGhost Cupcakes from Better Homes and Gardens


candied apple 2
Purple Candy Apples
 by The Kitchen McCabe

Aren’t these just the cutest? I can’t wait to see what you guys make; link me to your photos in the comments!

Happy Halloweening!

Sharon
Sugared Productions Online School

visit school


New Easter Toppers Book by Naomi Hubert

March 15, 2015 by Sharon Zambito Leave a Comment

 IT’S HERE!

Our Sweet friend, Naomi Hubert of  Tea Party Cakes, has a new book!!  We’re so excited and it’s just in time for Easter!

The newest book from The Cake & Bake Academy is now out ready for Easter and I am so incredibly excited because our dear friend and contributor to our online school, Naomi, has step by step projects in the book.


Easter toppers book

I can personally assure you that this book is wonderful,
and all of the tutorials are top notch.

GREAT Spring and Easter projects.


The book is available in paperback on Amazon or if you can’t wait and want an instant copy you can order a pdf ebook here:

http://www.kyle-craig.com/buypdf.html

I hope you all love the book!

Congratulations, Naomi!!  We love the book too! 🙂 (and you!)


Easy Mardi Gras Masks by Lisa Bugeja

February 13, 2015 by Sharon Zambito 3 Comments

Hey everyone!  It’s almost that time of the year here again in the Big Easy!  Our guest blogger today is Lisa Bugeja of Flour Confections, and she’s here to share a quick and easy tutorial on Mardi Gras mask cupcake toppers.  Take it away Lisa!


IMG_7932


1

Supplies required:

Piping gel
Gumpaste (Confectioners Choice)
various Edible glitters (green, purple, gold and optional rainbow)
Mask cutter
Silpat mat
Flexible silicone container
Parchment paper
paintbrush
Isomalt
Airbrush color if needing to colour your own isomalt (Americolor)
Saran Wrap


 3

Roll out white gumpaste to a thin consistency (#2 on pasta machine). Cut out masks using cutter.


4

Place masks on silpat mat while you prepare isomalt.


5

Following manufacturers instructions, place pre-coloured isomalt nibs in silicone container and melt in microwave. CAUTION HOT! DO NOT TOUCH


6


8

9

When fully melted, carefully pour isomalt into eye cavities – be careful not to overfill. Let cool until hard and ok to touch.


10

Once cooled, gently bend gumpaste mask to give shape and place ball of plastic wrap in behind to help maintain shape while gumpaste dries.


12

13

When masks are dry, using a paintbrush, apply piping gel to sections of mask where you want to adhere the edible glitter.


14

17

18

In order to do tri-colour effect, paint each section separately and apply glitter immediately to painted areas BEFORE moving on to another colour.


IMG_7934

Once complete, place masks on top of iced cupcakes & enjoy!


*** Note: Isomalt will dull if placed in refrigerator or in high humidity – best to add to cupcakes just before serving.


Thank you Lisa!  These are so cute!

lisa

Lisa Bugeja is the award winning artist & creative force behind Flour Confections Inc. & Baked and Beloved in  Toronto, Ontario. Her work has been featured in numerous publications such as Brides magazine, Toronto Life,    Wedluxe Magazine, American Cake Decorating, Bakers Journal, People.com to name a few.  She has also been seen  on CTV’s Canada AM; and as assistant to Ashlee Perkins on Food Network Challenge, and assistant to Matthew  Somers on their winning episode of Cake Walk.

————————————————————————-


Pilgrim Pumpkin Mini Cake

November 9, 2014 by Sharon Zambito Leave a Comment

Hello Sugar Friends!
We are re-posting this cute guy from the archives…… lots of readers have been asking for him, so here we go!
–
–
–
I hope you are having a nice Fall so far, and are enjoying the anticipation and preparations leading up to the holidays.  Thanksgiving is my very favorite holiday, and I love making  fun treats for the occasion. And I have to tell you that this little dude has got to be  my all time favorite! I have been busting at the seams since I made him; I am so excited to share him with you!
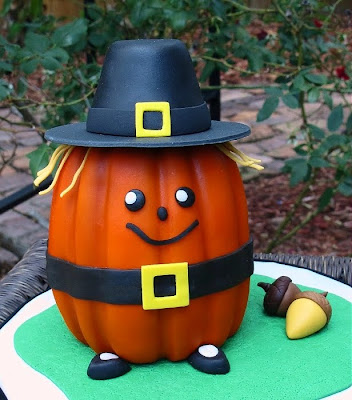
Meet my Pilgrim Pumpkin mini cake!
Don’t you just want to squeeze him?
Let me show you how I made him:
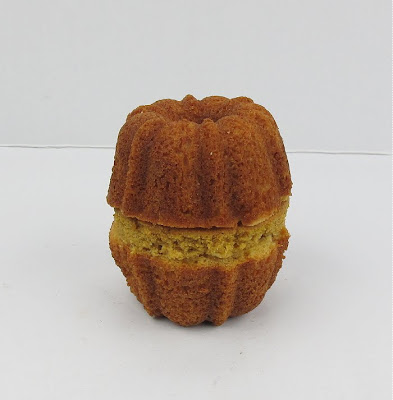
For his body I used two mini bundt cakes and a circle of cake I cut from a round layer with a cookie cutter. The height of the cut circle of cake was about 1/2 inch.
You need that extra height the circle of cake gives. Otherwise, he will be too squatty and you won’t have enough room for his belt and his face. If you want to spackle the seem with some stiffened buttercream to hide it more, you can do so.

 Crumb coat the cake with a  very thin layer of icing. Then cover the top half with orange fondant. Use a wooden dowel to impress in the grooves of the bundt pan to make them show up well. You will need a pretty thick layer of fondant or all the lumpy bumps  will show through. Or you can use two thinner layers of fondant, which is what I did. Once you get the top half covered, let it sit for a while to let the fondant set up some.
Then flip the cake over and do the exact same thing on the other half. Cut a clean seem between  both layers of fondant where they overlap in the middle, so that you get the result you see above.


Looking pumpkiny!

I airbrushed him just a little to help his colors pop, but that it optional. Cover the seem with a strip of black fondant to make his belt. Make his face with pieces of black fondant.

Cuteness emerging.
His hair is thin strips of a golden yellow fondant. Prop them away from his head  with  paper towels until they firm up. Make his adorable little pilgrim shoes from triangles of black fondant with an oval  piece of white fondant on top.At this point, just go ahead and squeal with delight. You will want you. You will need to. You have my blessing.
Cut a circle of black fondant for the brim of his hat, and fashion another piece in the tapered shape of a pilgrim hat. Let those both firm  up well. Attach the hat pieces together with  chocolate.
Once all is in place, add the  buckles to the belt and hat. I presented him on a little bit of fondant grass  with some acorns. At this point I called in all my family, my neighbors, the postman, and a stray cat to share my excitement with them.
Isn’t he just the cutest thing?
I heart him.
——————————

I often get asked where I get my ideas from, which can be all kinds of things. This project was inspired by this piece of  clip art I stumbled upon while searching on the internet for something:


My little guy came out pretty much how I envisioned in my head; which rarely happens. So I was very pleased.

Hope you give him a try, he was a lot  of fun to do!

Happy caking!
Sharon
www.sugaredproductions.com

—————————————————————————————

Join SugarEd Productions Online School for only $1!

Use coupon code ONE

Desktop45

Join Now

_________________________________


NOLA Photography http://bentzphotography.com/
  • « Previous Page
  • 1
  • 2
  • 3
  • 4
  • 5
  • …
  • 9
  • Next Page »

Sharon Zambito

Sharon Zambito

An RN turned SAHM turned cake maniac. Owner of SugarEd Productions Online School. Join me for some caking, baking, and all around sweet fun :)

Follow me..

  • Facebook
  • Instagram
  • Pinterest
  • YouTube

Pinterest

  • Autumn House Two Trees Machine Embroidery Design – Blasto Stitch
    Autumn House Two Trees Machine Embroidery Design – Blasto Stitch
  • Embroider  Sew :: Jelly Roll Purses - Embroidery Garden In the Hoop Machine Embroidery Designs
    Embroider Sew :: Jelly Roll Purses - Embroidery Garden In the Hoop Machine Embroidery Designs
  • (1) How to QUICKLY & SAFELY remove acrylic, gel, and dip powder polish | BAGGY METHOD - SO EASY! - YouTube
    (1) How to QUICKLY & SAFELY remove acrylic, gel, and dip powder polish | BAGGY METHOD - SO EASY! - YouTube
  • (1) Bouffant Surgical Cap - YouTube
    (1) Bouffant Surgical Cap - YouTube
Follow Me on Pinterest

Follow Me on Instagram

Instagram requires authorization to view a user profile. Use autorized account in widget settings

Recent Posts

  • Egg Safety Basics
  • Stable Mabel Support System Sale
  • Guest Post : 4 Vegan Cake Recipes No One Should Miss Out On!

Popular Posts

  • Ways To Make Your Cake Fluffy And Moist
  • How To Stencil on Cookies with Royal Icing
  • Doctored Cake Mix Recipes
  • Transferring an Image Without a Projector
  • All About Buttercream!
  • How to Fix Broken Ganache
  • Edible vs Non Toxic Gold Dusts

Categories

Search

Archives

Copyright © 2025 · Sharon Zambito and SugarEd Productions,LLC

Copyright © 2025 · Evangeline Theme on Genesis Framework · WordPress · Log in