Sugared Productions Blog

  • Blog Home
    • Home
  • Online Classes
  • Shop
  • Contact
  • About

Chocolate Bunny Boxes

April 11, 2009 by Sharon Zambito 5 Comments

It just would not be Easter without chocolate bunnies, right? I just had to share with you these adorable chocolate boxes I made. I got the mold here.

They are so cute filled up with candies. And you can eat the whole box! Gotta love that.


Paint the accent areas inside the mold with colored chocolate and a paint brush. It’s easier to do if the chocolate is cooled off a bit and a bit stiffer. Don’t be too worried about staying exactly in the lines. If you paint out of the lines, just let it air dry, and then use a toothpick to scrape off the excess where you don’t want it to be. Use a soft brush to brush out all the “crumbs”. Why not pop it in the fridge instead of waiting for it to air dry? Because that will cause the chocolate to release from the mold, and when you try to clean it up with the tooth pick, the whole piece of colored chocolate will pop right out. And then you will cry, and have to start all over.

This is what the outside of the mold looks like after the inside has been painted.


Then fill both cavities with melted chocolate in the color of your choice. Make sure the chocolate is cool to the touch. If it is too warm, it will melt your colored accents and they will run and smear. And then you will cry, and have to start all over again.

Edited to clarify: The above mold is the 2 pieces of the box. One side is the top, and the other side is the bottom part of the box with the cavity for the candies already in there. When you unmold it, the 2 pieces come out as you see in the finished product. I apologize for not getting a photo of the bottom part of the mold empty.


I put it in my freezer for 12-14 minutes, and then the 2 pieces come right out of the mold with a gentle tap. Let them come to room temp in cool room before you touch them. If not, you will get finger marks on the condensation you will not be able to repair. Then you will cry, and have to start all over again.
Isn’t he cute???
All packaged up and ready to be delivered by the real Easter Bunny.
Wishing all of you a blessed and peaceful Easter with your family and friends,
Sharon
www.sugaredproductions.com

Christmas Goody Baskets

December 23, 2008 by Sharon Zambito 15 Comments

They are finally done! Hooray!
I finally got the baskets all done. Whew! I did 18 of these babies in total, mostly for hubby’s employees and colleagues, and a few for friends and family.
Here is all the loot lined up ready for the assembly line. I was so pressed for time that I did not have time to set up the lights for really good photos. I apologize for the quality of these shots.

Heather and I searched and searched for hours for a good basket supply source and she found them here: Baskets. I absolutely love this place. They have the largest selection of baskets and colors I have ever seen, great customer service, reasonably priced and the baskets were great quality. This is now my go to place for baskets.
In addition to the things I already showed you, I also made some candy cane cookies covered in textured red fondant, some large square transfer cookies, dipped pretzel rods, and small squares with a candy cane sugar lay on top.
I also added some purchased items: Hershey’s candy cane kisses, and choc covered peppermint sticks ( hard to see in pics). I think the baskets would have looked better had I not bagged everything, but live and learn.

I always use shrink wrap on my bags to get a professional gourmet basket look. Coordinating bow and it is done!


————————————————-
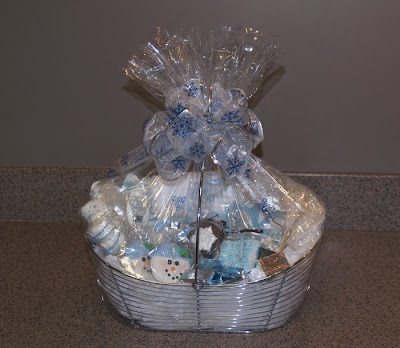
Here are some pics of the baskets from last year, a snow theme:


Sugar cookies, snowman cookies, marshmallow sticks, rock candy sticks, decorated sugar cubes, snowflake Oreo molds, chocolate coffee spoons, and hard candy snowflake suckers.
The little mint candies are made with a personalized candy mold that says The Zambitos. You can get them here.
You can get the Oreo molds here.
Sugar cookies were fondant covered and over-piped with royal icing.
Shrink wrapped and ready to gift!
——————————————–
So now I have to do a cookie order, and get my house ready to host Xmas dinner. No rest for the weary, and boy am I weary! Please send me pics of the goodies you guys made this year.
I wish you all a very Merry Christmas and a happy and prosperous New Year!
Hugs and love, Sharon


More Basket Goodies

December 9, 2008 by Sharon Zambito 9 Comments

Here it is 2 AM. I am exhausted, but I am so pumped up on caffeine and have so many things running through my mind I can’t sleep. I am burning the candle at both ends here trying to get everything done that needs to get done before Christmas. I am sure you guys are going though the same thing. Between working on these basket items, shopping for gifts, trying to get the house ready to host Christmas dinner, along with the normal daily chores of laundry, dishes, and homework, I feel like I need a clone! I love the holidays but they are are a lot of work!

I promised some more pics of the things I am making for my candy cane themed gift baskets this year. Here are sugar cookies decorated in fondant. You can see how tall that cookie is next to the ice cream dish. I got the cutter here.

White chocolate covered pretzels and Keebler shortbread cookies. After the white chocolate was dry, the red chocolate was piped on and red sanding sugar sprinkled on.


The artist in me thinks the basket goodies should only be done in red and white in order to really keep with the theme. But I know everyone does not like white chocolate, so I incorporate some milk chocolate items as well. Again, here we have pretzels and shortbread cookies in the back. In the front are dipped Oreos with crushed peppermint.

Marshmallows dipped in white chocolate with peppermint crunch and peppermint powder. Of course you could make your own with peppermint candies but I am way to lazy..um… busy for that!


I am still not done! I have a few more things to make for the baskets, and I am working on a big cake project too for my sister’s office party. But I can’t tell you what it is because she reads my blog. Stay tuned for pics next week.

So tell me what kinds of things you guys are working on for the holidays.

_____________________________________
Also just wanted to drop a reminder that the Design Gallery DVD will be shipping Wednesday! YAY! Finally! And this week I am going to announce another give-a-way, so stay tuned!

Happy Holidays!

Sharon
http://www.sugaredproductions.com/


Oreo Madness

December 4, 2008 by Sharon Zambito 28 Comments

What could be better than Oreos? Maybe Oreos covered in chocolate!
This post is dedicated to my dear friend Suze, and she knows why. What’s that? You want to know why too? No, I really should not say. Oh, you really want to know that badly? Well, OK, you forced it out of me. But please don’t tell her I told you this: she stinks at chocolate dipping Oreos!

The beauti–licious, yet dipping impaired Suze.
Last year I made the snowmen cookies below for the themed gift baskets I make every year. (They were a total copy from the wonderful site, FavorZ.)
Well, Suze tried to make some too, but let’s just say they came out, um, …well, ….not as good as she hoped for. So I started to rib her about it, and that gave birth to a friendly and good natured rivalry between the 2 of us and our confectionery skills. We try to poke fun at each other whenever we can.
So of course, Suzie came first to my mind as I was working on these chocolate dipped Oreos for this year’s baskets. I figured if I snapped some pictures and put together a little tutorial here, it might help her out. (Doubtful, but hey, what are friends for?)
These cookies are dipped in super white candy melts and chocolate transfer sheets in a candy cane design applied to the top. Cut the transfer sheets into little squares that will fit on the top of your cookie. Melt the candy melts till very smooth and creamy. I prefer the Merken’s and Guittard brands, as they perform the best. If the chocolate is low quality, or old, it will not melt nor cover smoothly. Be careful not to overheat or get water in the candy; that will ruin it as well.
Brush the Oreos with a big fluffy food brush before you dip them to avoid excess crumbs from getting in your melted chocolate. I use a large 3 pronged fork to dip the cookies. I dip, then let most of the excess chocolate fall back into the bowl, then place them on parchment or wax paper.
Gently place the transfer sheet squares on top and gently press it into place on top to make sure that chocolate comes into contact with all of the design.

I do about 5-8 on a cookie sheet and then pop those in the freezer for 5 minutes. Chilling them makes the design transfer over fully and cleanly, as well as giving the surface a nice shine. Just pull the transfer sheet square off when you take them out of the freezer. Don’t worry about the little bit of chocolate mess at the base of your cookies. After they have come back to room temp, you can take your handy palette knife and clean up the bottom edges.


By the end of your dipping session, your chocolate is still probably going to be “contaminated” with chocolate cookie crumbs, making it not very useful for any other purpose. So I crumble up all the broken Oreos that I did not dip into the chocolate, spread that on the parchment, chill, and break it up into a cookies and cream bark. YUMMY!

All the items in my basket are going to have a candy cane/peppermint theme. I do a different theme every year.


I will bag each of these individually and tie with a red ribbon before I put them in the baskets. If I place them unwrapped into the baskets; the transfer surface might get scratched and marked up by other items, and we just can’t have that! Not after all this work!


Maybe if Suze reads this she can give it another go. Of course, if she does read this I am in big time trouble. LOL

I hope you all get a chance to try this. Send me pics of your projects if you do! Even better, send all your pics to Suze! Tee hee hee.

Have fun making all of your holiday treats! I will try to post pics of more of the things I am working on if time permits. Such a crazy time of year, isn’t it?


Happy Holidays Ya’ll!

Sharon
http://www.sugaredproductions.com/


Yum to the Oh!

November 24, 2008 by Sharon Zambito 14 Comments

That is hip talk for Yummo. I know, lame attempt. I may not be hip but I can sure make a mean cake ball.


Hail the cake ball in all its glory.


Cakes balls (also known as cake bites for the more demure) have been popular on the cake message boards for as long as I can remember. It’s a great way to use up the scraps you save in your freezer when you level and carve your cakes. What? You don’t freeze your scraps? Well, you must start to do so now so you can partake of this delightfully delicious delicacy.


I usually have a boat load of scraps in my freezer at any give time. Since we travel the globe on holidays (OK, we house hop, but traveling the globe sounds more glamorous), it is the perfect time to get those scraps out and do some rolling!


My son J said he would make them with me, but I got ditched for a playdate with a friend. So I was thrown into cake ball world all alone. No worries… I put a little music on, got a big fizzy Diet Coke from the gas station (fountain only of course!), and I went to town.


You will find many variations of how people make the balls. Some add icing or filling or liquid flavored coffee creamers to the scraps and then mash them all up. I find that makes a mushy ball with my cake recipe, and I don’t care for that. I find the cake to be moist enough that if I just squoosh and moosh the scraps together very well, they bind together perfectly and are wonderfully moist as is.


I roll the balls and dip them right away into melted chocolate. Some folks freeze/chill the balls before dipping, but when I do that the chocolate cracks from the cold. I just dip them right away and they hold their shape beautifully .


I use candy melts (also known as candy coating) rather than “normal” chocolate. Candy melts do not have to be tempered. Regular chocolate must be tempered or it will bloom (get terrible white spots all over it). Melts are not as high of a grade of chocolate, but they taste fine to me, plus you won’t see any tempering going on around these parts. ( Too lazy, um I mean overbooked). If the chocolate is a little old (or cheap), it might not melt to a very smooth liquid state. In that case, I add some melted paramount crystals to get it flowing nicely again. It also gives the shells a nice soft bite in the mouth and they do not crumble all in your hands.
So now I have about a bajillion cake balls in Tupperware ready to travel the globe with us on Thursday. Hope you guys try it out if you have not already.


YUM. OH.

Happy Thanksgiving Everyone!
Sharon
http://www.sugaredproductions.com/


Chocolate Monogram Favors

August 29, 2008 by Sharon Zambito Leave a Comment

Be gentle with me folks. I am not very computer savvy. No really. I am bad. Ask my 2 friends Heather and Kim. I am sure those 2 poor girls wish my PC and I had never met.

Heather, who is my BFF (we live close by but we met on a cake message board many years ago), is awesome with graphic arts. She is our Webmaster, logo designer, and is creating the covers for the upcoming DVDs. Heck, I can’t even log onto my own website to work on it. Sad, I know. She has to do it all. And all for very little pay. OK, OK, no pay.


Kim is a computer guru by profession, but an awesome caker as well. You may know her work. She calls herself a newbie, but we all think she is lying. Her cakes are too darn good. She helps me with all the technical/operational computer junk. Things like doing updates, backing up files, maneuvering windows, downloading, troubleshooting….all that kind of icky stuff.
 

Here is the lovely Kim (and me) at my Baton Rouge class I taught with Jen Dontz.

Not to mention that the SugarEd girls also listen to my non stop brainstorming, obscessing and generally constantly asking for advice. I honestly do not know what I would do without the help of my team. They are so good to me, and I do not deserve them. (You will meet more of them later.)


So, now that I am armed with the knowledge that these 2 wonderful women have imparted upon me, I am going to now dip my toes into the waters of blogging. Oooooooooooooh, it’s cold!…….. Deep breath. ……….Here I go:

A few weeks back, one of my all time best customers and ex-neighbor asked me to make a baby shower cake for her SIL. Well, turns out that MIL went and ordered a cake from somewhere else (GASP), so Tracy asked me to do the favors. She wanted me to make monogram favors out of chocolate to match the monogram on the invitation. (Not anticipating at the time that I would be blogging, I threw the invitation out, so I cannot show you how wonderfully I matched it . (Grin.)


I had no molds that would do for this job, so I decided to cut the candy discs with cookie cutters from poured out chocolate. I had never really done this before, so there was a little trial and error involved. I tried using parchment, plastic wrap, my silicone mat, and silpat under the chocolate but none worked well. I found that using plastic sheet protectors worked perfectly. Now, I cannot tell you if using those is food safe or not, so I am not telling you that it is. You will have to use your judgement on that one. You can however buy food grade acetate for chocolate work that would be fine. (I had none and no time to get any , so I decided to live dangerously this once.)

Here is a sheet protector on the counter with spacer strips on each side. These are called perfection strips and you can get them at Country Kitchen Sweet Art. They make sure you get the chocolate level all the way across your field. I placed them on the thinner sides and I think the chocolate was about 1/4 inch think, but do not quote me on that.


You melt your chocolate (I used candy coating cuz I am not about to temper anything in this life time) and pour it out on the sheet. Use a food grade ruler to spread the chocolate out, resting it on the spacer bars to make sure the chocolate is spread out evenly along the sheet. I could not take a picture of me doing this, because it took 2 hands to do it, and no one was here to take the pictures for me. Ah, such is the life of a lonely baker…..

Now go get a Diet Coke from the gas station soda fountain (because they have the perfect balance of carbonation and syrup), and wait for the chocolate to set up. You have to wait for the surface to turn dull and firm. If you tap it lightly with your finger you will not mark it, but if you press firmly you will. It will still be slightly warm to the touch. How long will this take? It depends upon how cool your room is, how hot the lights are, how fresh your chocolate is. I had my portable A/C on in my cake room (his name is Jack and I love him so) so it set up in probably 15-20 minutes.

Then take your cookie cutter (which I also failed to take a picture of) and cut into the chocolate. If it makes a nice clean cut, you are doing fine. If the edges of the cut are kind of squooshy, it is not ready yet. Press it hard so you cut all the way down to the bottom. If you are using crappy cheap chocolate like in this picture, it might be hard to get the cutter out. (Yes, I can say crappy . This is my blog and I can say it. Gotta love that. (Wink.) Hence all the fingerprints on the chocolate. I actually ended up doing these again a few days later when my good Merkens chocolate came in and it was clean and beautiful. The cutters came right out. No finger prints. It is amazing what a difference a good vs bad product can make. Again, I was only taking these pics to send to Kim (she is so needy, sheesh), and not expecting to use them on a blog tutorial, so I did not take pics with the good chocolate. Let’s just pretend this one looks pretty, kay?

Now, go to the gas station and get a refill on your Diet Coke. Yes, I drink that much Diet Coke. Doesn’t everyone? Then get on the computer and IM with your buddies for a while until the chocolate sets up nice and firm and is totally cooled off. I guess you could do other things like clean the kitchen or help your kid with homework, if you are into that sort of thing. (J/K, I do those things too.)


Then take the cutters and go back in again, into the same cuts, to make sure the bottom is cut all the way through. I found that if I did not do this, the underneath side had kind of melded back together and the pieces would not break off clean. Now transfer the sheet to a cardboard and score the chocolate around the blossoms with a sharp knife. Pop that in the freezer for 6-9 minutes until set up totally. The blossoms will just pop right out perfectly clean with beautiful edges. Do not touch the tops or you will get finger marks. Let them sit at room temp, and all condensation must dry before you work with them again.

I did the exact same thing with the white chocolate to make the circle discs. Merkens, not the crappy stuff. Attach the 2 pieces together with some chocolate and pipe the monogram with royal icing. I used a clay gun to make the pink string border. The party theme was pink, brown and white, so I wanted to get all 3 colors in there. So here is the finished product. They were about 3.5 inches in diameter.


And just for fun, here is a pic of the coordinating cookie favors. Sugar cookies with textured fondant, candy pearls and luster dust. Tracy loved them. Hmm, I wonder if their cake was dry.

OK class, your homework assignment is to go make some cute chocolate cut out thingies. Email me the pictures of your creations and I will post them here.


Happy Caking!


or should I say Happy Chocolating


or Happy Chocolatiering


Happy ……um…… Messing with Chocolate

Whatever……….get going!!


Sharon

SugarEd Productions

  • « Previous Page
  • 1
  • 2
  • 3
  • 4

Sharon Zambito

Sharon Zambito

An RN turned SAHM turned cake maniac. Owner of SugarEd Productions Online School. Join me for some caking, baking, and all around sweet fun :)

Follow me..

  • Facebook
  • Instagram
  • Pinterest
  • YouTube

Pinterest

  • Autumn House Two Trees Machine Embroidery Design – Blasto Stitch
    Autumn House Two Trees Machine Embroidery Design – Blasto Stitch
  • Embroider  Sew :: Jelly Roll Purses - Embroidery Garden In the Hoop Machine Embroidery Designs
    Embroider Sew :: Jelly Roll Purses - Embroidery Garden In the Hoop Machine Embroidery Designs
  • (1) How to QUICKLY & SAFELY remove acrylic, gel, and dip powder polish | BAGGY METHOD - SO EASY! - YouTube
    (1) How to QUICKLY & SAFELY remove acrylic, gel, and dip powder polish | BAGGY METHOD - SO EASY! - YouTube
  • (1) Bouffant Surgical Cap - YouTube
    (1) Bouffant Surgical Cap - YouTube
Follow Me on Pinterest

Follow Me on Instagram

Instagram requires authorization to view a user profile. Use autorized account in widget settings

Recent Posts

  • Egg Safety Basics
  • Stable Mabel Support System Sale
  • Guest Post : 4 Vegan Cake Recipes No One Should Miss Out On!

Popular Posts

  • Ways To Make Your Cake Fluffy And Moist
  • How To Stencil on Cookies with Royal Icing
  • Doctored Cake Mix Recipes
  • Transferring an Image Without a Projector
  • All About Buttercream!
  • How to Fix Broken Ganache
  • Edible vs Non Toxic Gold Dusts

Categories

Search

Archives

Copyright © 2025 · Sharon Zambito and SugarEd Productions,LLC

Copyright © 2025 · Evangeline Theme on Genesis Framework · WordPress · Log in