Sugared Productions Blog

  • Blog Home
    • Home
  • Online Classes
  • Shop
  • Contact
  • About

Peppermint Fudge

December 18, 2012 by Sharon Zambito 5 Comments


Hey guys!  We don’t have much time!  Only one more week.  Are you ready?


Me either.


Still need some  ideas for quick and easy goodies? Yeah, me too.


How about some super easy Peppermint Fudge:

Ingredients:

  • 8 oz. cream cheese, at room temperature
  • 4 C. confectioners’ sugar
  • 1 1/4 t. vanilla extract
  • 12 oz. Ghirardelli White Chocolate baking bar ( I used almond bark from the grocery)
  • 1 C. crushed peppermint candy canes
Directions:
Line an 8 inch square baking dish with waxed paper and set aside. In a large bowl with an electric mixer, beat together cream cheese, sugar and vanilla at medium speed until smooth. Melt the chocolate, stirring occasionally until smooth.Stir the chocolate into the cream cheese mixture and add the crushed candy canes. Reserve a couple tablespoons to sprinkle on top. Spread the mixture into the prepared basking pan. Chill in the refrigerator until firm, at least 2 hours. Cut to package or to serve.


If you want to form the fudge inside cookie cutters to make a cute gift, press the cutters into the fudge while still soft.


Make sure the cutter is pushed all the way through to the bottom. I added a few more crushed candies inside the cutter. After it was chilled and set, I just broke away the large pieces to  reveal the cutters with the fudge inside.  The outside of the cutters did need to be cleaned off, but that was quick and easy with a paper towel.


Minty snowy flakes.


Bag them up and they make a great little gift or party favor.

The parts of the fudge that was in the pan surrounding the cutters can be cut into squares. Nothing goes to waste! Yay us for being lazy busy and smart!


At first I thought the candy canes might not give it enough minty flavor, but  once it was all set up, it was plenty strong enough. They were yummy, creamy, with that delicious cream cheese undertone.

Give peppermint fudge a try and let me know how you like it. I am now going to go do that laundry. Maybe.

Happy Holidays!

Sharon

Homemade Marshmallows

December 5, 2012 by Sharon Zambito 29 Comments

Heya Sugar friends!

I’ve got another installment of the I’m too lazy busy to make complicated goodies this year blog series!

I have always wanted to try homemade marshmallows but just never got around to it. The other night I just had a notion to give it a try. (You know, when I really should have been doing laundry. Inspiration hits at the oddest times, doesn’t it?) My younger son loves marshmallows, and I wanted to see if homemade were as good or better than store bought.


Recipes with cooked sugar can be intimidating for lots of folks, but I am here to tell you this was really easy and fun to do. Did not take a lot of time either. I am not a cook by any stretch of the imagination, so if I could do it without having to call 911, you can too!

Ingredients:

  • 2 teaspoons butter
  • 2 envelopes plain gelatin powder
  • 1 cup cold water
  • 2 cups granulated sugar
  • 1 cup light corn syrup
  • 1/8 tsp salt
  • 1 tsp clear vanilla flavoring
  • assorted colored sugars and sprinkles
Directions:
  1. Line a pan with foil and grease it liberally with butter. I used a 9 inch square pan to get tall marshmallows I could cut into cubes.
  2. In a mixer bowl, sprinkle the gelatin over 1/2 cup of the cold water and set it aside.
  3. In a heavy saucepan, combine the sugar, corn syrup, salt and the rest of the water. Bring to a boil, while stirring occasionally. Bring to 240 degrees on a candy thermometer or to soft ball stage.
  4. Remove from the heat and gradually add to the gelatin with mixer on low speed with whisk attachment. Turn up to high speed and beat until it is thick and fluffy and doubled in volume. It will look similar to marshmallow cream you get in the jar, but a but thinner. This takes about 15 minutes. Add the vanilla and mix in well.
  5. Spread into foiled pan with a buttered spatula. Cover with foil and let sit overnight.
  6. Lift the foil out of the pan and peel away from the marshmallow. It will come away easily as the marshmallow should be very firm at this point.
  7. Cut into squares with a non serrated knife greased with butter. Clean the knife under water, wipe dry, and re-butter before each cut, in order to get clean pretty edges on the marshmallow cubes.
  8. Roll them in sprinkles or colored sugars. If you do not want to add sprinkles, just roll them in powdered sugar and shake off the excess.
Note: soft ball stage is the point when cooking the sugar, that you can drop a small amount with a spoon into a glass of cold water, and you are able to gather up the sugar with your fingers and roll it into a flexible ball. This really works and is easy to do. I found my candy thermometer broken in my utensil drawer, and I used the soft ball method to make this batch. They came out great. Don’t be scared to do it that way if you do not have a candy thermometer.


 The 2 inch deep cake pan after marshmallow was spread in.


The next day the foil came away easily from the sides of the marshmallow as you can see here. Then I just proceeded to cut it into cubes and garnish them.


EASY


These would be so cute on your holiday dessert table. Or even as a nice homemade gift. (You would have to make them close to gift giving day because I am not sure how long they last with no preservatives in them.)

Or how about dipping them in mint chocolate to make hot cocoa stir sticks:


And just for fun……….

I had a little bit of the mixture left over when I filled the square cake pan, so I put that in another pan. It made a shallow sheet of marshmallows, which I experimented with cutting with cookie cutters.


 It worked great!


 I just greased the cutter well with butter and cut them out. Worked like a charm!


How cute are these wintry trees?

And they tasted great too! The texture was perfect. Every bit as good as the ones from the bag, if not better. So if you guys have been wanting to try this, I encourage you to do so. Let me know how they turn out for you.

I gotta run now, that dang laundry is still sitting there.

Or maybe I need to make some Christmas cookies right now………

Happy Holidays!

Sharon

Thanksgiving Tutorials

November 15, 2012 by Sharon Zambito Leave a Comment


Gobble Gobble my sugary friends! 


Thanksgiving is next week!  ACK! I am not ready!  So much to do between now and then, and then we go right into the Christmas rush. ACK! I am not ready!  😯


I thought it might be helpful to you guys to put together a post here with Thanksgiving tutorials from the archives. Might spark a few ideas as you crank up for all the T-day festivities. Click on the title below each photo to get to the tutorial:


TURKEY CAKE BALLS


PILGRIM PUMPKIN MINI CAKE


3D TURKEY COOKIES


PUMPKIN PIE CAKE


PERFECT PUMPKIN ROLL

TURKEY CAKE TOPPER (LINK)


TIPS FOR PERFECT CAKE BALLS

I want to take this opportunity to tell you how thankful I am for all of you. For your business, your encouragement and loyalty, but mostly for your friendship. You all have enriched my life in ways I could never adequately explain. I wish you and yours a beautiful, peaceful and Happy Thanksgiving.

Sharon

www.sugaredproductions.com

Witch Hat Brownie Bites

October 26, 2012 by Sharon Zambito 15 Comments

Hello sugar friends!

Those of you that follow me on facebook  know that I have a new love in my life.  My new schnoodle puppy, Lucy. We have never had a dog before, only cats, so this is quite a different experience. All I can say is that we are head over heels, over the moon, crazy in love with our sweet little girl.


She has the best personality and temperament,  is smart and trains quickly, and is simply off the charts cute. Some of my Facebook friends think I might be a little obsessed with her, but that’s just nuts. Just because I post pictures of her every day, have bought her an entire wardrobe of doggy clothes, and hand feed her food with a platinum spoon does not make one obsessed.

So look at my cute baby in her Halloween costume! Lucy the candy corn witch:


 Are you dying of cuteness ?


Since my other obsession is cakes and confections, as soon as I put her in the costume I had an inspiration for a cute idea: candy corn witch hat cake bites. But I did not have any cake baked. I had brownies baked. So I used them instead. (See my last post about being lazy busy.)

Let me show you how I made them:


You will need candy coating (any brand) in the colors you like, or start with white and color it with oil based candy colors.


I wanted a former to make the hats, because I knew hand forming them would not give me the precise and uniform look I wanted. I was going to use those pointy paper cups that you see at the water cooler, but could not find any. So I thought I would try using ice cream cones themselves to form the hat tops, but when I opened the box I saw the styro protector they were in, and that looked perfect to try.  So I cut off a piece from the top to the size I needed.


Shown here are the two halves of the protector, separated. I took a wad of brownie and mushed it up really well. It was very sticky so I rolled it in powdered sugar, and laid it in the former. (I know it looks kind of gross, but it is Halloween after all!)


Then I closed the former, so that it encased the brownie mixture, and packed it down in the center with my finger.


 Next I inserted a long toothpick down into the brownie.


When you open the former you have a perfect cone shape. Also note I made a mark on the inside of the former so I would fill all of them to the same height.


Use the toothpick to dip the brownie into white candy coating and let all the excess drip off.


I put the candy coating into paper cups (bathroom size) to make the dipping easy.


 Stick the coated cone into some styro to dry fully.


When the white coat is dry, take the cone off of the toothpick and hold it at the point.


Dip into the orange chocolate to make that layer. Allow the excess to drip off.


Stick it back on the toothpick to fully dry. Then repeat with the yellow coat.


I made the hat brims with yellow candy coating poured into the bottom of muffin pans. Pop into freezer for 5-7 minutes and they come right out the pan. (I promise this pan is clean, just well used and stained.)


I used black fondant to cut strips with a strip cutter to form the hat band and tiny bow.


I was not sure if my idea translated the way I wanted it to, so I asked my son if he knew what these were, giving him no clues. He said they looked like hazard cones. That is now burned into my mind, and when I look at them I can see nothing else. Dang kid; no Halloween candy for him!


 Caution: construction ahead! Oh wait, that’s not right.


 Cute Halloween brownie bites!


 Sweet Lucy the candy corn witch.


 Cute candy corn hazard cones witch hats.


They were easy and fun. If you are not into the hazard cone theme, these would be great in traditional colors of black, or a combo of black, green and purple, or black and orange…..

I also see some Christmas trees done this way in our future.

Let me know if you try them!

–

–

–

And in the interest of full disclosure, here is what Lucy really thought of her Halloween costume:


 HAPPY HALLOWEEN EVERYONE!

Sharon

www.sugaredproductions.com

 Thank you to Katharine Bentz Photography for the beautiful photos. (Yes, the craptastic ones are mine.)

Visit out online schhol

New Year’s Chocolate Party Favors

January 4, 2012 by Sharon Zambito Leave a Comment

HAPPY NEW YEAR!

Can you believe another year has gone by?  Boy it goes so fast.  I hope all of you had a wonderful and magical holiday season.
I have one last tutorial for you for this year. I realize I am probably posting too late for you to get the supplies and make these this year, but hopefully you will tuck this idea away  in your files for next year.

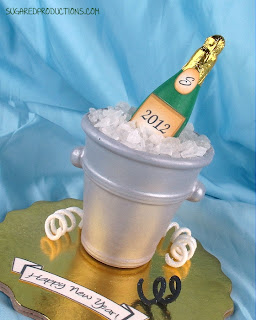
 Let’s make these adorable chocolate party favors. They stand about 5.5 inches tall.
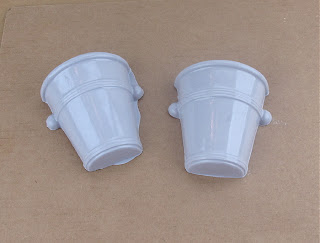
Gently melt the super white candy melts and tint it gray with oil based candy colors. Then fill both halves of the ice bucket mold. Pop them in the freezer for  about 10-12 minutes until they easily release from the mold.
Here are the two sides.
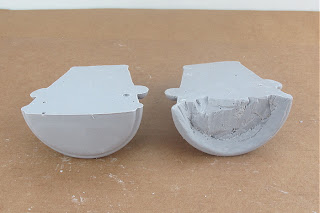
You can see by  looking at the half on the left that the mold has the chocolate coming up above the surface of the bucket. We have to carve some of that out with an exacto knife so that the bottle and ice can sit down in the bucket. You can see this was done on the half on the right.
Here are the two sides standing up for another angle showing how the halves need to be carved out.
Glue the two sides together with melted chocolate and smooth all the seems and imperfections with a knife and super clean (or gloved) fingers.
Now we break out the magic stuff. Silver luster dust dry dusted on top of gray chocolate (or fondant or gumpaste) will have a very realistic silver metallic look.  (Make sure you buy an edible luster dust.)
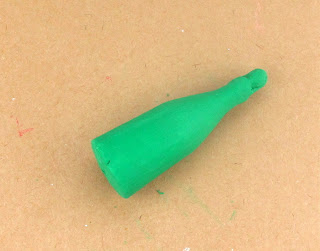
Then melt and color more chocolate green. Mold and chill the bottle halves.
Pop them out when ready.
Again join the two halves and smooth them out.
Cut the bottle at the height you want it to stick out of the bucket, with a little slant on the bottom.
Spray the bottle with about 3 coats (drying in between) of edible lacquer to give it some subtle shine.
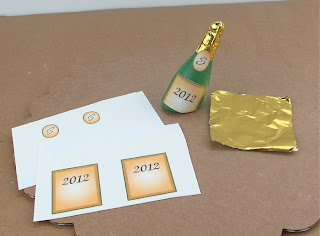
Edible icing sheets are used to make the labels, and candy foil to cover the stopper.
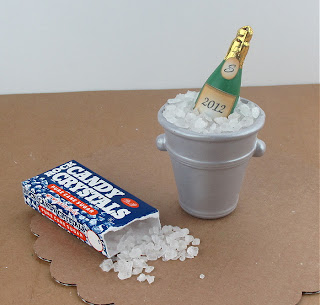
Glue the bottle in the bucket with more chocolate, and add rock candy  for ice.
A photo for size reference.
These would make great table decorations. They would also be fabulous party favors if boxed in clear plastic boxes.
 HERE IS TO 2012!
All of us here at SugarEd Productions wish you  a prosperous and healthy year; filled with love and laughter and success. We sincerely thank you for your patronage, and look forward to serving  you in 2012.
Happy caking!
Sharon
www.sugaredproductions.com

Edible Holiday Place Cards

December 19, 2011 by Sharon Zambito 21 Comments

It’s The Most Wonderful Time of the Year!
Don’t you just love the holiday season? I sure do. I especially love all the festivities and get togethers with loved ones. I am planning an intimate dinner party this weekend with just my closest of friends. I hate those big ole stuffy parties where it is so crowded and loud you can’t even talk to anyone, don’t you? I prefer a much more intimate setting. That is why I am doing a sit down holiday dinner. I have invited 6 of my closet friends. I cannot wait!

I have made these beautiful edible placards to put on the table. I just hate it when everyone fights over who is going to sit next to me. So awkward. These should solve that problem! 

Let me show you how to make them, they are easy!
(You can click on the photos to make them larger.)

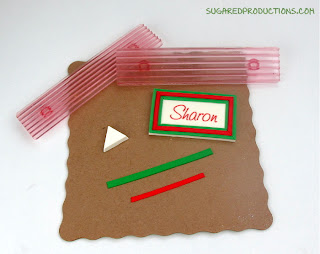
Print the names in the size and font you want on edible icing sheets. I like Kopykake brand. (You have to use an edible ink printer to make these food safe.)

Cut them out and lay them face down into the place card chocolate mold.


Pour melted white chocolate into the card molds and the little stands too.


About 8-10 minutes in the freezer and then they will fall right out of the mold. Now the edible image is embedded into the chocolate and it looks seamless and like all one piece! Love that.


To decorate these, I piped royal icing bead borders with a tip7. Let that dry a good bit and then paint them with  gold luster dust mixed with vodka. Let that fully dry. Then add a red
clay gun string ( the smallest round disc)  as  a decorative border inside the gold piping.


Attach the stand to the back with chocolate.
I also used these premade royal icing decorations that I purchased here.


Isn’t  that just beautiful? I think Martha will be a little jealous of my mad crafty skillz. 🙂

Your guests will be awed by the fact that these are edible, and even more so by the fact  that you made them.


I also made another design for my New Orleans pals.  Many of you know that I am a devoted native of New Orleans, and  just adore our culture and history.   I wanted to make something special for my local buds.


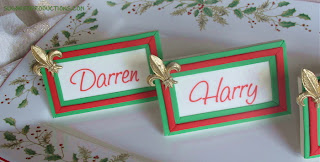
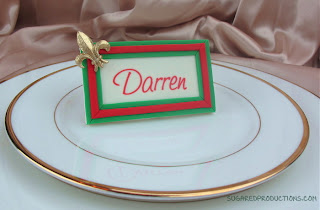
For these, I used my strip cutters to frame the cards with red and green fondant.


I used my fleur de lis push mold and white fondant to make the decorations. I painted them gold after they were dry, then attached them to the cards.
Lovely.  I think Drew will be impressed. Yes, Drew and I are close personal friends. (He just doesn’t know it yet.)
Darren (Sproles) and  Harry (Connick) will shower me with compliments.
What? You don’t believe that I know Harry?
Let me prove it to you then:


Right after this photo was taken he proposed. But I had to say no because I am already married.
Back to the place cards:
I think the fleur de lis is especially fitting for Drew.
Darren also, since they both play for the Saints. Who Dat!
Harry loves his coffee and dessert.
I cannot wait for my party!
I hope Oprah does not drink too much and hit on Donald like last year.
I hope you guys give these a try; they are really fun and easy to make.
And be sure to join us on Facebook for our related Give-away!
Happy Holidays Everyone!
Sharon
www.sugaredproductions.com

Turkey Cake Balls!

November 14, 2011 by Sharon Zambito 20 Comments

Welcome to post #2 of my Thanksgiving Blog Blitz!  I will have a new blog post for you every few days from now until Turkey day. I hope you enjoy.


It’s Turkey Season!
Yay!


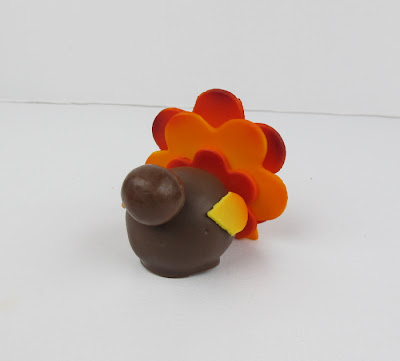
I don’t know about you guys, but I have  serious crush on cute little turkey themed treats. I love seeing all the adorable confections that people come up with  this time of year. I did a post a couple of years ago about Thanksgiving cake balls, which we make every year. But I wanted to kick them up a notch this year, and turn them into something  more fun and eye catching.


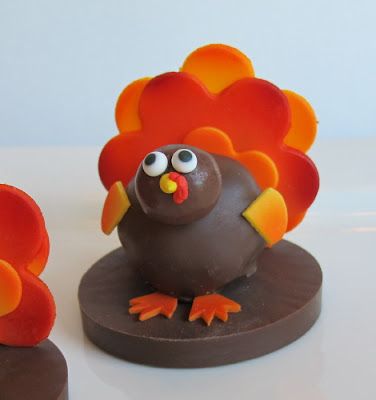
And here is what I came up with:


Tee hee hee.


They tickle me pink. Well, they tickle me orange and yellow, anyway.


Here is how you make ’em:


You will need Whopper candies and your dipped cake balls in the flavor of your choice.


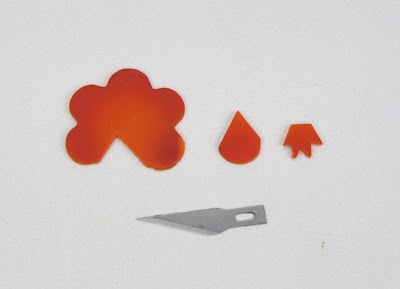
Cut the fondant  “feathers” by  using 3 sizes of blossom cutters. See the brown ones? Ignore those. I decided later that I did not like the brown feathers so I  left them off.


If you like, hit the edges of them with some airbrush color to make them pop and give them dimension.


To make the little front wings,  cut two petals out of a blossom with an exacto knife.


Attach a whopper for his head, 3 blossoms for his fan of feathers, and his side wings with melted chocolate.


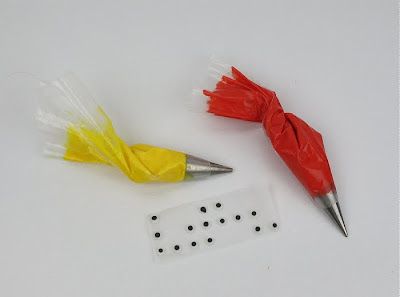
Attach candy googly eyes, and pipe his beak and that jiggly red thing with royal icing.


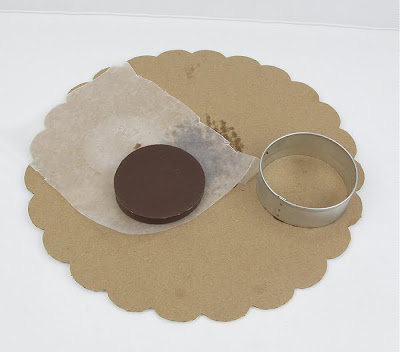
To make the base he is standing on, pour some melted chocolate into a round cookie cutter that has some wax or parchment paper under it.


Pop it into the freezer until fully firm and release it from the cutter.


Use two more petals cut and carved out with a knife to make his feet.


Attach the turkey and his feet with chocolate to the base.


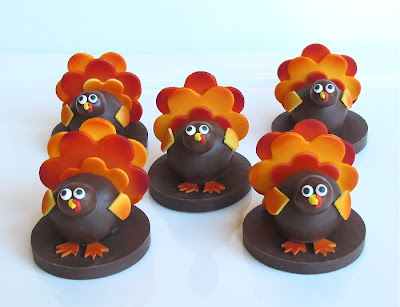
SO STINKIN ‘CUTE!


What you lookin’ at Willis?


I simply adore these turkey cake balls. I can see them sitting on top of a bread plate at each place setting on the Thanksgiving dining table.  Your guests will simply go nuts over them, and you will get rave reviews for being such a clever confectionery creator.

;

I hope you try them out!


Happy turkey-ing,
Sharon
www.sugaredproductions.com


PS. You can learn how to make perfect cake balls step by step in our online school.


Halloween Marshmallow Pops

October 13, 2011 by Sharon Zambito 24 Comments

Boo!


Did I scare ya?


Probably not, as you intentionally logged onto this post. 🙂


Monster Marshmallow Pops Tutorial


One of my very favorite holidays is upon us. Halloween is a confectioner’s dream, as it provides an opportunity to make some of the cutest tasty treats evah. Let me share with you some I made this week. These were a lot of fun, and not very difficult nor time consuming. They get extra points for that!


Halloween marshmallow pops

Meet Broomelda and Franque. (He is French).


Initial supplies used to make our cozy candy couple include yellow candy melts, green oil based candy color, marshmallows and sucker sticks. I highly recommend Merkens brand melts for optimum dipping performance. In this case I used the campfire roasting marshmallows. Have you seen those things? They are hugantic! They are as big as…..as ……as a giant marshmallow! I also suggest using the thicker sucker sticks, as these bad boys are heavy once they are done.


Big bowl of green melty chocolate.


Other supplies used will be these candies and pre-made googly eyes, that you can get at most cake decorating places.


For Broomelda, we have to cut angles off each side of the gargantu-mallow. Run your knife under hot water, and dry it off before each cut. This will make the cutting of the freakishly large marshmallow much easier.


Stick and dip. Place on wax paper to dry fully.


Let’s do Franque first:

Cut out a circle of black fondant and cut out notches along the outer edge. Do not cut them evenly or symmetrically. Franque does not have the most couture coif I have ever seen. Just sayin’.


Lay the toupee over his head and just press down all around the sides. (Hint: use shortening as your glue. Trust me. You will thank me for this later.) Glue on his googly eyes with melted chocolate. Cut a white Good & Plenty in half and glue in place for his bolts. Give the rest of the box to hubby because he loves those nasty candies. Oh wait, that is my hubby. Ignore that. Next use a paintbrush to drop a dollop of the same green chocolate on his handsome face to make a nose.


Next we need to bring out the big guns. OK just one small gun. Anyway, get your clay gun out, and using the smallest size circle disc, extrude a string of black fondant. Use that to make eyebrows and mouth. Again, using shortening on his face as glue will save you many bad words. And if you just cannot help yourself (like me), use silver luster dust mixed with vodka to paint his bolts. An edible marker (not shown) can be used to make his scar.

You mad confectionery scientists will have
created a marshmallow monster!


MWAHAHAHA!

Now on to Broomelda:


Marshmallow pops


As with all ladies, we need to spend some time on the hair. Use your clay gun with the largest muti hole disc.


Extrude a length of purple fondant and apply to the side of her head.


Repeat process on each side until her head is covered.


Cut a few short pieces to make her bangs. The bob is very in this season in the witch world.


Now to make her face. Clay gun string again for the brows and mouth. Half of the green Mike and Ike candy for the nose. (Keep that box cuz we like those.) Another pair of google eyes.


Well hello my pretty!


To make the pointy part of her hat, start with a ball of black fondant.


Roll it into a cone shape initially, and then continue to elongate and shape it into a witch hat shape.


A circle of black fondant laid on her head, and then the cone part of the hat is attached to the top of that. A couple of purple clay gun strings will create a perfect hat band.


marshmallow pops

 And they are done!


marshmallow pops

Franque: Hey good lookin’. You want to go for a drink?
Broomelda: Why yes, thank you. I will have a Bloody Mary.


marshmallow pops

Double date!


Happy Halloween everybody! Send me pics if you make these and I will post them on Facebook. Please tell all your friends to like our Facebook page.

Sharon
Sugared Productions Online School

visit our online school


Fleur de Lis Candy Baskets

February 20, 2010 by Sharon Zambito 55 Comments

HELLO DEAR SUGAR FRIENDS!
I have missed you all so much, and I am sorry I have been MIA on the blog. Preparing for the Ultimate Cake Off show, during the Christmas holidays, trying to get both the new DVD and website launched, and the chores of daily life took over for a while. It has been a crazy few months for sure. But things are settling down now, and I will be back to posting regularly.
The new Sheet Cake Secrets and Bonus Lagniappe DVDs are ready to ship. Sadly, the new website launched Wednesday for all of 30 minutes before we had to pull it due to a technical problem. I am frustrated and regretful about the delay; but I assure you that the web techies are working on it as we speak. My gut tells me it is going to be a few more days before it is fixed. Please hang tight because I promise the new DVDs will be worth the wait!
AND we are shooting our next DVD this coming Monday! You ask for ’em, we make ’em!
In fact, we are looking for suggestions for topics for our next 2 DVDs. So if you post a suggestion in the comment section here, you will be entered into a drawing for a free gift! I will give away one of the new tools featured in the sheet cake DVDs! Yay! I love give-aways!
So post your ideas and good luck!
————————————————
In honor of the Saints big Superbowl win (WHO DAT!), and it just ending Mardi Gras season here, I want to share with you these fabulous fleur de lis candies that my talented and awesome sister Barbara made. She made these beautiful baskets as Christmas gifts this year. But fleur de lis are always in style, and always in season!
My beautiful sister with her baskets.
These are made with the Spinning Leaf Oreo cookie molds. They have all kinds of molds for different shaped cookies, in many fun designs. The molds are very easy to use as well, and they work great.


These were made with molded white chocolate. The molds can be found here. The gold color was achieved by using the PME gold luster spray in the can.


Each cookie was put into an individual bag and tied with a ribbon.
Beautiful.
Just a gorgeous gift basket.
Get yourself some of those molds and give it a try.
It really is a lot of fun!
I hope to be back this next week with the announcement that our new DVDs are ready to order. Stay tuned!
Sharon
www.sugaredproductions.com


Pulling from the Archives

December 17, 2009 by Sharon Zambito 5 Comments
HAPPY HOLIDAYS EVERYONE!
I hope your season is going great and you guys are having lots of fun. What a busy time of year this is! I am so buried in work that I am not making any Christmas goodies this year. So I thought I would pull from the archives and give you guys the links to some older blog posts relating to holiday yummies. Maybe these will refresh your memory and spark some creative ideas you can try out this year.
Bronwen’s Santa Class
Cake Balls
Oreo Madness
Holiday Basket Goodies
Santa and his Sleigh
Christmas Baskets
My Favorite Things

I wish you all the very happiest of holidays, a blessed time with family and friends, and hope all of your wishes for the new year come true.


Sharon
www.sugaredproductions.com


  • « Previous Page
  • 1
  • 2
  • 3
  • 4
  • Next Page »

Sharon Zambito

Sharon Zambito

An RN turned SAHM turned cake maniac. Owner of SugarEd Productions Online School. Join me for some caking, baking, and all around sweet fun :)

Follow me..

  • Facebook
  • Instagram
  • Pinterest
  • YouTube

Pinterest

  • Autumn House Two Trees Machine Embroidery Design – Blasto Stitch
    Autumn House Two Trees Machine Embroidery Design – Blasto Stitch
  • Embroider  Sew :: Jelly Roll Purses - Embroidery Garden In the Hoop Machine Embroidery Designs
    Embroider Sew :: Jelly Roll Purses - Embroidery Garden In the Hoop Machine Embroidery Designs
  • (1) How to QUICKLY & SAFELY remove acrylic, gel, and dip powder polish | BAGGY METHOD - SO EASY! - YouTube
    (1) How to QUICKLY & SAFELY remove acrylic, gel, and dip powder polish | BAGGY METHOD - SO EASY! - YouTube
  • (1) Bouffant Surgical Cap - YouTube
    (1) Bouffant Surgical Cap - YouTube
Follow Me on Pinterest

Follow Me on Instagram

Instagram requires authorization to view a user profile. Use autorized account in widget settings

Recent Posts

  • Egg Safety Basics
  • Stable Mabel Support System Sale
  • Guest Post : 4 Vegan Cake Recipes No One Should Miss Out On!

Popular Posts

  • Ways To Make Your Cake Fluffy And Moist
  • How To Stencil on Cookies with Royal Icing
  • Doctored Cake Mix Recipes
  • Transferring an Image Without a Projector
  • All About Buttercream!
  • How to Fix Broken Ganache
  • Edible vs Non Toxic Gold Dusts

Categories

Search

Archives

Copyright © 2025 · Sharon Zambito and SugarEd Productions,LLC

Copyright © 2025 · Evangeline Theme on Genesis Framework · WordPress · Log in