Sugared Productions Blog

  • Blog Home
    • Home
  • Online Classes
  • Shop
  • Contact
  • About

Quickie Graduation Cake

June 21, 2013 by Sharon Zambito 3 Comments

Hello all my sugar friends!


I hope you all are having a great summer so far. Down here is NOLA it is hot and humid as always! I hope those of you that were in the path of the recent tornadoes and bad storms are doing ok, and that the effects were minimal. I pray daily for those who sustained injury to home or person.


Well, graduation season is just ending, so I thought I would post a picture of this cake I had to get done really quickly. (And I apologize for the low quality cell phone pic at that.)


559436_10151568988670999_812874850_n


My oldest son has graduated from college this summer (how in the heck is THAT possible?) He has 3 cousins also graduating from high school and college, so my sister in law and I combined them all into one big crawfish boil/BBQ party.

There were 3 schools, 5 colors, 2 genders, and 4 graduates I had to incorporate all into one cake somehow. And I had to do it in 48 hours. I have been so insanely busy getting the new online cake decorating school website ready, (more on that coming very soon!), I just did not have a lot of time to do stuff ahead of time. So I went for a clean and simple design incorporating the 3 schools and the graduates’ names.

I applied colored fondant bands with coordinating trim, each tier representing the color of one of the schools. I used clip art of the school logos and printed them out onto edible icing sheets. I applied those to a fondant backing and let the plaques dry firm overnight. The next day I applied them to the bands with melted white chocolate. (Be aware of summer heat of you use chocolate as glue!)

I used this JEM alphabet cutter set to make the names. I made the black hat by cutting out a grad hat silhouette shape from black fondant with some tylose added, and let that dry until firm. I put that into my food dehydrator to speed up the process and make it very hard. I glued sucker sticks to the back and inserted that into the top of the cake.

A few fondant curly ques and balls were the finishing festive touch.

Not an overly complicated design, and even with all the opposing colors, it still seemed to work. The grads loved it, so that is all that counts, right?

I hope all of your grad cakes are a huge success this year. Enjoy the summer and have fun with your family and friends when you can.


I will be back soon with a post letting you know more details about our online school opening soon. We will have a library of new and exclusive  photo and video tutorials, recipes, articles, a message forum, photo galleries, and lots more for our members to enjoy. Stay tuned and sign up for our newsletter here to be kept up to date on all the news!


Happy Caking Everyone!

Sharon


Thanksgiving Tutorials

November 15, 2012 by Sharon Zambito Leave a Comment


Gobble Gobble my sugary friends! 


Thanksgiving is next week!  ACK! I am not ready!  So much to do between now and then, and then we go right into the Christmas rush. ACK! I am not ready!  😯


I thought it might be helpful to you guys to put together a post here with Thanksgiving tutorials from the archives. Might spark a few ideas as you crank up for all the T-day festivities. Click on the title below each photo to get to the tutorial:


TURKEY CAKE BALLS


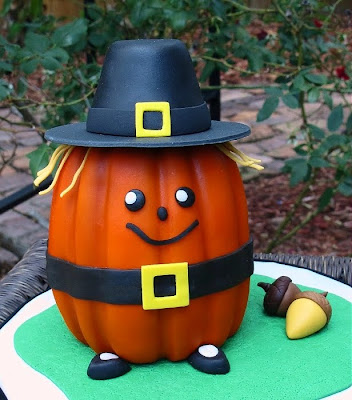
PILGRIM PUMPKIN MINI CAKE


3D TURKEY COOKIES


PUMPKIN PIE CAKE


PERFECT PUMPKIN ROLL

TURKEY CAKE TOPPER (LINK)


TIPS FOR PERFECT CAKE BALLS

I want to take this opportunity to tell you how thankful I am for all of you. For your business, your encouragement and loyalty, but mostly for your friendship. You all have enriched my life in ways I could never adequately explain. I wish you and yours a beautiful, peaceful and Happy Thanksgiving.

Sharon

www.sugaredproductions.com

Turkey Cupcake Cake

November 13, 2012 by Sharon Zambito 22 Comments

It’s almost turkey day!

Are you guys ready? Ready for the holidays?  

It’s that time of year when we have to come up with oodles of cute ideas for cakes and confections for our families, friends, and businesses. I personally spend so much time trying to think of new and interesting things to do, it makes my brain hurt. (Although, it doesn’t take much to do that. :mrgreen: )  Every now and then I like to go back to some good old school decorating. The basics we build our skills on.

At the end of every one of my DVDs I tell you guys to practice, not be too hard on yourselves, and to always have fun. That is what this project and this post is all about. This quick cupcake cake is a great way to practice some basic techniques, but not to take it so seriously that we stress ourselves out. There are times we need to be really precise and worry about all the little details of a cake. But sometimes it is fun and  liberating to not have to do that, and just have some good ole fun.


So let’s make this cute Turkey Tom cake. Do you guys recall the cupcake pull apart cake that was all the rage a few years back? It has kind of died out in popularity, but I think we need to bring it back! It’s a great item to send to school for all the kids’ holiday parties. It’s easy to make and easy for them to serve.


And it’s a great vehicle to practice on. It goes together quickly, and if you mess up, who cares? It’s just cupcakes!


Let’s do this!

Find a clip art or coloring book page that you like. Enlarge it to the size you need and print it out. Note that in my Print Shop program, I had to print it out on 4 pages to make it big enough. Tape the pieces together in alignment and cut it out. (Note: you really should transfer the pattern onto a food safe paper like parchment. But I was too lazy short on time to do that for this blog post.)


Use the paper template to arrange your cupcakes in the desired shape on the cake board.  Secure each one down to the board with a smear of buttercream under the liner.


I had some spaces after I arranged the cupcakes. I stuck some rice crispy treat pieces into those holes to take up some room and support the buttercream I was going to put on top. I wanted to prevent sink holes in the top of the icing. Each cupcake also got a little crumb coat of icing on top just to seal it for freshness.


Ice the whole top of the cupcakes and use your favorite smoothing method. I used the viva paper towel and fondant smoother. This is good practice for smoothing, but don’t stress over it! If it’s not perfect, IT IS OK. I promise! It’s just cupcakes! 


Now we are going to use the pin prick method. Put the template over some Styrofoam (food safe dummy here) and use a toothpick to prick thru the paper along the entire outline of the image and all the details. That will create raised bumps on the back of the paper that will serve as an impression mat on the icing.


Put the template in place and gently smooth over the entire surface with your hands. Be sure to press along the outer edges so that you get an outer outline of the graphic in the icing. I took a photo after I did this, but the camera could not pick up the impression marks on the white icing, so please trust me when I tell you that it leaves you a nice outline to follow for your piping. You guys know I won’t lie to you! I promise you will be able to see it. 🙂


I also used the same method to imprint the message I wanted to pipe on the sign.


Now let’s talk about piping the outline. For this, I highly suggest you make some glace icing. For two reasons: 1) it’s easier to pipe a nice outline because of the glace’s elasticity, and 2) it is going to secure itself to the icing and not blow away when you airbrush the sections of the image. A regular buttercream piped outline is going to blow off the cake when you airbrush. (Been there, done that. 😆 ) If you do not want to bother with making glace icing, you can surely airbrush the entire image first, and then pipe the outline on top of that last. I have done it both ways.

To make a little bit of glace icing, just throw a couple of cups of powdered sugar into a bowl. Mix in equal parts of water and corn syrup into it, about a Tbs of each at a time, blending with a whisk, until you get a smooth but very stiff icing. I used super black gel to tint it, and piped the outlines with a PME tip 2. Note: PME tips are some of the best tips for piping. You get a nice smooth string with no curling. PME’s tip 2 has a bit smaller hole than Wilton tip 2, and I like that size better for outlines. That’s just my personal preference; you can use an even bigger tip if you like a fatter outline. 

Remember when you are piping outlines to not drag the tip across the cake. Hold the tip above the surface of the cake, and let the icing drop onto the cake as you apply pressure to the bag, guiding it by moving the piping bag along as you go. This will give you a very smooth and fluent outline.

Now you just got some great practice on outlining, which can be used both for images on cakes and also for decorated cookies. Yay for practice! But are we going to get upset if our outline is not perfect?  No way! Are we going to scrape it all off and redo it? No way!  IT IS OK! It’s just cupcakes!

————————————


So now on to airbrushing.  I get lots of emails asking for help with this, but it is pretty difficult to make a photo tutorial on airbrushing. But have no fear, because I have already filmed several videos for the new online membership area that are going to cover airbrushing. From the basics of the different types of brushes, basic skills and practice drills, cleaning the gun, to full cake projects that use airbrushing in them. So be sure to stay tuned for that coming in a few months!

If you have an airbrush, this is a great cake to practice coloring on, because you basically are just going to fill in each section of the image with airbrush color. (Like a coloring book.) It gives you practice on fine control of outlines, following lines, and varying the width of the spray. And if we mess up a bit, will we freak out? No way! Are we going to cry if we get some over spray? No way! Are we going to call the airbrush police if we get some blotches or spurts? No way Jose! IT IS OK!  It’s just cupcakes!


 So here you see the first sections of blue color airbrushed in.


 And now some more sections.


Here is the whole thing airbrushed. Note that I did not outline the sign with black before I airbrushed. I thought it would be better to do that afterwards on such a large rectangle, but really I do not think it matters much either way. You could pipe that outline before or after airbrushing.

If you look closely you can see the imprint of the Happy Thanksgiving message on the sign, which I later piped over with black buttercream and a tip 3. Again, here we have the opportunity for some great practice on piping words directly on a cake. I used the Tinker Toy font, which is a nice easy one to follow. It is just a series of straight lines and dots. If we mess up a little are we going to have a nervous breakdown? No way! Are we going to point out to everyone who sees the cake that our writing could have been better? No way! Are we going to scrape it off and re-pipe it? OK, yes we might. (Gotcha on that one!) If we really screw a letter up, we may have to. I in fact scraped two letters off and re-piped them. Can you tell which two in the next photo?  BUT beware that if you do that you are going to scrape off your airbrushing and reveal white icing again. So you will need to touch up that spot with a little more airbrush color. The patch will never match exactly, which works fine for a design like this that is not precise and is variegated by nature. But keep in mind for other cakes that anytime you patch airbrush color it will not match, and that might not work for every cake you do.


So here he is all done. Go back and look at the first photo I posted and note that I had originally forgotten to pipe the rest of the details on the sign. Oopsie! Here you can see I added the extra lines and cracks to make it look even more better.


And here is a super close up. Do you see that little bit of over spray on the outer portion of the black outline? Do you see a few impression holes peaking out from behind the black lines? See a few spots where the icing is not super duper smooth? Do we care? No way! Are we  freaked out? No way! IT IS OK! It’s just cupcakes!


Let’s step back to normal viewing distance and have a look:


Is it cute? Yes way! Do we love it? Yes way! Will the kids love it? Yes way! Did we get some great low stress practice on some basic skills? Yes way! It’s just cupcakes and we are very happy with it!


Here are just a few more things I want to note:

1) The airbrush colors I used for this were:

  • turquoise
  • sky blue
  • orange
  • egg and lemon yellow
  • black
  • dusty rose
  • brown (face and body)
  • warm brown (arms)
  • purple made by mixing pink with sky blue
  • ivory (sign)

2) To make the eyes I piped fat dots of black and then white icing, let it crust, and patted it down with the tip of my finger.

3) If you do not have an airbrush, or do not want to do it that way, you can use any other easy fill in technique for this cake, such as run sugar, star tip fill in, or piped buttercream fill in. Run sugar uses the same glace icing in a flood consistency to create the image. Here are two cakes where the image was done with run sugar:


(If you are interested in learning more, our online school teaches in great detail all these techniques: pin prick method, outlining, run sugar, frozen buttercream transfers, chocolate transfers, royal icing transfers, some basic airbrushing, piped borders and more.)


I hope this post inspires you to get out your tools and go back to some old school decorating. Be sure to share a photo of your cakes on our Facebook page if you do. In fact, let’s start a grass roots movement to bring back the cupcake cake! Who is with me??


HAPPY THANKSGIVING!

Sharon

www.sugaredproductions.com


Bunny Butt Cupcakes

April 3, 2012 by Sharon Zambito 15 Comments


The Easter Bunny Is Coming!


But before he can make his rounds, he has all his helpers searching for his missing carrots.  And that leaves us to view the cutest little bunny butts ever.


 And if you would like to make some of these adorable cupcakes; here is the how to:


Give your cupcake a crumb coat of green buttercream and then cover the entire surface with short grass using a tip 233.

Use a round scoop to form half balls with white fondant, and place them down into the grass.

Cut a circle of fondant and then cut two ear shapes off the sides of the circle with the same cutter. Stick them into the grass and bend them forward at the tips just a bit.


Attach a small ball of white fondant with water to make the tail. Poke it a bunch of times with a veining tool or pointy end of a small paintbrush to give it the bushy texture.


That is all there is to it!  Now all you have to do is watch your guests squeal in delight when they see these cuties.

You can make these quickly with things you probably already have on hand at home. So if you procrastinate (like I do), and need a cute treat to whip up fast, these are a great option.


SugarEd wishes  our readers who celebrate Easter a most blessed and joyous day. And for those that do not, we wish you a happy and healthy Spring.


Sweet Regards,

Sharon


Blossom Bunny Cake

March 29, 2012 by Sharon Zambito 59 Comments


 Happy Spring Everyone!


Things are starting to turn green and warm up. Easter is right around the corner. In the spirit of the season I would like to share with you how I made this cute blossom bunny cake.


First, let me share with you my inspiration. I was shopping  for groceries and as soon as I walked into the store, before me stood the floral department. And right smack in the middle was this paper craft bunny covered with blossoms. It was very striking and pretty, and my immediate thought was “CAKE!”.  I did not have my phone with me, so I drove back home, got it, and clicked this photo of it to use as a reference. (Ah, the things we do for the love of cake.)


This cell phone photo does not do it justice.

So next I went on the hunt for the right cake pan. This is the one I decided to use, as I liked its shape the most. It is the Wilton 3D bunny pan:

Unfortunately this pan is no longer made, but I saw several for sale on Ebay and Amazon, and a few other sites. So you should be able to get one if you like.

I baked up my cake in the pan, and  it came out really nice. The crust was brown but not overly thick. The center cooked well and the cake was moist. I was very pleased with the performance of the pan. (Sometimes you never know how those 3D pans are going to work.)


Now, I really had my heart set on my bunny having his ears coming straight off the top of his head. I chose this pan because it looked like it should be pretty easy to re-arrange them. (You guys know me; I can’t leave well enough alone.)


In this photo you can see I just cut off his ears in one large piece following the line of his back.


 Next I cut the ears into two pieces right down the middle.

They were then too big to sit side by side on the top of his head, so I had to trim them down. I just followed the curve along the sides of the ears made by the pan.


 Cut a little bevel off the bottom edge and cut them a little shorter too.


I also trimmed along the curve on the other side of the ear as well. I did the same with both ears.


 A skewer put deep into both the ear and the cake will hold them firmly in place.

If you noticed, we gave our poor bunny a lobotomy, so we have to restore the posterior occipital region of his cerebrum and cranium. *I like to use my medical terms once in a while so I don’t get rusty 🙂

 A cupcake made with extra batter is the perfect remedy for what ails our bunny.

Just smoosh up the cupcake really tightly (similar to cake ball mixture) and stick it to the back of his head with some buttercream. You will notice I also softened up the curve of his back just a bit where I had lopped off his ears.

 A nice little crumb coat smoothed with some Viva and our plastic surgery is done.


 Now it’s time to stick his ears back in. He was very happy to be able to hear again.


I also beveled the sharp corners of his ears as well to give them a more rounded and natural shape.


Here is a profile pic. See how nice his shape is?  I have to admit I was pretty tickled with how  it came out. I really had no idea what I was doing, and just winging it as I went along. (I do that a lot, LOL)

So the rest is really easy but very time consuming. Use your favorite blossom cutter and make 80 bamillion blossoms. Lay them on a soft sponge and press the middle with a fat tip of a paintbrush to make them curl up. (*Please don’t look at my funky cel pad. It is weary from wear.)


Thin your buttercream with water and paint on the bunny in small sections, applying the blossoms while still wet.  After you place a bunch of blossoms on, push in the middles again with your paintbrush handle to make them bunch up a bit.


Get your coffee pot brewing, turn on the TV to your favorite show, and plan to spend the next large portion of your life making and applying blossoms. Please don’t  curse me while you are doing this. But I promise the end result will be well worth it!

Use balls of fondant to make his eyes and nose.


You may not be able to tell in the photo, but I sprayed the whole cake with pearl shimmer after it was done. (Cover the eyes while you do this.) It really just made the cake  come to life and added that soft finishing touch it needed.


And don’t forget the bow.

I hope you give this a try. You are sure to get some serious oohs and aahs when you present this beauty. Please send me photos if you do!

Happy Caking!

Sharon

Ruffled Christmas Tree cake

December 17, 2011 by Sharon Zambito 53 Comments

Oh Christmas Tree!
Oh, I used that intro last time.
My bad.
Wanna see how to make this ridiculously raucous ruffled rarity?

ruffled tree cake tutorial

Let me show you my inspiration. I saw this photo of a shirt on Pinterest and it screamed cake to me. (Sorry I do not know the owner of this photo.)


ruffled tree cake tutorial
“MAKE ME INTO A CAKE!”


ruffled tree cake tutorial

Ok, stop yelling at me. I will!


ruffled tree cake tutorial

I wanted to make it a little bit more fun by coloring the batter. How did I do it you ask? Just make two batches of batter and color them with your gel or paste colors. Then just plop blobs of the batter into the pan alternately and randomly. Do not spread it out with a spatula, nor stir or swirl it. That will make the colors mix and give you black cake. Ask me how I know. 🙂 …. Bake as usual.


ruffled tree cake tutorial

Then I carved a basic triangular tree shape from the cake and used a leftover piece for the trunk. I decided after the first cuts that the tree was too thin, so I added small strips on each side to make it fatter. You can see the icing seems where I glued those pieces together.


ruffled tree cake tutorial

Crumb coated.


ruffled tree cake tutorial

Covered in fondant. You can surely use buttercream if you like.


ruffled tree cake tutorial

Now it is time to make the ruffles. Cut a long strip of fondant.


ruffled tree cake tutorial

Use white fondant to cut circles for your polka dots.


ruffled tree cake tutorial

Attach the fondant to the cake. Just pinch and press the top edge of the fondant ruffle as you go along the width of the cake. Use shortening as your glue and you will love me forever. Trust me on this. No mess. No drippies. No smears. No cuss words. 🙂
I put the polka dots on after the green ruffle was on the cake. It was much easier to do it that way, rather than trying to do it before. Trust me again. I tried it both ways. First way involved some cuss words. 🙂


ruffled tree cake tutorial

Red strip of fondant with thinner white strips.


ruffled tree cake tutorial

Attach the stripes before you put the ruffle on the cake. Trust me on this too. I tried to add them after the ruffle was applied, and it involved some cuss words. 🙂


ruffled tree cake tutorial

Pinch and ruffle as you go along. Use paper towel scraps to prop up your ruffles or they will just droop down flat.


ruffled tree cake tutorial

This green ruffle used the PME smocking roller. Don’t even think about doing the impression after the ruffle is on the cake! 🙂


ruffled tree cake tutorial

In place.


ruffled tree cake tutorial

Another white ruffle with bigger red polka dots.


ruffled tree cake tutorial

Diagonal white stripes on green ruffle.


ruffled tree cake tutorial

Keep it on going all the way up the tree.


ruffled tree cake tutorial

I finished mine with a bow on the top. Prop it up with paper towels until fully dry and firm.When everything is fully dry, take all the paper towels out. If you have dryness, cornstarch residue, or just want to refresh the look of the cake, we then do what? I know you know! 🙂


ruffled tree cake tutorial

Fondant clay gun squiggles and polka dots to dress up the board.


ruffled tree cake tutorial

Cute, yes?


Let’s see how the inside looks:

ruffled tree cake tutorial

Fun, yes?


ruffled tree cake tutorial

Kewl.


ruffled tree cake tutorial

I love my little ruffly tree cake. I think the Tshirt would be proud.


ruffled tree cake tutorial

What other color combinations do you think would be cute for this cake?
I hope you like it and try it!
Happy Caking!
Sharon
www.sugaredproductions.com


NOLA Photography http://bentzphotography.com/

Christmas Tree Mini Cakes

December 14, 2011 by Sharon Zambito 22 Comments

Oh Christmas Tree!


Oh Christmas Tree!


I have a serious weakness for mini and individual confection cuteness. I saw a mini cake on the Family Fun website that spurred the idea for these. Come along with me and I will show you how to make ‘em!


I used frozen pound cake in this case because I was too lazy too pressed for time to bake. You can certainly use your own recipe and cut these from sheet cakes. Just be sure to use a very sturdy cake or they will not hold up under the weight of the icing.


I used my Ateco nesting blossom cutters for these trees, but you could also use squares and stagger the shapes, or even hexagons might be cute. (Ignore the marshmallows in this photo. I ended up not using them but forget to retake this photo. Oopsie.)


Level the cake and create a layer the height you want each tier of your tree to be. My layers were right at one inch high each. Use your three sizes of cutters and cut out the shapes.


This next thing I am going to tell you is very important, so lean closer to the monitor so you can hear me. Closer. Still a little closer. I do not want you to miss this, because the success of your entire project may depend upon this!


Are you close? Ok, good. Notice how I am cutting the cake with the crust side up. Please be sure NOT to do this. Cut it with the crust side down. And then push the cake up through the top of the cutter to get it out. You will see why in just a little bit.


Pull the rest of the cake away and then remove the cake from the cutters. It is much easier to work with firm cold cake.


Now you have the three tiers of your tree and the extra cake can be used to make cake balls, or do what I do and just throw them in a Ziplock for the hubby and kids to snack on.


Now take the layers of cake, and stack them up, but alternate the alignment of the petals as shown above. Run a skewer through all three layers for stability. This is the only cake you may ever make where one tiny skewer is the only dowel you will need for the whole cake!


Sit the  cake on top of one of the cookie cutters, and place this on a cookie sheet lined with plastic wrap or wax paper.


Cut the skewer off right below the top surface of the cake.


Now time to make the icing to pour. In this case I used glace icing because it gives more coverage than poured fondant, is not as translucent, dries with more of a gloss, and I was too lazy is easier to make and use.


Glace icing:
one pound powdered sugar
6 TBS milk
6 TBS light corn syrup

flavorings as desired (I use 1tsp each of vanilla and almond)

Whisk all of the above together vigorously by hand with gel or paste food coloring until totally smooth. Cover the surface with plastic wrap and let it settle a while until the air bubbles rise to the surface. Then you can take the plastic off and pop the bubbles on the surface with the back of a spoon or spatula. Do not re-stir. (Keep icing covered in plastic when not in use.)


Now you are ready to pour:


You need to pour a large amount over the cake. Way more than what will end up staying on the cake. This will insure that every little nook and cranny of the cake will be covered. I took this picture right after I poured the icing and put the bowl down. It should run down the cake very fast, about the consistency a chocolate fountain would be.


Within just a minute or two , most of it will run off the cake. You can see how it is getting thinner on the sides now.


When the dripping slows down to just a few drops (this will be just a few minutes), pick up the cookie cutter with cake still on top and move it to another surface to dry fully. You need to do this right away so you can scrape up all the excess poured icing, put it back in your bowl and use it again. The glace has to be scraped up quickly before it starts to crystallize and firm up.

You may want to let this layer of icing firm for about an hour, and then give the whole cake another pour. I did two coats on mine, because it made the finished cake look a lot smoother and more polished than just one coat.


Ok, remember that I told you about cutting the cake crust side down ? The reason for this is because you want the flow of the icing to be going in the same direction as the grain of the cut of the cookie cutter. You want the icing to flow down the cut sides of the layers in the same direction that the cookie cutter cut them.


And this is why:


Can you say ugly? This cake was poured with the layers stacked in the opposite direction of how they were cut. So the weight of the icing flowing down pulled down the cut sides of the cake (against the grain), and made the cake sides separate and stick out, not stay flush and tight. So I got this really ugly surface on the cake. Blech.

Pretty:


Pretty ugly:


—————————————————–


So, now you have to let the icing dry for 18-24 hours until the surface is nice and firm in order to be able to decorate it.


To decorate: strings from the clay gun for the garland, little rolled balls of fondant for the ornaments, and a fondant star for the top. I used sanding sugar in the white icing snow and threw some white disco dust over everything, because disco dust makes everything look better! Note: not all dusts are considered edible, so choose wisely.

Ta dah!! I also made some little fondant packages and a cute teeny weeny snowman.


Say it with me: awwwwww


And a picture just for size reference.


So, do remember this hideous nightmare disaster of ugliness the likes the Earth has never seen before?


I hated the thought of throwing it away, so I tried to disguise its mutant repulsiveness by painting some white buttercream snow on the branches of the cake, and adding some colored balls and edible sparkle dust:


What do you think? I think it’s not too bad now! And the plus side is that this one takes way less time to decorate than the first one.


——————————————————


 Back to that purchased frozen fresh baked cake you made:


You will have a layer of cake left over from leveling that will not be tall enough to use for tiers of the tree. You can use other holiday shaped cookie cutters.


They are the perfect height for little petit fours. Just pour icing over them them and let dry. Easy.


Then treat yourself to them on nice china with a hot cup of your favorite holiday flavored coffee. You worked hard; you deserve it.

Oh Christmas Tree!


Sing along with me everyone:
Oh Christmas Tree! Oh Christmas Tree!
They leaves are so unchanging.
Not only green with icing here.
But also sweet and cuteness near.
Oh Christmas Tree! Oh Christmas Tree!
Thy leaves are so……(Fill in the blank)


Happy Holidays!
Sharon


Pilgrim Pumpkin

November 16, 2011 by Sharon Zambito 14 Comments

Thanksgiving Blog Blitz Post #3!
I hope you are having a nice Fall so far, and are enjoying the anticipation and preparations leading up to the holidays.  Thanksgiving is my very favorite holiday, and I love making  fun treats for the occasion. And I have to tell you that this little dude has got to be  my all time favorite! I have been busting at the seams since I made him; I am so excited to share him with you!
Meet my Pilgrim Pumpkin mini cake!
Don’t you just want to squeeze him?
Let me show you how I made him:
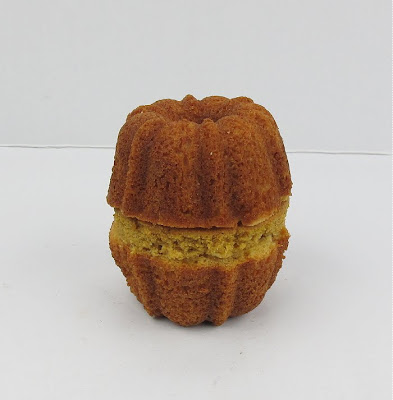
For his body I used two mini bundt cakes and a circle of cake I cut from a round layer with a cookie cutter. The height of the cut circle of cake was about 1/2 inch.
You need that extra height the circle of cake gives. Otherwise, he will be too squatty and you won’t have enough room for his belt and his face. If you want to spackle the seem with some stiffened buttercream to hide it more, you can do so.

 Crumb coat the cake with a  very thin layer of icing. Then cover the top half with orange fondant. Use a wooden dowel to impress in the grooves of the bundt pan to make them show up well. You will need a pretty thick layer of fondant or all the lumpy bumps  will show through. Or you can use two thinner layers of fondant, which is what I did. Once you get the top half covered, let it sit for a while to let the fondant set up some.
Then flip the cake over and do the exact same thing on the other half. Cut a clean seem between  both layers of fondant where they overlap in the middle, so that you get the result you see above.

Looking pumpkiny!

I airbrushed him just a little to help his colors pop, but that it optional. Cover the seem with a strip of black fondant to make his belt. Make his face with pieces of black fondant.

Cuteness emerging.
His hair is thin strips of a golden yellow fondant. Prop them away from his head  with  paper towels until they firm up. Make his adorable little pilgrim shoes from triangles of black fondant with an oval  piece of white fondant on top.At this point, just go ahead and squeal with delight. You will want you. You will need to. You have my blessing.
Cut a circle of black fondant for the brim of his hat, and fashion another piece in the tapered shape of a pilgrim hat. Let those both firm  up well. Attach the hat pieces together with  chocolate.
Once all is in place, add the  buckles to the belt and hat. I presented him on a little bit of fondant grass  with some acorns. At this point I called in all my family, my neighbors, the postman, and a stray cat to share my excitement with them.
Isn’t he just the cutest thing?
I heart him.
——————————

I often get asked where I get my ideas from, which can be all kinds of things. This project was inspired by this piece of  clip art I stumbled upon while searching on the internet for something:


My little guy came out pretty much how I envisioned in my head; which rarely happens. So I was very pleased.

Hope you give him a try, he was a lot  of fun to do!

Stray tuned for the next installment of my Thanksgiving Blog Blitz coming Friday!

Happy caking!
Sharon
www.sugaredproductions.com


Have Your Pie and Eat It Too

November 7, 2011 by Sharon Zambito 8 Comments

Thanksgiving means one thing to everyone I am sure:


Pumpkin Pie!


I love all things pumpkin flavored: muffins, breads, shakes, martinis (oops, did I admit that?)…. except for one thing….. pie. I just do not care for it for some reason. But I cannot imagine having a Thanksgiving spread without that iconic pie on the table. So I thought I would try to have the best of both worlds this year, and maybe even play a little trickery on my unsuspecting family at the same time. (devilish  grin)


Oh that beautiful symbol of fall, gratitude, good food, and precious time with family and friends…..
 

Let’s make ours!


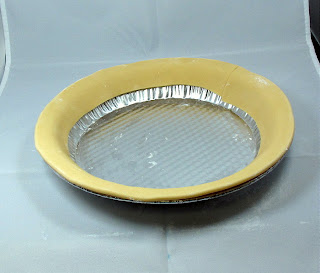
Start with a pie tin and line the edge with a strip of ivory fondant. Use some shortening to glue it on or it will not stay in place.


Flute the edges with  your fingers just as you would do a regular pie crust.


Airbrush color gives this “pie” its magic. A little yellow base coat, then followed by ivory (which comes out light brown for some reason). If you do not have an airbrush you can use the color mists in the can as well.


After the crust is dry, then add a layer of pumpkin cake. You can split and fill the cake if you want, but it is a pretty short layer, so I find the icing on the top to be enough for me.


Ice the  top of the cake with colored icing. I used orange, brown and a little red to get this color. Some pumpkin pies are more brown, and others more orange, so go for the look you like. Sprinkle some cinnamon on top of the icing. If you get big clumps like you see in this photo, just spread it out with your spatula, let the icing crust, and then smooth it out with your Viva paper  towel.


A little bit more airbrushing on the top. I used a combo of yellow and ivory to give it that  yummy custard-y baked look.


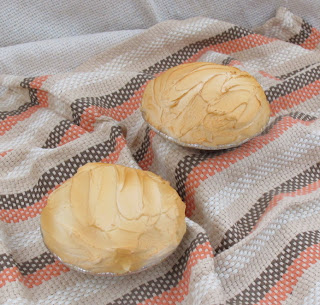
How about some mini meringue “pies” on the side ? (wink wink)


Follow the same process using mini pie shells. Pile on white icing  with a spatula and hit it with a light coat of ivory airbrush color.


They have that beautiful just baked meringue look.


Mmmmm.


Watch your guests’ faces as they cut into this pie and find out your secret surprise! (You might want to bring along a real pumpkin pie as back up, just in case. You don’t want an angry crowd caused by being deprived of pumpkin pie at Thanksgiving.)


This cake was SO easy and fast to do. You can make several and trick all of your neighbors we well. And your coworkers and boss. And the kids’ teachers. The fun could go one for weeks!


Here is an easy pumpkin cake recipe I used. It is super moist and yummy:


Ingredients

  • 1 (18.25 ounce) package spice cake mix
  •  3 eggs
  • 1/3 vegetable oil
  • 1 (15 ounce) can pumpkin puree
  • 1  TBS pumpkin pie spice
  • 1/3 cup white sugar

Directions

  • Combine everything in mixer at speed two until combined. Pour into prepared pan and bake at 325 until  done.
  • Cool completely. Level off the top, put the scraps in a ziplock bag, and hide them in your office so no one else can get to them.
  • Split layer into the height needed to fill your pie pan.


I really hope you guys give this fun cake a try and send me photos so I can post them!

Happy caking!
Sharon
www.sugaredproductions.com


Sunflower Grad Cake

May 24, 2011 by Sharon Zambito 106 Comments

Graduation season is here! Are you guys making a lot of grad cakes right  now? I had the opportunity last week to make a cake for my son’s best friend. She is a very sweet girl, and I was happy to make it for her. I included the elements in the cake that she requested: the colors of red and black, a sunflower (her favorite flower), and paw prints to represent her desire to open her own small animal care business. And of course we had to include the grad cap and tassel to represent her school. (Instructions on how to make the cap and tassel can be found  in our Book Smarts DVD.)
I took some photos of the process I used while making the sunflower and thought you might like to see them, so here we go:

I used yellow gumpaste (Wilton premade works very well) to cut out two of the sunflower shapes.

Putting the petal on my cel pad, I used my ball tool to thin the cornstarch dusted petals. I put most of the pressure on the middle of the petals, because sunflower  petals are a little bit wider in the middle than they are on the two ends. I avoided thinning too much where the petals join the center portion, because sunflowers (and daisies) are notorious for breaking in that vulnerable spot.

After the thinning was done, I used the veining tool to add some vertical lines to the inside of the petals.

The flower was  placed into a cupped former lined with foil. I pinched the tips of the petals to give them  some movement and make them more life-like. Petals were propped with paper toweling in a random pattern to give the petals a natural look.
I repeated the exact same process with the second layer, but I did not glue the two pieces together. The reason for this is because I wanted them to dry in the proper shape together, but I needed to be able to  separate the pieces later for dusting.
In order to speed up the process of drying, I placed them into my dehydrator. (I made two flowers; I always make extra for breakage.)
This is Bessy. She may be old, she may be ratty and held together with masking tape, but she is a faithful and loyal friend who always gets the job done. She is a Nesco food dehydrator that I got at Walmart years ago for about $35. I use her constantly for so many items. I could not live without her. If you invest in one, I recommend that you get one with a temperate regulator. Always use the coolest temperature setting so that your items do not melt.
After the flower was fully dry, it was time to dust. The best part!  Dusting the flower just makes it come to life, and is so much fun! My dusting process was as follows: The entire flower got a light dusting with buttercup yellow. The lower portion of the petals were dusted with a combo of sunflower and pumpkin. The centers of the petals were hit with some daffodil yellow. The tips also got a little bit of the sunflower color. Then the entire flower got a very very light dusting with yellow luster dust, just to brighten it up a bit.
Remember  that I said this type of flower is known for petal breakage? Yep, happens almost every time! ACK! Here you see a petal glued back on with just a little bit of melted white chocolate. The break was low enough on the petal that it will be covered by the center once applied.
I used a silicone push mold to make the center. Brown gumpaste was pushed into the mold, and popped right out. So easy it feels like cheating.
A little bit of dark brown petal dust was applied to the center. Then I brushed the center with just a little bit of  shortening to give it a little sheen and wake it up. We don’t want a sleepy sunflower! 🙂
Now onto the cake for a minute:
I wanted extra height on the cake tiers, so that the sunflower and stem would be in the correct proportion. We did not need any more extra servings of cake, so I increased the height by using fomecore under the tiers. I used  pieces of  1/2 inch  fomecore taped together, and then covered that with Glad Press and Seal.
I used three pieces of fomecore for the lower tier, and 2 pieces for the upper tier. Then I proceeded to ice and stack  per my normal techniques. (You can learn my technique for smooth icing and stacking in our DVDs available here.)
The finished flower was then attached to the side of the cake with a little bit of melted chocolate. Ta da!! Isn’t it pretty! I love how the yellow pops against the red and black.
And the finished cake. Nicole was thrilled with it, and I was very happy that she was happy.
We will be shooting our next DVD in a few weeks. The topic will be gumpaste and fondant flowers. Do you think we should include this sunflower in the DVD? Leave a comment here and tell me what you think, and you will be entered into a drawing to win a free flower DVD when it is released in the fall. Woo Hoo! Free stuff!
Happy caking everyone!
Sharon
http://www.sugaredproductions.com/
  • « Previous Page
  • 1
  • …
  • 4
  • 5
  • 6
  • 7
  • 8
  • …
  • 10
  • Next Page »

Sharon Zambito

Sharon Zambito

An RN turned SAHM turned cake maniac. Owner of SugarEd Productions Online School. Join me for some caking, baking, and all around sweet fun :)

Follow me..

  • Facebook
  • Instagram
  • Pinterest
  • YouTube

Pinterest

  • Autumn House Two Trees Machine Embroidery Design – Blasto Stitch
    Autumn House Two Trees Machine Embroidery Design – Blasto Stitch
  • Embroider  Sew :: Jelly Roll Purses - Embroidery Garden In the Hoop Machine Embroidery Designs
    Embroider Sew :: Jelly Roll Purses - Embroidery Garden In the Hoop Machine Embroidery Designs
  • (1) How to QUICKLY & SAFELY remove acrylic, gel, and dip powder polish | BAGGY METHOD - SO EASY! - YouTube
    (1) How to QUICKLY & SAFELY remove acrylic, gel, and dip powder polish | BAGGY METHOD - SO EASY! - YouTube
  • (1) Bouffant Surgical Cap - YouTube
    (1) Bouffant Surgical Cap - YouTube
Follow Me on Pinterest

Follow Me on Instagram

Instagram requires authorization to view a user profile. Use autorized account in widget settings

Recent Posts

  • Egg Safety Basics
  • Stable Mabel Support System Sale
  • Guest Post : 4 Vegan Cake Recipes No One Should Miss Out On!

Popular Posts

  • Ways To Make Your Cake Fluffy And Moist
  • How To Stencil on Cookies with Royal Icing
  • Doctored Cake Mix Recipes
  • Transferring an Image Without a Projector
  • All About Buttercream!
  • How to Fix Broken Ganache
  • Edible vs Non Toxic Gold Dusts

Categories

Search

Archives

Copyright © 2025 · Sharon Zambito and SugarEd Productions,LLC

Copyright © 2025 · Evangeline Theme on Genesis Framework · WordPress · Log in