Sugared Productions Blog

  • Blog Home
    • Home
  • Online Classes
  • Shop
  • Contact
  • About

Fall Tutorial Roundup

October 5, 2016 by Sharon Z 1 Comment

Hi sugar babies! It’s Fall!! Here are some of our favorite treats from around the web to get you inspired for the season!


Fall-Leaves61

Fall Leaves from Sweet Ambs


 10938473505_a17308bdf7_o

Scarecrow Cake Pops from Bakerella


Pumpkin-Kiss-Brownie-Bites-title

Pumpkin Spice Bites from Bru Crew Life


pies9

Pumpkin Pie Cake from SugarEd Productions


pumpkincinnamon-339x1024

Pumpkin Cinammon Chips from Baker By Nature


frosted-pumpkin-bars-1

Frosted Pumpkin Bars from Liluna


Sugared-Candycorn-Cookies

Candy Corn Sugar Cookies from Our Best Bites


fall baskets video tutorial

Autumn Basket Cake from SugarEd Productions


I hope these tutorials inspire you to get into the season!

Happy Baking!
Sharon

Visit our online school

Summer Treat Tutorial Roundup

August 2, 2016 by Sharon Z Leave a Comment

Hi All!

It’s officially August, however school is not back in session so to me it’s still Summer! In honor of the coming end of the season, we have some treats we want to share. Hope these give you some inspiration.

How-to-DIY-Cute-Ladybug-Cupcakes

Ladybug Cupcakes by Victorious Cupcakes


54eba479c9e4c_-_sunflower21_lgn

Sunflower Cupcakes by Country Living


Summer-Smores-Beach-Cake

Summer S’mores Beach Cake by Framed Frosting


IMG_1504e2

Fun Summer Cookies  by Glorious Treats


IMG_1374e

Watermelon Cookies by Glorious Treats


7531931078_2715c94301_o

Beach Ball Cake Pops by Bakerella


NEO4A-1

Neapolitan Party by SugarEd Productions


Strawberry Cupcakes FInal Shot

Strawberry Cupcake Toppers by SugarEd Productions


Flip-Flop-Cake-pops

Flip Flop Cake Pops by Living Locurto


That’s our Summer treat round up. Time is running out to get our last Summer baking projects done. I’d love to hear what you are working on.


Happy Baking,
Sharon

Visit our online school

Sphere Cakes- Tips for Success

July 12, 2016 by Sharon Z 2 Comments

Hello my sugar friend!

Recently I sent an email out with a story and tutorial link about this giant cherry cake. One of my fav cakes of all time, mostly because it disses my sister 🙂


sphere cakes tips

But sphere cakes are scary!

How the heck do you get the shape?

And don’t even think about covering it in fondant!

That’s the things nightmares are made of.

I admit sphere cakes aren’t the easiest shape to do, but they don’t have to be so awful that we crawl into the corner crying for mommy. 🙂

Here’s a few of my tips for spherical success 🙂

  • Use a half sphere pan to bake if you can find the size you need. That eliminates carving and that’s half the battle.
  •  

  • Once you level the 2 cake halves and put them together, you may not have a perfectly round ball. You can insert a short layer of cake (baked in the same diameter round pan as the sphere pan) between the 2 halves to give the extra height needed to create a fully round sphere.
  •  

  • If you do carve the sphere from round cake layers, remember that shape doesn’t have to be perfect. You will make it perfect with the icing or ganache.
  •  

  • Use a sturdy cake that can hold up to carving and it’s own weight. A light fluffy recipe won’t cut it.
  •  

  • What to use for the bottom half of the sphere? It might be paralyzingly frightening to try to use cake for the bottom half as well. (It can be done with sturdy cake and proper support where needed.) But consider non cake options for the bottom half. Especially for your first go at it.
     
    For the bottom half you can use:

– styrofoam (see my blog post linked above)
– compressed (and I mean seriously compressed) rice cereal treats formed in   the cake pan
– chocolate formed in the cake pan

  • Use a firm base coat under the fondant such as a super chilled butter based icing or firm ganache.
  •  

  • Choose your fondant wisely. Not all types or brands will do well trying to stretch and mold over that shape.

The great Wayne Steinkopf of Swank Cake Design changed my caking life when he advised me to use a mixture of half Fondx and half ChocoPan brands for sphere shapes. It works incredibly well, has tons of elasticity, and is tear resistant. (There’s a new brand called Dream that is supposed to be like a hybrid of these two. I’ll be trying it this week.)

Liz Merek’s semi homemade fondant also has great stretch and elasticity.

  • Get the cake raised up off the counter to apply the fondant. Put it on a small diameter fondant tub or something similar so you can tuck the fondant onto the underside of the ball.
  •  

  • Take it easy on yourself. It doesn’t have to be perfect to look great. 🙂


Go ahead and try a sphere cake, you CAN do it!!

Sharon

Visit our online school


NOLA photography: http://bentzphotography.com/

The Cherry Hog

June 7, 2016 by Sharon Zambito 4 Comments

 
Some of you who have been with me for a few years may remember this story. It’s a re-post of an older blog, but I’ve gotten a lot of requests for it again, so here goes…. (read thru to the end for a quick tutorial.)


Once upon a time there were 3 sisters that grew up in the city of New Orleans with their 2 older brothers and parents. They were not exactly poor, but things were very tight, as they were living on one modest accountant’s salary. Melba, the mom, knew how to make every penny stretch. She was very frugal. There were never any treats like candy, soda, chips, or cookies in the house. Those things were reserved for very special occasions.

Since vacations were out of the budget, the family would make day trips a few times a summer to a nearby state park. The kids would swim in the Bogafalaya river and play on the sandy beach. Melba would pack an ice chest and picnic basket and they would spend the day swimming, eating, and relaxing.

On one particular trip to the river, Melba really splurged and bought a bag of fresh cherries. Not a big bag, mind you. But this was still a really special treat for the kids to get such an extravagance.

So on this particular day, after lunch, the 2 youngest sisters, Sharon and Janice, decided to go for a nice long swim, anticipating their refreshing treat of cherries upon their return. They wanted to save them for the just the right moment, to enjoy them to their fullest. So after their nice swim in the river, they happily skipped back to the picnic table, excited about the luscious fruit that awaited them. But alas, to their dismay, they discovered that their older sister Barbara (aka the Cherry Hog) had eaten them all! All of them! All that was left was a bag of pits and stems.

Needless to say the 2 little sisters were disappointed….. no, devastated….. no, scarred for life! Despite years in therapy and reading many self help books, they have not been able to work through the trauma of this event. In this tragic story they did not live happily ever after. So needless to say, to this day they give Barbara grief about it any chance they can get.

—————————————-


Last week, when the whole family was invited to a friend’s house on the bayou for a Good Friday seafood boil, they took the opportunity to also celebrate Barbara’s birthday.


And here is the Cherry Hog’s birthday cake.


CH with her cake. She loved it.


                        Sharon and CH.


Sharon, CH and Janice.


Seafood boil of crabs , crawfish, potatoes, corn and more!


And fresh boiled shrimp! It was so yummy!


J-Man got to drive the boat!


Cherry Hog and her nephew D.


The cake was yummy and enjoyed by all. We had a wonderful day of boating, eating, and playing board games.
 
Note: Cherry Hog claims to have no memory of this event ever happening. Classic case of denial, if you ask me.


—————————————


HOW TO MAKE CHERRY HOG’S CAKE:


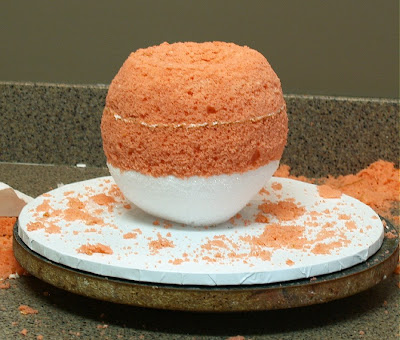
My BFF Heather gave me the great idea of using Styrofoam as the base of the cake. I used an 8 inch ball and cut it a little shorter than in half. I cut a flat bottom so it would stand up, and I used another piece of styro as “sand paper” to shape the bottom half of the cherry. (I learned that trick in a Collette Peter’s demo.)


Then I sharpened wooden dowels and drove them thru the styro and into the cake drum base for stability. I used 3, but in retrospect I could have done with just 2.


I then attached a circle of parchment paper to the top of the styro with buttercream to form a barrier with the cake.


First layer of cake in place.


I put a ball of modeling chocolate down in the hole to serve as the pit. Tee hee. Then I plugged the hole with the cake from the heating core.


Second layer of cake in place.


Carved to a cherry shape with a sharp knife. I intentionally went with a somewhat asymmetrical look, because real cherries are not perfectly round. Also makes the carving easier; I love that!


Then I applied a basecoat of thickened ganache over the whole thing. The ganache is 2 parts semi sweet chocolate to one part heavy cream. You let it cool to a thick paste consistency and then apply it just like a buttercream coat with a hot spatula. It firms up to make a nice chocolate shell; a wonderful surface on which to apply your fondant.


I smeared the whole cake with piping gel and then applied red fondant. I used a wad of fondant cupped in my hand in lieu of fondant smoothers. This works great on round and curved shapes.
I then gave the whole cake a liberal rubdown with everclear alcohol to get the excess cornstarch off before airbrushing. What??? No Crisco? I know what you are thinking. Sharon rubs down everything with Crisco! Yes, this is true, but not in the case of airbrushing. That will cause the airbrush color to not go on smoothly and you might get blotching.


After the everclear dried (took about 2 minutes) , I gave it several coats of red color. Let the coats dry in between or you will get pooling and dripping of color. Here it is still wet with color. (And I am still blowing red snot a week later.)


One more coat of color and dried.


I made the stem by wrapping several 18 gauge floral wires with brown floral tape and then airbrushed brown and green over that. I just stuck the stem down thru the center of the cake and down into the base of the styro. Note: This is not food safe, but it was for Cherry Hog so I did not care. The proper thing to do would have been to coat the part of the stem going down into the cake with chocolate and dried before inserting.


I made the beach chair with the cutter set here. I cut the pieces from white gumpaste. After fully dried I painted them with brown airbrush color mixed with everclear to make the wood look. The seat of the chair is white gumpaste. Ain’t it cute?? I love this chair! The sand is Domino’s brownulated sugar from the grocery store.


It was a lot of fun making this cake! This is when I love caking the most. A fun, challenging cake that has a special story to go with it.


Now you all go make one for your favorite Cherry Hog!


Happy Hogging!
Sharon
http://www.sugaredproductions.com/


PS. Remember you can click on the photos for a larger view.


Contributor Spotlight: The Partiologist

May 27, 2016 by Sharon Z Leave a Comment

I bet you guys all know Kim Heimbuck aka “The Partiologist”, right?

She is the super talented lady behind that amazing blog, and a frequent guest contributor for us here at SugarEd.

If you have not yet visited her blog, then run, don’t walk on over. Be prepared to spend at least a couple of hours there, though. Her blog is a treasure trove of some of the most unique creative sweets and tablescapes on the planet.

Here are just a few examples of her never ending creativity. All tutorials are available on her blog or in our online school.


Hanging-Chandelier-Cookie

Hanging Chandelier Cookies


bouquet cake

Bridal Bouquet Cake


Cover-3
Spring Bonnets


Cover (2)-1 Pumpkin Pie Cake


Kim’s tutorials are so great, and that’s only a few of them!  You can check out these and more on our site. (Full disclosure, you do have to be a member to see them. We’d love to have you join us.)

kim-picKim is the genius behind The Partiologist, where she showcases the parties she has hosted and how to recreate them from start to finish. In case you missed it, here is a link to her blog:  www.thepartiologist.com stop by and say hello!


Mother’s Day Tutorials!

May 3, 2016 by Sharon Z Leave a Comment

Hi All! Mother’s Day is Sunday May 8 (and my birthday!)

I know you’ve got goodies you’ll need to make, so here’s our round-up of some tutorials to help get you inspired!


VCFinalShot-Mother'sDaycupcakes (2)

Pretty Mother’s Day Cupcakes from our online school.


white lace effect1

 The Magic White Lace Effect  on cupcakes, also from the online school.


rose-cake-pops-1

Rose Cake Pops from The Cake Blog


 Metallic-Gold-Icing_Sweetsugarbelle
Swirl Roses For Mother’s Day Cookies from Sweet SugarBelle


Metallic-Purple-Flower-Cake

Metallic Purple Flower Cake from Wilton


cake3-650x618

Open Star Tip Cake from I am Baker


Morning Glory Flower cookies

Morning Glory Cookies frpm Glorious Treats


smalleIMG_86361

Hat Cake Pops from The Sugar Turntable


I hope these give you some ideas. I’d love to hear what you’re making for Mom’s special day!

Happy Caking!

Sharon

St. Patrick’s Day Tutorial Roundup

March 15, 2016 by Sharon Z Leave a Comment

Hi sweet friends!

St. Patrick’s Day is this week! To get you ready for this festive holiday, here are some treats to inspire you!


shamrock cookies

Plaid Shamrock Cookies


Decorated Biscoff Cut-Out Cookies


Pot O’ Gold Cake Pops


Mint Oreo Truffles


Rainbow Chocolate Cake


Fiona’s Cottage, St. Patrick’s Day Gingerbread House


St. Patrick’s Day Rice Krispie Treats 


I hope these treat ideas make you feel empowered with the Luck of the Irish!

Happy Caking!
Sharon

Visit out online school


Tips For Gravity Defying Cakes

March 11, 2016 by Sharon Z 3 Comments

Hey it’s Sharon —

I’m sure you’ve noticed the recent craze in cake decorating: the gravity defying cake!

The old days of the “simple” topsy turvy cakes like below are gone.

gravity defying cake tutorial

gravity defying cake tutorial
Now it’s been taken up a notch, with increasing tilt angles and the use of custom internal structures to achieve the seemingly impossible:

gravity defying cake tutorial

They can be intimidating; especially the first one you make. But with that also comes the fun of the challenge and the feeling of pride when you’re done.

I’m an advocate for all of us trying to push past our comfort zones. I encourage you to give them a try if you haven’t. You might be surprised at what you can do.

If you do foray into the anti-gravity cake world, here’s a few basic tips to keep in mind:

  •  Plan, plan, plan – Take a good amount of time to really think it through and design your structure. Use whatever tutorials you can find, and apply that info to your specific project.
  • Don’t push it – Keep your angles at about 10 degrees, no more than 15. You’d be surprised how “topsy” a 10 degree angle will look.
  • Do a test run – If it’s your first go at it, do a dry run with maybe two tiers, to ensure you’ve got all the basics nailed down. You may discover some issues you didn’t expect, and you can resolve them before you do the “real” version.
  • Ensure food safety – This is a biggie. Structure cakes use a lot of materials not intended for use with food. Find out what steps you need to take to make sure all parts are compliant with food safety rules. Example: disinfect all PVC pieces before use or paint metal pieces with a food safe paint
  • Think about weight – Consider how much weight your structure will need to hold and choose your materials accordingly. A small bag of M&M’s pouring out into a “bowl” would work using a thin wooden or plastic dowel, but a hefty project like the one below will need heavy duty metal rods, flanges, PVC, washers and nuts to keep it stable.
  • Support your support – Just like a traditional tiered wedding or party cake, you need super strong support boards under each tier of cake. Use something that won’t flex or bend, like 1/2 inch fomecore, plywood, or MDF (covered with plastic wrap to make it food safe.)
  • Break out the ganache – The tiers that make up a gravity defying cake are often sitting at a pretty steep angle. I recommend using ganache under fondant, rather than buttercream. That ganache shell sets up nice and firm to hold everything in place with much less chance of shifting or sliding.
  • Have fun! Go ahead and dive in and have a good time. Don’t let fear hold you back. Start small and work your way up to the big time like this beauty:

gravity defying cake tutorial gravity defying cake tutorial gravity defying cake tutorial


Full length video tutorial for this gravity defying Birthday Bash cake is available in my online school along with a special offer:

LEAN MORE HERE

Happy Caking!
Sharon


NOLA Photography http://bentzphotography.com/

Guest Post: Gum Paste Name Cake Topper Tutorial

February 23, 2016 by Sharon Z 7 Comments

Hi sugar babies! Today we have a guest post from Natalie over at Sweetness & Bite.

Today, she is going to show us how to make this super cute name topper!


Gumpaste-Name-Cake-Topper-Tutorial
You know that moment when a child does or says something that makes you suddenly feel really old? That was me a month or so ago when my niece Jazmyn told her mum (my best friend Katie) and I that she wanted “a Tumblr party”. I’ll admit, I had vaguely heard of Tumblr, but considering I can barely keep up with Facebook, I’m sporadic with Pinterest, and I’m only just slowly easing my way into Instagram, investigating this mysterious Tumblr thing was not on my list of priorities. After a bit of questioning, a few Google image searches, and a (for me) scarily perky YouTube video called “How To Be Tumblr” we eventually figured out that what Jaz liked about the Tumblr images she’d been looking at were the bright colours, room decor and, um, donuts. Sprinkles also seemed to feature heavily. That’s when I perked up, because sprinkles, I can do. Sprinkles, I understand. Sprinkles are kinda my thing.

The cakes we talked about were very sprinkly, and Jaz also liked the “drippy cake” trend inspired by Katherine Sabbath‘s fabulous cakes, so I threw those ideas together with a watercolour effect like some of the fanciful, pastel-y coloured Tumblr photos we’d been looking at.


Sprinkle-Watercolour-Drizzle-Cake tutorial


I’ve got a couple more tutorials coming up for the sprinkle tier of this cake, and also the watercolour effect I did on the top tier, but I thought we’d start right at the top and talk about the gumpaste name cake topper.

The easy route would have been to cut out individual letters in a block font, but I wanted a look similar to the gorgeous toppers made by businesses like Design at 409, Glistening Occasions and Communicake It, so I picked out a cursive font. I knew it would have some weak points where the letters joined together, so instead of cutting out one thick piece of icing, I decided to sandwich pieces of wire between two pieces of gum paste to reinforce the topper and make it less likely to crack. Clearly this means that despite being made from gum paste it’s not an edible cake topper, unless you enjoy flossing with wire, but it gives you the benefit of being able to use whatever font you like, make the topper whatever size you want, and colour-match it to the rest of your cake.

I haven’t yet tried this with a longer name, but my guess is that it will work best for names under 6 or so letters. That’s not to say it definitely won’t work for longer names, but if you do try it with one, make sure you add plenty of the reinforcing wires, make the support wires (the ones that you’ll insert into the cake) thicker or use florists tape to attach some skewers to the wires for extra support. And always, always make a backup topper.

You can also use the instructions for cutting the letters to make a name using individual letters in a block font, just cut each letter out from a thicker piece of gum paste (4mm or so is good) and insert a toothpick or skewer into the bottom of each letter.

There aren’t any terribly fancy tools needed for this, but a silicone-tipped colour shaper (from an art supply store) or the wedge tool from a set of Sugar Shapers (their new mini shapers are on my drool-list) will make smoothing the edges of the letters a lot easier.

I cut up a thin plastic document sleeve to make my template, but you can use any thin, flexible plastic that is similar in thickness to acetate (or, if this helps, like good old fashioned overhead projector sheets. Ahh, primary school memories.)

I should warn you that this is a real watch-the-work-in-progress tutorial, no prettily staged and photographed stunt-toppers here, all these photos were taken as I made the topper I used on the cake, and the back-up topper. The only way it could be more raw and even less professional is if I’d videoed myself making it whilst wearing my pajamas and then uploaded it to YouTube for you to watch.

But don’t worry. I’ll never make you suffer through anything like that. I’ll just let you read through it and look at the pictures. Of the topper, I mean. Not me in my pajamas.

What you need:

Thin plastic or acetate
Cutting mat
Waxed paper
Scalpel or craft knife
Small scissors
Isopropyl alcohol (or other strong alcohol like cake decorator’s alcohol/rose spirit)
Rolling pin and/or pasta machine
Gum paste (or fondant mixed with tylose). I have the best results with Satin Ice gum paste.
Shortening (I used Crisco)
Large resealable plastic bag
Paintbrush and sugar glue (I used glue made from tylose and water)
Silicone-tipped colour shaper – wedge shape (from an art store) or Sugar Shapers
Ruler
20 & 22 gauge paper-covered wire
Vodka
Foam pad
Thin straws or flower picks

What to do:

Choose your font and write out the name. I did this in Photoshop, but you can use Word, Pages or any other program that you’re comfortable using. For Jaz’s name, I used ‘Salamander’ font, and did the ‘J’ and ‘az’ on separate layers in Photoshop, so that I could move the ‘az’ lower to make sure the the end of ‘z’ was in line with the end of the ‘J’. Where the bottoms of those letters sit is where the name will sit against the cake, and where we will insert the supports. Don’t be put off, that’s just what I had to do to make these particular letters work. With most other fonts the bottoms of the letters will line up on their own.


Print out the name onto regular printer paper, then place it under the sheet of thin plastic, and use a permanent marker to trace the letters onto the plastic. Use small scissors and/or the scalpel to cut out the name. Rub the plastic with some strong alcohol to remove the ink from the edges (even though it’s ‘permanent’ I still find that it can come off on the icing, so I just remove it with alcohol.)


(Now is the part where I apologise for the amount of pink in this tutorial. I used a pink cutting board, pink gumpaste and (this is the really stupid bit) pink plastic for the template. So yeah, sorry about that. It makes it hard to see, but hopefully I can make up for that with some exceptionally well written instructions. Hopefully…)

Have a look at your lettering and pick out the places that you think will be the weakest and most likely to break. Here I figured it would just be the joins between the letters. Cut small pieces of 22 gauge wire and curve and bend them to shape, ensuring that you make them long enough to bridge the weak point and reach a thicker part of the letters, which won’t be so fragile. Then find the bottom points of your letters (here the tails of the J and Z.) where the base of the letters will sit against the cake. Curve the end of some longer, thicker pieces of wire to shape, then bend the wire so that it will go straight down into the cake. Set the wires aside.


Tape a piece of waxed paper to a cutting mat. Rub the surface of the paper lightly with shortening. (I’d already done this in the picture above.)

Roll out your gum paste, to about 2mm thick (I used #2 on my pasta machine). Make sure the piece is big enough to fit the name. Place it onto the Crisco rubbed paper.


Rub the back side of the plastic template with a very thin smear of Crisco, then place it onto the gumpaste. Gently run along the letters with your finger to make sure they’re stuck to the gumpaste. You can also rub over it very gently with a fondant smoother.


Begin cutting around your letters using a craft knife or scalpel. If you find your knife dragging or pulling at the gum paste too much, try applying a bit of shortening to the tip of the knife. Don’t panic too much about drag marks or pulling though, you can smooth them out later. Remember that as you cut you can move the whole board around to get the most comfortable angle.

As you finish a section, it’s good to cut away the excess paste from the outside. When it comes to fiddly bits like the tail of the ‘z’, trim around it so there is about 4mm remaining, then use lots of small vertical cuts to trim close around the point. You can then use a tool like a silicone tipped paint eraser or sugar shaper to smooth and round off the point.


Once you’ve cut all of the excess paste away, use your silicone tool to go around all of the edges, smoothing any rough spots. You can also go back with your scalpel and trim any little flappy bits.

To remove the template, loosen an edge and very gently pull it away. If it’s doesn’t come away easily, you can slide a soft paintbrush between the plastic and the gum paste and use that to gently ease it away.


Carefully remove the tape and remove the waxed paper from the board, leaving the name in place, still stuck to the paper. Rub a second piece of waxed paper very lightly with shortening (and I do mean lightly here, you can wipe over the paper with a piece of paper towel to remove any excess), place the sheet (shortening side down) over your gum paste letters and gently rub over it with a fondant smoother to further flatten the letters and adhere the paper.


Place the whole thing into a resealable plastic bag. If you think the gum paste has dried out too much as you cut the letters, you can place a slightly damp paper towel into the bag with the letters, just make sure it doesn’t touch the paper or the letters. This will help keep the gum paste soft.


Repeat the process to cut out a second set of letters. Once they’re cut, leave the plastic template on the letters and set this piece aside.

Remove the first set of letters from the plastic bag. Find your bits of wire, and stick them onto the top (front) of the letters, adhering with a little sugar glue. Press the wire down gently into the gum paste using a fondant smoother, aiming to embed them about halfway into the gum paste. Brush a little more glue over the top of the wire.


Name-Cake-Topper-Tutorial-13-640x896


Paint a small amount of vodka onto the rest of the letters, just enough to lightly dampen the gum paste, and making sure you go right to the edge. I like to use vodka as if any seeps out between the layers, it will evaporate. Sugar glue will dry shiny and look messy. If you don’t want to use vodka, then water is the second best option, but be very sparing.

Gently flip over the paper with the second set of letters, and peel off the paper from the back. Flip the letters right side up (the plastic template will keep the letters in place) and place it over the first set of letters, lining up all the edges.


You can use your silicone tool to gently nudge the letters into place so they line up and use it to smooth the joins. Leaving the template in place while you do this will stop the letters getting misshapen.


Use a ruler to make sure the bottoms of the letters line up nicely and that the wires point straight down. Or you could use the lines on your cutting mat, if you remember that they’re there, which I clearly didn’t.


Leave to firm up for half an hour or so, then remove the template from the top, smoothing around the top edge of the letters with your finger to remove any drag marks (use a little shortening on your finger if they’re stubborn marks). Leave for a few hours, then place a foam pad over the letters and flip the whole thing over, and remove the back piece of waxed paper. Leave for several days (a week is better) to dry, gently turning the letters over occasionally so they dry evenly.


Now here’s the bit you will either love or hate me for, but it is very important. Do it all again to make a second topper. And if you’re clumsy, or have less than a week for the topper to dry, do a third set. Remember that an extra half hour spent now making another set will be far better than breaking your only topper at the last minute and not having time to make a new one and have it dry in time. Trust me. One word: experience.

Place the toppers into a cardboard box, and store in a cool, dry place until you need to use them. If it’s humid where you live, add some silica gel packets or dry rice to the box to help absorb moisture.

To insert the topper into the cake, first decide where on the cake you want the topper to go. I don’t recommend inserting wire (even paper covered wire) directly into a cake, so you will need to use flower picks, small straws or as I used, plastic lollipop sticks with holes through the middle. Trim the wires on the topper slightly shorter than the length of your straw/pick/stick (which in turn should be slightly shorter than the height of your cake). Insert each straw/pick/stick into the cake using the guide markings. Once your cake is delivered and all set up, gently insert the topper into the straws/picks/sticks. I don’t recommend travelling with the topper on the cake – always wait until the cake is set up.

So there you have it, one (or more, you did make a spare, right?!) gum paste name cake topper. I’ll be back soon with a couple more tutorials for the sprinkle and watercolour tiers of this cake.

Happy, er… topper-ing.

~Natalie

Check out the other tutorials for this beautiful cake here!:

Sprinkle Tier

Watercolor Tier

Original Post

About Natalie:

Untitled-1

I love candlelit dinners and long walks on the beach… um, no. Not unless the sand on that beach happens to be crushed biscuits on their way to becoming a cheesecake crust.I love to bake. Ok, I’ll admit it, I’m addicted to baking. Not just baking, but creating anything that’s sweet/pretty/yummy and makes people go “Ooh!” While most of my recipes are gluten free, they are most definitely not glutton-free. I’m not into low-fat, sugar-free or everything but the kitchen sink-free. If I’m going to be naughty, I’m gonna do it properly. However, that’s not to say if you have further dietary needs you can’t adjust these recipes to fit! My hope with this blog is to throw my three baking loves {cake decorating, baking in general, and baking gluten free goodies that aren’t just “good for gluten free,” but just plain good!} into a bowl, mix them up with a spoonful or six of my own brand of crazy and come out with something wickedly good, quite possibly dripping in chocolate, and all going well, covered in sprinkles.


NOLA Photography http://bentzphotography.com/

Tutorial Sale: Buttercream Rosettes and Ruffles

February 16, 2016 by Sharon Z Leave a Comment

Hello all!

Today I want to spotlight one of our new tutorials and guest instructor. Shannon Bond of Shannon Bond Cake Design is an AMAZING cake artist, who in this fondant dominated cake world, has perfected the art of the buttercream ruffle technique.

This hour long video is packed full of valuable techniques, that will help you become a buttercream master! Check out some photos below from the tutorial:
 

Gorgeous symmetrical buttercream rosettes with rustic icing on the top  tier:

buttercream rosette video for $3


Asymmetrical rosettes and free form ruffles, all in buttercream:

buttercream rosette video for $3


All done with one piping tip:

buttercream rosette video for $3


Both of these cakes are taught in the video tutorial.

buttercream rosette video for $3


How amazing is her work?

If you’d like to learn these gorgeous techniques, do take advantage of our special offer:

One month of full membership to our online school for only $3

You’ll get access to the full website, over 300 tutorials, and our private members’ only Facebook group for 30 days. At that time you can stay and pay at the regular price of $10 per month or cancel anytime. No risk and no obligation.

YOU CAN JOIN HERE

I’d love to have you join me.

Sharon

SugarEd Productions

—————————————————————————————–

About The Instructor: 

buttercream rosette video for $3Shannon Bond is an award winning cake artist based in Olathe, KS and owner of Shannon Bond Cake Design, which serves the greater Kansas City areas. Shannon has been featured in publications such as Cake Masters Magazine, American Cake Decorating Magazine, Cake Central, Cake Design France Magazine, Papilles Magazine, EA Bride Magazine, Australia CAKE!, Sweet Magazine, DIY Weddings Magazine, Party Cakes Magazine, and other multiple online blogs and websites. Visit her Facebook page here.


NOLA Photography http://bentzphotography.com/
  • « Previous Page
  • 1
  • 2
  • 3
  • 4
  • …
  • 10
  • Next Page »

Sharon Zambito

Sharon Zambito

An RN turned SAHM turned cake maniac. Owner of SugarEd Productions Online School. Join me for some caking, baking, and all around sweet fun :)

Follow me..

  • Facebook
  • Instagram
  • Pinterest
  • YouTube

Pinterest

  • Autumn House Two Trees Machine Embroidery Design – Blasto Stitch
    Autumn House Two Trees Machine Embroidery Design – Blasto Stitch
  • Embroider  Sew :: Jelly Roll Purses - Embroidery Garden In the Hoop Machine Embroidery Designs
    Embroider Sew :: Jelly Roll Purses - Embroidery Garden In the Hoop Machine Embroidery Designs
  • (1) How to QUICKLY & SAFELY remove acrylic, gel, and dip powder polish | BAGGY METHOD - SO EASY! - YouTube
    (1) How to QUICKLY & SAFELY remove acrylic, gel, and dip powder polish | BAGGY METHOD - SO EASY! - YouTube
  • (1) Bouffant Surgical Cap - YouTube
    (1) Bouffant Surgical Cap - YouTube
Follow Me on Pinterest

Follow Me on Instagram

Instagram requires authorization to view a user profile. Use autorized account in widget settings

Recent Posts

  • Egg Safety Basics
  • Stable Mabel Support System Sale
  • Guest Post : 4 Vegan Cake Recipes No One Should Miss Out On!

Popular Posts

  • Ways To Make Your Cake Fluffy And Moist
  • How To Stencil on Cookies with Royal Icing
  • Doctored Cake Mix Recipes
  • Transferring an Image Without a Projector
  • All About Buttercream!
  • How to Fix Broken Ganache
  • Edible vs Non Toxic Gold Dusts

Categories

Search

Archives

Copyright © 2025 · Sharon Zambito and SugarEd Productions,LLC

Copyright © 2025 · Evangeline Theme on Genesis Framework · WordPress · Log in