Sugared Productions Blog

  • Blog Home
    • Home
  • Online Classes
  • Shop
  • Contact
  • About

Twas the Week Before Christmas

December 20, 2008 by Sharon Zambito 20 Comments

When, what to my wondering eye should appear
But a miniature sleigh and eight tiny reindeer.
OK, so the reindeer went off to graze …..

Here is the big project I have been working on for weeks. I made this for my sister’s office party. She challenges me to raise the bar every year. I try to resist, but she gets me every time.
When she saw the Santa cake I made in Bronwen’s class, she asked for that for the party. Knowing that was not enough servings for 50 people, I had to think of a coordinating way to add servings.
Late at night in bed it came to me. I knew it would be very labor intensive and stressful, but I knew I just had to try. I would have never been able to live with myself if I did not.

I thought and thought and thought some more about how to go about doing this. I used dried fondant panels for the sleigh and cake made up the seat.
The loot bag was made from piled up cake scraps. Wendy made the packages for me from styro, and I threw in a few of my goodie basket candy cane cookies too.

I searched the Internet for sleigh images and clip art, and decided to use this as my template and model: Sleigh


I made my own template on card stock using this image as a guide. I cut 2 of each piece. I wanted to have extras in case of breakage. I cut them out about 10 days before I assembled the sleigh. I flipped them over every few days to enhance them drying.


After about one week, I put the scroll work on using layers of clay gun strings. (My arms and chest are still sore.) Then I painted it with gold highlighter mixed with vodka. ( Yeah, that took a while too, LOL)


My wonderful Wendy came over to help me assemble the sleigh. I was very nervous about breakage. I had invested way too much time and effort by this point to lose it all. And it certainly took 4 hands and 2 brains to get it together. We carved the cake and placed it on the bottom piece, then attached the back piece. (Melted chocolate was our glue for everything.)


Here it is just put together. I decided to double the side panels for strength, which was a very good idea. They may not have made it had I left them single. You can see the hole in the board in front of the sleigh where Santa’s stand will go down into. ( Thanks to Wendy’s dad for cutting the board for me.)
Wendy came with me to deliver it and assemble it. When we got there, we dropped Santa down into the hole, applied the buttercream snow and added the doo dads.

Here is my template. You can adjust the size of this, keeping the ratio proportion the same, to make any size you want. You could make cute little gumpaste or gingerbread sleighs too.

Side panels.
Back panel
Bottom panel (excuse the typo)
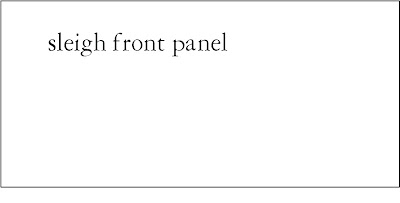
Front panel
Everyone at the party was just amazed and awed. It was a lot of work, and worrisome, but I am glad I rose to the challenge. I am also very glad it is over! LOL

Next on tap is assembling the goodie baskets I have been working on. I will post those pics over the weekend. Have to get my house clean for company tomorrow night. I could use a cocktail!

Happy Holiday Caking,
Sharon
http://www.sugaredproductions.com/


Eat More Chicken

November 27, 2008 by Sharon Zambito 8 Comments

At least that is what Tom Turkey wants you to do!


I made this little topsy for our family dinner tomorrow at my sis’s. I used this tutorial from the great site, Pastry Whiz, to make Tom.


Steak is good for Thanksgiving, no?

Look at that scared little face!


Giving Thanks.

Today I give thanks for all the wonderful blessings in my life, namely my incredible family and friends, without whom life would have no meaning. I also give thanks for all of you. You have all enriched my life in ways I cannot explain. I thank you for your business, your friendship, and your talent. I wish each and every one of you a blessed and beautiful Thanksgiving day.

Sharon


Follow the Yellow Brick Road

November 19, 2008 by Sharon Zambito 30 Comments

What a great movie. Brings back such good childhood memories of watching it on TV with my big sisters. Last weekend I made a cake with the Wizard of Oz theme. I was cruising the photo gallery on Cake Central and saw one using a sheet cake as the yellow brick road and got my inspiration from that wonderful cake. I took some photos of it in progress to share with you some of the techniques I used.
Taylor’s Wizard of Oz cake.
I made a paper template of the shape I wanted the cake to be and used that to cut the shape from a 12×16 sheet cake.
Then it was filled and crumb coated.
I wanted to show you guys how airless my icing is. This batch was made 3 days ahead of time, covered in plastic wrap on the surface, and kept in a plastic container at room temp. (If you want to see a clip of me making my icing, look here.)

The fondant was colored yellow and a some powdered tylose was added to help it firm up. I rolled it out and then used my brick impression mat over it. I used the same paper template that I cut the cake with to cut out the fondant. I let it sit there for a good 20 minutes or so to firm up, so that when I transferred it to the cake it would not stretch or distort.


Top piece applied to the cake.
I then cut a long strip of fondant (long enough to go around entire cake) and rolled it up bandage style.

The sides of the cake were dampened with water, and the bandage unrolled around the cake and smoothed in place. I then trimmed it level with the top of the “bricks” with an exacto knife.


I applied pieces of green fondant around the perimeter of the road to make grass. I made a seam in the front that would later be covered by flowers. I put a 21 star tip on my finger (much like a thimble) and stippled the entire surface of the green fondant to mimic grass.


The rainbow was an edible icing sheet that was put on fondant and allowed to dry firm for a few days. That was attached to the back of the cake with some melted chocolate.
The lollipops were made ahead also, and sucker sticks glued to the back. I stuck the sucker sticks down into the fondant and secured them in place with melted chocolate. I propped them in place until the chocolate firmed up.
After they were secure, I covered the chocolate with a little more “grass”.
The shoes were white chocolate tinted red and made in a 3D mold. Here they are right out of the mold.
I cleaned up the seams, added a fondant bow and painted them with piping gel.
A skewer in the bottom let me rotate them without messing them up with my hands as I sprinkled red disco dust all over them. (Be advised that while disco dust is non toxic, it is not truly considered food safe.)
The ruby slippers. I’ll get them, my pretty!
I’m meltiiiiiingggg…..
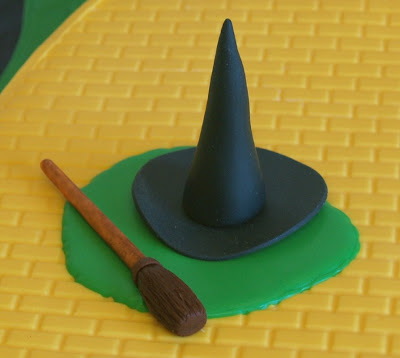
The hat and broom were hand modeled from fondant. A little puddle of green royal icing serves as the melted wicked witch. (She scared the bejeebers out of me…..you?)

I had a good time making this cake. None of the techniques are particularly difficult, just a little time consuming. I hope you have a chance to try it one day! Send me a pic if you do!

Happy Caking!
Sharon
http://www.sugaredproductions.com/

Here Comes Santa Claus!

November 12, 2008 by Sharon Zambito 14 Comments

WOW. PERIOD.
That just about sums up the class we hosted with Bronwen Weber last Sunday. She and her crew came and taught the 3D Standing Santa to 34 very eager students. They brought all the supplies and tools; all we had to do was show up. And each and every one of us left with a completed Santa cake. Very cool.
Bronwen and her assistants Heather and Francois (who is also her new hubby). All 3 of them were super nice, fun and helpful. Bronwen is total kick in the pants fun. Very positive, encouraging, relaxed and a great teacher.
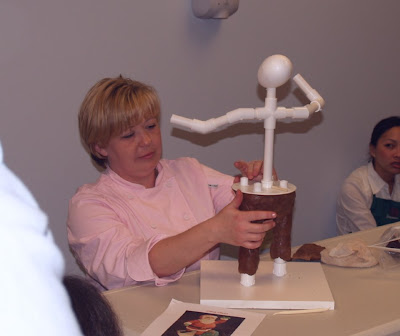
The Santa starts with a skeleton of PVC piping screwed into the base board. Arms and legs are formed with modeling chocolate.
We all went up to her demo table to see each technique and then went back to our seats to do it ourselves. We had immediate assistance if we needed it.

Wendy and I were goofing off here. Santa’s belly is cake supported by an acrylic plate.


Students busy at work.

A little army of Santas in the making.


Wendy kneading her fondant.

Working on my guy’s coat. Of all the techniques, I found the coat pieces to be the hardest to do .
Silly girls.
Bronwen showed us 2 ways to do the face. The one on the left would be the sculpted realistic face, but it is not complete. In addition, his mouth is all messed up from Bronwen getting goofy with him , but you get the general idea. The one on the right is the more cartoonish, and easier face, as there is no real sculpting involved. I chose the easier one, mostly because I wanted the cartoonishface for the kids, but I would like to try the sculpted face one day.
This is Bronwen’s Santa, with just the trim on his hat brim missing. Awesome huh?
Me, Bronwen, and my Santa. He is still wet from his vodka bath in this photo.

My Santa before his vodka bath. I still have to do a few finishing trim touches to him , and when I do, I will post some good shots of him.


I think he looks cute! I was thrilled with my cake. I never thought I could make a cake like this. I learned so many great new techniques I can apply to other cakes. It was a fabulous class and we will be hosting her here back again next year.

Gotta give a shout out to my hubby for getting us the big conference room at his place of work. Thanks Hun! And thank you to all of the students who attended and made it a great success!


Deedra’s Santa flew coach home! She said everyone on the plane went nuts over him and the pilot took a picture of him!

If you guys ever get a chance to take class with her, do it. Just do it.


Happy Holiday Caking Ya’ll!

Sharon
http://www.sugaredproductions.com/


Trick or Treat!

October 31, 2008 by Sharon Zambito 18 Comments

Happy Halloween everyone!

Hope you have a wonderful day with your kids and families. Don’t get sick eating too much of their candy like I always do!

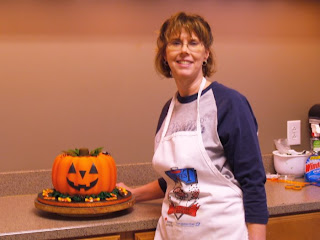
My sister Barbara, who has never decorated a cake in her life, came over for me to help her make a cake for her office Halloween goody contest. She has been a huge help to me with SugarEd over the last year, and has come with me to several of my demos and vendor shows, so she has been exposed to a lot this last year. (Some of you have met her! I also have another fabulous sister that you will meet later on.) She baked the cake herself and brought it over. I showed her how to do each technique (basically off the cake) and then she did the rest herself. She was quite a quick learner. She colored and rolled out the fondant, applied it (I helped her smooth one side while she did the other in the interest of drying out time.) She airbrushed it, made her own leaves and stem, piped the grass, and made the words. I helped her just a little bit with the face and spider.

We used 2 bundt cakes and spackled the seam with stiffened buttercream. Cream cheese filling was piped down into the center hole and a circle of cardboard sits on the top to support the stem.


Here is Barbara airbrushing her masterpiece. Do you dig the fancy taped up towels?

Piping the grass.

Finished!

Hers came out better than mine! And she won first place too! I am so proud, congrats Barb!

I also want to share with you the cookies I did yesterday for my bestest client.

All flooded with royal icing and candy eyes.

These were huge! The web was about 6 inches across.


The big bats are royal icing stenciled onto royal.

Pumpkins are royal stenciled on royal, ghosts are royal with fondant face.

Fondant face on airbrushed royal icing.
These were my favorite! They make me giggle.
Have a nice night everyone; have fun and stay safe!
Sharon
http://www.sugaredproductions.com/

Making a Gumpaste Crown

October 21, 2008 by Sharon Zambito 19 Comments

Raise your hand if you love princess cakes. Yes, yes, I see a lot of hands going up! We love princess cakes! And our customers do too!

When I say Princess, you say Cakes…..


Me: Princess

You: Cakes!

Me: Princess


You: Cakes!


OK, so I get a little excited about cake. And princess cakes have been a very popular design for a few years now. I have made more than I can count. I get asked quite often how I make the gumpaste crowns, so here are some step by step pictures I took many years ago. The pictures are rather craptastic, due to the fact that I had a craptastic camera at the time, and had no idea how to take a good picture back then. But I think you can get the idea of what I am doing in them. (PS. Craptastic = if crap was fantastic, this would be it)

MAKING A GUMPASTE CROWN:
Paper template:


Cut the metal rim off one end of your can (like a shortening can; I use the gumpaste mix can):


Wrap parchment paper (or wax paper) around your can and tape it in place. The end with the metal lid still on goes down on the counter:


Tape parchment or wax paper down well on counter (you do not need the blue mat under it) and grease it well with shortening:


Roll out gumpaste onto the wax paper and lay the paper template over it and trace over it to cut out the crown shape:


Apply shortening to the surface of the cut out crown with a brush:


Cut the wax paper with a knife along the bottom edge of the crown, and proceed to cut out the rest of a rectangle around the crown. Do not cut out the wax paper along the exact shape of the crown, except along the bottom edge:


Take the can and roll it onto the crown, lining up the base of can with the bottom edge of the crown. The greased side of the crown is sticking to the parchment paper wrapped around the can:


After crown is in place, wrapped all the way around the can, stand it up. Wax paper is still in place on top of the crown:


Gently peel off the wax paper from the top side of the crown. The side of the crown that was face down on the counter, touching the wax paper, is now the upside of the crown and exposed to the air:


Let that sit and dry for 1-2 days. Do not rush it or you will surely break it. (Ask me how I know):


When the crown is dry enough to hold its shape, grab the top of the parchment paper extending above the can and gently slide all of it together off the can:

Sit that on a board and then gently peel the parchment paper off of the inside of the crown:
Let that sit and dry for a few more days. When the crown is really firm you may need to wipe the excess shortening off the inside of the crown, and then dust it with a tad of cornstarch:
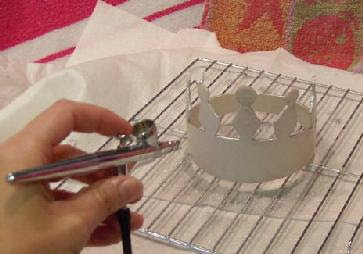
When fully dry, you can airbrush or paint it silver or gold. (This photo below is a lie. I was not actually airbrushing it at this time because I had to hold the airbrush with my left hand while my right hand took the picture. Impressive, eh?):
Then you can add plastic craft jewels, or even better, make edible ones!:


Pretty easy but you have to plan a few days ahead at least. Make 2, because if you make only one I guarantee you will break it. (Ask me how I know.) I like to use the Wilton gumpaste mix in the can for these because it not very elastic and rubbery, and that cuts easier than other types I have tried.

Here is a template for the crowns shown above. This is only one half of the crown. And you will have to enlarge this template to the right size for your cake:
Here is another template, the first one I ever made, an older design:


So there you have it! Now go get to making crowns!

Lots of crowns! All kinds of crowns!


We love Princess cakes!!

Happy crowning!
Sharon
http://www.sugaredproductions.com/

Cute Chocolate Cut Out Thingies

September 19, 2008 by Sharon Zambito 6 Comments

Yay for homework!

Two of our readers have sent in their chocolate favor projects, and I am excited to share them with you all.


Christie H. writes: While I haven’t made individual favors, I’ve used a similar technique to cut out plaques for a few cakes. I’ve added photos of two of them. In the first one, I melted white chocolate, then swirled black candy coloring to get a marbled effect. I love the layered look of yours and will definitely be trying that in the future!
Very clever technique, don’t you think?

Kim B. whipped out these beauties one evening after work for an office party. (Told ya no way she is a newbie.) Aren’t they gorgeous? She used the Funky Tappit cutters for her monogram.


Now as for the rest of you, get going on your homework projects and send them in! You don’t want to end up in confection detention!

Have a great weekend!

Sharon
http://www.sugaredproductions.com/


  • « Previous Page
  • 1
  • …
  • 8
  • 9
  • 10

Sharon Zambito

Sharon Zambito

An RN turned SAHM turned cake maniac. Owner of SugarEd Productions Online School. Join me for some caking, baking, and all around sweet fun :)

Follow me..

  • Facebook
  • Instagram
  • Pinterest
  • YouTube

Pinterest

  • Autumn House Two Trees Machine Embroidery Design – Blasto Stitch
    Autumn House Two Trees Machine Embroidery Design – Blasto Stitch
  • Embroider  Sew :: Jelly Roll Purses - Embroidery Garden In the Hoop Machine Embroidery Designs
    Embroider Sew :: Jelly Roll Purses - Embroidery Garden In the Hoop Machine Embroidery Designs
  • (1) How to QUICKLY & SAFELY remove acrylic, gel, and dip powder polish | BAGGY METHOD - SO EASY! - YouTube
    (1) How to QUICKLY & SAFELY remove acrylic, gel, and dip powder polish | BAGGY METHOD - SO EASY! - YouTube
  • (1) Bouffant Surgical Cap - YouTube
    (1) Bouffant Surgical Cap - YouTube
Follow Me on Pinterest

Follow Me on Instagram

Instagram requires authorization to view a user profile. Use autorized account in widget settings

Recent Posts

  • Egg Safety Basics
  • Stable Mabel Support System Sale
  • Guest Post : 4 Vegan Cake Recipes No One Should Miss Out On!

Popular Posts

  • Ways To Make Your Cake Fluffy And Moist
  • How To Stencil on Cookies with Royal Icing
  • Doctored Cake Mix Recipes
  • Transferring an Image Without a Projector
  • All About Buttercream!
  • How to Fix Broken Ganache
  • Edible vs Non Toxic Gold Dusts

Categories

Search

Archives

Copyright © 2025 · Sharon Zambito and SugarEd Productions,LLC

Copyright © 2025 · Evangeline Theme on Genesis Framework · WordPress · Log in