Sugared Productions Blog

  • Blog Home
    • Home
  • Online Classes
  • Shop
  • Contact
  • About

Brotherly Love

November 5, 2008 by Sharon Zambito 11 Comments

Family. Ya gotta love ’em. What would we do without them?
I was blessed (or sentenced, depending upon how look at it, LOL) to be born into a large family, the last of 5 siblings. The age gap between my older siblings and I was large enough that they really were too old to be my playmates. In fact, I think I was more an object for their entertainment by harassing and torturing me for their own evil pleasure. All of them but my brother Michael. He was never mean to me. He never stung me with rubber bands, beat up my teddy bear, or forced me to look at skeleton pictures. He never scared me with a vampire face, or tricked me by wrapping rocks to look like candy just to see me cry from disappointment. He never talked on the phone late at night when I was trying to sleep, pulled me off the desk chair to do “college work”, or eat all the fresh cherries at the beach so I got none. Nope, not Mike. (You others know who you are and what you have done. I wonder how you sleep at night.) Michael does not have a mean bone in his body. I don’t think I have ever heard him utter a cross word. He taught me to play chess, did word Jumble puzzles with me, and took me on vacation to the Grand Canyon. He is the most gentle, kind and selfless person I know.
Left to right: John, Mike, Janice, Barbara, and me.

And he’s good to me still to this day. Whenever my PC gets all bogged down with junk and viruses, and starts to run badly, I can always take it in to him for a full clean out and tune up. He gets it running fast and clean for me again. Just like he did this week. So how do I thank him for his help? By doing the only thing I know how to do: bake!

Mike can’t have sugar, so I make him sugar free cakes. Gives me a chance to try out some new recipes. He seems to like anything though; he is not picky.


This recipe I had saved on my PC, and I do not know the source to give credit. The cake was a tad dry to me, but I may have baked it a little bit too long. I would advise to take it out the oven before the toothpick comes out fully clean to prevent over baking. The icing was delicious. Squirt-the-piping-bag-right-into-your-mouth delicious. And yes, I did do that. 3 times. But not until I was finished with the cake.

Sugar-free Chocolate Cake

2 cups flour
1½ cups Splenda (granular no calorie sweetener)
3/4-cup non-dairy creamer powder
¼ tsp salt
1 ¼ tsp baking soda
½ cup + 2 Tbsp cocoa
¾ cup applesauce or vegetable oil
1 cup + 2 Tbsp milk
2 tsp baking powder
3 eggs
1 ½ tsp vanilla

Measure the dry ingredients into a bowl reserving ¼ cup Splenda. In another bowl mix the applesauce (or substitute ¾ cup vegetable oil),Milk, vanilla, and 3 egg yolks. Beat the egg whites until fluffy, slowly adding the remaining ¼ cup of Splenda. Whisk together the dry ingredients with the liquid making a smooth batter. Beat for 2 minutes until color lightens. Then fold in the egg whites. Bake in two greased and floured 8 –inch cake pans, at 350 degrees about 20 – 30 minutes. When Baking with Splenda, products bake quicker so test to see when cake springs back or when a toothpick comes out clean. They also do not rise very much. Each layer was about 1-1.5 inches tall, so I torted them and filled.

Sugar-free Chocolate Frosting

1 Large box Vanilla or chocolate instant sugar free Jell-O pudding mix
1-cup low fat milk
2 cups heavy cream

In a mixing bowl pour the milk. Measure out the heavy cream and open the pudding box. Quickly pour the pudding into the milk beating just until absorbed, add the heavy cream and continue to beat until light and fluffy.(I doubled this recipe to fill and ice my cake as shown.)
It made a nice cake and I would make it again. Janice is the real sugar free baker in the family. She doesn’t know it yet, but I am going to recruit her to contribute to my blog when she tries out all her new recipes. It’s the least she can do after all that childhood misery she caused me. I know how much I love sweets and cannot imagine not being able to have them because of dietary restrictions. So from time to time I will post some sugar free recipes.
What mean things did your sibs do to you?
Happy Baking!
Sharon,
http://www.sugaredproductions.com/

Trick or Treat!

October 31, 2008 by Sharon Zambito 18 Comments

Happy Halloween everyone!

Hope you have a wonderful day with your kids and families. Don’t get sick eating too much of their candy like I always do!

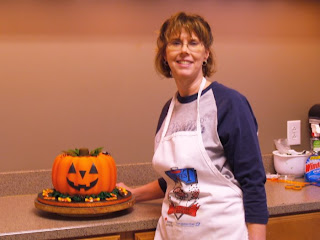
My sister Barbara, who has never decorated a cake in her life, came over for me to help her make a cake for her office Halloween goody contest. She has been a huge help to me with SugarEd over the last year, and has come with me to several of my demos and vendor shows, so she has been exposed to a lot this last year. (Some of you have met her! I also have another fabulous sister that you will meet later on.) She baked the cake herself and brought it over. I showed her how to do each technique (basically off the cake) and then she did the rest herself. She was quite a quick learner. She colored and rolled out the fondant, applied it (I helped her smooth one side while she did the other in the interest of drying out time.) She airbrushed it, made her own leaves and stem, piped the grass, and made the words. I helped her just a little bit with the face and spider.

We used 2 bundt cakes and spackled the seam with stiffened buttercream. Cream cheese filling was piped down into the center hole and a circle of cardboard sits on the top to support the stem.


Here is Barbara airbrushing her masterpiece. Do you dig the fancy taped up towels?

Piping the grass.

Finished!

Hers came out better than mine! And she won first place too! I am so proud, congrats Barb!

I also want to share with you the cookies I did yesterday for my bestest client.

All flooded with royal icing and candy eyes.

These were huge! The web was about 6 inches across.


The big bats are royal icing stenciled onto royal.

Pumpkins are royal stenciled on royal, ghosts are royal with fondant face.

Fondant face on airbrushed royal icing.
These were my favorite! They make me giggle.
Have a nice night everyone; have fun and stay safe!
Sharon
http://www.sugaredproductions.com/

Making a Gumpaste Crown

October 21, 2008 by Sharon Zambito 19 Comments

Raise your hand if you love princess cakes. Yes, yes, I see a lot of hands going up! We love princess cakes! And our customers do too!

When I say Princess, you say Cakes…..


Me: Princess

You: Cakes!

Me: Princess


You: Cakes!


OK, so I get a little excited about cake. And princess cakes have been a very popular design for a few years now. I have made more than I can count. I get asked quite often how I make the gumpaste crowns, so here are some step by step pictures I took many years ago. The pictures are rather craptastic, due to the fact that I had a craptastic camera at the time, and had no idea how to take a good picture back then. But I think you can get the idea of what I am doing in them. (PS. Craptastic = if crap was fantastic, this would be it)

MAKING A GUMPASTE CROWN:
Paper template:


Cut the metal rim off one end of your can (like a shortening can; I use the gumpaste mix can):


Wrap parchment paper (or wax paper) around your can and tape it in place. The end with the metal lid still on goes down on the counter:


Tape parchment or wax paper down well on counter (you do not need the blue mat under it) and grease it well with shortening:


Roll out gumpaste onto the wax paper and lay the paper template over it and trace over it to cut out the crown shape:


Apply shortening to the surface of the cut out crown with a brush:


Cut the wax paper with a knife along the bottom edge of the crown, and proceed to cut out the rest of a rectangle around the crown. Do not cut out the wax paper along the exact shape of the crown, except along the bottom edge:


Take the can and roll it onto the crown, lining up the base of can with the bottom edge of the crown. The greased side of the crown is sticking to the parchment paper wrapped around the can:


After crown is in place, wrapped all the way around the can, stand it up. Wax paper is still in place on top of the crown:


Gently peel off the wax paper from the top side of the crown. The side of the crown that was face down on the counter, touching the wax paper, is now the upside of the crown and exposed to the air:


Let that sit and dry for 1-2 days. Do not rush it or you will surely break it. (Ask me how I know):


When the crown is dry enough to hold its shape, grab the top of the parchment paper extending above the can and gently slide all of it together off the can:

Sit that on a board and then gently peel the parchment paper off of the inside of the crown:
Let that sit and dry for a few more days. When the crown is really firm you may need to wipe the excess shortening off the inside of the crown, and then dust it with a tad of cornstarch:
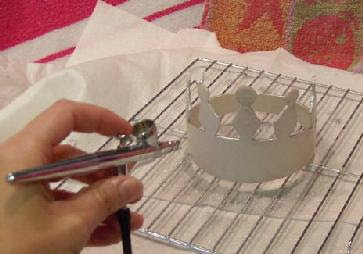
When fully dry, you can airbrush or paint it silver or gold. (This photo below is a lie. I was not actually airbrushing it at this time because I had to hold the airbrush with my left hand while my right hand took the picture. Impressive, eh?):
Then you can add plastic craft jewels, or even better, make edible ones!:


Pretty easy but you have to plan a few days ahead at least. Make 2, because if you make only one I guarantee you will break it. (Ask me how I know.) I like to use the Wilton gumpaste mix in the can for these because it not very elastic and rubbery, and that cuts easier than other types I have tried.

Here is a template for the crowns shown above. This is only one half of the crown. And you will have to enlarge this template to the right size for your cake:
Here is another template, the first one I ever made, an older design:


So there you have it! Now go get to making crowns!

Lots of crowns! All kinds of crowns!


We love Princess cakes!!

Happy crowning!
Sharon
http://www.sugaredproductions.com/

Cute Chocolate Cut Out Thingies

September 19, 2008 by Sharon Zambito 6 Comments

Yay for homework!

Two of our readers have sent in their chocolate favor projects, and I am excited to share them with you all.


Christie H. writes: While I haven’t made individual favors, I’ve used a similar technique to cut out plaques for a few cakes. I’ve added photos of two of them. In the first one, I melted white chocolate, then swirled black candy coloring to get a marbled effect. I love the layered look of yours and will definitely be trying that in the future!
Very clever technique, don’t you think?

Kim B. whipped out these beauties one evening after work for an office party. (Told ya no way she is a newbie.) Aren’t they gorgeous? She used the Funky Tappit cutters for her monogram.


Now as for the rest of you, get going on your homework projects and send them in! You don’t want to end up in confection detention!

Have a great weekend!

Sharon
http://www.sugaredproductions.com/


Back in the Saddle

September 14, 2008 by Sharon Zambito 24 Comments


The cake saddle that is.


It sure seems like it has been a while since I did any caking. I purposefully took most of the summer off to spend time with my kids, since D was going off to college. (sniff, sniff). We hung out a lot and went on a family vacation. I also needed to finish some long overdue house projects and yard work. But mysteriously, none of that got done. Hmm…wonder how that happened. Oh well, I’ll get to it eventually.


Since I was refreshed and rejuvenated, I decided to upgrade my customer’s simple small cake so I could make a design I had in my head. Well, the cake had other ideas. This cake made my hurricanoids flair. (In other words, it was a pain in my rear.)
 
First of all, it is not a good idea to have big ole honkin’ chunks of cherries in a cake you know you are going to carve. I knew this was not a good idea going into it. But in my arrogance, I forged ahead. I was so cocky I even added more cherries than the recipe called for. I ain’t a skeered of no cherries.
 
Then came time to carve. And it showed me who was boss. Even with my super sharp knife; it was a mess. Cherries came out in chunks, bringing precious cake along with it. Calling myself a few choice names, I proceeded on. I finally got the 2 tiers carved and patched up.
 
 
Then I scorched my first batch of cream while making the ganache to ice the cake with. After the do-over, I got them iced and let them set overnight to firm up.
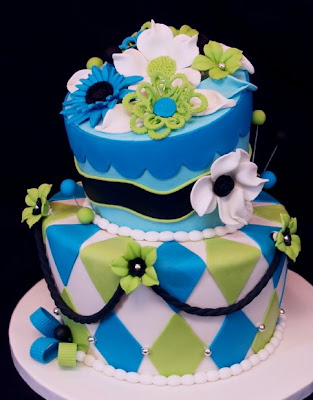


The next day I got the bottom tier covered beautifully; but within 15 -30 minutes the fondant just started acting wonky. It was bulgy and kind of baggy and getting a lot of elephant skin along the bottom edges. It was morphing before my eyes! I have had this happen before on rare occasion, so I chalked it up to an “off” bucket of fondant. If I tried to take it off, I would have destroyed the cake. So I did what any good decorator would do in this case: uttered a few more choice words, and then I changed the design. The harlequin diamond pattern in fondant is a wonderful way to cover up boo boos or naughty acting fondant. So diamonds it was.
 
The original design was going to be somewhat musical. I was dying to use my new sheet music stencil I got at ICES. I got the upper tier covered and greased it down to get the corn starch off. (Cuz we all know I love my cornstarch, LOL). I was under an impending deadline and getting worried about finishing in time. For one nanosecond, my brain said, “Sharon, do not stencil on that freshly Crisco’d tier. It will not work.” Obviously not having learned my lesson from the cherry fiasco, I blew myself off and proceeded to stencil. Folks, you cannot stencil with royal icing onto greasy fondant. You have to wait until it absorbs in. It was a smeary mess. Of course the black royal would not clean all the way off. It left a nice black stain. So I did what any self respecting decorator would do: after calling myself a new variety of very choice words, I changed the design. Hence the birth of the wacky black band around the top tier.

From there I just added the swags and the flowers I had made the night before. The cake no longer had a musical theme, but a gal has to do what a gal has to do. The customer loved it, so all is well that ends well.


Despite all my troubles, I thought it was kind of nice in the end.
And I very much love my array of fantasy flowers.


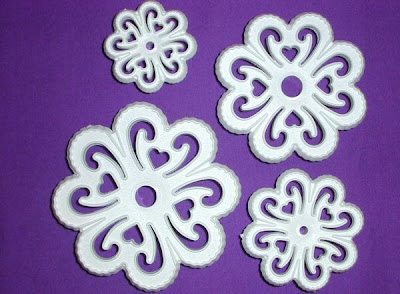
The filigree type flowers were made with cutters available here:


The trumpet like flowers were made with this petunia set:


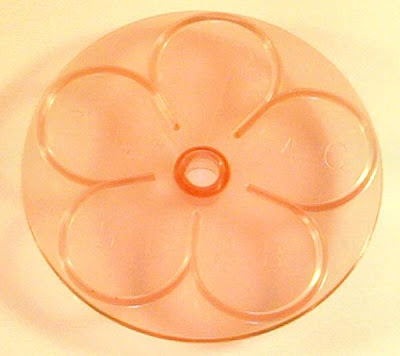
The 2 white blossom flowers were made with the all in one rose cutter:


And I used various buttons from this mold for some of the flower centers:


The camouflage:


Moral of the story:
 
Listen to your gut;
never give up.


I Love it to the Core

September 7, 2008 by Sharon Zambito Leave a Comment

For as long as I have been around the Internet cake world, it seems that I must be the only caker on the face of the planet that actually likes to use the heating core when baking my layers. Most bakers I know use the rose nail as a heating element in the center of the pans to help them bake evenly. But I did not have much success with those. Once I tried the heating core, I have never looked back.

I use my Wilton Cake Release (squirt bottle, not spray) to coat my pans, as well as in the inside and outside of the core, using a pastry brush. I absolutely LUV the Wilton Cake Release. My cakes never stick, it is easy to use, and the pans are easy to clean up afterwards. I tried homemade pan grease, but wasn’t too fond of that either. Plus, I am always looking for ways to not have to make stuff. If I can find a product I like that prevents me from having to make something home made, I am a happy camper.


Fill your pans as usual after they and the core are prepped. Fill the core about half way with batter also.


Bake your cake as usual. The heating core will help the centers of the cake bake more quickly, keeping up with the edges (which bake faster than the middle). So the cake bakes more evenly across, and prevents dried out edges from occurring while waiting for the center to cook fully.

You will get a nice baked up cone of cake in the center. Take the pan out of the oven and let them cool for about 10 minutes (or follow your normal procedure.)

When you are ready to flip your cakes out of the pan, take the core out and set aside.

Then flip your cakes out to cool as you normally do. I suggest leaving the core to cool completely before you take the cake out. If I try to take it out while it is still warm, it breaks and some cake gets stuck in the metal core. To get the cake out of the core, just turn it over and shake really hard and it should pop out.


After your cakes are fully cooled and you are ready to fill your layers, place the core of cake right into the empty hole.


Level your cakes per usual.

You will hardly even be able to tell where the cake plug is. Fill and ice as usual.


Maybe you will choose to try this out. Who knows, I might even recruit a few of you over to the dark side. MWAHAHA.

 Beautiful maraschinos for the cherry chocolate cake.
PS. Please note that you can now subscribe to email alerts to our blog. Use the form in the right upper hand column of this page to enroll. You will be notified via email when there is a new blog entry. Feel free to post a comment or send an email to let us know how we are doing.

Happy caking!

Sharon
SugarEd Productions
  • « Previous Page
  • 1
  • …
  • 16
  • 17
  • 18

Sharon Zambito

Sharon Zambito

An RN turned SAHM turned cake maniac. Owner of SugarEd Productions Online School. Join me for some caking, baking, and all around sweet fun :)

Follow me..

  • Facebook
  • Instagram
  • Pinterest
  • YouTube

Pinterest

  • Autumn House Two Trees Machine Embroidery Design – Blasto Stitch
    Autumn House Two Trees Machine Embroidery Design – Blasto Stitch
  • Embroider  Sew :: Jelly Roll Purses - Embroidery Garden In the Hoop Machine Embroidery Designs
    Embroider Sew :: Jelly Roll Purses - Embroidery Garden In the Hoop Machine Embroidery Designs
  • (1) How to QUICKLY & SAFELY remove acrylic, gel, and dip powder polish | BAGGY METHOD - SO EASY! - YouTube
    (1) How to QUICKLY & SAFELY remove acrylic, gel, and dip powder polish | BAGGY METHOD - SO EASY! - YouTube
  • (1) Bouffant Surgical Cap - YouTube
    (1) Bouffant Surgical Cap - YouTube
Follow Me on Pinterest

Follow Me on Instagram

Instagram requires authorization to view a user profile. Use autorized account in widget settings

Recent Posts

  • Egg Safety Basics
  • Stable Mabel Support System Sale
  • Guest Post : 4 Vegan Cake Recipes No One Should Miss Out On!

Popular Posts

  • Ways To Make Your Cake Fluffy And Moist
  • How To Stencil on Cookies with Royal Icing
  • Doctored Cake Mix Recipes
  • Transferring an Image Without a Projector
  • All About Buttercream!
  • How to Fix Broken Ganache
  • Edible vs Non Toxic Gold Dusts

Categories

Search

Archives

Copyright © 2025 · Sharon Zambito and SugarEd Productions,LLC

Copyright © 2025 · Evangeline Theme on Genesis Framework · WordPress · Log in