Sugared Productions Blog

  • Blog Home
    • Home
  • Online Classes
  • Shop
  • Contact
  • About

Is This Stuff Still Good?

August 15, 2016 by Sharon Z 2 Comments

Hi again sugar friend –

Ever have this happen?

You’re baking a cake, and have all the stuff in the mixer ready to go when you realize that you forgot to get one of the ingredients at the store.

It’s late and you’re tired and your grocery isn’t even open right now!

You dig around in your pantry, and way in the back you find and older container of the missing ingredient, yay!…. but it doesn’t have an expiration date on it.

ARGH! What to do?

Use it and take your chances? Or trudge to the 24 hour Wal Mart to get more?

Yeah, me too. Been there. More than once. 🙂

So I’ve put together a list of common baking ingredients, how often they should be replaced, storage suggestions, and what can be stored in the freezer.

  • Since expired milk can be a safety hazard, you should always follow the expiration date for this ingredient. When kept in the fridge, milk is good for about 5 days after the sell-by date. The main body of the refrigerator stays colder than the doors so be sure to keep your milk in the main body. In the freezer, milk will stay fresh for three months.
  • Butter should be kept in the refrigerator or freezer to prevent melting. Butter is good for one month after the sell-by date when kept in the fridge. In the freezer, butter will last between six and nine months.
  • Buttermilk can be kept in the refrigerator for about two weeks. In the freezer, it will last up to three months. It’s important to remember that buttermilk is like regular milk in the sense that it does not matter whether or not it has been opened – it will go bad in the same amount of time. If the buttermilk smells bad or looks lumpy, it should be thrown away.
  • Shortening has a relatively long shelf life when kept in a cool, dark pantry. If sealed, shortening is good for two years. Once opened, it can be stored for a year as long as you keep the lid tightly closed.Baking powder and baking soda will need to be swapped out about every six months. However, you can test these ingredients before throwing them away. To test baking soda, put a few teaspoons of white vinegar into a small bowl and add a teaspoon of baking soda. If the mixture bubbles and foams, the baking soda is still good.
  • Baking powder can be tested by placing a few teaspoons of warm water in a small bowl and adding a teaspoon of baking powder. If the baking powder has not expired, it will form tiny bubbles and make the water cloudy.
  • All-purpose flour stays fresh for about a year. It can be kept in the pantry, refrigerator, or freezer depending on how long you are trying to store it. Flour is best kept in its original container inside of an airtight bag to ensure it does not pick up the odor from any other ingredients stored nearby. If at any time the flour acquires a smell, it should be thrown away to ensure it does not change the taste of your cake. Expired flour can make your cake taste a little bitter.
  • For safety purposes, boxed cake mix should be thrown away after the expiration date. Although it is unusual, there have been cases of cake mix developing a yeast that results in the growth of toxic spores or mold.
  • An unopened bottle of vegetable oil will stay fresh for about two years. After it has been opened, you can store oil for 18 to 24 months. Oil is negatively affected by air, heat, and light. To ensure your oil lasts a long time, be sure to keep the bottle tightly sealed in a cool, dark area like the pantry.
  • In terms of safety, spices do not expire. However, they really should be replaced after two or three years. Spices any older than this will start to lose their flavor and aroma causing your cake to taste funny. If at any time you notice a spice is losing its vibrancy or changing color, it should be thrown away. Make sure you keep your spices tightly sealed in a cool area to prevent this from happening.
  • Flavoring extracts are very similar to spices. They do not spoil, but they can lose flavor and aroma after six months to a year. If you notice an extract has begun to lose its smell, it is best to throw it away to ensure it does not affect the outcome of your baking. The only exception is pure vanilla extract which actually improves with age and can be stored indefinitely.


So that covers the basic shelf life for common baking ingredients.

However, you should always contact your health department for food safety regulations.

If any ingredient looks or smells funny, even before the expiration date, it’s best to throw it away. It’s always better to be safe than sorry!

Now we can all go take stock of our pantry and fridge, purge out the old stuff and replace with new. Time to go shopping!

I hope you have a wonderfully cakey rest of the week 🙂

Sharon

————————————————–

PS. Here’s a peak of some of the new tutorials in my online school:

unnamed-9
These and over 300 more are available.

Join at www.sugaredproductions.com/subscribe

Summer Treat Tutorial Roundup

August 2, 2016 by Sharon Z Leave a Comment

Hi All!

It’s officially August, however school is not back in session so to me it’s still Summer! In honor of the coming end of the season, we have some treats we want to share. Hope these give you some inspiration.

How-to-DIY-Cute-Ladybug-Cupcakes

Ladybug Cupcakes by Victorious Cupcakes


54eba479c9e4c_-_sunflower21_lgn

Sunflower Cupcakes by Country Living


Summer-Smores-Beach-Cake

Summer S’mores Beach Cake by Framed Frosting


IMG_1504e2

Fun Summer Cookies  by Glorious Treats


IMG_1374e

Watermelon Cookies by Glorious Treats


7531931078_2715c94301_o

Beach Ball Cake Pops by Bakerella


NEO4A-1

Neapolitan Party by SugarEd Productions


Strawberry Cupcakes FInal Shot

Strawberry Cupcake Toppers by SugarEd Productions


Flip-Flop-Cake-pops

Flip Flop Cake Pops by Living Locurto


That’s our Summer treat round up. Time is running out to get our last Summer baking projects done. I’d love to hear what you are working on.


Happy Baking,
Sharon

Visit our online school

Ways To Make Your Cake Fluffy And Moist

July 27, 2016 by Sharon Z 61 Comments

Hi all! Today we have a guest post from our friends at 247naijacakeaffairs, and they are going to give us some tips on how to make our cakes moist and fluffy!


c501a702ef05e90d163a1eeeb1633357_L

Making a cake is not a difficult process, but complications can arise whether you are using a premixed product or baking the cake from scratch. By altering the ingredients, however, you can eliminate a number of potential pitfalls that lead to a cake being dry and crumbly when it comes out of the oven. In some cases, making substitutions or adding one additional element is all you need to make an extremely moist and fluffy cake. Please note that it is possible for a cake to by fluffy and not moist. It is thus beneficial for you to know exactly what you want to achieve in order for the rules below to guide you. Let’s look at the points as categorized below.


WORK WITH A RECIPE

Baking is as much an art as it is a science. In order to achieve dependable results, we need to work with recipes and not use guess work. Unlike in times past when we baked merely based on what comes into our heads. If a recipe must be changed during baking, take note of those changes. That way you know what to repeat or avoid the next time you are baking that type of cake.


TYPE OF CAKE

ry0401_carrotcake


Some types of cakes like red velvet and carrot cakes are naturally moist, and in fact cakes with high liquid proportions always turn out moist. Sponge cakes are naturally fluffy, while vanilla cakes are usually not as moist and fluffy. Knowing what to expect from a particular type of cake and having good knowledge of the characteristics of various types of cakes is an asset that will help you decide on the type of cake that will fit your objective.


CHOICE OF INGREDIENTS

Cake-Ingredients


The types of ingredients you use to bake your cakes play a major role in how fluffy and moist you cake will be. Let’s consider these few tips below:

  •  Use cake flour in place of all-purpose flour. Cake flour is flour which has been mixed with some corn starch in order to make it lighter. Cakes baked with cake flour are usually lighter and softer than cakes baked with all-purpose flour.
  • Use real butter in place of margarine, even if the recipe calls for it. Margarine or butter substitutes contain more water than fat. However, it is the fat in butter that helps to hold the cake together and moisten it. The excess water in margarine will evaporate in the oven’s heat, leaving you with a dry texture to your cake.


butter


  •  Substituting some butter with oil in a recipe always leads to moister cakes. Vegetable oil reduces the production of gluten in flour, a protein found in wheat products that work as a binding agent. Too much gluten in a cake will cause it to be sticky and tough rather than moist.
  •  

  •  Consider substituting milk for buttermilk. Buttermilk has a high acidic content which breaks down the gluten in flour, thus making cakes softer. If you are going to use buttermilk in a recipe which does not include baking soda, consider adding a little bit of baking soda to the recipe.
  •  

  • Blend the batter thoroughly after adding any additional ingredients called for in the recipe to ensure their full incorporation and then bake the cake normally.


MIXING THE BATTER

cakebatter


At the point of mixing the cake batter, here are a few things to consider:

  •  If you are using the creaming method of mixing the butter and sugar first, be sure to add as much air into the mixture as possible. When air is trapped in your batter it will help make your cake light and fluffy, however, do not overdo it.  5 to 8 minutes of creaming will be enough.
  • The reverse is the case after flour has been added. Over-mixing after the flour has been added will make the cake dense and hard. Always use the technique of adding flour and milk in alternating additions (flour, milk, flour, milk, flour). This will guarantee that you do not over mix the batter. If you are using a stand mixer, stop the machine after most of the flour has been poured in and mix the rest using your spatula.
  •  Separate the white from the yolk of one egg included in the recipe. Discard the white and add only the yolk to the batter. This step is necessary for only one egg, regardless of how many are used in the recipe. Egg whites are drying agents and too many will reduce the moisture content of the batter. To achieve extra fluffy cakes, especially when making vanilla cakes, separate the egg whites from the egg yolk, make the batter with the egg yolks, beat the egg whites separately and fold it into the batter in the end.


BAKING

baking

Over baking your cakes could be a problem. Below are a few tips for avoiding this:

  • Try dividing your batter into 2 baking pans and baking them in those separate pans instead of baking all the batter in one deep baking pan. The more quantity of batter poured in a pan, the longer you will need to bake the cake, and the more chances the cake will dry out during baking.
  •  Be attentive while your cake is in the oven. Over baking a cake is sure to make it dry. Always bring out your cake from the oven as soon as your cake is baked. This is ascertained as soon as a tester inserted in the middle comes out clean. Always note the recommended baking time for the recipe you are using and start checking 8 minutes earlier.
  •  If your cake is taking too long to bake, cover the top of the cake with parchment paper. This will not only prevent the cake from browning too much but will also prevent it from drying out.


STORING AND FROSTING

  •  Make sure your cakes are completely cool before storing them in a fridge. Seal them properly with foil before putting them in the fridge. When cakes are exposed over time, they gradually dry out. Sealing helps to keep moisture inside the cake.
  • Adding syrup (eg, sugar syrup) is a great way of adding moisture to your cakes. To use, pour or spray some simple syrup over your cake slices before frosting the cake.


Thanks to 247naijacakeaffairs for this great post. I hope it helps you in your cake baking adventures!

Sharon

Visit our online school


Cake Baking: Troubleshooting Guide

July 19, 2016 by Sharon Z 2 Comments


Hi it’s Sharon here 🙂

If you’re like me, you’ve encountered your share of problems while baking the cakes we love to decorate. (Some days I wish I could just wiggle my nose and have them baked and filled, all ready to decorate 🙂

There are several common issues associated with baking, and most of these are fairly simple to fix. The difficult part is figuring out exactly what is causing the problem.

Below is a list of common problems along with possible causes.

Keep in mind there is not one solution for each issue. This means you’ll probably need to play around with your baking process to identify the culprit.

Your cake falls

  • The oven temperature is too low
  • Under-baking the cake
  • Under-mixing the batter
  • Using too much baking powder
  • The altitude is too high
  • Not using enough eggs


Your cake peaks in the center

  • The oven temperature is too hot
  • Using too much flour
  • Not using enough liquid
  • Over-mixing the batter
  • Not using enough batter in the pans
  • Using too high of an egg content


Your cake is heavy

  • Over-mixing the batter
  • The oven temperature is too low
  • Using too much shortening, sugar, or liquid


Your cake is coarse

  • Under-mixing or over-mixing the batter
  • The oven temperature is too low
  • Using too much baking powder or soda
  • Letting the batter stand for too long


Your cake is dry

  • Baking the cake too long
  • The batter curdles
  • Over-beating the eggs
  • Using too much flour, baking powder, or soda
  • Not using enough shortening or sugar


Your cake cracks and falls apart

  • Removing the cake from the pan too soon
  • Too much shortening, baking powder or soda
  • The oven temperature is too high
  • The cake is receiving too much bottom or top heat


Your cake shrinks

  • The oven temperature is too low or high
  • Over-mixing the batter
  • Over-baking the cake
  • Over-greasing the pan
  • Using too much liquid in the batter
  • Not using enough batter in the pans


Your cake surface is sticky

  • Using too much sugar
  • Using too weak of a flour
  • Using too much shortening
  • Not using the proper cooling techniques


Your cake has holes

  • Over-mixing or under-mixing the batter
  • Using too strong of a flour
  • Not using enough liquid
  • Not using enough sugar
  • Using too many eggs


Your cake has a low volume

  • The oven temperature is too high
  • The batter temperature is too high
  • Using too little or too much liquid
  • Not using enough batter in the pans
  • The leavening is expired
  • The eggs are too cold


Your cake is uneven

  • The cake pan is uneven
  • The butter is spread unevenly
  • The oven is heating unevenly
  • The oven has hot spots
  • Too much top or bottom heat
  • Improperly mixing the batter


Your cake has a wet texture

  • Under-mixing the batter
  • Using too much sugar
  • The oven is not hot enough
  • The sugar is too coarse
  • Over-creaming the sugar and shortening


Note: We have a great video called Scratch Baking 101 here in the online school website as well.

So there you have it. I hope this guide will help you with your cake baking!

Sharon

Visit our online school


NOLA photography: http://bentzphotography.com/


Sphere Cakes- Tips for Success

July 12, 2016 by Sharon Z 2 Comments

Hello my sugar friend!

Recently I sent an email out with a story and tutorial link about this giant cherry cake. One of my fav cakes of all time, mostly because it disses my sister 🙂


sphere cakes tips

But sphere cakes are scary!

How the heck do you get the shape?

And don’t even think about covering it in fondant!

That’s the things nightmares are made of.

I admit sphere cakes aren’t the easiest shape to do, but they don’t have to be so awful that we crawl into the corner crying for mommy. 🙂

Here’s a few of my tips for spherical success 🙂

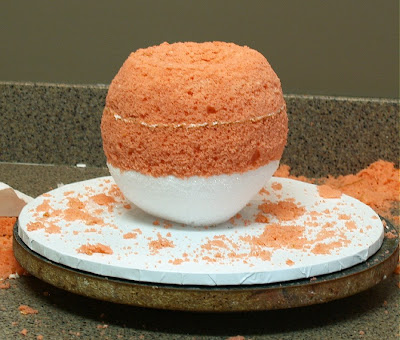
  • Use a half sphere pan to bake if you can find the size you need. That eliminates carving and that’s half the battle.
  •  

  • Once you level the 2 cake halves and put them together, you may not have a perfectly round ball. You can insert a short layer of cake (baked in the same diameter round pan as the sphere pan) between the 2 halves to give the extra height needed to create a fully round sphere.
  •  

  • If you do carve the sphere from round cake layers, remember that shape doesn’t have to be perfect. You will make it perfect with the icing or ganache.
  •  

  • Use a sturdy cake that can hold up to carving and it’s own weight. A light fluffy recipe won’t cut it.
  •  

  • What to use for the bottom half of the sphere? It might be paralyzingly frightening to try to use cake for the bottom half as well. (It can be done with sturdy cake and proper support where needed.) But consider non cake options for the bottom half. Especially for your first go at it.
     
    For the bottom half you can use:

– styrofoam (see my blog post linked above)
– compressed (and I mean seriously compressed) rice cereal treats formed in   the cake pan
– chocolate formed in the cake pan

  • Use a firm base coat under the fondant such as a super chilled butter based icing or firm ganache.
  •  

  • Choose your fondant wisely. Not all types or brands will do well trying to stretch and mold over that shape.

The great Wayne Steinkopf of Swank Cake Design changed my caking life when he advised me to use a mixture of half Fondx and half ChocoPan brands for sphere shapes. It works incredibly well, has tons of elasticity, and is tear resistant. (There’s a new brand called Dream that is supposed to be like a hybrid of these two. I’ll be trying it this week.)

Liz Merek’s semi homemade fondant also has great stretch and elasticity.

  • Get the cake raised up off the counter to apply the fondant. Put it on a small diameter fondant tub or something similar so you can tuck the fondant onto the underside of the ball.
  •  

  • Take it easy on yourself. It doesn’t have to be perfect to look great. 🙂


Go ahead and try a sphere cake, you CAN do it!!

Sharon

Visit our online school


NOLA photography: http://bentzphotography.com/

Ganache 101

July 5, 2016 by Sharon Z 5 Comments

Let’s talk about the basics of Ganache today. This is a popular topic, and here are some of the basics. I’ve got a list of ratios needed for each type and the different uses.

guide to ganache ratios
To review, ganache is a delicious (I eat it with a spoon, don’t you?) emulsion made from cream and chocolate.

So super easy to make: heat the cream, pour over chocolate bits and stir until super smooth and glossy.

The great thing about it is its versatility. This simple recipe of just 2 ingredients can be easily tweaked to use in a variety of ways: as a glaze, frosting, filling, mousse, truffles. But the most common use in cake decorating these days is to create firm chocolate shell around cakes on which to apply fondant

There are 3 factors that can be adjusted to create different end products

  • the ratio of chocolate to cream
  • what type of chocolate is used
  • or what temperature the ganache is when used

A thicker ganache is typically used to make chocolate truffles or the “chocolate shell” on cakes I mentioned above.

A thinner ganache is used in dessert fondues or as a poured glaze.

Allow the glaze recipe to cool, and then when it’s thicker it can be used to frost or fill cakes.

You can even whip ganache to make chocolate mousse or a whipped icing/filling.

Warmer ganache will be thin and even a liquid, but it will firm up as it gets cool.

The ratio of chocolate to cream will determine how firm the ganache gets when fully cooled.

Likewise, different types of chocolate (semi sweet, milk, white) will perform differently at the same ratio.

Here are the common ratios and uses for ganache:

-Semi sweet chocolate/ heavy whipping cream:

1:1 ratio:
glaze (warm)
dips/fondue (warm)
thin spreadable frosting (cool or room temp)

2:1 ratio:
thick spreadable icing (room temp) that will set up to a firm shell around cake. Used under fondant cakes or left naked.
cookie icing, tart filling (room temp)
truffle centers (cool/room temp)
can be whipped after cooled to create forsting for cupcakes, cakes

2.5:1 ratio:
this is my prefered ratio to create the super firm shell on a cake under fondant

1:2 ratio:
this can be whipped after cooling to create a super light and airy frosting or mousse

-milk chocolate ganache:

2:1 ratio:
glaze (warm)
dips/fondue (warm)
thin spreadable frosting (cool or room temp)

3:1 ratio:
thick spreadable icing (room temp) that will set up to a firm shell around cake. Used under fondant cakes or left naked.
cookie icing, tart filling (room temp)
truffle centers (cool/room temp)
can be whipped after cooled to create frosting for cupcakes, cakes

-white chocolate:

2:1 – 3:1: (ratio needed can vary by kind and brand)
glaze (warm)
dips/fondue (warm)
thin spreadable frosting (cool or room temp)
cookie icing, tart filling (room temp)
truffle centers (cool/room temp)
can be whipped after cooled to create frosting for cupcakes, cakes

4:1 ratio:
thick spreadable icing (room temp) that will set up to a firm shell around cake. Used under fondant cakes or left naked.


NOTES:

* Milk chocolate and white chocolate are softer then semi sweet, and will need a higher ratio of chocolate to cream to set up at the desired consistency.

* The ratios needed may vary depending on the brand and type of chocolate.

* Use real block chocolate, not chips, as they may not set up the same.

* You can infuse the cream with flavors like tea, mint, herbs, citrus.

* You can flavor ganache with liqueurs or fruit purees.

So there you have it! All about ganache and it’s many uses.

NOTE: See my post on fixing broken ganache here.

I hope you give it a try. In fact, I think I need to go make some right now.

Until next time, happy caking!
Sharon

PS. Visit my online school for a full education on making ganache and it’s many uses:
www.sugaredproductions.com

Ultimate Guide to Candy Buffets

June 29, 2016 by Sharon Zambito 14 Comments

First off, thank you to Sharon for the opportunity to connect with her readers. I’m Sarah, and I work at CandyStore.com. We have a lot of experience helping people plan candy buffets for their weddings and events. I am excited to share this great tip to get you started. Here goes!

If you’re new to building a candy buffet, you may be intimidated by the prospect of building one yourself. Don’t be. The main reason people give up on having a candy buffet at their event is not money, it’s fear*.  The solution to removing that fear is here. With one tip, we can soothe this savage beast.

“Fear?” you say. I ain’t scurred. Right, I’m not talking about grizzly bear fear or public speaking-type fear.

public speaking bear

I’m talking more about the fear that it’ll take too much time to plan and fear that even after all that time it won’t turn out well. It’s that overwhelming, my-brain-just-turned-off feeling where you just think. I can’t even. But you CAN! Here’s the tip that will save you:

Size Matters

This is true in many avenues of life, even scientists agree.  With candy buffets, it’s a little more nuanced. It boils down to choosing the appropriate size buffet for your event and budget. You don’t need to have a magazine cover-style Candy Buffet of the Year spread.

magazine worthy candy buffete

If building a diy candy dessert bar gives you anxiety attacks – are you ready? – use a small table.

You can see your shoulders dropping already. Your breathing is getting more relaxed. That’s it, thaaaaat’s it.

breathe


And yeah, a small table – that’s it! The beauty of a small table is that you can break it down in your mind more easily. It’s more doable in your head. It’s also less expensive, easier to plan and has just as much impact as a large table, if not more. Now that you’re nice and relaxed, here’s the rest of the plan.

The biggest decisions you have to make for a candy buffet have already been made.

What Colors Should I Use?

You know the answer already. Since you’ll likely want to match the colors of your event, that takes care of that step. Bulk candy can be bought in most general colors now-a-days and even some more specific colors like maroon and aqua. Gold candy and dust are popular and fit within many events color schemes. Just be careful with the edible stuff.

Ok, this is already gaining momentum! You’re on your way.

What types of containers do I need?

You need 3 types. Big, medium and small. There we go with the bear metaphor again, goldilocks. A nice looking candy buffet uses zones to create depth and (sometimes just the illusion of) abundance. There’s more detail in my DIY candy buffet guide here, but basically, that feeling of abundance is harder to create over a larger space. Keep the table small.


Candy Buffet Zones Guide

The Candy Buffet Zones

Put the small containers – bowls, platters – in front and put your individually wrapped candy bars here. Other appropriate things to put here are baked goods and desserts that don’t ‘scoop’ and wrapped items that might get handled a bit. Larger, bulkier items tend to work best here. Cookies, cupcakes, etc.

Medium containers in the middle will contain some unwrapped candy that may need somewhat gentle handling. Gummy sharks, old-fashioned stick candy, chocolate covered espresso beans. Use tongs or scoops where appropriate.

In the back you put your tallest containers. Fill them up with wrapped or unwrapped bulk candy. Depending on how tall they are scooping may be awkward if people need to reach over the rest of the display. Consider wrapped candy that’s easily grab-able by hand if this is a concern. Foil-wrapped chocolate balls are great and come in a ton of cool colors. Alternatively, use single-color gum balls or another easily scoop-able candy item.

Centerpiece Optional

If you’re getting the hang of this and your brain is flowing with ideas, consider this. An optional centerpiece. If you wanna go the extra step, use a loaded up cupcake stand as a center piece and curve your zones around it. Cupcake stand, flower arrangement, or even the event’s main cake or dessert!

cupcake stands for candy buffets

You may need a slightly bigger table for this, but by now maybe you feel like you can handle that. If not, stay small. A high and tight candy buffet looks much better than a loose-goosey arrangement on a bigger table.

Add a personal touch

This is the part you’re already good at. Once you have the layout all worked out, add some personal touches to the decor. Some ribbon around the containers, maybe some tasteful confetti will look nice, fresh flowers. A framed picture of the honored guest(s).

picture frames for candy buffets

Tie it into your existing event decor.  The dessert bar doesn’t need it’s own theme, it is merely an extension of the theme of the party it lives in.

lovely purple candy buffets

Final Thought

I’ll leave you with this one last thing. There are no rules. Have fun with your arrangement. If you get overwhelmed, dial it down. If you’re feeling empowered and want some more knowledge, we put together this amazing infographic (below) from my Ultimate Guide to DIY Candy Buffets.  Pin it, print it out, use it to your advantage.

I’ll be answering any questions in the comments section, so let them fly. Also love to hear about how it went! So please let me know if you used these tips and how your candy display table turned out.  Love to Sharon and SugarEd Productions!

Candy buffet infographic guide step by step


(* You may be saying, fear isn’t the only reason people give up. They might also think it’s going to cost too much because they’ll have to hire someone to build the darn thing. This is a subset of the fear you have of doing it yourself.  There’s no reason buying some bulk candy and some containers should be expensive. The bang for your buck is there if you can get past your fear!)


How to Fix Broken Ganache

June 24, 2016 by Sharon Z 1 Comment

how to fix broken ganache

Today I’m going to talk about ganache — the hero of the cake decorating world. When made at a certain ratio, it creates a firm chocolate shell around the cake – super firm, which gives the cake great stability and allows for super smooth and sharp fondant application.

With it’s awesome properties also come the pitfalls in making it, and I get asked a lot of questions about how to handle them. I hope to help with that today.

It’s important to know just a leeetle bit about the science behind ganache to be successful. (Just a little, I promise 🙂

Ganache is a simple emulsion made with just two ingredients: chocolate and heavy cream.

Mixing chocolate and cream is a lot like mixing oil and water. (Or me and housework.) They don’t wanna go together. They fight it every step of the way.

The process of getting them to succumb and properly mix is called emulsification.

The emulsification process combines the fat in the chocolate (cocoa butter) with the water in the cream. It uses two processes: heat and agitation.

First the fat is liquefied by using heat: hot cream is combined with the chocolate, which melts the cocoa butter fat into liquid form.

Stirring (agitation) breaks down the liquid fat into microscopic droplets, which are small enough to be suspended within the water (in the cream.) This creates a smooth and creamy emulsion.

Ta dah!

unnamed-7
The temperature is a very important factor. If the temperature rises above 110F, the cocoa butter gets too hot. This causes droplets of fat to pool together and separate from the water. When this occurs, the ganache is referred to as separated or “broken.” It will look gloopy and grainy, and pools of oil will be on the surface and around the edges.

Also, if the ratio of fat (cocoa butter) to water (in the cream) gets too high, it’s too much fat for the water to handle. The fat will again separate out, and you’ll be left with a goopy mixture that’s oily rather than smooth and creamy.

Here’s a good photo of badly broken ganache.

Yucky! But many batches like this have been thrown out needlessly, because luckily it can be fixed in most cases.
Ways to fix a broken ganache:

Immersion Blender Method:
Make sure the ganache is warm, but not hot. Use an immersion blender, moving it all around the bowl to get it incorporated again. This may take some time, and it may or may not work. If it does not, move on to one of the other methods listed below.

Corn Syrup Method:
Put 1-1.5 Tbs of broken ganache into a bowl. Bring 2 Tbs light corn syrup to a boil. Whisk very small amounts of corn syrup at a time into that portion of broken ganache. Keep adding corn syrup, a little at a time, whisking constantly, until that ganache is smooth and shiny again. This newly re-emulsified ganache is called the “seed”. Now keep adding the rest of the broken ganache, whisking the entire time, until it’s all incorporated into the seed, and the whole batch is smooth and shiny again. This method won’t change the consistency of the ganache enough to notice.

Skim Milk Method:
Heat a small amount of skim or low fat milk to a simmer but don’t overheat. Slowly drizzle it into the broken ganache, whisking all the while. Only add tiny amounts at a time, whisking vigorously, until it comes back together. (An immersion blender works great for this.) The extra water from the low fat milk enables the ganache to “handle” all the fat and get it back into emulsion. Be aware that adding more liquid may change the consistency of the final product.

Temperature Regulating Method:
Divide the broken ganache in half. Warm one half over a double boiler to a temperature of 130F. The fat will melt and make the mixture thinner. Cool the remaining half to 60F by stirring it over a bowl of ice. (Don’t put it in the fridge because it won’t cool evenly.) This portion of the ganache will thicken.

When both halves have reached the correct temperatures, slowly stream the hot ganache into the cold portion and whisk away. (You can use a food processor for this if you like.) Combining the two portions averages the temperature to the optimal range, and the fat droplets will go back into the water, restoring the emulsion.
Two more ganache problems:

    1. Grainy Ganache:
      Sometimes the ganache can have a grainy texture without the oil pooling. This is caused by excessive mixing after the ganache has cooled down lower than 90F.
      Fixes:
      If it’s still liquid enough, strain thru a fine mesh strainer (think tea) and stir again. If too cool, put over a double boiler and gently get it warmed up again, mixing all the while until smooth again.


  1.  Chunks in the set-up ganache:
    Sometimes the ganache looks perfect and smooth when you make it, but after sitting overnight you discover tiny little chucks all throughout it. This occurs because not all of the chocolate was fully melted when the ganche was made (even though it looked like it was.)
    Fix:
    Gently remelt it over low double boiler as to avoid scorching the chocolate or causing it to separate by getting the temp too high. Stir, stir, stir until it’s liquid and smooth. Let is set up again before use. Chop the chocolate into pieces no larger than 1/4 inch in size before adding the hot cream. This helps all the pieces melt fully.

So there you go! Now you know how to fix any ganache problems you may have. And don’t feel bad if you do have problems – they are very common and happen to everyone. Ganache is very forgiving and can almost always be saved as long as the chocolate was not scorched.

See my blog post HERE on  how different ratios are used for different purposes, and a few more chocolatey tid bits.

Until then, happy caking!
Sharon

Visit our online school


SugarEd Productions
www.sugaredproductions.com

Can I Freeze Royal Icing?

June 15, 2016 by Sharon Z 5 Comments

 Hi sugar friends! Today we have an awesome guest post from David at Good things by David on freezing royal icing.


freeze royal icing
This is a question I get asked quite a bit here on the blog and, much to my embarrassment, it is one that I had no answer for until I tested it myself.

It’s baking season now and many people want to get into the kitchen to ice those marvelous cookies for friends and family. I’m right there with you. Those of us who ice cookies on a regular basis inevitably end up with leftover royal icing and I’ll admit that in the past I used to dump what was left (big guilt trip, believe me!). Well, I no longer do that because I freeze what I do have left after one of my baking projects.

It’s simple, it’s easy and it works!
 
PA030022
 
Unless one is icing hundreds of cookies, you may end up with leftover royal icing after making a couple of dozen cookies. Most royal icing recipes (including my own) make a substantial amount to begin with. I think it’s good to have more icing than is needed, because there are always moments when you want to add a little flourish here or there, and then there are moments when you absolutely do run out of a color and need to make more.
 
 
royalicingbags
 
You can see that I truly do love to use a whole range of colors when I decorate these types of cookies. Having more options makes the job of icing sugar cookies enjoyable and absolutely easier. Again, unless I have a specific request from someone, I usually mix colors based on what I want to convey. I almost see it as artwork that allows one to express a certain kind of creativity.
 
Keep in mind that I tested freezing royal icing with my recipe and no one else’s.
 
frozenroyalicing
 
This is what you do. Any leftover royal icing should be placed into zip-top freezer bags, giving each color its own bag. Push the icing to the very bottom of the bag and squeeze as much air out of the bag as possible before sealing it shut. You want the royal icing baggies to be well sealed. Repeat with remaining icing. Place these sealed bags into a larger zip-top freezer bag and seal shut, removing as much air as possible to prevent freezer burn.

Freeze flat on a rimmed baking sheet until you’re ready to use the icing.

You can make your icing a couple of weeks ahead of time and freeze it before your baking project. With all of the baking I’ve been doing in the past month, believe me, it has saved a lot of time doing this task early.

Note: royal icing can successfully be frozen for up to one month.
 
 
thawedicing
 
Thawing is the easiest thing of all. Remove as many icing baggies from the freezer as you will need and let them thaw on the kitchen counter. As soon as they’re malleable, they are ready to be removed from the bags.

Note: colors may separate and the icing may need to be adjusted to have the right consistency for piping and flooding. I urge you to drop the icing into a bowl to mix thoroughly with a spoon rather than putting it into your piping bag. Find out if it needs to be thinned out with a bit of water or if it needs anything else for your baking project. If the colors do seem uneven, use that spoon and bring the color back together. This is imperative!

Use as desired by filling your piping bag or squeeze bottle and decorate those cookies.

If you have followed my delicious recipe, there will be no compromise in flavor or texture.
 
 
PA200086
 

Now you know! Royal icing can be frozen with great success.

Happy Baking!


P9080654

Good things by David was started because I wanted to share some of the Good Things that have made my life a little bit easier, a little bit nicer and certainly more enjoyable. Everyone knows the phrase, “It’s a good thing”, made famous by Martha Stewart many years ago. In this blog you will find not only good things that have come from Martha, but you’ll also come across many that I’ve created over the years. It is my wish to perhaps inspire and encourage you, the reader, to try something new.

 
Visit our online school 


SugarEd Productions
www.sugaredproductions.com

The Cherry Hog

June 7, 2016 by Sharon Zambito 4 Comments

 
Some of you who have been with me for a few years may remember this story. It’s a re-post of an older blog, but I’ve gotten a lot of requests for it again, so here goes…. (read thru to the end for a quick tutorial.)


Once upon a time there were 3 sisters that grew up in the city of New Orleans with their 2 older brothers and parents. They were not exactly poor, but things were very tight, as they were living on one modest accountant’s salary. Melba, the mom, knew how to make every penny stretch. She was very frugal. There were never any treats like candy, soda, chips, or cookies in the house. Those things were reserved for very special occasions.

Since vacations were out of the budget, the family would make day trips a few times a summer to a nearby state park. The kids would swim in the Bogafalaya river and play on the sandy beach. Melba would pack an ice chest and picnic basket and they would spend the day swimming, eating, and relaxing.

On one particular trip to the river, Melba really splurged and bought a bag of fresh cherries. Not a big bag, mind you. But this was still a really special treat for the kids to get such an extravagance.

So on this particular day, after lunch, the 2 youngest sisters, Sharon and Janice, decided to go for a nice long swim, anticipating their refreshing treat of cherries upon their return. They wanted to save them for the just the right moment, to enjoy them to their fullest. So after their nice swim in the river, they happily skipped back to the picnic table, excited about the luscious fruit that awaited them. But alas, to their dismay, they discovered that their older sister Barbara (aka the Cherry Hog) had eaten them all! All of them! All that was left was a bag of pits and stems.

Needless to say the 2 little sisters were disappointed….. no, devastated….. no, scarred for life! Despite years in therapy and reading many self help books, they have not been able to work through the trauma of this event. In this tragic story they did not live happily ever after. So needless to say, to this day they give Barbara grief about it any chance they can get.

—————————————-


Last week, when the whole family was invited to a friend’s house on the bayou for a Good Friday seafood boil, they took the opportunity to also celebrate Barbara’s birthday.


And here is the Cherry Hog’s birthday cake.


CH with her cake. She loved it.


                        Sharon and CH.


Sharon, CH and Janice.


Seafood boil of crabs , crawfish, potatoes, corn and more!


And fresh boiled shrimp! It was so yummy!


J-Man got to drive the boat!


Cherry Hog and her nephew D.


The cake was yummy and enjoyed by all. We had a wonderful day of boating, eating, and playing board games.
 
Note: Cherry Hog claims to have no memory of this event ever happening. Classic case of denial, if you ask me.


—————————————


HOW TO MAKE CHERRY HOG’S CAKE:


My BFF Heather gave me the great idea of using Styrofoam as the base of the cake. I used an 8 inch ball and cut it a little shorter than in half. I cut a flat bottom so it would stand up, and I used another piece of styro as “sand paper” to shape the bottom half of the cherry. (I learned that trick in a Collette Peter’s demo.)


Then I sharpened wooden dowels and drove them thru the styro and into the cake drum base for stability. I used 3, but in retrospect I could have done with just 2.


I then attached a circle of parchment paper to the top of the styro with buttercream to form a barrier with the cake.


First layer of cake in place.


I put a ball of modeling chocolate down in the hole to serve as the pit. Tee hee. Then I plugged the hole with the cake from the heating core.


Second layer of cake in place.


Carved to a cherry shape with a sharp knife. I intentionally went with a somewhat asymmetrical look, because real cherries are not perfectly round. Also makes the carving easier; I love that!


Then I applied a basecoat of thickened ganache over the whole thing. The ganache is 2 parts semi sweet chocolate to one part heavy cream. You let it cool to a thick paste consistency and then apply it just like a buttercream coat with a hot spatula. It firms up to make a nice chocolate shell; a wonderful surface on which to apply your fondant.


I smeared the whole cake with piping gel and then applied red fondant. I used a wad of fondant cupped in my hand in lieu of fondant smoothers. This works great on round and curved shapes.
I then gave the whole cake a liberal rubdown with everclear alcohol to get the excess cornstarch off before airbrushing. What??? No Crisco? I know what you are thinking. Sharon rubs down everything with Crisco! Yes, this is true, but not in the case of airbrushing. That will cause the airbrush color to not go on smoothly and you might get blotching.


After the everclear dried (took about 2 minutes) , I gave it several coats of red color. Let the coats dry in between or you will get pooling and dripping of color. Here it is still wet with color. (And I am still blowing red snot a week later.)


One more coat of color and dried.


I made the stem by wrapping several 18 gauge floral wires with brown floral tape and then airbrushed brown and green over that. I just stuck the stem down thru the center of the cake and down into the base of the styro. Note: This is not food safe, but it was for Cherry Hog so I did not care. The proper thing to do would have been to coat the part of the stem going down into the cake with chocolate and dried before inserting.


I made the beach chair with the cutter set here. I cut the pieces from white gumpaste. After fully dried I painted them with brown airbrush color mixed with everclear to make the wood look. The seat of the chair is white gumpaste. Ain’t it cute?? I love this chair! The sand is Domino’s brownulated sugar from the grocery store.


It was a lot of fun making this cake! This is when I love caking the most. A fun, challenging cake that has a special story to go with it.


Now you all go make one for your favorite Cherry Hog!


Happy Hogging!
Sharon
http://www.sugaredproductions.com/


PS. Remember you can click on the photos for a larger view.


  • « Previous Page
  • 1
  • …
  • 4
  • 5
  • 6
  • 7
  • 8
  • …
  • 36
  • Next Page »

Sharon Zambito

Sharon Zambito

An RN turned SAHM turned cake maniac. Owner of SugarEd Productions Online School. Join me for some caking, baking, and all around sweet fun :)

Follow me..

  • Facebook
  • Instagram
  • Pinterest
  • YouTube

Pinterest

  • Autumn House Two Trees Machine Embroidery Design – Blasto Stitch
    Autumn House Two Trees Machine Embroidery Design – Blasto Stitch
  • Embroider  Sew :: Jelly Roll Purses - Embroidery Garden In the Hoop Machine Embroidery Designs
    Embroider Sew :: Jelly Roll Purses - Embroidery Garden In the Hoop Machine Embroidery Designs
  • (1) How to QUICKLY & SAFELY remove acrylic, gel, and dip powder polish | BAGGY METHOD - SO EASY! - YouTube
    (1) How to QUICKLY & SAFELY remove acrylic, gel, and dip powder polish | BAGGY METHOD - SO EASY! - YouTube
  • (1) Bouffant Surgical Cap - YouTube
    (1) Bouffant Surgical Cap - YouTube
Follow Me on Pinterest

Follow Me on Instagram

Instagram requires authorization to view a user profile. Use autorized account in widget settings

Recent Posts

  • Egg Safety Basics
  • Stable Mabel Support System Sale
  • Guest Post : 4 Vegan Cake Recipes No One Should Miss Out On!

Popular Posts

  • Ways To Make Your Cake Fluffy And Moist
  • How To Stencil on Cookies with Royal Icing
  • Doctored Cake Mix Recipes
  • Transferring an Image Without a Projector
  • All About Buttercream!
  • How to Fix Broken Ganache
  • Edible vs Non Toxic Gold Dusts

Categories

Search

Archives

Copyright © 2025 · Sharon Zambito and SugarEd Productions,LLC

Copyright © 2025 · Evangeline Theme on Genesis Framework · WordPress · Log in