Sugared Productions Blog

  • Blog Home
    • Home
  • Online Classes
  • Shop
  • Contact
  • About

Back in the Saddle

September 14, 2008 by Sharon Zambito 24 Comments


The cake saddle that is.


It sure seems like it has been a while since I did any caking. I purposefully took most of the summer off to spend time with my kids, since D was going off to college. (sniff, sniff). We hung out a lot and went on a family vacation. I also needed to finish some long overdue house projects and yard work. But mysteriously, none of that got done. Hmm…wonder how that happened. Oh well, I’ll get to it eventually.


Since I was refreshed and rejuvenated, I decided to upgrade my customer’s simple small cake so I could make a design I had in my head. Well, the cake had other ideas. This cake made my hurricanoids flair. (In other words, it was a pain in my rear.)
 
First of all, it is not a good idea to have big ole honkin’ chunks of cherries in a cake you know you are going to carve. I knew this was not a good idea going into it. But in my arrogance, I forged ahead. I was so cocky I even added more cherries than the recipe called for. I ain’t a skeered of no cherries.
 
Then came time to carve. And it showed me who was boss. Even with my super sharp knife; it was a mess. Cherries came out in chunks, bringing precious cake along with it. Calling myself a few choice names, I proceeded on. I finally got the 2 tiers carved and patched up.
 
 
Then I scorched my first batch of cream while making the ganache to ice the cake with. After the do-over, I got them iced and let them set overnight to firm up.


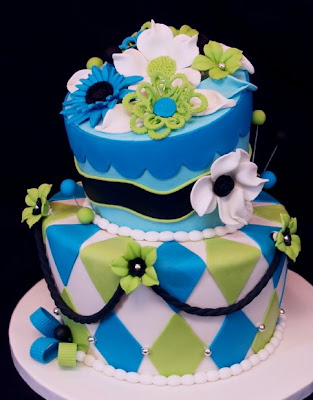
The next day I got the bottom tier covered beautifully; but within 15 -30 minutes the fondant just started acting wonky. It was bulgy and kind of baggy and getting a lot of elephant skin along the bottom edges. It was morphing before my eyes! I have had this happen before on rare occasion, so I chalked it up to an “off” bucket of fondant. If I tried to take it off, I would have destroyed the cake. So I did what any good decorator would do in this case: uttered a few more choice words, and then I changed the design. The harlequin diamond pattern in fondant is a wonderful way to cover up boo boos or naughty acting fondant. So diamonds it was.
 
The original design was going to be somewhat musical. I was dying to use my new sheet music stencil I got at ICES. I got the upper tier covered and greased it down to get the corn starch off. (Cuz we all know I love my cornstarch, LOL). I was under an impending deadline and getting worried about finishing in time. For one nanosecond, my brain said, “Sharon, do not stencil on that freshly Crisco’d tier. It will not work.” Obviously not having learned my lesson from the cherry fiasco, I blew myself off and proceeded to stencil. Folks, you cannot stencil with royal icing onto greasy fondant. You have to wait until it absorbs in. It was a smeary mess. Of course the black royal would not clean all the way off. It left a nice black stain. So I did what any self respecting decorator would do: after calling myself a new variety of very choice words, I changed the design. Hence the birth of the wacky black band around the top tier.

From there I just added the swags and the flowers I had made the night before. The cake no longer had a musical theme, but a gal has to do what a gal has to do. The customer loved it, so all is well that ends well.


Despite all my troubles, I thought it was kind of nice in the end.
And I very much love my array of fantasy flowers.


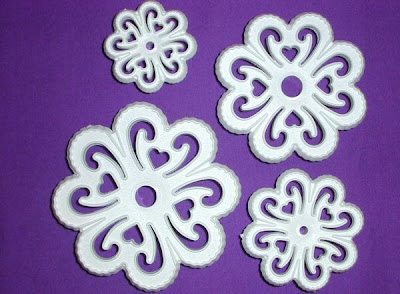
The filigree type flowers were made with cutters available here:


The trumpet like flowers were made with this petunia set:


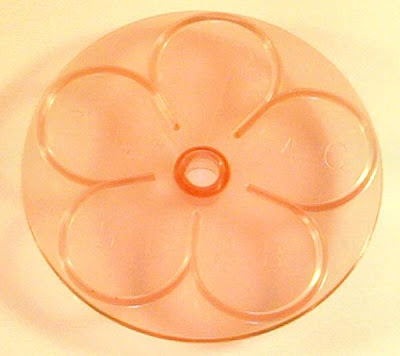
The 2 white blossom flowers were made with the all in one rose cutter:


And I used various buttons from this mold for some of the flower centers:


The camouflage:


Moral of the story:
 
Listen to your gut;
never give up.


I Love it to the Core

September 7, 2008 by Sharon Zambito Leave a Comment

For as long as I have been around the Internet cake world, it seems that I must be the only caker on the face of the planet that actually likes to use the heating core when baking my layers. Most bakers I know use the rose nail as a heating element in the center of the pans to help them bake evenly. But I did not have much success with those. Once I tried the heating core, I have never looked back.

I use my Wilton Cake Release (squirt bottle, not spray) to coat my pans, as well as in the inside and outside of the core, using a pastry brush. I absolutely LUV the Wilton Cake Release. My cakes never stick, it is easy to use, and the pans are easy to clean up afterwards. I tried homemade pan grease, but wasn’t too fond of that either. Plus, I am always looking for ways to not have to make stuff. If I can find a product I like that prevents me from having to make something home made, I am a happy camper.


Fill your pans as usual after they and the core are prepped. Fill the core about half way with batter also.


Bake your cake as usual. The heating core will help the centers of the cake bake more quickly, keeping up with the edges (which bake faster than the middle). So the cake bakes more evenly across, and prevents dried out edges from occurring while waiting for the center to cook fully.

You will get a nice baked up cone of cake in the center. Take the pan out of the oven and let them cool for about 10 minutes (or follow your normal procedure.)

When you are ready to flip your cakes out of the pan, take the core out and set aside.

Then flip your cakes out to cool as you normally do. I suggest leaving the core to cool completely before you take the cake out. If I try to take it out while it is still warm, it breaks and some cake gets stuck in the metal core. To get the cake out of the core, just turn it over and shake really hard and it should pop out.


After your cakes are fully cooled and you are ready to fill your layers, place the core of cake right into the empty hole.


Level your cakes per usual.

You will hardly even be able to tell where the cake plug is. Fill and ice as usual.


Maybe you will choose to try this out. Who knows, I might even recruit a few of you over to the dark side. MWAHAHA.

 Beautiful maraschinos for the cherry chocolate cake.
PS. Please note that you can now subscribe to email alerts to our blog. Use the form in the right upper hand column of this page to enroll. You will be notified via email when there is a new blog entry. Feel free to post a comment or send an email to let us know how we are doing.

Happy caking!

Sharon
SugarEd Productions

Dodged a bullet named Gustav

September 4, 2008 by Sharon Zambito Leave a Comment

Well that was fun. Not.


But it has been 3 years since we have had to evacuate, and this time there was no comparison to what we came home to. So I am not complaining. If Gusatv had not downgraded right before land fall, my beloved city of New Orleans and its surrounding areas would have take a major hit. Again.

But we had to go. You have to go if you are in the potential hit zone. Hurricanes are so unpredictable; they can change course on a dime, strengthen or weaken. You just never know what is going to happen until it happens. So you have to go.

My hubby is a hospital administrator, so he always has to stay at the hospital. In the past the boys and I have always gone there with him. But the Katrina experience was so awful, I vowed never to do that again. So for the first time, we separated for evacuation. I had reservations in Point Clear, AL. But by the time we left early Sunday morning, the interstates going east (and west) were shut down due to overloaded traffic. So we went north to the first place that had hotel rooms available. Little Rock. An 8 hour trip that took over 11 hours due to the outpouring of evacuees and contraflow. Bumper to bumper, 5 miles an hour, for nearly the first half of the trip. Not fun.

My oldest son D was truly my hurricane hero. I was so exhausted from having little sleep the 2 nights before I was unable to drive. D took over the wheel and got us there safely. He was truly the man of the family while we were gone. He kept little brother J occupied and happy, got him to eat (a real challenge), and just generally took care of us while we were gone. He again handled the drive home. (I was once again exhausted from lack of sleep the night before. The hotel lost power and we had no A/C, making for a fitful night’s sleep.) The drive home was met with nearly non stop heavy rains and wind, but he handled it like a pro. We got a bit punch drunk on the way back. We were stir crazy in the hotel for 3 days (constant rain in LR made it hard to get out and do stuff.) We were repeating the same long drive we had made just 3 days before. So towards the last 3 hours we were rather goofy and delirious. We did coin a new term though:


Hurricanoids: (her-ack-in-oids) A medical condition to the posterior area of the body caused by sitting in 12 hours of bumper to bumper hurricane evacuation traffic.
 
 My hurricane hero with his little brother at his high school graduation this past May.

We got home late last night. Thankfully our house did fine. I lost all my fridge and freezer food, but since I don’t cook much, it wasn’t much of a loss.(grin). Our wooden fence gate is trashed, and 2 ornamental trees in the back yard were uprooted. But my saddest loss is my iron arched trellis with pink rose vines. I am hoping when hubby gets home we will be able to salvage the plant.

My sister and I did a switch off last night, and I took in my 94 year old Aunt last night until her nursing home reopens. Those of you that knew me 3 years ago may remember my Katrina evacuation adventure with Aunt Ursula, my MIL, et al. But that’s a really long story for another blog, LOL.
 The lovely Ursula enjoying her canned soup.
(The grocery stores are wiped out). 94 years old and sharp as a tack.


So I have cleaned my fridge, am washing clothes and mopped the floor. Now we wait for the rain to stop so we can work in the yard, and the grocery stores to restock so we can go get food. But the gas station down the street is open, and the soda fountain is flowing with Diet Coke. So all is right with the world. I thank God for the minimal impact this storm had. It could have been so much worse. We are very grateful to Him for that.


I also want to thank you all for the outpouring of messages of concern, well wishes and prayers while we were gone. It is very much appreciated and means more to us than you can know.
So now I am going to nurse my hurricanoids with Diet Coke, and check out what Ike and Josephine are doing.

Yikes.

Chocolate Monogram Favors

August 29, 2008 by Sharon Zambito Leave a Comment

Be gentle with me folks. I am not very computer savvy. No really. I am bad. Ask my 2 friends Heather and Kim. I am sure those 2 poor girls wish my PC and I had never met.

Heather, who is my BFF (we live close by but we met on a cake message board many years ago), is awesome with graphic arts. She is our Webmaster, logo designer, and is creating the covers for the upcoming DVDs. Heck, I can’t even log onto my own website to work on it. Sad, I know. She has to do it all. And all for very little pay. OK, OK, no pay.


Kim is a computer guru by profession, but an awesome caker as well. You may know her work. She calls herself a newbie, but we all think she is lying. Her cakes are too darn good. She helps me with all the technical/operational computer junk. Things like doing updates, backing up files, maneuvering windows, downloading, troubleshooting….all that kind of icky stuff.
 

Here is the lovely Kim (and me) at my Baton Rouge class I taught with Jen Dontz.

Not to mention that the SugarEd girls also listen to my non stop brainstorming, obscessing and generally constantly asking for advice. I honestly do not know what I would do without the help of my team. They are so good to me, and I do not deserve them. (You will meet more of them later.)


So, now that I am armed with the knowledge that these 2 wonderful women have imparted upon me, I am going to now dip my toes into the waters of blogging. Oooooooooooooh, it’s cold!…….. Deep breath. ……….Here I go:

A few weeks back, one of my all time best customers and ex-neighbor asked me to make a baby shower cake for her SIL. Well, turns out that MIL went and ordered a cake from somewhere else (GASP), so Tracy asked me to do the favors. She wanted me to make monogram favors out of chocolate to match the monogram on the invitation. (Not anticipating at the time that I would be blogging, I threw the invitation out, so I cannot show you how wonderfully I matched it . (Grin.)


I had no molds that would do for this job, so I decided to cut the candy discs with cookie cutters from poured out chocolate. I had never really done this before, so there was a little trial and error involved. I tried using parchment, plastic wrap, my silicone mat, and silpat under the chocolate but none worked well. I found that using plastic sheet protectors worked perfectly. Now, I cannot tell you if using those is food safe or not, so I am not telling you that it is. You will have to use your judgement on that one. You can however buy food grade acetate for chocolate work that would be fine. (I had none and no time to get any , so I decided to live dangerously this once.)

Here is a sheet protector on the counter with spacer strips on each side. These are called perfection strips and you can get them at Country Kitchen Sweet Art. They make sure you get the chocolate level all the way across your field. I placed them on the thinner sides and I think the chocolate was about 1/4 inch think, but do not quote me on that.


You melt your chocolate (I used candy coating cuz I am not about to temper anything in this life time) and pour it out on the sheet. Use a food grade ruler to spread the chocolate out, resting it on the spacer bars to make sure the chocolate is spread out evenly along the sheet. I could not take a picture of me doing this, because it took 2 hands to do it, and no one was here to take the pictures for me. Ah, such is the life of a lonely baker…..

Now go get a Diet Coke from the gas station soda fountain (because they have the perfect balance of carbonation and syrup), and wait for the chocolate to set up. You have to wait for the surface to turn dull and firm. If you tap it lightly with your finger you will not mark it, but if you press firmly you will. It will still be slightly warm to the touch. How long will this take? It depends upon how cool your room is, how hot the lights are, how fresh your chocolate is. I had my portable A/C on in my cake room (his name is Jack and I love him so) so it set up in probably 15-20 minutes.

Then take your cookie cutter (which I also failed to take a picture of) and cut into the chocolate. If it makes a nice clean cut, you are doing fine. If the edges of the cut are kind of squooshy, it is not ready yet. Press it hard so you cut all the way down to the bottom. If you are using crappy cheap chocolate like in this picture, it might be hard to get the cutter out. (Yes, I can say crappy . This is my blog and I can say it. Gotta love that. (Wink.) Hence all the fingerprints on the chocolate. I actually ended up doing these again a few days later when my good Merkens chocolate came in and it was clean and beautiful. The cutters came right out. No finger prints. It is amazing what a difference a good vs bad product can make. Again, I was only taking these pics to send to Kim (she is so needy, sheesh), and not expecting to use them on a blog tutorial, so I did not take pics with the good chocolate. Let’s just pretend this one looks pretty, kay?

Now, go to the gas station and get a refill on your Diet Coke. Yes, I drink that much Diet Coke. Doesn’t everyone? Then get on the computer and IM with your buddies for a while until the chocolate sets up nice and firm and is totally cooled off. I guess you could do other things like clean the kitchen or help your kid with homework, if you are into that sort of thing. (J/K, I do those things too.)


Then take the cutters and go back in again, into the same cuts, to make sure the bottom is cut all the way through. I found that if I did not do this, the underneath side had kind of melded back together and the pieces would not break off clean. Now transfer the sheet to a cardboard and score the chocolate around the blossoms with a sharp knife. Pop that in the freezer for 6-9 minutes until set up totally. The blossoms will just pop right out perfectly clean with beautiful edges. Do not touch the tops or you will get finger marks. Let them sit at room temp, and all condensation must dry before you work with them again.

I did the exact same thing with the white chocolate to make the circle discs. Merkens, not the crappy stuff. Attach the 2 pieces together with some chocolate and pipe the monogram with royal icing. I used a clay gun to make the pink string border. The party theme was pink, brown and white, so I wanted to get all 3 colors in there. So here is the finished product. They were about 3.5 inches in diameter.


And just for fun, here is a pic of the coordinating cookie favors. Sugar cookies with textured fondant, candy pearls and luster dust. Tracy loved them. Hmm, I wonder if their cake was dry.

OK class, your homework assignment is to go make some cute chocolate cut out thingies. Email me the pictures of your creations and I will post them here.


Happy Caking!


or should I say Happy Chocolating


or Happy Chocolatiering


Happy ……um…… Messing with Chocolate

Whatever……….get going!!


Sharon

SugarEd Productions

SugarEd Has a Blog!

August 27, 2008 by Sharon Zambito Leave a Comment

HELLO ALL!

Those of you that have our DVDs know what lagniappe is! (pronounced lan-yap). It is a French creole word used down here in Louisiana that means “something extra.” We think you guys deserve a little lagniappe, so we hope to use this blog to give you updates and a behind the scenes glimpse of what is happening here at SugarEd Productions. We will also throw in some freebie how to’s and helpful tid bits. Email us cake decorating questions and we will answer them here on the blog.

We will add a little fun personal info too, so you can get to know your SugarEd staff a little bit. ( If they let me take their pics that is!)

Thank you to all of our loyal customers for your continued support. And welcome to our new customers too; please let us know what you think! We are always eager to hear your comments and suggestions.

Please check back often and happy caking!

Sharon Zambito
www.sugaredproductions.com

  • « Previous Page
  • 1
  • …
  • 34
  • 35
  • 36

Sharon Zambito

Sharon Zambito

An RN turned SAHM turned cake maniac. Owner of SugarEd Productions Online School. Join me for some caking, baking, and all around sweet fun :)

Follow me..

  • Facebook
  • Instagram
  • Pinterest
  • YouTube

Pinterest

  • Autumn House Two Trees Machine Embroidery Design – Blasto Stitch
    Autumn House Two Trees Machine Embroidery Design – Blasto Stitch
  • Embroider  Sew :: Jelly Roll Purses - Embroidery Garden In the Hoop Machine Embroidery Designs
    Embroider Sew :: Jelly Roll Purses - Embroidery Garden In the Hoop Machine Embroidery Designs
  • (1) How to QUICKLY & SAFELY remove acrylic, gel, and dip powder polish | BAGGY METHOD - SO EASY! - YouTube
    (1) How to QUICKLY & SAFELY remove acrylic, gel, and dip powder polish | BAGGY METHOD - SO EASY! - YouTube
  • (1) Bouffant Surgical Cap - YouTube
    (1) Bouffant Surgical Cap - YouTube
Follow Me on Pinterest

Follow Me on Instagram

Instagram requires authorization to view a user profile. Use autorized account in widget settings

Recent Posts

  • Egg Safety Basics
  • Stable Mabel Support System Sale
  • Guest Post : 4 Vegan Cake Recipes No One Should Miss Out On!

Popular Posts

  • Ways To Make Your Cake Fluffy And Moist
  • How To Stencil on Cookies with Royal Icing
  • Doctored Cake Mix Recipes
  • Transferring an Image Without a Projector
  • All About Buttercream!
  • How to Fix Broken Ganache
  • Edible vs Non Toxic Gold Dusts

Categories

Search

Archives

Copyright © 2025 · Sharon Zambito and SugarEd Productions,LLC

Copyright © 2025 · Evangeline Theme on Genesis Framework · WordPress · Log in