Sugared Productions Blog

  • Blog Home
    • Home
  • Online Classes
  • Shop
  • Contact
  • About

Under the Sea

June 2, 2009 by Sharon Zambito 15 Comments

Note: I had to delete and re-enter this post to fix my html problems. The sad part is I lost all of your wonderful comments. 🙁


Under the Sea , Take Two:


Hello Sugar Friends!

I hope you had a nice holiday weekend, and that this weekend is shaping up nicely for you. I had another busy week of DVD editing, doctor appointments, end of school stuff, and cakes.

Did I mention the END OF SCHOOL? YEEE HAAW! Summer is here! No homework, no early mornings after being up half the night working. No more washing uniforms, keeping up with project deadlines, and attending boring open houses. (Oops, did I just say that? Well, I confess. I love my kids and all. But I really hate going to open house.) 12 more weeks of freedom until I have to attend another one. (Sharon squeals with delight.)

And nothing says summer more than the beach, right? Who doesn’t love a nice relaxing day on the warm sand and in the cool clear water. So I thought it only fitting to usher in summer by sharing this cute little cake I just did yesterday for a sweet little boy.


Here is a scan of the treat bag the mom gave me to use for the theme:

The cake was iced in buttercream and I made all the little creatures from fondant with a bit of tylose added. (I made a back fin for the seahorse and promptly forgot to put it on. I have no idea where it is. It was so small it probably got swiped into the trash. Hate when I do that. But no worries, because our seahorse has magical powers and he can swim upright with no fins.)

I used various shaped cutters in various sizes to create the animals. I have tens of thousands of shaped cutters in all kinds of sizes. OK, I have dozens.
Air bubbles were piped buttercream dots tapped down with my finger.

The different seaweed and coral were also just formed freehand from fondant. See that brain coral? SO easy. Roll a ball and poke it a gillion times with the end of a paintbrush. Voila!


Mr. Happy Whale was also made from fondant/tylose. Probably the easiest figure I have ever modeled. I think he is so cute! I love Mr. Happy Whale. I did not want him to go with the big mean lady who came to pick him up. 🙁
So now that summer is officially here, I am going to put my sunscreen on, get my book, and go work on my tan.
No I am not. At least not right now. Have to get dressed to go to a “function” for hubby’s job tonight. I hate functions. Just about as much as I hate open houses. (Sigh)
Sharon
http://www.sugaredproductions.com/

It’s a Swamp Thing!!!

May 26, 2009 by Sharon Zambito 5 Comments


Sharon Zambito and Dena Bryngelson will be teaching a 2 day class August 22-23, 2009 in Kenner, LA (suburb outside New Orleans).

 
IT’S A SWAMP THING!

We will be doing a large 3D swamp scene including a 3D gator, tree stump with turtle, and other little thingies. (Photo of full class project coming in a few weeks.)

Only 15 spots available.

$250 for 2 days, at least 10 hours per day, or until we finish.

You will need to bring basic supplies i.e. cake, board, fondant, tools.

Detailed supply lists to come later.

Lunches will probably be provided.

Dena is an exceptional 3D cake artist and a wickedly good teacher. See her work at http://www.denascakes.com/

Here is the exceptionally talented Dena with one of her gator cakes. Our class cake will also include a 3D tree stump, a little turtle, and some other surprises as time permits.

Deposit of $125 to hold spot; non-refundable. Balance due one month before class.

Email me with questions or to reserve your spot. szcakes@aol.com

Hope to see you there; it is going to be crazy good!

Sharon
http://www.sugaredproductions.com/


The Most Beautiful Cake I Have Ever Seen

May 25, 2009 by Sharon Zambito 21 Comments


I have seen a lot of incredible and gorgeous cakes in my day. But last week I saw one that is by the far the most beautiful I have ever laid my eyes on. It took my breath away really, and brought tears to my eyes.


Honestly, have you ever seen a cake more beautiful? Look at those shell borders. The perfect writing. The flawless fondant. I am still awe-struck.


This was the birthday cake my son J made for me. He really does love to bake, and he got very little help from me. He baked the cakes, iced and stacked them, rolled and applied the fondant, and piped all the decorations by himself. All I did was knead the fondant for him and color the buttercream. The rest was all him. Those of you that know J know that this is really a wonderful accomplishment for him, and I am so very proud I could just burst. But I won’t, cuz that would be gross. So I will just bask in my motherly pride, and feel the love my sweet boy gave to me on my birthday.
 
 
———————————


Totally Topsy Turvy DVD Give-a-way Winners!
 
You thought I forgot, didn’t you? You guys have been waiting by the computer since midnight waiting for me to post the winners, huh? 6 AM….10 AM….. lunch…… still no post. You guys were sure I forgot today was the day huh? Well, I would never forget you guys! I just slept late! Because Heather and I were up till 3 AM finishing the DVD cover so I can get it to the printer!


I like it! Do you guys like it? Poor Heather. What I put that girl through. Cover looks simple enough, yes? You have no idea how many hours it takes just to get that simple little thing right. Not because of Heather. She is a crackerjack in Adobe. It’s my pain-in-the-ass, can’t make up my mind, over-tweaking self that tortures the poor girl. But she never complains. She just forges through and redoes it as many times as I ask, until we are both happy. I could not live without that woman. A better friend could not be had. Love you, H. And thank you from the bottom of my tweak-happy heart.

Well, you guys have a nice Memorial Day. Don’t eat too much BBQ and I will see you in a few days!

Happy caking,

Sharon

www.sugaredproductions.com


GOTCHA!

You thought I forgot again, huh? Tee hee hee. I love messing with you guys.

We had so many entries, I picked 2 winners!

Susie Q

Jennifer

Yo, Jennifer… you did not leave an email address, so you need to email me if you want this fabo prize! Here is your post:

Jennifer said…
Thanks for taking me step by step through the cake assembling. I’ve always wondered how stable those kind of cakes are. I would love to win a copy of the topsy turvy DVD!
May 22, 2009 2:29 PM

Ya’ll, the editing is done and we are going to the presses. I hate to brag, but I have to tell you I am very proud of this DVD and so excited about it. You guys asked to see everything, and see everything you will. Every last cotton picking detail from start to finish. This sucker is long, so get your refreshments and settle in before you watch it. I might say it is our best DVD yet! And I love love the music on this one. It just makes me happy! Let me know if you like it too!

Thank you all for your business and support!


Graduation Wedge Cake

May 19, 2009 by Sharon Zambito 143 Comments

Hello everyone!
Good gravy have I been busy! Running pillar to post. Burning the candle at both ends. Nose to the grindstone. Running around like a chicken with my head cut off. Burning the midnight oil. OK, I will stop. You get the idea. I bet you guys have been busy too since it is graduation time.
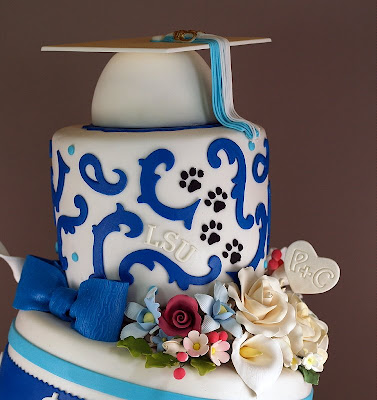
My beautiful and sweet niece graduated from high school last weekend, and I made her a special cake. I wanted to try the tilted method using wedges. I had not done that before. It was really pretty easy.
I wanted to of course use her school colors and mascot, but also incorporate little bits of her life, while making it fun and whimsical.
The grad hat was a styro ball I cut and carved a bit and covered with fondant. The mortar board was a square of fondant with tylose, dried ahead and glued on with chocolate. I used a 4 inch ball and a 5 inch square in this case. The clay gun was used to make the tassel.
The scroll work was done with a cutter set available here.
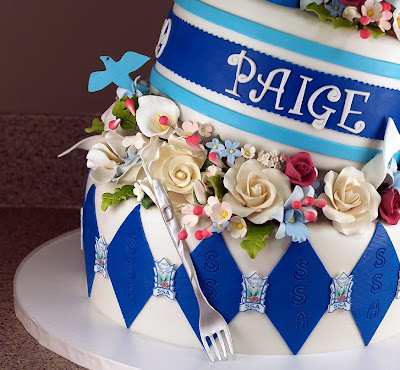
The paw prints were stenciled on, and represent LSU, where she is going to college. I used the alphabet tappit cutters for the LSU letters. I used the funky alphabet cutters for her name.
The initials in the heart are of Paige and her boyfriend, Chris.
I did not have time to make the flowers, so I purchased them, and dusted some to add color.

Here are the flowers I purchased:

Cally lily spray

Rose spray

Large roses

Blue roses


The graduation figure was made with a chocolate mold. I used fondant with tylose in the mold, let it dry firm, and then airbrushed it with super pearl luster dust.

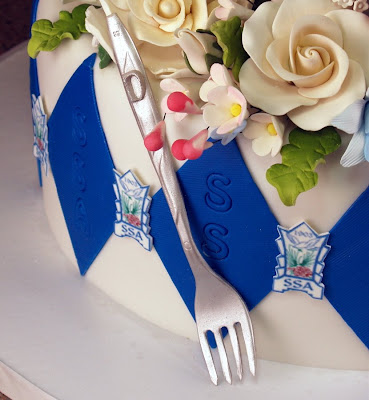
The fork represents the restaurant where she works as a hostess. That thing was quite a challenge to make. I was so engrossed in trying to get one of those suckers to come out right, I forgot to take photos. But here is how I did it:

I rolled out a piece of gumpaste and pressed it between 2 plastic forks that were stacked on top of each other. I squeezed them hard together to make the impression of the handle and the 4 tines into the gumpaste. While they were sandwiched together I trimmed around the outside of the fork edges with an exacto knife. Then I took the top fork off and let the cut out gumpaste sit atop the bottom one for a good long time. After it dried a good bit, I took that gumpaste “fork” and laid it on the table and trimmed to the exact outline of the impressions made by real forks. The handle was easy peasy, but trying to cut the tines out made me curse and throw things. And curse some more. They kept breaking off or were just crappy looking. After creating a graveyard of about 12 reject forks, I decided to go with shorter than real-life tines, and got one fork that was decent. I put that back on top of the plastic fork to get the proper shape and let it dry a day or two. Airbrushed it silver after I added the letter D on the top of the handle. I just knew I was going to break it, but God was smiling on me and it made it to the cake. Whew!
————————————-
Here are some photos of the construction. Please forgive the terrible quality of these photos. I was very pressed for time as my power had gone out for quite a while and put me behind schedule. On top of that, I was working with a heavily bandaged finger after slicing it it open cutting the Styrofoam wedges with a very long, very sharp knife. I think I needed a stitch or two, but no time for that!
I put the ganached tiers atop a Styrofoam lift, so I would be able to tuck the fondant under the cake and foamcore board under it for a clean bottom look.
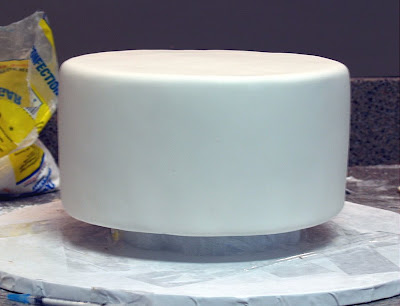
Here is one tier after it was covered.
I had topsy turvy dummies laying around, which worked out great, because the top slant was already cut for me. I just had to trim them down to the height I wanted. (Note: to be considered food safe, you need to cover your wedge and board with something appropriate.)
I attached a piece of thin foamcore to the bottom of each styro wedge with white chocolate. This would prevent the supports from going into the styro under the weight of the cakes. I doweled the bottom cake as usual under the wedge support.
I used melted chocolate to attach the wedge to the lower tier, and more melted chocolate on top of the wedge, then placed the middle tier in place and held it there until the chocolate firmed up. Then I drove 2 wooden dowels down through both tiers.

I repeated the same process to apply the top tier. I wanted the top tier to have more of a tilt to the opposite side, but I miscalculated my slant, so it basically came out straight. Oh well, live and learn. (Dagnabbit!) After the top tier was in place, I drove one large wooden dowel down the middle of all 3 tiers.

That cake was very stable and did not budge. Cutting and serving it proved to be a little bit messy, as the melted chocolate between the tiers did tear off some of the fondant when I disassembled it. But I guess that is the price you have to pay to get this look and have it be super stable. I guess you could try to do it without the melted chocolate, but I felt better having it there as glue.


I cut apart all the purchased flower sprays and arranged them on the cake, using royal icing as glue where needed. The fondant dove is the school mascot.
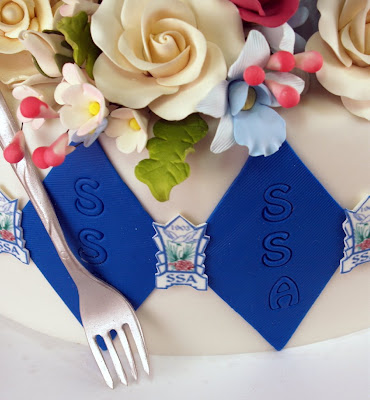


I used the school logo clip art that I got off their website. I made little icons with edible icing sheets backed with white fondant, to put between the diamonds. The school initials, SSA, were impressed into the diamonds using the JEM alphabet cutter set.

Paige just loved her cake and thanked me over and over and over. Everyone at the party went nuts over it; it was very good for my ego, LOL! I have 4 more nieces coming up behind her, graduating from the same school, so I better start thinking of more design ideas soon! Oy vay. I’ll think about that later.


—————————–
NOTE: THIS CONTEST HAS ENDED:

Totally Topsy Turvy is almost ready! Just a few more tweaks in editing and we are going to the presses! I am really proud of this one; I think you guys will like it too. I take you through every single step of making this cake from start to finish. No stone is left unturned. And there are a few fun surprises thrown in there too.

I am so happy with this DVD, I feel like having a give-a-way! (The crowd jumps to its feet and roars!) To enter, just leave a comment below, and you will be entered into a random drawing for a free copy of Totally Topsy Turvy! I will draw the winner on Monday.


GOOD LUCK!
Sharon
www.sugaredproductions.com

A note about emails

May 19, 2009 by Sharon Zambito 6 Comments

 
Hey guys!
 

I just wanted to make a note about my answering email questions and private messages that you guys send me. I am more than happy to help, and do answer every email I get. However, if I am swamped, it might take me up to a week to answer. If you do not get an answer from me within one week, please resend the email. I have been known to lose track of them sometimes.

The other issue I am having is that in answering some emails,they are bouncing back to me as undeliverable. That makes me fear that some of you think I am ignoring you, because I cannot get in touch with you. If you send me an email, please make sure that you make my return email address an accepted one to your account, so it will not bounce back as spam.

Currently, I am trying to answer Dawn and Jen and Jan, but the emails will not go through. If you guys could email me once more, we can try again.

Thanks so much!


Sharon
www.sugaredproductions.com


Readers’ Cakes …Take One

May 11, 2009 by Sharon Zambito 6 Comments


Hi Sugar Peeps!

I have gotten a great response to my request for readers’ cakes made using the techniques taught in our DVDs. You guys have blown me away; your cakes are awesome! It brings me joy to hear that our work is truly helping you guys with your cake skills. Please enjoy this first installment of eye candy brought you by SugarEd clients!
 
 
———————
 
 
Hey Sharon,

I made the design on this cake using that special cutter set I bought from you. God gave us a sweet tooth!! Eat more Cake!!
Lea

 
——————————
 
 
I am attaching a few of my latest cakes as requested in your blog. The blue one is buttercream…as smooth as a baby’s butt, thanks to your first video and the impression mat with pearl idea from your fondant video lagniappe. I made the hydrangea and lady bug out of gumpaste. The chocolate cake is copied from your blog. My son dipped the strawberries in chocolate and I made a gumpaste butterfly. Vicki 🙂


——————————–
 
 
Yomomma says: Hi Sharon, This is my first and only wedding cake, that I made after ordering and watching (many times b4 attempting) your stacking and fondant dvds. I give you full credit (plus prayer!) for the end results. Thanks for your thorough teaching on your dvds.


—————————-


Kari made this cake based off of the Boxes and Bows DVD:


——————–


I have attached one picture that utilizes the bow that is first taught on your “Boxes and Bows” DVD. LOVE IT!! My new favorite-I’m pushing that one on all my clients!
Nicole O. A Slice Of Heaven, LLC http://www.roanokecakes.com/


—————————


I did these two after watching your fondant dvd…..my freaking best fondant jobs ever and I’m ever so grateful to you, darling!!!!
And if anyone wants a good laugh, they can check me out at http://www.mannmadecakes.com….lisa/


——————————–


Hi Sharon! I wanted to share a picture of my FIRST wedding cake! I made this right after seeing your flawless fondant DVD, and I must say I amazed myself by how smooth my fondant looks. I love your idea of chilling the cakes before fondanting. I also love your idea for covering the cake board. Genius. Anyway, this cake is a 6,8,10,12″ with gumpaste roses and hydrangeas. My flickr site is at http://www.tishperez.comthanks/! Tish
 
 
———————————–


Smoooooth buttercream, with fondant accents. That bow is the best so far!! Thanks Sugarshack!!
I have your Perfecting the Art of Buttercream, Successful Stacking, and Boxes and Bows. Love them all, and have watched them several times.
Thanks again.
Laurie
 
 
——————————–


Hi Sharon,
I wanted to tell you I loved your last video, Boxes and Bows and I can’t wait until I get to make one! I love your instructions. You make it look so easy! Oh, and here’s one of my latest wedding cakes, I made the sugar flowers too! The couple’s favorite color is orange!
Tracy ….My website is http://www.thebuttercreamstudio.com/


———————–
 
 
Hi Sharon,
I just made my first butter cream cake using the techniques and recipe in your DVD. Your instructions made it so easy. My first creation didn’t turn out perfectly perfect, but I am very pleased with it. It turned out looking better by far than the techniques I used previous to watching your DVD.
Thank you for providing me with easy to follow instructions. You possess a real talent for teaching!
Sally

PS – My Detective Sergeant just retired after 31 years and I’ve included a photograph of the cake I made for his party using your techniques.


———————


WOW! You guys rock!
More reader pics coming soon!
 
Happy caking!
Sharon
http://www.sugaredproductions.com/


Remy Stirs the Pot

May 7, 2009 by Sharon Zambito 24 Comments

Hello Sugar Friends!
So sorry for the delay in posting. I have been crazy busy; and it continues through next week. Whew, this old cake chick is tired! I hope all of you are doing great, and your caking adventures are going well.
I am working on some things to post next week, so in the mean time I thought I would show this cute cake I made a few months back for the daughter of a friend. She was having her party at one of those little chef places, so the theme of the cake was just perfect! When the mom asked me if I could make Remy stirring the soup pot like in the movie, I said sure I can! Then of course, after I hung up the phone, my thought was : How the heck am I going to do that? The pot I can do, but figure modeling is not my strong suit. So I just jumped in and went for it.

I used a real chopping board for the cake base, and I love the effect that gave.


Here is the first body parts of Remy drying. I find this image quite disturbing. He scares me. But not as much as possums.
I put on his face and arms, and then used a bubble tea straw to simulate the spoon he would be holding on the real cake.

Hands make holding the spoon a tad easier for him. His little chef hat makes him official!


Here he is drying so he would have the proper body position for the cake. He no longer scares me. I think he is pretty dern cute now.
Here are 3 layers of cake iced with thickened ganache as I described in this post.
Here are the pot handles drying. An Aussie friend gave me the idea to use aquarium air tubing wrapped in fondant. I taped them down to the table so they would dry in the proper curve. I have no idea if that is food safe, so do some research before you do this.
 
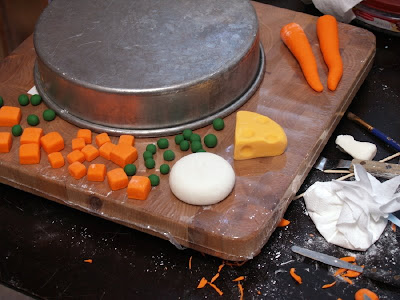
Here I am working on the cheese and veggies, all made of fondant with tylose.

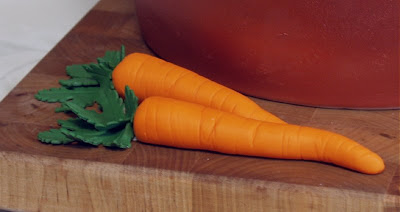
Cute little carrots.

Swiss and aged Gouda. Tee hee.
I wrapped the cake in white fondant, added the top trim and the handles, and then airbrushed it with copper luster dust. Buttercream makes the soup, with little fondant veggies sprinkled on top.
Despite using the straw to configure his arms, when I put the real spoon in the cake, I could not get it to line up with his hands correctly. After a few choice words, I just decided that he was shifting the spoon from one hand to the other, and my picture caught it mid-shift. Yep, I like that story.
I also chose to ignore the fact that he is walking on the soup more than he is standing on the edge of the pot. (Rat bastard.)
Sometimes things just don’t go as we plan, and we have to suck it up. I hate when that happens.
But overall, I was very pleased with the cake, and mom and daughter went crazy over it. Mission accomplished!
————————–
Here is a cake I did last weekend before going to Texas using the run sugar technique. Is this something you guys would like to see on DVD?
——————————
Back from Texas
I had a wonderful time in Texas last weekend. The DOS and classes were a blast! I love traveling to teach and meet cake people. Cake peeps are the best on earth!
Check out this cake Sandy in Texas made in my fish class. Hers came out better than mine. She is banned from any future classes with me.

Check out Sandy’s great cakes at: http://www.picturetrail.com/sandyscakes


        ————————-

Topsy Turvy DVD
Todd and I are working on the finishing touches for Totally Topsy Turvy. It’s going to be close to 4 hours long. It will include a narrated slide show showing how to cut and serve a topsy, and also has some bloopers from the shoot! I love the music for this one; my favorite so far! Thank you for the pre-orders placed already. May 15 is the cut off to get the free recipes!
————————-
OK kids, back to my busy, crazy, wonderful life, and I will check in with you guys next week. This weekend is my 46th birthday, 24th wedding anniversary and Mother’s Day. I got me some serious eating to do!
Happy Mother’s day to you all! (Even if you do not have kids, you are still a mother to your cakes, so go celebrate!)
Sharon
http://www.sugaredproductions.com/


Totally Topsy Turvy DVD on Sale NOW!

April 27, 2009 by Sharon Zambito 12 Comments

 
HELLO SUGAR FRIENDS!
 
Totally Topsy Turvy is now taking pre-orders!


Learn how to make this entire cake from start to finish.


Learn how to fill, carve and stack for ultimate stability.


                      Learn every single decorative technique you see on this cake!


You will become a Topsy Turvy master!


                                CLICK HERE TO PRE-ORDER

 
CLICK HERE FOR ALL THE NEW TOOLS!
 
 
We at SugarEd Productions thank you for your business!


Daring Bakers: Cheescake

April 27, 2009 by Sharon Zambito 8 Comments

Finally!

After a couple of savory challenges, we are finally back to sweets for the Daring Bakers group! Now that’s what I’m talkin bout!

I know I have made no bake cheescakes before, but I do not recall if I have made a baked one from scratch. So if I can’t remember, it really means it has been to long to count anyway. This was a really easy, straightforward recipe that even the kitchen challenged like myself could do. And I am proud to say mine had no cracks on top! Zero. Nada. But I have no pictures to prove it, so you will have to take my word for it.
The April 2009 challenge is hosted by Jenny from Jenny Bakes. She has chosen Abbey’s Infamous Cheesecake as the challenge.

I dressed mine up with tinted coconut grass and a fondant bunny looking for his carrots. It was one of the desserts for our family Easter dinner.

It was tasty, but not the best cheesecake I have ever had. It was very creamy and mild in flavor. I like my cheesecake to have bit more twang to it. My piece was also very soft from sitting out for for a few hours. I think it would have been better cold from the fridge.


Abbey’s Infamous Cheesecake:

Crust:

2 cups / 180 g graham cracker crumbs

1 stick / 4 oz butter, melted

2 tbsp. / 24 g sugar

1 tsp. vanilla extract


Cheesecake:

3 sticks of cream cheese, 8 oz each (total of 24 oz) room temperature

1 cup / 210 g sugar

3 large eggs

1 cup / 8 oz heavy cream

1 tbsp. lemon juice

1 tbsp. vanilla extract (or the innards of a vanilla bean)

1 tbsp liqueur, optional, but choose what will work well with your cheesecake


DIRECTIONS:

1. Preheat oven to 350 degrees F (Gas Mark 4 = 180C = Moderate heat). Begin to boil a large pot of water for the water bath.

2. Mix together the crust ingredients and press into your preferred pan. You can press the crust just into the bottom, or up the sides of the pan too – baker’s choice. Set crust aside.

3. Combine cream cheese and sugar in the bowl of a stand-mixer (or in a large bowl if using a hand-mixer) and cream together until smooth. Add eggs, one at a time, fully incorporating each before adding the next. Make sure to scrape down the bowl in between each egg. Add heavy cream, vanilla, lemon juice, and alcohol and blend until smooth and creamy.

4. Pour batter into prepared crust and tap the pan on the counter a few times to bring all air bubbles to the surface. Place pan into a larger pan and pour boiling water into the larger pan until halfway up the side of the cheesecake pan. If cheesecake pan is not airtight, cover bottom securely with foil before adding water.

5. Bake 45 to 55 minutes, until it is almost done – this can be hard to judge, but you’re looking for the cake to hold together, but still have a lot of jiggle to it in the center. You don’t want it to be completely firm at this stage. Close the oven door, turn the heat off, and let rest in the cooling oven for one hour. This lets the cake finish cooking and cool down gently enough so that it won’t crack on the top. After one hour, remove cheesecake from oven and lift carefully out of water bath. Let it finish cooling on the counter, and then cover and put in the fridge to chill. Once fully chilled, it is ready to serve.


Pan note: The creator of this recipe used to use a spring form pan, but no matter how well she wrapped the thing in tin foil, water would always seep in and make the crust soggy. Now she uses one of those 1-use foil “casserole” shaped pans from the grocery store. They’re 8 or 9 inches wide and really deep, and best of all, water-tight. When it comes time to serve, just cut the foil away.


Prep notes: While the actual making of this cheesecake is a minimal time commitment, it does need to bake for almost an hour, cool in the oven for an hour, and chill overnight before it is served. Please plan accordingly!


Some variations from the recipe creator:

** Lavender-scented cheesecake w/ blueberries – heat the cup of heavy cream in the microwave or a saucepan until hot but not boiling. Add 2 tbsp of lavender flowers and stir. Let lavender steep in the cream for about 10-15 minutes, then strain the flowers out. Add strained cream to cheesecake batter as normal. Top with fresh blueberries, or make a quick stove top blueberry sauce (splash of orange juice, blueberries, a little bit of sugar, and a dash of cinnamon – cook until berries burst, then cool)


** Cafe au lait cheesecake with caramel – take 1/4 cup of the heavy cream and heat it in the microwave for a short amount of time until very hot. Add 1-2 tbsp. instant espresso or instant coffee; stir to dissolve. Add this to the remainder of cream and use as normal. Top cheesecake with homemade caramel sauce (I usually find one on the food network website – just make sure it has heavy cream in it. You can use store-bought in a pinch, but the flavor is just not the same since its usually just sugar and corn syrup with no dairy).


** Tropical – add about a half cup of chopped macadamias to the crust, then top the cake with a mango-raspberry-mandarin orange puree.


** Mexican Turtle – add a bar of melted dark chocolate (between 3 and 5 oz., to taste) to the batter, along with a teaspoon of cinnamon and a dash of cayenne pepper (about 1/8 tsp.). Top it with pecan halves and a homemade caramel sauce.


** Honey-cinnamon with port-pomegranate poached pears – replace 1/2 cup of the sugar with 1/2 cup of honey, add about a teaspoon or more (to taste) of cinnamon. Take 2 pears (any variety you like or whatever is in season), peeled and cored, and poach them in a boiling poaching liquid of port wine, pomegranate juice/seeds, a couple of “coins” of fresh ginger, a cinnamon stick, and about a 1/4 cup of sugar. Poach them until tender, then let cool. Strain the poaching liquid and simmer until reduced to a syrupy-glaze consistency, then cool. Thinly slice the cooled pears and fan them out atop the cooled cheesecake. Pour the cooled poaching syrup over the pears, then sprinkle the top with chopped walnuts and fresh pomegranate seeds.


Some variations from Jenny (from JennyBakes):

**Key lime – add zest from one lime to sugar before mixing with cream cheese. Substitute lemon juice, alcohol, and vanilla with key lime juice.


**Cheesecakelets – put in muffin tins, ramekins, or custard cups. Try baking 20-35 minutes, or until still a little jiggly, and cool as before.


Overall it was a very good and easy recipe and I would like to try some of the other variations in the future. If you make it, let me know how you like it. And check out the Daring Bakers’ blog roll to see what creations other members have come up with.

Happy baking!

Sharon
http://www.sugaredproductions.com/


Sharon teaching near Houston next weekend!

April 25, 2009 by Sharon Zambito 3 Comments


Don’t forget I will be in Alvin (suburb of Houston), Texas (if I live through this week, LOL) next Sunday and Monday, May 3-4, for the Pearland Cake Society Day of Sharing and mini classes.

Please come see us. We have so much fun in our classes it borders on ridiculous!

 
I am driving all that way by myself; the least you all can do is meet me there! 🙂


                                     Click here for more info!


  • « Previous Page
  • 1
  • …
  • 16
  • 17
  • 18
  • 19
  • 20
  • …
  • 25
  • Next Page »

Sharon Zambito

Sharon Zambito

An RN turned SAHM turned cake maniac. Owner of SugarEd Productions Online School. Join me for some caking, baking, and all around sweet fun :)

Follow me..

  • Facebook
  • Instagram
  • Pinterest
  • YouTube

Pinterest

  • Autumn House Two Trees Machine Embroidery Design – Blasto Stitch
    Autumn House Two Trees Machine Embroidery Design – Blasto Stitch
  • Embroider  Sew :: Jelly Roll Purses - Embroidery Garden In the Hoop Machine Embroidery Designs
    Embroider Sew :: Jelly Roll Purses - Embroidery Garden In the Hoop Machine Embroidery Designs
  • (1) How to QUICKLY & SAFELY remove acrylic, gel, and dip powder polish | BAGGY METHOD - SO EASY! - YouTube
    (1) How to QUICKLY & SAFELY remove acrylic, gel, and dip powder polish | BAGGY METHOD - SO EASY! - YouTube
  • (1) Bouffant Surgical Cap - YouTube
    (1) Bouffant Surgical Cap - YouTube
Follow Me on Pinterest

Follow Me on Instagram

Instagram requires authorization to view a user profile. Use autorized account in widget settings

Recent Posts

  • Egg Safety Basics
  • Stable Mabel Support System Sale
  • Guest Post : 4 Vegan Cake Recipes No One Should Miss Out On!

Popular Posts

  • Ways To Make Your Cake Fluffy And Moist
  • How To Stencil on Cookies with Royal Icing
  • Doctored Cake Mix Recipes
  • Transferring an Image Without a Projector
  • All About Buttercream!
  • How to Fix Broken Ganache
  • Edible vs Non Toxic Gold Dusts

Categories

Search

Archives

Copyright © 2025 · Sharon Zambito and SugarEd Productions,LLC

Copyright © 2025 · Evangeline Theme on Genesis Framework · WordPress · Log in