Sugared Productions Blog

  • Blog Home
    • Home
  • Online Classes
  • Shop
  • Contact
  • About

Autumn Themed Treats

September 6, 2015 by Sharon Zambito Leave a Comment

Hi ya’ll!!

Have you had enough of summer? I know I have. It’s hot as heck down here in the deep south.

Let’s dream about the upcoming Fall season. Here’s a round up of Autumn themed treats and recipes to help get us ready!


Chocolate-Caramel-Cupcakes-Sweetopia-590x885

 Chocolate Caramel Cupcakes from Sweetopia


Indian-Corn-Cookies-480x324

Indian Corn Cookies from Sweet SugarBelle


pumpkin-cake-pops-120-800x535

Pumpkin Cake Pops from The Pink Whisk


basket1a small

Autumn Basket Cake from SugarEd Productions


cat

Kitty Cat Pumpkin Cake from The Cake Girls


dark_gourd_cake_8

Chocolate Painted Cake from The Cake Blog


IMG_1076smallTurned

Slice of Pie Cookies from Cookie Crazy


easy-no-bake-pumpkin-patties

Pumpkin Patties from Mom On Timeout

I can almost smell the scent of pumpkin pie in the air. I hope these got you inspired for Fall baking.

Happy Caking!

Sharon

Does it matter what type of buttercream I use?

September 6, 2015 by Sharon Zambito 2 Comments

Hi ya’ll! Today, I wanted to talk to you all about buttercreams, and if it REALLY matters which one you use.

The answer: No, It doesn’t!

There are all different kinds of buttercreams out there, and as with most things in life: it’s all about choices. Let’s discuss a few of the popular ones here!


7U5A9559 - Copy


American Buttercream– This buttercream is perhaps the most popular in our country. This type of icing is made by combining shortening or butter (or a combo of the 2) with powdered sugar, and mixing until it forms into a creamy spreadable consistency. It is delicious, and sweet! Most ABC recipes form what we call a “crust”. That is, it gets a bit of a “shell” on the surface. This makes smoothing a DREAM with things like paper towels, or any other smooth surface (within reason!). My famous buttercream recipe falls in this category, and I’ve got a great in-depth video here on the site showing how to make it. A con to this recipe, is that some people find this recipe to be very sweet. 

Here’s the video on making American Buttercream:


abc


——————————————————————-

Next Buttercream Type:

                                    smbc101


Swiss/Italian Meringue Buttercream– I decided to combine these two because the final product is more or less the same. The difference comes in the preparation of the meringue. Swiss Meringue BC is made by whisking egg whites and sugar until the mixture has reached 160 degrees, and whipping the egg white to stiff peaks. Italian Meringue BC is made by cooking a sugar syrup to 245 degrees and pouring it into egg whites and whipping to stiff peaks.  This buttercream is a great alternative for those clients or family members who prefer something that is a little less sweet. This buttercream does not form a crust, so a popular smoothing method here is using what we cal the “hot knife” or “hot scraper” method. However, this buttercream can be less stable in heat. Butter melts at a lower temperature than shortening, making American BC a great recipe to use in  hot and humid climates! Another con to this particular recipe, is that it does not color a well as American Buttercream due to the low sugar content.


My suggestion would be to try both of the recipes, and see what you like best! There is no right or wrong when it comes to choosing a buttercream! In fact, many people don’t choose. There are places for BOTH of these buttercreams in your icing arsenal! No matter what recipe you decide you like best, be sure to check out our videos on applying buttercream in our website.

Happy Caking!

Sharon

3D Standing Letter… in Cake!

September 5, 2015 by Sharon Zambito 1 Comment

Hello everyone!

I’m bringing back an older post from the archives due to it’s high popularity. A  fun project I made for my son’s graduation last year. See how I made it:

I was very pressed for time in getting it done, as well as preparing for the big party we threw for him, so this is not a high quality professional photo tutorial by any means.

It is more of an explanation of how I created the cake with a few craptastic photos that I took added in. This in no way represents the quality of tutorials I deliver in my online cake decorating school, LOL.

JWATER


The method that I used would not apply to every letter of the alphabet, but hopefully you will be able to take away some techniques from this tutorial that you can apply to other cakes. So here we go!


 (click to enlarge:)

Jason cake FINAL


The diagram above basically shows how the cake was constructed. The very bottom portion was Styrofoam cut from a 2 inch thick sheet cake dummy. Because the bottom of the letter has those cut angles on each side, I wanted to be sure that the base was strong enough to support the weight of the tall side of the J. I put a piece of regular cake cardboard on top of the Styrofoam for food safety reasons. Then I built the cake above that. This cake was about 17 inches tall, and after it was ganached and covered in modeling chocolate it was about 3 inches deep, (front to back). So it was basically a very tall and skinny cake. (caps and I would say it served 15 – 20).

I baked 2 inch high dense chocolate cakes in two pans: a 9 x 13 and a 12 x 18. I overfilled the pans so the cakes would bake over the top, so that when I leveled the cakes they would be as close to 2 inches tall as possible. I then cut pieces from those sheet cakes as I built the cake.

I used ¼ inch foam core to support the “tiers” of the cake. I did not want to go any higher than 6 inches of cake without internal support. I used bubble tea straws for support as indicated in the diagram above.

NOTE: I built the cake while it was actually lying flat on its back on a big board. Then I ganached it, partially covered it in modeling chocolate. And not until then did I stand it up, secure to the base board and finish it. You will see more of this process in the photos that follow.


IMG_4272

I made a paper template in the actual size I wanted the finished cake to be. (photo above). I then used this as a guide to to make the foamcore ganache templates, and also used this as a guide to build the cake.


IMG_4275

The photo above shows the section of Styrofoam cut out for the bottom of the cake. IMPORTANT: the size of this Styrofoam base is about a1/4 -1/2 inch smaller all the way around than the paper template itself.

The reason for that is that there has to be enough room around the cake, once built, to apply a thick layer of ganache. If you cut this Styrofoam piece exactly the same size as the template, and build the rest of the cake to the exact measurements of your paper template, you will have no room for ganache later when you use the cardboard templates.


IMG_4277

Above you see two templates made from one quarter inch foam core. These were my ganache boards. These were covered in press and seal plastic wrap, and used as the guide for the bench scraper to ganache the cake after it was built.


This next portion I am going to explain, I do not have process photos of:

I built the cake lying flat on the bottom foamcore template. I had the entire thing lying on the larger foamcore board (that you see in the photo below). Once the cake was all “stacked” and built, I then put a layer of ganache on the entire top surface of the cake. While the ganache was still very soft, I put the top foamcore template (covered in press and seal) on it and pressed firmly down. I used a level while pressing down on the top template to get it as level as possible. I then left it alone for a while so the ganache would firm up. Then I took a larger foamcore board and put it on top of the entire cake and flipped the entire project over. I removed the previously bottom, but now on top, foamcore template. Repeated the process of applying a layer of ganache, putting the (press and seal covered) template board back on, pressing firmly and getting it level. I left that to set up until firm.


10338808_10202926199169361_863531217_n

Then I ganached the sides of the cake and used the edges of the two templates on the top and bottom of the cake to guide my bench scraper, to give me the sharp outline of the letter. (We have instructional videos in our online school on making spreadable ganache, as well as using two template boards like this to create a perfect shell.)

I put a very thick layer of ganache on all sides of the cake, because I wanted it to be super stable once I stood it up. I wasn’t sure how the cake was going to react to standing up straight, so I went really heavy with the coating of ganache. (You can see here why it is important that the Styrofoam base and the entire cake once built, was smaller than the actual template boards. It left space for ganache to be applied around the outer perimeter of the cake.)

Remember that the top and bottom templates are covered in press and seal plastic wrap. The smooth sides of the plastic wrapped templates are against the ganache. Once the whole cake was covered in ganache, (as you  see in the photo above), I left it overnight to totally set up. The next day, the templates popped right off and I repaired any divots in the surface of the ganache with some fresh ganache and let that set up totally before starting to cover the cake.

Next came the covering of the cake. I decided to use modeling chocolate so that I would have more workability time and be able to blend seams and such better than if I had used fondant. In retrospect, I’m not sure I would do that again. The modeling chocolate showed a lot of blemishes and was rather “delicate”. I wonder if I could have gotten a cleaner looking surface using fondant with tylose. (I realize that these photos do not show the imperfections in the surface of the cake, but there were many.)


10309564_10202938189429110_7344175358695697366_n (2)

Back to the covering of the cake: I first covered the sides of the letter. I rolled out strips of modeling chocolate and wrapped them around the sides of the cake. I did not cover the whole perimeter of the cake in one strip of modeling chocolate. I did it in sections and placed the seams in the inside corners of the letter as indicated in the photo above. Next, I covered the top surface with modeling chocolate, trimmed it, and blended the seems joining the side strips to the top piece with my finger.

Note: notice in the photo above that I did not cover the Styrofoam at the base of the cake. I did not want to stand the cake up onto modeling chocolate, because the weight of the cake would have caused it to squoosh out the bottom and not given a clean look.

Then it was time to stand the cake up. I slid the cake a bit so that the bottom edge of the Styrofoam was even with the bottom of the rectangular cardboard you see in the picture above. Then I put my hand under that cardboard and used that to stand the cake straight up onto the wood grain fondant covered baseboard. I put some melted white chocolate on the cake board where the bottom of the J would be standing on it.


phorrrrrto (2)

Here is the back of the letter, right after the cake was stood up onto the board. Two wooden dowels were then driven through the cake and down into the baseboard as indicated above. I decided not to put a long wooden dowel down the tall side of the J because I was not traveling with this cake. If I were going to have to bring it to another venue, I would recommend doweling that side too. That being said, the cake was pretty stable once it was all assembled. I think the ginormous amount of ganache surrounding the cake made it very stable.

To cover the back of the cake: I rolled out modeling chocolate onto a piece of foam core, popped that into the freezer for about 10 min., then cut out the letter shape using my paper template. I popped that back into the freezer for another 7 min. or so to get it super firm. I used shortening, applied liberally, (as you can see in the photo above), as the glue to hold the back panel on. The back panel was very firm from being in the freezer, so I just stood it up and attached it to the back of the cake, being careful not to put too much pressure onto the precariously standing cake. I then used my fingers to smooth the seam where the back panel and the side strips of modeling chocolate met.


phxsdsdcsdoto (2)

Here is a photo of the cake after it is standing up and doweled into the baseboard. The holes on the top of the cake created from the wooden dowels were plugged with little pieces of modeling chocolate and blended in as well as possible. (However, they were visible.)

NOTE: I wanted the front of the cake to have some dimension and have that “collegiate font” look. So I actually created another panel with red modeling chocolate in the shape of the J, but made it a bit smaller then the front of the cake. I applied that to the front of the cake, then I outlined that with black fondant using the semicircle disc of my clay gun.

NOTE: the woodgrain fondant board was made by putting fondant onto a cake drum. I scored it to create planks, used a wood grain impression mat, and painted it with airbrush color diluted with vodka. Once that was dry, I dusted it with brown petal dusts to give it more dimension. Glued a 5/8 inch black ribbon around the side of the board. (We have video tutorials on woodgrain boards as well in our online school. Shameless plug #2, LOL)


DSC_7291 (B0830132xBC09D)-001

This photo shows the (broken) tassel laying on the board after we cut the cake. The tassel was made using a clay gun. I built it on an 18 gauge wire in the shape of an upside down L. That allowed me to insert the wire into the front of the cake, to give the illusion that the tassel was actually dangling in front of the cake. ( The wire was coated in white chocolate before being inserted into the cake.)

The bulldog was simply an edible image applied to a piece of fondant, and allowed to dry to create a plaque.


Now to cutting and serving:


DSC_7264 (B0830118xBC09D)-001

The first piece was cut where indicated.


DSC_7270 (B0830121xBC09D)-001

Then cut horizontally right along the top of the ¼ foamcore board that was holding up the top portion of the cake.


DSC_7274 (B0830124xBC09D)a

Continued to serve the top portion.


DSC_7285 (B0830129xBC09D) (2)

Then after the top foam core support board was removed, I just cut across to create pieces from the tall side of the cake. You can see the wooden dowel sticking out on the shorter side. All the cake has been served on that shorter side and right under that little bit of brown is the Styrofoam.


DSC_7286 (B0830130xBC09D) (2)

(I call this an action shot. I was moving so fast, the camera couldn’t keep up with me!) Terribly blurry picture, but you can see me removing a bubble tea straw as I came across it while serving.


DSC_7285 (B0830129xBC09D)-001

Cake to ganache ratio is ridiculous. I did have emergency syringes of insulin on standby.


DSC_7276 (B0830126xBC09D) (2)

And in case that wasn’t enough sugar, I served it with whipped cream and caramel sauce 🙂 I had 911 on speed dial.


DSC_7291 (B0830132xBC09D)-002

If you look close enough, you can see the patch on the top of the modeling chocolate where the other wooden dowel was inserted. They were  visible and it did bug me LOL. The way to avoid that would have been to stand up the cake and dowel it to the baseboard before any modeling chocolate was applied. But I did not want to cover the entire cake with modeling chocolate in the standing position, so I chose the lesser of two evils. (But the patches still bugged me, LOL)

_____________________________________________________________

And so that is it! I hope that this gave you enough information to help you to try to create your own tall, skinny standing cake.


Check out my online cake decorating school!

 $5 for 30 days of full membership. Use coupon code OFF50 


AD


www.sugaredproductions.com

Happy Caking!

Sharon


NOLA Photography http://bentzphotography.com/

How to color wafer paper and make a peony

June 15, 2015 by Sharon Zambito 2 Comments

Hi Y’all!  Wafer paper flowers are so trendy right now! We’ve had requests to repost this, so  today we have guest blogger, Summer Stone, from Cake Paper Party, here to teach us how to color our wafer paper and make this gorgeous poppy!  Take it away, Summer!

Wafer paper continues to gain popularity in cake decorating because of its low ticket price and ease of use for beginner and professional cake decorators. The trouble is that it comes in one color: white. While white is lovely for many projects it is often desirable to have other colors for your decorating repertoire. Some decorators color wafer paper by printing on it with food safe ink from a printer; but not all of us have access to such a printer or the cash to shell out for one. Thinking there had to be a better solution I came up with a way to color this medium for less.


wafer-poppy2web

Let’s get started coloring wafer paper for flower petals and other cake and cupcake decorations!


poppy-suppliesweb

Here are the supplies you will need:

  • wafer paper
  • scissors
  • cosmetic sponges
  • binder clips
  • candy food coloring (Wilton Candy Red and Americolor Oil Candy Color Orange used here). Candy color is essential because it is oil, not water based and therefore will not melt the wafer paper.
  • toothpicks
  • small container of water
  • small paint brush
  • wax paper


petal-drawweb


 petal-cutweb1

1. Start by preparing your wafer paper shapes. Here I hand drew petals on the wafer paper then cut them out with scissors.


   color-dropweb

2. Drop desired color of candy color on a piece of wax paper. Here is used red and a combination of orange and red mixed together and then straight red to create color gradient. If mixing colors use a toothpick to blend them together.


 sponge-colorweb

3. Make a sponge dauber. Cut cosmetic sponges into small pieces then fold and clip with binder clip.


 sponge-tampweb

4. Pick up color. Dip dauber into color and then tamp 15-20 times to ensure even distribution of color on the sponge.


start-spongingweb


 keep-spongingweb

5. Apply color to wafer paper.  Start dabbing the first color onto the smooth side of the  wafer paper petal with a light touch. Here I used a combination of two drops orange and one drop red. You will get the most even color if you add it lightly and gradually build the color up. Keep sponging until the color is even. Here I stopped 3/4 of the way up the petal so I could add a darker color at the petal tips.


done-petalweb

6. Add additional colors. To add gradient and shading apply a second darker color to the wafer paper. Let the petals sit for a couple of hours or overnight to absorb the color (they don’t exactly dry since it is oil color). Alternately you can use them immediately just try not to touch the petal surface.


petal-crossweb

7. Shape petals. Here I clipped a small line with scissors up from the bottom center of the petal. Then I applied a small amount of water with a damp paintbrush and crossed the petal over itself to create a cupped shape.


 wafer-poppy1web

8. Layer your petals. Layer the petals together using very small amounts of water to adhere. For the poppy I add a center of black thread  and modeling chocolate.


wafer-color-chartweb

Here is a chart of how different brands and mixes color onto water paper. The top is Americolor Candy Colors followed by Wilton Candy Color, Ateco Soft Gel Colors mixed with Flowcoat (3 drops Flow coat to 1 drop gel color) and on the bottom Wilton White Food Color mixed with candy color (1 to 1). Mixing the white with the candy color makes lovely opaque pastels.

Try this wafer paper coloring technique out and let me know what you think!


—————————————————————————————

Join SugarEd Productions Online School for only $1!

Use coupon code OneDollar

Join Now

Desktop45

_________________________________

Pilgrim Pumpkin Mini Cake

November 9, 2014 by Sharon Zambito Leave a Comment

Hello Sugar Friends!
We are re-posting this cute guy from the archives…… lots of readers have been asking for him, so here we go!
–
–
–
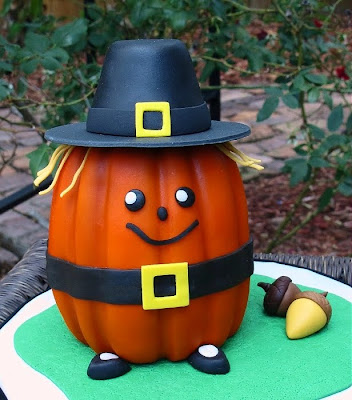
I hope you are having a nice Fall so far, and are enjoying the anticipation and preparations leading up to the holidays.  Thanksgiving is my very favorite holiday, and I love making  fun treats for the occasion. And I have to tell you that this little dude has got to be  my all time favorite! I have been busting at the seams since I made him; I am so excited to share him with you!
Meet my Pilgrim Pumpkin mini cake!
Don’t you just want to squeeze him?
Let me show you how I made him:
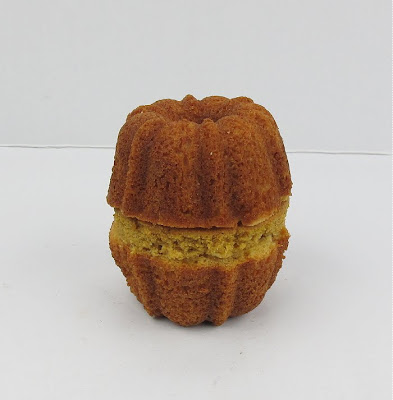
For his body I used two mini bundt cakes and a circle of cake I cut from a round layer with a cookie cutter. The height of the cut circle of cake was about 1/2 inch.
You need that extra height the circle of cake gives. Otherwise, he will be too squatty and you won’t have enough room for his belt and his face. If you want to spackle the seem with some stiffened buttercream to hide it more, you can do so.

 Crumb coat the cake with a  very thin layer of icing. Then cover the top half with orange fondant. Use a wooden dowel to impress in the grooves of the bundt pan to make them show up well. You will need a pretty thick layer of fondant or all the lumpy bumps  will show through. Or you can use two thinner layers of fondant, which is what I did. Once you get the top half covered, let it sit for a while to let the fondant set up some.
Then flip the cake over and do the exact same thing on the other half. Cut a clean seem between  both layers of fondant where they overlap in the middle, so that you get the result you see above.


Looking pumpkiny!

I airbrushed him just a little to help his colors pop, but that it optional. Cover the seem with a strip of black fondant to make his belt. Make his face with pieces of black fondant.

Cuteness emerging.
His hair is thin strips of a golden yellow fondant. Prop them away from his head  with  paper towels until they firm up. Make his adorable little pilgrim shoes from triangles of black fondant with an oval  piece of white fondant on top.At this point, just go ahead and squeal with delight. You will want you. You will need to. You have my blessing.
Cut a circle of black fondant for the brim of his hat, and fashion another piece in the tapered shape of a pilgrim hat. Let those both firm  up well. Attach the hat pieces together with  chocolate.
Once all is in place, add the  buckles to the belt and hat. I presented him on a little bit of fondant grass  with some acorns. At this point I called in all my family, my neighbors, the postman, and a stray cat to share my excitement with them.
Isn’t he just the cutest thing?
I heart him.
——————————

I often get asked where I get my ideas from, which can be all kinds of things. This project was inspired by this piece of  clip art I stumbled upon while searching on the internet for something:


My little guy came out pretty much how I envisioned in my head; which rarely happens. So I was very pleased.

Hope you give him a try, he was a lot  of fun to do!

Happy caking!
Sharon
www.sugaredproductions.com

—————————————————————————————

Join SugarEd Productions Online School for only $1!

Use coupon code ONE

Desktop45

Join Now

_________________________________


NOLA Photography http://bentzphotography.com/

Agbay Leveler Giveaway!

June 29, 2014 by Sharon Zambito 1 Comment

  DON’T MISS OUT! GIVEAWAY ENDS FRIDAY! 


Collages20


We are having a giveaway on our Facebook page!
 
Agbay Single Blade Leveler (full size)
 
Retail value $230!
 
Enter Giveaway Here
 
*Earn up to 16 entries!
 
————————————————————–
 
Don’t have a Facebook account? You can enter the giveaway
by entering your e-mail address in the sign-up box on our
website home page. (One entry only.)
 
Alternative Entry Here
 
—————————————————————
 
*Note: Agbay is available for shipping to USA and Canada only. If an international entry is drawn, a $50 gift certificate to the SugarEd Online store will be awarded and another entry drawn for the Agbay.


GOOD LUCK!
 

————————————————————————————————————


1452450_10151914164635999_1498578573_n


Join SugarEd Productions Online School

Use Coupon Code OFF50

50% off one month membership


Agbay Leveler Giveaway!

June 25, 2014 by Sharon Zambito 1 Comment

Collages20


We are having a giveaway on our Facebook page!
 
Agbay Single Blade Leveler (full size)
 
Retail value $230!
 
Enter Giveaway Here
 
*Earn up to 16 entries!
 
————————————————————–
 
Don’t have a Facebook account? You can enter the giveaway
by entering your e-mail address in the sign-up box on our
website home page. (One entry only.)
 
Alternative Entry Here
 
—————————————————————
 
*Note: Agbay is available for shipping to USA and Canada only. If an international entry is drawn, a $50 gift certificate to the SugarEd Online store will be awarded and another entry drawn for the Agbay.


GOOD LUCK!


Fathers Day Tie Cookies

June 7, 2014 by Sharon Zambito 3 Comments

Hello everyone! Today we have a guest post by the fabulous cookie decorator, Semi- Sweet Designs. Check out these adorable tie cookies that hang on the side of Dad’s Cup!

Fathers Day Tie Cookies

by Semi Sweet Designs


Father’s Day is this Sunday and I have an easy cookie idea to share. If you want to make the dad in your life feel extra special on this special day, I say start his morning off right. Impress him with a dapper cup of joe with these Father’s Day mug hanging necktie cookies!
To make these cookies, first download this simple necktie template I created. You can either print the template directly on food safe card stock or use food safe template plastic like I did below. (Parchment paper would work too.) Any method will work. Cut out the template and use it as a guide to carve out the dough by hand.
Necktie cookie template:
These cookies require a kind of “hook piece” that will attach to the back of the necktie cookie. You’ll see what I mean by the end of the post.
Making the hook:
 
Cut out a circle about 2 inches in diameter. Use a cookie cutter for the letter “I” to cut out a small notch in the circle. (You can also carve out a notch with a knife if you don’t have an “I” cutter.) Cut the piece in half with a knife.
After you have cut out and baked the necktie and the hook pieces, it is time to ready the royal icing.
You will need:
White piping and flood royal icing. (I chose white to match the color of the mug.)
Piping and flood royal icing in the necktie color/s of your choice.
With white flood icing, spread a thin layer of icing over the top of the necktie cookie. IMPORTANT NOTE:   Don’t do what I did in the photo and only cover the top half of the cookie. I didn’t account for potential spreading. If the dough does spread after baking (which it did for me), covering the entire top surface makes for a better looking cookie.


After the top, thin coat of icing is dry, it’s time to add the collar. If drawing the outlines for the collar free-hand scares you, you can use a scribe tool or toothpick to mark where the lines should go. Just cut the collar detail off of the template and use that as a guide to make your marks.

Once the markings are made, pipe over them with white piping icing, then fill the middle area with white flood icing.


After the collar area had time to set, it is time to do the tie details. Above shows the basic steps to do a solid-color tie. Pretty simple.


However, if your dad isn’t a solid-color-tie-type-of-guy, there are many other design options you can try. There are stripes…
Or polka dots…
The possibilities are endless. Here are a few examples I came up with, nothing too complicated. I just played around with the three colors I had on hand.
After the necktie cookies are iced, leave them to dry and harden completely before moving on to the next step.
Attaching the hook:
Once the icing on the necktie cookies are dry and hard, turn them over. Apply a center strip of relatively stiff icing on the back of the cookie with a #3 icing tip. Attach the hooked cookie piece on top of the icing strip. If the icing is stiff enough, the hook should stand upright on its own. Leave these cookies to set and harden for a few hours.


After the icing around the back hook had time to dry, the necktie cookie should be ready to hang off a mug.


I should note the color of the collar was chosen to match the color of the mug. This should give the mug the appearance it is the shirt to the collar/necktie cookie. If you don’t have a white mug, I would recommend trying to match the collar icing color to the color of the mug you plan on using.
I hope everyone has a Happy Father’s Day and a great rest of the week!
—————————————————————————————————————-
Please visit the Semi Sweet Blog
Copyright Semi Sweet Designs 2013. 
 Reprinted with permission


Snowflakes Cutters on Sale

December 13, 2013 by Sharon Zambito 2 Comments

Hello sugar friends!

We have put both styles of our snowflake cutter sets on sale. The cookie cutter set has five pieces, so you can make your own custom snowflake designs. It is great for cookies as well as for fondant or gum paste decorations for cakes, as shown in the photos below. The Patchwork cutter set makes gorgeous intricate snowflakes as well as stars.


1480777_10152019339770999_758792873_n


Use coupon code SNOW to receive a 15% discount
on all cutter sets.


SHOP SNOWFLAKE CUTTERS HERE


Happy Holidays!


I Love it to the Core

September 7, 2008 by Sharon Zambito Leave a Comment

For as long as I have been around the Internet cake world, it seems that I must be the only caker on the face of the planet that actually likes to use the heating core when baking my layers. Most bakers I know use the rose nail as a heating element in the center of the pans to help them bake evenly. But I did not have much success with those. Once I tried the heating core, I have never looked back.

I use my Wilton Cake Release (squirt bottle, not spray) to coat my pans, as well as in the inside and outside of the core, using a pastry brush. I absolutely LUV the Wilton Cake Release. My cakes never stick, it is easy to use, and the pans are easy to clean up afterwards. I tried homemade pan grease, but wasn’t too fond of that either. Plus, I am always looking for ways to not have to make stuff. If I can find a product I like that prevents me from having to make something home made, I am a happy camper.


Fill your pans as usual after they and the core are prepped. Fill the core about half way with batter also.


Bake your cake as usual. The heating core will help the centers of the cake bake more quickly, keeping up with the edges (which bake faster than the middle). So the cake bakes more evenly across, and prevents dried out edges from occurring while waiting for the center to cook fully.

You will get a nice baked up cone of cake in the center. Take the pan out of the oven and let them cool for about 10 minutes (or follow your normal procedure.)

When you are ready to flip your cakes out of the pan, take the core out and set aside.

Then flip your cakes out to cool as you normally do. I suggest leaving the core to cool completely before you take the cake out. If I try to take it out while it is still warm, it breaks and some cake gets stuck in the metal core. To get the cake out of the core, just turn it over and shake really hard and it should pop out.


After your cakes are fully cooled and you are ready to fill your layers, place the core of cake right into the empty hole.


Level your cakes per usual.

You will hardly even be able to tell where the cake plug is. Fill and ice as usual.


Maybe you will choose to try this out. Who knows, I might even recruit a few of you over to the dark side. MWAHAHA.

 Beautiful maraschinos for the cherry chocolate cake.
PS. Please note that you can now subscribe to email alerts to our blog. Use the form in the right upper hand column of this page to enroll. You will be notified via email when there is a new blog entry. Feel free to post a comment or send an email to let us know how we are doing.

Happy caking!

Sharon
SugarEd Productions
  • « Previous Page
  • 1
  • 2
  • 3
  • 4
  • Next Page »

Sharon Zambito

Sharon Zambito

An RN turned SAHM turned cake maniac. Owner of SugarEd Productions Online School. Join me for some caking, baking, and all around sweet fun :)

Follow me..

  • Facebook
  • Instagram
  • Pinterest
  • YouTube

Pinterest

  • Autumn House Two Trees Machine Embroidery Design – Blasto Stitch
    Autumn House Two Trees Machine Embroidery Design – Blasto Stitch
  • Embroider  Sew :: Jelly Roll Purses - Embroidery Garden In the Hoop Machine Embroidery Designs
    Embroider Sew :: Jelly Roll Purses - Embroidery Garden In the Hoop Machine Embroidery Designs
  • (1) How to QUICKLY & SAFELY remove acrylic, gel, and dip powder polish | BAGGY METHOD - SO EASY! - YouTube
    (1) How to QUICKLY & SAFELY remove acrylic, gel, and dip powder polish | BAGGY METHOD - SO EASY! - YouTube
  • (1) Bouffant Surgical Cap - YouTube
    (1) Bouffant Surgical Cap - YouTube
Follow Me on Pinterest

Follow Me on Instagram

Instagram requires authorization to view a user profile. Use autorized account in widget settings

Recent Posts

  • Egg Safety Basics
  • Stable Mabel Support System Sale
  • Guest Post : 4 Vegan Cake Recipes No One Should Miss Out On!

Popular Posts

  • Ways To Make Your Cake Fluffy And Moist
  • How To Stencil on Cookies with Royal Icing
  • Doctored Cake Mix Recipes
  • Transferring an Image Without a Projector
  • All About Buttercream!
  • How to Fix Broken Ganache
  • Edible vs Non Toxic Gold Dusts

Categories

Search

Archives

Copyright © 2025 · Sharon Zambito and SugarEd Productions,LLC

Copyright © 2025 · Evangeline Theme on Genesis Framework · WordPress · Log in