Sugared Productions Blog

  • Blog Home
    • Home
  • Online Classes
  • Shop
  • Contact
  • About

Cookie Cutter Gift Boxes

December 21, 2012 by Sharon Zambito 7 Comments


Sooooooooo, tomorrow is the last day of school. Do you have the gifts for the teachers ready? No? So you did not listen to me a few weeks back when I warned you to get going on the holiday projects. I told you if you did not get with the program it was going to come back to bite you. And here it is the night before the last day of school before Christmas break with no teacher gifts.

–

–

Oh… so sorry folks, I was talking to myself again. (I do that a lot.)

BUT we still have time to pull this off!

Run, don’t walk, to the hobby store and grab some cookie cutters, cardboard boxes, and ribbon.

Then run, don’t walk, (it’s probably faster to drive) to the grocery and get sugar, flour, eggs, and vanilla. (Or buy the premade sugar cookie dough. I won’t tell if you do.)

Roll that dough out, and bake the cookies inside the cutters.


After fully cooled, throw those puppies in a gift box, ribbon it up and voila!


Fastest homemade teacher gift everrrr!

You saved the day! Your kids will not look like losers showing up at school with nothing for the teachers. Now they won’t fail next semester. And you are supermom in the eyes of your offspring.

You can thank me later.

Get in the car and go. Now!

All Purpose Sugar Cookies:

Ingredients:

  • one cup softened butter
  • one cup sugar
  • one large egg
  • 1tsp vanilla
  • 3 cups sifted flour
Directions:
  • cream sugar and butter till light and fluffy
  • add egg and flavoring and mix
  • add flour one cup at a time until just incorporated
  • kneed on counter just until smooth
  • roll out, cut, and bake at 325 until set but not brown (9-12 minutes)

Happy baking!

Sharon

Roly Poly Santa Cookies

December 12, 2012 by Sharon Zambito 11 Comments

Hello sugar friends!

You know that laundry that was waiting for me because I was making marshmallows? Yeah, well, I didn’t do it. I made cookies instead!

You know by now I have been extra lazy busy this season. So lazy busy in fact, that I can’t even come up with my own original cookie idea. This one I saw on the cover of the Taste of Home Christmas Cookies magazine at the grocery store. Cuteness overcame me at the checkout line. These Santas had to be made. At my house. In my kitchen. By my hands.

The originator of this project is Mrs. Andrew Syer from Oakridge, MO. I love Mrs. Syer. Mrs. Syer rocks. Mrs. Syer is the bomb.com. Not only did she come up with an amazingly cute Santa cookie, and she made the cover of the Taste of Home magazine, but she also got me out of doing laundry. Mrs. Syer is my new BFF. Or at least she would be if she knew I existed.


 CUTENESS CLAUS!!

ROLY POLY SANTA COOKIES:

Ingredients:

  •  1 cup softened butter
  • 1/2 cup sugar
  • 1 Tbs milk
  • 1 tsp vanilla
  • 2 1/4 cups all purpose flour
  • red food coloring
  • mini chocolate chips
Directions:
  1. Cream butter and sugar until light and fluffy. Add milk and vanilla; mix. Add flour and mix well. Remove 1 3/4 cups dough and tint red.
  2. Assemble Santas on ungreased cookie sheet or parchment paper: Roll ball of red and flatten to create body shape. Do the same with the white dough to create the head. Then add hat shape. Add shapes for arms, hands and feet.
  3. Insert the mini choco chips upside down for eyes and buttons.
  4. Bake at 325 for 12-15 minutes until set but not browned.
  5. Cool for 10 minutes and then remove from pan to cool fully.
  6. Use royal icing to pipe fur, trim and beard; use white non pareils if desired on top of the piping.


Check out naked Santa. Here is what he looks like before baking.


On some of them I brushed the body with piping gel and sprinkled on red sanding sugar. Santa got bling!

I used a tip 2 for the clothes trims and a 14 or 16 (I can’t recall, sheesh) for his hat trim and beard. A red jimmie was used for his mouth.


Ho
Ho Ho!

 He’s coming! You better be good!

These were easy and fast; the kids would love to make these. Give them a try.

Now I am off to go friend Mrs. Syer on Facebook.

Merry Christmas Ya’ll!

Sharon

Thanksgiving Tutorials

November 15, 2012 by Sharon Zambito Leave a Comment


Gobble Gobble my sugary friends! 


Thanksgiving is next week!  ACK! I am not ready!  So much to do between now and then, and then we go right into the Christmas rush. ACK! I am not ready!  😯


I thought it might be helpful to you guys to put together a post here with Thanksgiving tutorials from the archives. Might spark a few ideas as you crank up for all the T-day festivities. Click on the title below each photo to get to the tutorial:


TURKEY CAKE BALLS


PILGRIM PUMPKIN MINI CAKE


3D TURKEY COOKIES


PUMPKIN PIE CAKE


PERFECT PUMPKIN ROLL

TURKEY CAKE TOPPER (LINK)


TIPS FOR PERFECT CAKE BALLS

I want to take this opportunity to tell you how thankful I am for all of you. For your business, your encouragement and loyalty, but mostly for your friendship. You all have enriched my life in ways I could never adequately explain. I wish you and yours a beautiful, peaceful and Happy Thanksgiving.

Sharon

www.sugaredproductions.com

Turkey 3D Cookies

November 18, 2011 by Sharon Zambito 3 Comments

Thanksgiving Blog Blitz Post #4!


Gobble! Gobble!


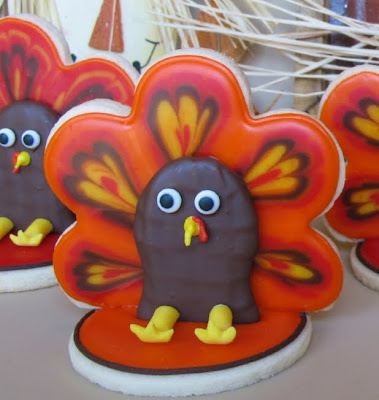
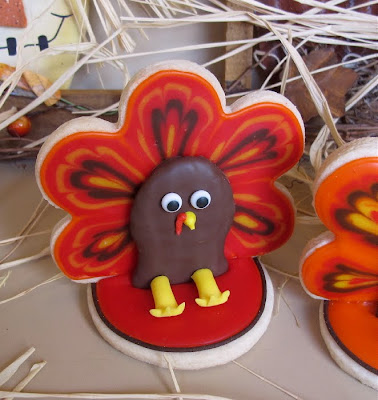
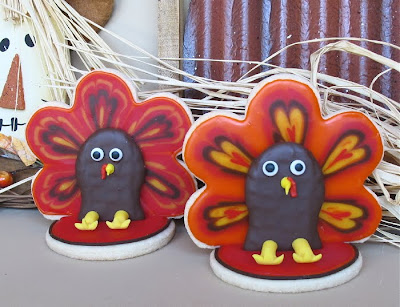
How about some 3D turkey cookies?


As I have mentioned before, I have a weakness for cute little turkey confections. Here is another take on turkey cookies:


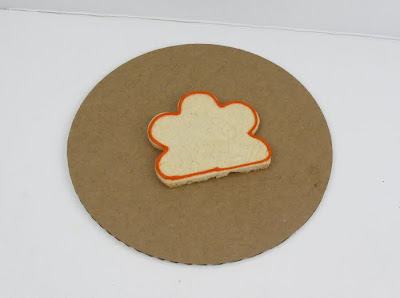
Bake your  favorite  cookie recipe and cut out large blossom shapes. After cooling, cut a portion off the bottom to make a flat  bottom edge. Outline your cookie with thickened icing and flood in your main color. I used glace icing here, but you can also use royal.


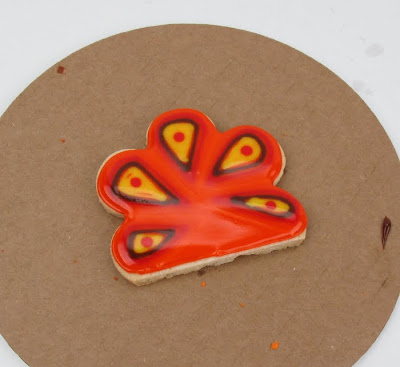
Immediately pipe in the above pattern with the other colors in flood consistency icing. It will sink right in. Then take a toothpick and drag it through that pattern, starting from the outer edge of the cookie, in toward the center.


Do this 3-5 times in each section of the blossom. You will create the feather pattern you see above. Let that fully dry, about 24 hours.


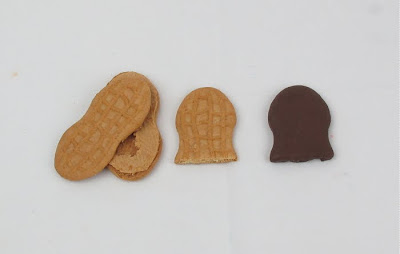
Use Nutter Butter cookies to make the turkey body. Take the cookies apart, scrape off the peanut butter, happily eat that, and then cut the  bottom portion of the cookie off. Happily eat that too. Dip the cookie in melted chocolate and let dry fully.


Use candy eyes, and royal icing to pipe the beak and red jiggly neck thingy. (Been getting a lot of use out of those candy eyes lately too. They rock.)


When you are ready to assemble, outline and flood a circle shaped cookie for the base. Let that set up for a few hours, but not until it is fully dried through. At this point you can put the feather cookie and body cookie on top of the base cookie. It will sink down a little bit into the still partially wet icing. When that fully dries, it will hold the whole cookie together. You might have to prop up the  back of the cookie with a little something while it is drying to  keep it perfectly upright.  Let that  base surface dry very well.


Use a clay gun to extrude a thick string of yellow fondant. Smash down  one  end with your finger and then cut out notches to make the feet.


Bend the feet up at the ankles and put them in place. I also used a very thin clay gun string in black to outline the base cookie to give it a little pop.


Turkey time!  How cute would these be on your Thanksgiving place setting? Or lined up on a dessert buffet.

I hope you try these. You will seriously impress your family and friends!


Sugar Cookie Recipe:

one cup sugar
one cup butter
one egg
1 tsp each vanilla and almond flavoring as desired
3 cups all purpose flour, sifted

Cream sugar and softened butter. Add egg and flavorings and beat for a minute or so. Add flour one cup at a time until just incorporated. Knead gently for a minute. Ready to roll out and use right away. Bake at 325.


Glace icing:

one pound powdered sugar
6 TBS light corn syrup
6TBS milk
clear flavorings as desired

Combine in bowl and mix well with a whisk. Adjust with more sugar or milk to create outline and flooding consistencies.


MAKE US PLEASE!

Happy Turkeys!
Sharon
www.sugaredproductions.com


Pulling from the Archives

December 17, 2009 by Sharon Zambito 5 Comments

HAPPY HOLIDAYS EVERYONE!
I hope your season is going great and you guys are having lots of fun. What a busy time of year this is! I am so buried in work that I am not making any Christmas goodies this year. So I thought I would pull from the archives and give you guys the links to some older blog posts relating to holiday yummies. Maybe these will refresh your memory and spark some creative ideas you can try out this year.
Bronwen’s Santa Class
Cake Balls
Oreo Madness
Holiday Basket Goodies
Santa and his Sleigh
Christmas Baskets
My Favorite Things

I wish you all the very happiest of holidays, a blessed time with family and friends, and hope all of your wishes for the new year come true.


Sharon
www.sugaredproductions.com


Free Gift from SugarEd

November 6, 2009 by Sharon Zambito 6 Comments


FREE SNOWFLAKE CUTTER SET


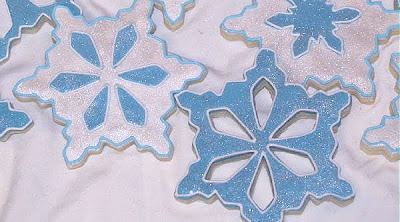
Make the holidays special by creating an endless assortment of snowflake
cookies with this 5 piece set!


Decorate with royal or glace icing, fondant, modeling chocolate , colored sugars or sprinkles.


You can also use them to cut out shapes from brownies, bar cookies, or sandwiches


Use to cut fondant or gumpaste decorations for your holiday and winter cakes.


This set of cookie cutters comes in a reusable storage tin.


Set of 5:
3 snowflakes (4¾”, 3¾”, and 2¼” diameters) and 2 cutout shapes.


Free gift with purchase of $50 or more before shipping.


DETAILS HERE


Happy Holidays from SugarEd!


Poured Fondant Pumpkin Cookies

October 8, 2009 by Sharon Zambito 29 Comments


Fall is here! Fall is here!
 
Don’t you just love fall? It is my favorite time of year. More than Spring, more than Summer vacation, more than the Christmas holidays. I love the cooler temps and lower humidity (what little of that we get where I live, LOL.) I love fall colors , pumpkins and turning leaves. I love the promise of the time to be spent with family and friends during the upcoming months.
 
I especially love fall baking. I adore fall themed cakes, cookies and cupcakes. Just love everything about it!


Recently I used the pumpkin cutter set we featured in a SugarEd free gift promotion to make some cookies using poured fondant and rolled fondant. I cannot locate this exact set anywhere retail, but set 1872 here looks to be very similar.


After baking the cookies, I made poured fondant:


6 cups confectioners’ sugar (I often add 1-2 cups more sugar to make it a bit thicker, optional)
1/2 cup water
2 tablespoons light corn syrup
1 teaspoon almond extract ,optional
1 teaspoon vanilla, optional


DIRECTIONS:
In a saucepan, combine confectioner’s sugar, water and corn syrup. Cook over low heat, stirring constantly, until it reaches a temperature of 92 degrees F (33 degrees C.) Mixture should be thin enough to pour, but thick enough to coat cookie. Add food coloring to desired color and stir thoroughly.


Make sure not to overheat. Overheating will cause the mixture to crystallize and show sugar crystals once dried. It may also become too thick to flow well.


I take it off the heat to pour over the cookies. It will thicken up as it cools. If it gets too thick to flow well, gently heat it back up until it is thin enough again. Again, be careful not to overheat it at any time. If you do it will give you trouble. You will get mad. You will say bad words. You might throw cookies across the room. …..Just sayin’.


I hold the cookie in one hand over the pot and spoon the icing over it, allowing the excess to flow back into the pot.


Coat entire cookie. (I do normally wear gloves for this but was so excited to do this tutorial it slipped my mind.)


Let all the excess drip off and then slide your spoon under the cookie.


Slide the bottom of the cookie across the edge of the pot to scrape the excess off.


Lay it on wax paper or parchment. I do not like to put my cookies on cooling/cookie racks because the icing hardens and sticks to the rack. Then when you release the cookie from the rack it messes up your pretty cookie edge.


See that pool of icing? No worries. When it is all dry and hardened, you scrape that excess off with a palette or exacto knife and you end up with a perfectly clean edged cookie.


For the big kahuna cookies, the process is close to the same.


Use several spoonfuls to get the entire cookie coated well.


Let the excess drip back into the pot.


Hold the large cookie with both hands and tap the sides of your hands on the edge of the pot to get all the excess icing flowing off the cookie.


Slide the bottom of the cookie along the edge of the pot as you take it out to scrape off any more excess.


This is where you get so excited because you have this adorable Jack o’ lantern cookie looking back at you! Place him on the parchment too and leave them alone for a while till fully hardened. I leave them for at least a few hours before I clean them up.
 

                                               Rolled fondant covered:


Roll out your orange fondant and cut out the shape with the cookie cutter you used to make the cookie. Smear a little thinned buttercream onto the cookie to make it stick.


                          I used a large oval cutter to make indentations into the fondant.


I did this four times to make the indent lines that pumpkins have.


                                                                  Airbrushing:

Airbrushing adds more depth and dimension and interest to your cookies. It is not necessary to do this, but I like what it adds to the look. I gave it a light overall coating of orange color.


Then I did more pinpoint lines in the grooves with orange.


I did the same thing on the poured fondant cookies.


You can vary the colors if you like. You can add some yellow to give it bright highlights or add some brown to make it more rustic.
 
 
                        Let that dry fully and then add your fondant leaves and arrange!


A beautiful bounty of fall pumpkins!


I love fall stuff!


Here is the fondant one. I even dusted just a tad of pearl dust on this one. Not too much or it will be ugly; trust me on this one.


Punkies, punkies everywhere!


Mr. and Mrs. Happy Patch


Mr. Grouchy Gourd


Cuteness factor overload!


Now go make some of these.
 
Now.
 
Hurry.
 
Then send me some.
 
Please.


Happy Fall!
 
Sharon
www.sugaredproductions.com


NOLA Photography http://bentzphotography.com/

Free Gift from SugarEd!

September 5, 2009 by Sharon Zambito 2 Comments


Celebrate Fall with this adorable
pumpkin cookie cutter set!


Make a $60.00 purchase (before shipping) with SugarEd Productions and receive this adorable pumpkin cutter set as a free gift.


A $14.00 value!
 
 
This 7 piece set includes three pumpkin cutters (1.5 inch, 2.5 inch, 5 inch…. that’s big!) and 4 accent cutters to complete their facial features. Each set of cutters comes in a large metal tin and includes two cookie dough recipes. This really is a nice big set; I was very impressed when I saw it.


These cutters are great to make Jack O Lanterns for Halloween or a bounty of Fall pumpkins throughout the season. Can also be used for fondant accents on your Fall cakes, as well as cutting biscuits or children’s sandwiches.


Note: The cutter set will not show up in your shopping cart, but they will be automatically included for all orders over $60 (before shipping).
 
 
I will be posting a tutorial with these cutters showing poured fondant within the next few weeks; so get yours while supplies last! We only have a limited number in stock.
 
Please visit www.sugaredproductions.com to get your set today!


Daring Bakers: Tuiles

January 28, 2009 by Sharon Zambito 12 Comments


After missing two Daring Bakers challenges during the holidays I needed to put up or shut up this month. One more miss and I would have been kicked out! LOL. Luckily this one was pretty easy and not too time consuming, as once again I am pressed for time. Ain’t I always? Aren’t we all?
This month’s project was tuiles. Tuiles? What the heck is tuile? I thought it was that meshy fabric you made bows out of for the pews at weddings. Shows how much of a baking sophisticate I am. Not.

Traditionally, tuiles are thin, crisp almond cookies that are gently molded over a rolling pin or arched form while they are still warm. Once set, their shape resembles the curved French roofing tiles for which they’re named.

This month’s challenge is brought to us by Karen of Bake My Day and Zorra of 1x umruehren bitte aka Kochtopf. They have chosen Tuiles from The Chocolate Book by Angélique Schmeink and Nougatine and Chocolate Tuiles from Michel Roux.
Recipe:
Preparation time batter 10 minutes, waiting time 30 minutes, baking time: 5-10 minutes per batch
65 grams / ¼ cup / 2.3 ounces softened butter (not melted but soft)
60 grams / ½ cup / 2.1 ounces sifted confectioner’s sugar
1 sachet vanilla sugar (7 grams or substitute with a dash of vanilla extract)
2 large egg whites (slightly whisked with a fork)
65 grams / 1/2 cup / 2.3 ounces sifted all purpose flour
1 table spoon cocoa powder/or food coloring of choice
Butter/spray to grease baking sheet
Oven: 180C / 350F
Using a hand whisk or a stand mixer fitted with the paddle (low speed) and cream butter, sugar and vanilla to a paste. Keep stirring while you gradually add the egg whites. Continue to add the flour in small batches and stir to achieve a homogeneous and smooth batter/paste. Be careful to not over mix.Cover the bowl with plastic wrap and chill in the fridge for at least 30 minutes to firm up. (This batter will keep in the fridge for up to a week, take it out 30 minutes before you plan to use it).Line a baking sheet with parchment paper or grease with either butter/spray and chill in the fridge for at least 15 minutes. This will help spread the batter more easily if using a stencil/cardboard template such as the butterfly. Press the stencil on the baking sheet and use an off sided spatula to spread batter. Leave some room in between your shapes. Mix a small part of the batter with the cocoa and a few drops of warm water until evenly colored. Use this colored batter in a paper piping bag and proceed to pipe decorations on the wings and body of the butterfly.Bake butterflies in a preheated oven (180C/350F) for about 5-10 minutes or until the edges turn golden brown. Immediately release from baking sheet and proceed to shape/bend the cookies in the desired shape.
These cookies have to be shaped when still warm, you might want to bake a small amount at a time or maybe put them in the oven to warm them up again. Or: place a baking sheet toward the front of the warm oven, leaving the door half open. The warmth will keep the cookies malleable.If you don’t want to do stencil shapes, you might want to transfer the batter into a piping bag fitted with a small plain tip. Pipe the desired shapes and bake. Shape immediately after baking using for instance a rolling pin, a broom handle, cups, cones….

I chose the regular flavor tuile and served them on pistachinilla mousse with specialty cream. ( AKA I screwed up the boxed pistachio mouse by adding too much liquid and had to add a box of vanilla Jello pudding to make it set up. And while I am confessing, that specialty cream is Cool Whip.) I know. I know. I am such a cheater.
But hey, in my own defense, I have a wedding order this week, am working furiously to get the Boxes and Bows DVD ready, and my chronic reflux is flared up bad. Had to set my priorities and I figured the wedding cake and getting the DVD to you guys was more important than home made mousse. Yeah. That sounds good. I’m sticking with that story.

J said the cookies looked like the flowers in Bikini Bottom on Sponge Bob. He is right! They are a delightfully thin, light , not too sweet cookie. Perfect with mouse, pudding, sorbet ice cream or a spot o tea. Easy and fast too, and fun to shape while they are warm. Give them a try!

____________________________________

Speaking of reflux, I have not had a Diet Coke in about 6 weeks and I feel like this:
J had a close encounter with the hair dryer. He is such a goofball. Gawd I love that kid.
I will try to post early next week before I go to the Owensboro class (still have openings, hint hint). If I don’t, I will surely check back in early the following week. If all goes well, Boxes and Bows will ship that week too!

Happy Cooky-ing,
Sharon
http://www.sugaredproductions.com/


Christmas Goody Baskets

December 23, 2008 by Sharon Zambito 15 Comments

They are finally done! Hooray!
I finally got the baskets all done. Whew! I did 18 of these babies in total, mostly for hubby’s employees and colleagues, and a few for friends and family.
Here is all the loot lined up ready for the assembly line. I was so pressed for time that I did not have time to set up the lights for really good photos. I apologize for the quality of these shots.

Heather and I searched and searched for hours for a good basket supply source and she found them here: Baskets. I absolutely love this place. They have the largest selection of baskets and colors I have ever seen, great customer service, reasonably priced and the baskets were great quality. This is now my go to place for baskets.
In addition to the things I already showed you, I also made some candy cane cookies covered in textured red fondant, some large square transfer cookies, dipped pretzel rods, and small squares with a candy cane sugar lay on top.
I also added some purchased items: Hershey’s candy cane kisses, and choc covered peppermint sticks ( hard to see in pics). I think the baskets would have looked better had I not bagged everything, but live and learn.

I always use shrink wrap on my bags to get a professional gourmet basket look. Coordinating bow and it is done!


————————————————-
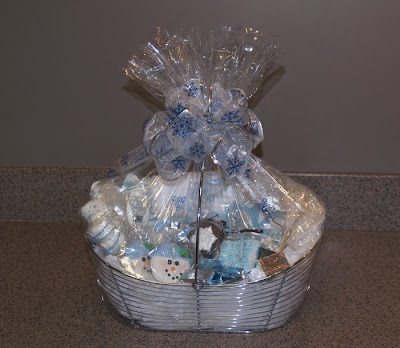
Here are some pics of the baskets from last year, a snow theme:


Sugar cookies, snowman cookies, marshmallow sticks, rock candy sticks, decorated sugar cubes, snowflake Oreo molds, chocolate coffee spoons, and hard candy snowflake suckers.
The little mint candies are made with a personalized candy mold that says The Zambitos. You can get them here.
You can get the Oreo molds here.
Sugar cookies were fondant covered and over-piped with royal icing.
Shrink wrapped and ready to gift!
——————————————–
So now I have to do a cookie order, and get my house ready to host Xmas dinner. No rest for the weary, and boy am I weary! Please send me pics of the goodies you guys made this year.
I wish you all a very Merry Christmas and a happy and prosperous New Year!
Hugs and love, Sharon


  • « Previous Page
  • 1
  • 2
  • 3
  • 4
  • Next Page »

Sharon Zambito

Sharon Zambito

An RN turned SAHM turned cake maniac. Owner of SugarEd Productions Online School. Join me for some caking, baking, and all around sweet fun :)

Follow me..

  • Facebook
  • Instagram
  • Pinterest
  • YouTube

Pinterest

  • Autumn House Two Trees Machine Embroidery Design – Blasto Stitch
    Autumn House Two Trees Machine Embroidery Design – Blasto Stitch
  • Embroider  Sew :: Jelly Roll Purses - Embroidery Garden In the Hoop Machine Embroidery Designs
    Embroider Sew :: Jelly Roll Purses - Embroidery Garden In the Hoop Machine Embroidery Designs
  • (1) How to QUICKLY & SAFELY remove acrylic, gel, and dip powder polish | BAGGY METHOD - SO EASY! - YouTube
    (1) How to QUICKLY & SAFELY remove acrylic, gel, and dip powder polish | BAGGY METHOD - SO EASY! - YouTube
  • (1) Bouffant Surgical Cap - YouTube
    (1) Bouffant Surgical Cap - YouTube
Follow Me on Pinterest

Follow Me on Instagram

Instagram requires authorization to view a user profile. Use autorized account in widget settings

Recent Posts

  • Egg Safety Basics
  • Stable Mabel Support System Sale
  • Guest Post : 4 Vegan Cake Recipes No One Should Miss Out On!

Popular Posts

  • Ways To Make Your Cake Fluffy And Moist
  • How To Stencil on Cookies with Royal Icing
  • Doctored Cake Mix Recipes
  • Transferring an Image Without a Projector
  • All About Buttercream!
  • How to Fix Broken Ganache
  • Edible vs Non Toxic Gold Dusts

Categories

Search

Archives

Copyright © 2025 · Sharon Zambito and SugarEd Productions,LLC

Copyright © 2025 · Evangeline Theme on Genesis Framework · WordPress · Log in