
My family and I wish you a very Happy Father’s Day. Let’s celebrate the wonderful men we are blessed to have/had in our lives. I hope you all have a wonderful day full of peace, love and joy.
 I miss you, Daddy.
Sharon
I miss you, Daddy.
Hey Guys!
It’s time for more eye candy
submitted by our wonderful blog readers!
—————————————–


—————————————–
Skunar submitted her adorable sea cake!


I watched the stacking dvd the night before to refresh my memory. Thanks, Sharon.
Nicol

Hey Sharon, I wanted to send a few of my cake pictures using the Boxes & Bows & Flawless Fondant DVD!
Thanks for sharing this knowledge with the rest of us!!! You are awesome!!! And I could not have gotten this type of quality work achieved without much more years of research and experience, but because of your DVDs I feel like a pro and at only 4 years of cakin experience. Thanks again, you have a relocated yankee friend here in NC!
— Sincerely, Maria C

I just recently did a Tiffany box style wedding cake and I was so excited about the cake and your boxes and bows dvd…I couldn’t wait to make this cake. If you hadn’t made this dvd, this cake would have not been as successful as it was. I got so many compliments from all over. I have never had a reaction to a cake like this. So I thank you for time that you put into these dvd’s…I can’t wait for the topsy turvy one!
I attached a picture of the cake
Rhonda


Tracy

Here’s my fish cake from the class in Pearland.
Thanks,
Rebecca

Best to you!
Tracy


Sincerely
Jayni


I remember my own first communion very well. It was such a big milestone in our young lives. I think we were in the first grade. I was so excited to finally be able to receive the Host. The pretty white dress and veil was such a treat to have in our modest lifestyle. I remember we practiced as a class in the church several times for the ceremony. Where to sit, how to file up to the front, when to approach the kneeler, when to kneel, when to stand. On the very last practice day they even served us unconsecrated hosts, so we could practice accepting it on our tongues (there was no hand communion back then), and to get a feel for its taste and consistency. That day I was SO excited. I mean SUPER excited that we were getting a real host. Of course, as per the curse of those whose last names start with a Z (yes, my maiden name started with a Z too), I was the last one. Last pew, last seat, last in line. I was so very worried that they would run out of hosts before I got up there. As the line moved forward I was just praying… please don’t run out… please don’t run out. Of course they ran out. Story of my life. Another emotional scar I have had to overcome. To this day I practically run out of my pew, knocking people over, to get in line at communion time cuz I am afraid they are going to run out.
But I digress. Let me share with you some of the cakes I made this year:
 This one was for a male, and the mom wanted it to be classic, elegant, simple, but no way feminine. No flowers, no colors. This one I iced in white buttercream. I used the diamond impression mat on the sides and put small candy pearls at the intersections.
 I used a stencil to apply the pattern to the ivory stripes. I first rolled out the ivory fondant, stenciled the pattern on with buttercream, then cut the strips with my ribbon cutter. I then gently lifted them, applied water to the back with a brush, and attached them to the cake carefully with the aid of the end of a dowel rod so as not to smear the stencil. A 6 mm bead maker was used for the pearl border. (I show how to use these in Boxes and Bows.)
The same stencil was used with luster dust on the drape and knot. The cross was cut out from fondant with gumpaste, and allowed to dry firm. Later, 4mm pearls were attached to the edge, and the whole thing was airbrushed with super pearl dust after I applied the monogram initial.
—————————
 This cake was made for sweet little Elizabeth, a close family friend. Lizzy designed her entire cake from start to finish. This was the first custom cake she had ever had, and she was super excited. I did exactly as she instructed me to.
The cake was iced in white buttercream. 8 mm pearls were used for the borders. Satin ribbon was applied around the tiers, and the monogram was printed on an edible icing sheet and backed with fondant.
The cross was cut from fondant, piped with royal, and airbrushed with super pearl. All the flowers were made from gumpaste using this set.
My hubby delivered the cake, and said she was absolutely thrilled and overjoyed with her cake. She and her cousins and sisters were oogling over it, and they even ate the flowers!
Look at this sweet note she wrote me the next week. Just melts my heart:

—————————–
Here is another one for a young man. He also specified “very simple and nothing girly”. Those boys are very concerned that their cakes be masculine! LOL
 Also iced in white buttercream. The lighting makes the cake look as if it is two tone, but it was not. The shaped plaque was molded white chocolate. The chalice and Host were made with a chocolate mold from fondant with tylose, dried and then painted.

 I saw this design on a google search and loved it. I do not know who the original artist was to give credit. If you know, please let me know.
Mine did not do the original justice, but Eva was happy. Here are some progress photos:
 I baked a single layer sheet cake and cut large pieces to fit under my cross template, made from card stock.
 I cut out the cross shape, then torted and filled the cake with lots of pink icing per Eva’s request!
 Crumbcoat applied.
 Final icing base coat done.
 I then wrapped a strip of pink fondant around the sides of the cake using the same technique as on my Oz cake.
 I used the template to cut the top piece and applied it.
 I used my fondant crimpers to seal the seams.
 I also used impression stamps to make scrolls on the top piece before I laid it on top of the cake.
 I made another template for the white inner cross and cut that from fondant. I used scrap booking stamps to impress her name. (Again: PLEASE make sure all stamps you use are food safe before using them. Not all plastic is safe for food.)
 Eva seemed very please when she picked it up. Yessssssssss! Another score!!
Under the Sea , Take Two:
I hope you had a nice holiday weekend, and that this weekend is shaping up nicely for you. I had another busy week of DVD editing, doctor appointments, end of school stuff, and cakes.
Did I mention the END OF SCHOOL? YEEE HAAW! Summer is here! No homework, no early mornings after being up half the night working. No more washing uniforms, keeping up with project deadlines, and attending boring open houses. (Oops, did I just say that? Well, I confess. I love my kids and all. But I really hate going to open house.) 12 more weeks of freedom until I have to attend another one. (Sharon squeals with delight.)
And nothing says summer more than the beach, right? Who doesn’t love a nice relaxing day on the warm sand and in the cool clear water. So I thought it only fitting to usher in summer by sharing this cute little cake I just did yesterday for a sweet little boy.

Here is a scan of the treat bag the mom gave me to use for the theme:


The cake was iced in buttercream and I made all the little creatures from fondant with a bit of tylose added. (I made a back fin for the seahorse and promptly forgot to put it on. I have no idea where it is. It was so small it probably got swiped into the trash. Hate when I do that. But no worries, because our seahorse has magical powers and he can swim upright with no fins.)


The different seaweed and coral were also just formed freehand from fondant. See that brain coral? SO easy. Roll a ball and poke it a gillion times with the end of a paintbrush. Voila!
 Mr. Happy Whale was also made from fondant/tylose. Probably the easiest figure I have ever modeled. I think he is so cute! I love Mr. Happy Whale. I did not want him to go with the big mean lady who came to pick him up. 🙁
Sharon Zambito and Dena Bryngelson will be teaching a 2 day class August 22-23, 2009 in Kenner, LA (suburb outside New Orleans).
We will be doing a large 3D swamp scene including a 3D gator, tree stump with turtle, and other little thingies. (Photo of full class project coming in a few weeks.)
$250 for 2 days, at least 10 hours per day, or until we finish.
You will need to bring basic supplies i.e. cake, board, fondant, tools.
Detailed supply lists to come later.
Lunches will probably be provided.
Dena is an exceptional 3D cake artist and a wickedly good teacher. See her work at http://www.denascakes.com/
 Here is the exceptionally talented Dena with one of her gator cakes. Our class cake will also include a 3D tree stump, a little turtle, and some other surprises as time permits.
Deposit of $125 to hold spot; non-refundable. Balance due one month before class.
Email me with questions or to reserve your spot. szcakes@aol.com
Hope to see you there; it is going to be crazy good!
Sharon
http://www.sugaredproductions.com/

 This was the birthday cake my son J made for me. He really does love to bake, and he got very little help from me. He baked the cakes, iced and stacked them, rolled and applied the fondant, and piped all the decorations by himself. All I did was knead the fondant for him and color the buttercream. The rest was all him. Those of you that know J know that this is really a wonderful accomplishment for him, and I am so very proud I could just burst. But I won’t, cuz that would be gross. So I will just bask in my motherly pride, and feel the love my sweet boy gave to me on my birthday.
I like it! Do you guys like it? Poor Heather. What I put that girl through. Cover looks simple enough, yes? You have no idea how many hours it takes just to get that simple little thing right. Not because of Heather. She is a crackerjack in Adobe. It’s my pain-in-the-ass, can’t make up my mind, over-tweaking self that tortures the poor girl. But she never complains. She just forges through and redoes it as many times as I ask, until we are both happy. I could not live without that woman. A better friend could not be had. Love you, H. And thank you from the bottom of my tweak-happy heart.
Well, you guys have a nice Memorial Day. Don’t eat too much BBQ and I will see you in a few days!
Happy caking,
Sharon
GOTCHA!
You thought I forgot again, huh? Tee hee hee. I love messing with you guys.
We had so many entries, I picked 2 winners!
Susie Q
Jennifer
Yo, Jennifer… you did not leave an email address, so you need to email me if you want this fabo prize! Here is your post:
Jennifer said…
Thanks for taking me step by step through the cake assembling. I’ve always wondered how stable those kind of cakes are. I would love to win a copy of the topsy turvy DVD!
May 22, 2009 2:29 PM
Ya’ll, the editing is done and we are going to the presses. I hate to brag, but I have to tell you I am very proud of this DVD and so excited about it. You guys asked to see everything, and see everything you will. Every last cotton picking detail from start to finish. This sucker is long, so get your refreshments and settle in before you watch it. I might say it is our best DVD yet! And I love love the music on this one. It just makes me happy! Let me know if you like it too!
Thank you all for your business and support!
 I wanted to of course use her school colors and mascot, but also incorporate little bits of her life, while making it fun and whimsical.
Here are the flowers I purchased:
 The graduation figure was made with a chocolate mold. I used fondant with tylose in the mold, let it dry firm, and then airbrushed it with super pearl luster dust.
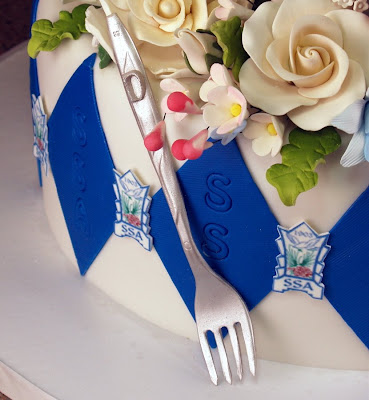
The fork represents the restaurant where she works as a hostess. That thing was quite a challenge to make. I was so engrossed in trying to get one of those suckers to come out right, I forgot to take photos. But here is how I did it:
 I put the ganached tiers atop a Styrofoam lift, so I would be able to tuck the fondant under the cake and foamcore board under it for a clean bottom look.
 Here is one tier after it was covered.
 I had topsy turvy dummies laying around, which worked out great, because the top slant was already cut for me. I just had to trim them down to the height I wanted. (Note: to be considered food safe, you need to cover your wedge and board with something appropriate.)
 I attached a piece of thin foamcore to the bottom of each styro wedge with white chocolate. This would prevent the supports from going into the styro under the weight of the cakes. I doweled the bottom cake as usual under the wedge support.
 I used melted chocolate to attach the wedge to the lower tier, and more melted chocolate on top of the wedge, then placed the middle tier in place and held it there until the chocolate firmed up. Then I drove 2 wooden dowels down through both tiers.
 I repeated the same process to apply the top tier. I wanted the top tier to have more of a tilt to the opposite side, but I miscalculated my slant, so it basically came out straight. Oh well, live and learn. (Dagnabbit!) After the top tier was in place, I drove one large wooden dowel down the middle of all 3 tiers.
That cake was very stable and did not budge. Cutting and serving it proved to be a little bit messy, as the melted chocolate between the tiers did tear off some of the fondant when I disassembled it. But I guess that is the price you have to pay to get this look and have it be super stable. I guess you could try to do it without the melted chocolate, but I felt better having it there as glue.
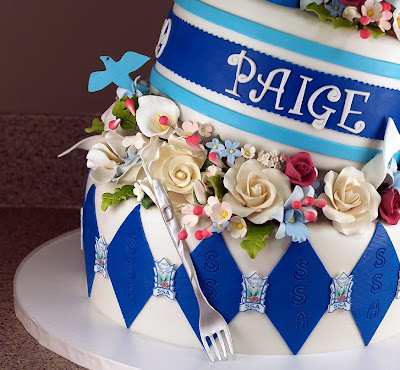 I cut apart all the purchased flower sprays and arranged them on the cake, using royal icing as glue where needed. The fondant dove is the school mascot.
 I used the school logo clip art that I got off their website. I made little icons with edible icing sheets backed with white fondant, to put between the diamonds. The school initials, SSA, were impressed into the diamonds using the JEM alphabet cutter set.
Paige just loved her cake and thanked me over and over and over. Everyone at the party went nuts over it; it was very good for my ego, LOL! I have 4 more nieces coming up behind her, graduating from the same school, so I better start thinking of more design ideas soon! Oy vay. I’ll think about that later.
Totally Topsy Turvy is almost ready! Just a few more tweaks in editing and we are going to the presses! I am really proud of this one; I think you guys will like it too. I take you through every single step of making this cake from start to finish. No stone is left unturned. And there are a few fun surprises thrown in there too.
I am so happy with this DVD, I feel like having a give-a-way! (The crowd jumps to its feet and roars!) To enter, just leave a comment below, and you will be entered into a random drawing for a free copy of Totally Topsy Turvy! I will draw the winner on Monday.

I made the design on this cake using that special cutter set I bought from you. God gave us a sweet tooth!! Eat more Cake!!
Lea


Kari made this cake based off of the Boxes and Bows DVD:


PS – My Detective Sergeant just retired after 31 years and I’ve included a photograph of the cake I made for his party using your techniques.

 I used a real chopping board for the cake base, and I love the effect that gave.
 Here is the first body parts of Remy drying. I find this image quite disturbing. He scares me. But not as much as possums.
 I put on his face and arms, and then used a bubble tea straw to simulate the spoon he would be holding on the real cake.
 Hands make holding the spoon a tad easier for him. His little chef hat makes him official!
 Here he is drying so he would have the proper body position for the cake. He no longer scares me. I think he is pretty dern cute now.
 Here are 3 layers of cake iced with thickened ganache as I described in this post.
 Here are the pot handles drying. An Aussie friend gave me the idea to use aquarium air tubing wrapped in fondant. I taped them down to the table so they would dry in the proper curve. I have no idea if that is food safe, so do some research before you do this.
 Here I am working on the cheese and veggies, all made of fondant with tylose.
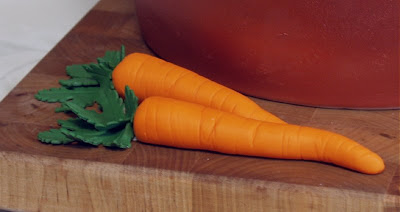

 I wrapped the cake in white fondant, added the top trim and the handles, and then airbrushed it with copper luster dust. Buttercream makes the soup, with little fondant veggies sprinkled on top.
 Despite using the straw to configure his arms, when I put the real spoon in the cake, I could not get it to line up with his hands correctly. After a few choice words, I just decided that he was shifting the spoon from one hand to the other, and my picture caught it mid-shift. Yep, I like that story.
 Here is a cake I did last weekend before going to Texas using the run sugar technique. Is this something you guys would like to see on DVD?
————————-


Learn every single decorative technique you see on this cake!


