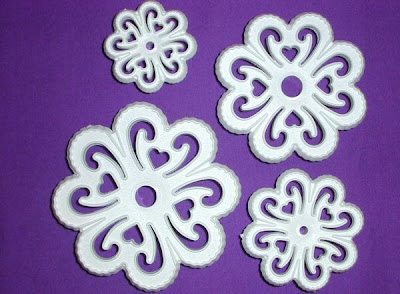
Sugared Productions Blog

  • Blog Home
    • Home
  • Online Classes
  • Shop
  • Contact
  • About

Search Results for: Stencil royal icing

How To Stencil on Cookies with Royal Icing

September 20, 2016 by Sharon Z 7 Comments

by Krista Heij-Barber of Cookies With Character
for SugarEd Productions


how to stencil on cookies


how to stencil on cookies

Choose any shape you like. My favorite of all time is the versatile plaque shape!


how to stencil on cookies

The colors I chose for this tutorial are a “vintage-ish” teal color scheme. The key is to start with an ivory base. Then I added Americolor Teal and Sky Blue. If you feel it’s getting too strong or bright, add a bit more ivory. *I tend to use ivory a lot with my colors. I love how it can change colors drastically. Muting the vibrate pinks etc. Love it!!


how to stencil on cookies

Choose your stencils. These are my faves from The Cookie Countess and Salsa Sweets/Salsa Stencils. They can be found here: https://thecookiecountess.com https://www.facebook.com/SalsaSweets


how to stencil on cookies

Base flood your cookie and allow to dry at least 24hrs. If it is not dry enough, your finger will indent the cookie during the stenciling process. (Note: see our Cookie 101 tutorial in our online school to learn about icing and flooding cookies).


Then lay your chosen stencil onto of the cookie and look at all areas to make sure the stencil “ends” off the cookie the way you like. Layer on a rather thick coat of icing with an offset spatula. I recommend using a metal spatula. They are more sturdy and give you a cleaner edge for stenciling.


how to stencil on cookies

Wipe the spatula on a wet paper towel. Using the edge of the spatula, in long swipes, remove as much excess icing as possible. This may take 3 or 4 passes. Don’t worry about the ends, we will fix them later.


how to stencil on cookies

Gently remove the stencil in one quick movement.


how to stencil on cookies

Afterwards, you will notice these little wiggles of excess icing that have fallen between the stencil and the cookie. Use either a toothpick to remove the excess or…


how to stencil on cookies

… the tip of the spatula to quickly scrape off the ends.


how to stencil on cookies

You may also want to use only a section of a stencil. Here, I wanted to just use one line of my damask stencil. Using scotch tape, mask off the top and bottom of the area you want to stencil. I have also heard of some using “Press and Seal” wrap to mask off areas.


how to stencil on cookies

Repeat the process above, trying to keep the icing in the center of the area we masked off.


how to stencil on cookies

Remove excess icing with spatula or toothpick.


how to stencil on cookies


Smaller stencils do tend to be easier to use at first. Mainly because a lot of them have a small “tab” on the side that allow you to hold it easier.

  1. If you would like to practice, you could use either a paper plate upside down or the “Notta Cookie” The Notta Cookie can be found at Karenscookies.net. It is a dishwasher safe, reusable fake cookie. I love be able to test techniques on a similar shape to a cookie!
  2. Place stencil on cookie.
  3. Add icing to bottom of offset metal spatula.
  4. Layer on your icing. Not too thick, but making sure it gets into all the groves.
  5. After you have wiped your spatula on a damp paper towel, swipe off excess icing.
  6. Remove stencil carefully.
  7. Beautiful butterfly! This stencil, and others can be found at designerstencils.com These cookies made a HUGE splash at my kids school. The teachers where blown away and wondered where I bought them! 😉

Stenciling can give you that big bang for little effort. Think about your colors and shapes ahead of time and the process goes super quick!


how to stencil on cookies


how to stencil on cookies

Happy stenciling!

————————————————————————————————-

Merging her lifelong love of art and baking with a career in illustration and design has given birth to Krista’s immensely popular cookie business and blog. After working in illustration for 15 years, she married that skill with her affinity for baking, and Cookies with Character was created. Krista’s fun yet refined designs have helped put her stamp on the cookie world.
Krista’s pages: Facebook, Website, and Etsy shop

— Krista’s full bio here


Visit our online school

Grazioso Cake by Leyda Vakarelov

July 21, 2014 by Sharon Zambito 3 Comments

Hello everyone!  Today we have a guest blogger!  Leyda Vakarelov from Custom Cakes Atelier shares her gorgeous Grazioso cake!


Grazioso Cake-1

Isn’t it stunning?

Leyda will share her technique on making this cake with Marvelous Molds’ new onlays, and a stenciled “sheet music” that encases the middle tier!  Take it away, Leyda!


Figure-1-600x480

Below are most of the tools that I used throughout this project. In this photo you will see the two colors of the fondant/gum paste mixture that I used. I advise you not to use pure fondant with these onlays. Fondant can be a bit sticky and this will prevent it from dislodging nicely from the onlays. Use a 50/50 mixture of fondant and gum paste to give the fondant some stability.

*Please note that when I work with the onlay molds and I say “fondant”, I really mean the 50/50 fondant/gum-paste mixture.

If you are new to Silicone Onlays™ you can watch the free master class video here.

Fleur de Lis Pattern Silicone Onlay™
Bird with Blossoms Silicone Onlay™
Rise Silicone Onlay™
cornstarch
black royal icing
edible glue (3 parts corn syrup to one-part water)
purple music sheet mesh stencil
Pasta Rolling Machine
pizza wheel
large dusting brush
small paint brush
wax paper
scissors
food safe blade
food safe pins
small roller
small spatula
rubber scraper
extruder
wooden skewers

Figure-2-600x480

I pre-made these fleur-de-lis with a single onlay (you will see the onlay later on), and then I airbrushed them in gold. These can be done a few days ahead.


SECOND TIER:

second-tier-600x450

This is an 8’’ by 6” double cake tier covered with fondant. Here I used the Bird with Blossoms, and Rise Onlays.


 Figure-31-600x398

I began by dusting generously the entire onlay with cornstarch. Then, I removed most of it by shaking off the onlay. You just need a thin layer of cornstarch to prevent the fondant from sticking. It is crucial not to rush this step if the onlay is new. The fondant will stick less to the onlay after using it several times.


Figure-41-600x399

The fondant needs to be thinned down before laying it on the onlay. I used a pasta roller to get it very thin consistently throughout. But first, I used a rolling pin to thin it enough to get it through the lowest setting of my pasta roller.


 Figure-5-600x399

I started with setting 0 and past the fondant through to level 5. The fondant needs to be thick enough so that it is at the same level as the edges of the onlay once it is pressed down. It shouldn’t be below the edges, because otherwise it will not be high enough to touch the surface of the cake to stick to it.


 Figure-6-600x398

I took the sheet of fondant and carefully laid it on the onlay. First, using my fingers, I gently pressed on it throughout the surface to secure the fondant to the onlay.


 Figure-7-600x400

With a small rolling pin, I gently rolled on top of the fondant. I rolled through the entire onlay working on sections at a time. Don’t go from one end to the other in one shot. Take your time to work the fondant in every single grove in sections.


 Figure-81-600x400

I removed the outer excess fondant once it cut through the edges of the onlay, and then I continued rolling the rest.


 Figure-91-600x400

Once all fondant has been worked in to the same level of the onlay, then you can start removing elements of the design if you desire. A good way to know that you have rolled enough is when you can see and feel all of the teeth of the design. Here I am removing some strips and I will replace them with new ones.


 Figure-101-600x400

For accent purposes in my design, I am replacing some strips with some gold ones that I prepared and airbrushed ahead of time using the same onlay. Right after I replaced these strips, I brushed the entire surface of the onlay with the glue solution and then I adhered the entire onlay onto the cake. I will show this step on a later photo.


 Figure-111-480x600

On this tier, I used two different onlays: The one with the stripes and the one with the bird on the branch. I created this template and I placed it on the cake with pins to save the space for the bird onlay, and to also use it as a guide for cutting the stripes that will surround the bird. You will see this on the other photos.


Figure-12-479x600

Here I am laying the stripes that will surround the entire tier. This cake is 8’’ tall. So, two applications upwards of the onlay are required to reach the full height of the cake. Once you apply the first set of stripes, it is important to match up the second application lengthwise as close as possible with the first. In order to be accurate, I placed a pin that marked the end of the onlay during the first application. You can see this pin on the right side of the photo.


Figure-13-450x600

With a sharp blade and the template as a guide, I cut the strips on both sides into perfect curves.


Figure-14-479x600

With a straight edge and a sharp blade, I cut the strips on the back to fit nicely. Note that since the cake is covered in fondant and this adds thickness to the surface of the cake, it will almost always be necessary to make your own adjustments at the end. If things do not match up nicely, you can make this the back of your cake.


 Figure-15-600x399

Here I am working with the bird onlay. I followed all of the earlier steps as with the stripes onlay. I am removing excess fondant and I am just leaving the shape of the design. It is important to roll the fondant carefully into the onlays that have more intricate detail so that you don’t distort your design when you are removing the excess.


 Figure-16-600x399

 If you look at the bird, you will see that I removed some segments of fondant to create more interest. This of course, is optional!


 Figure-17-479x600

In order to place the onlay on the cake at the proper height, I used a strip of wax paper as a guide. I pre-cut this strip to my desired height (5 cm.) and I adhered it to the cake with shortening (not with glue). I also placed a mark on the side of the onlay and on the wax paper strip to keep everything centered.


Figure-18-480x600

You can see the final image on the cake. If it is a bit shiny where you had the wax paper strip, you can gently wipe the area with dry paper towel, and then you can mildly buffer it up with cornstarch.


 FIRST (BOTTOM) TIER:

bottom-tier-600x450

This is a 16” by 4” cake covered in fondant. Here I used the Fleur de Lis, and the Fleur de Lis Medallion onlays.


Figure-19-600x398

With this tier I wanted to add more interest to my onlay design by “printing” musical notes onto my fondant before laying it on the onlay. First, I rolled the fondant as before on the pasta roller through setting 5. Second, I used the sheet music mesh stencil to print the notes onto the fondant with black royal icing. The consistency of the icing should be thin, but still of piping consistency.


Figure-201-600x398

First, I applied the icing generously with a small spatula, and then I scraped most of it with a small rubber scraper.


Figure-211-600x399

I removed the mesh stencil gently, and then with a medium pizza cutter I removed the messy edges.


 Figure-22-600x399

You can see the clean image on the fondant. The onlay is already dusted lightly, but thoroughly with cornstarch.


Figure-23-600x399

As I stated earlier, press the fondant onto the onlay with your hands first and then use a small rolling pin to work it all the way in. Make sure to do this all around the onlay.


 Figure-24-600x398

After rolling everything nicely in the silicone onlay, I applied the glue all around.


 Figure-25-600x398

After applying the glue, I removed parts of the design that I did not want. You can also apply the glue after you remove these parts out, but I find it easier to remove fondant once the glue has been applied even though you end up with some sticky fingers!


 Figure-26-600x399

Here I am just doing some final touch ups before adhering the onlay onto the cake.


Figure-27-600x399

I am replacing one of the large fleur-de-lis with a pre-made gold fleur-de-lis. Again, this step is optional! If you do this step, remember to apply glue to this new fleur-de-lis too. If it is a bit stiff, microwave it for 15-20 seconds to make it a bit bendy.


Figure-28-600x398

This bottom tier is 4’’ tall like the height of the onlay. Notice how the bottom of the onlay has to be in direct contact with the table.


Figure-29-600x399

Note how the wavy edge of the side of the onlay fits nicely around the fleur-de-lis that is already on the cake. It is important to do this alignment carefully so that you do not end up with obvious gaps from one application to the next. Practice on a different surface before you do this on the cake. You can use the little openings on the onlay to guide you with this alignment. Before you remove the onlay, with your fingers press all around the surface of the onlay to force every piece of fondant to adhere to the cake.


Figure-30-600x399

Slowly take one end of the onlay and start removing it from the surface of the cake. Again, try not to rush this step and watch what is happening with the design the whole time. I found it helpful to exert some pressure on the onlay with my left hand as I remove it with the other hand. By doing this you are securing the covered part of the design to stay in place.

THIRD (UPPER) TIER:

Grazioso-Cake-8-600x398

This is a 6” by 4” cake covered with fondant. Here I used the Fleur de-Lis Medallion onlay.


 Figure-311-600x399

I used this single onlay to make the gold fleur-de-lis.


Figure-321-600x399

I also used the single onlay to attach the fleur-de-lis properly on the cake. If the fleur-de-lis tends to dislodge from the onlay as you lift it up, dab a little bit of shortening on it just to help it stay in.


Figure-331-600x399

After pressing the onlay for a bit on the cake, the fleur-de-lis adhered perfectly.


FINAL TOUCH-UPS:

 Figure-34-567x600

Here you can see the designs and minor alterations on the back of the bottom and middle tiers.


 Figure-351-567x600

I extruded a thin fondant string to close the gap of the second tier. I did the same thing with the small upper tier with its respective color.


SHEET-MUSIC WRAP:

Figure-361-600x399

I created gum paste sheets (9” by 6”) with the pasta roller, up to setting 5. I printed the same notes design with the mesh stencil (surrounded with paper to prevent leaking). Then, I frilled all of the music sheets that will embrace the second tier. I chose gum paste (colored off-white) so that the strip they will make stays in place with very little support.


 Figure-37-600x480

All the sheets were prepared just like this one. Note that I cut the sheets into trapezoids before frilling.


 Figure-38-600x248

The sheets were joined together with glue to form a long arch that will then fold into a cone on the cake.

Figure-39-480x600

I placed some supports to hold the cone formed by the arch until it dried completely overnight.


 Grazioso Cake-4

 Flawless!

———————————————————————————-

Leyda Vakarelov is the owner of Custom Cakes Atelier, located in Chapel Hill, NC. This small cake atelier specializes in unique artistic cake design with strong emphasis on artistic composition and detailed work.

 — Leyda’s website

 — Facebook page


————————————————————————————————————

 1452450_10151914164635999_1498578573_n

Join SugarEd Productions Online School

Use Coupon Code OFF50 for one month membership for $5

Plaid Shamrock Cookies

March 11, 2013 by Sharon Zambito 58 Comments

 Hello everyone!

We have a lot of big things in store here at SugarEd coming this year. Our online school is a big hit with members, contests and games….. so be sure to sign up for our newsletter on our homepage HERE to get all the scoop!


Now, on to the business at hand. Usually, I am not one to brag. But I gotta say, I love today’s project. It came out just as I had hoped, and we all know how often that happens! I don’t usually have that kind of luck.

Just a few days ago, I was surfing the net, brainstorming St. Patty’s day ideas, and came across the image below.

It  screamed cookie to me. I did not think piping the plaid would have the effect I wanted. And I surely was not going to weave fondant bands, LOL. Airbrushing was the only way to go. I could see in my head how seriously cute it was going to be.  

But I had two problems: 1) No shamrock cookie cutter and not enough time to order one, 2) Bent needle in the airbrush and not enough time to order one. What bad luck.

So I went to sleep, which is when I do my most creative thinking and problem solving. Yes, I actually come up with my best designs and ideas while in twilight sleep. Weird, huh? But I was feeling lucky, and I hoped that the little leprechaun muses were going to visit me in my slumber.


And it worked! I came up with a plan of attack to get my cute plaid shamrock cookies made. I used a heart cutter to make the three petals.


Now, for the stem. I cut a square from the dough, and then cut off a section, which I tapered both sides of as you can see above.


I pinched one end narrow with my fingers, and then pressed it against the side of a round cookie cutter to give it a curve.


Slipped the stem into place and voila! A shamrock. (I do recommend gluing the edges that meet with some egg white or water to help them adhere better.)


Bake and cool as per normal. If you are lucky, your cookies will not come apart where the pieces are joined. But if they do, do not fear! You can glue them back together with some melted chocolate. You will not see the repair job once your cookie is iced.


Once fully cooled, outline and flood your cookie with royal icing. I outline and flood with the same consistency icing, all at the same time, in order to achieve no visible outline. But you can surely outline with a stiffer icing, and then flood with your thinner icing.


Let that dry 24 hours or so.


Next, I needed a stencil to airbrush the plaid lines. I did not have the kind I needed, and not enough time to order one, so I tried my luck at making my own.


I used a pen to draw lines along food safe acetate in the width I wanted my plaid to be. I get my acetate here, but you could try parchment paper or some other food safe paper.


After cutting the strips apart, I then taped them, equidistant apart, to card stock on each end.


Lay (lay, laid, lain, who really knows??) that atop the cookie with pen ink side up. See how I had to use a little piece of cookie to prop up the card stock on the left hand side? You want to have the strips laying (laying, lying, layning??) flat on the cookie top. If the card stock droops down on the two ends, it will cause gaps between the acetate strips and the cookie, leading to the very unlucky phenomenon known as underspray. (boo, hiss!)


I used the Wilton color in a can. Spray in light bursts over the cookie and stencil. Be sure not to blast the cookie with heavy spray, or have the can too close. That will give you heavy splotches, pooling and dripping of color. Just use a light spray and apply 1-2 coats as needed. Be sure the spray is coming straight down onto the top of the stencil, at a 90 degree angle. Not from the side. Do not push your luck. Trust me on this one.That will cause the spray to go under the strips of the stencil and you won’t get nice clean lines of green.


Carefully lift the stencil straight off, and with any luck, you will have some nice clean green lines. Ta dah!


Wipe off the stencil to get all the color off. After the color has dried on the cookie (10-20 minutes), put the stencil back on with the strips going in the opposite direction.


Repeat the process, carefully lift off the stencil and………..

Were the lucky leprechauns smiling upon us?……..

Or did we push our luck too far?…….

Will luck be a lady tonight?……


Ok, I’ll stop.


Leapin’ lucky leprechauns, it worked!!


I love the beautiful simplicity.


I thought about piping a a border outline, but I thought it would detract from the cookie, so I skipped it. If that little bit of green color on the edges of the cookie itself bothers you, you can pipe a small bead border around the edges of the royal icing. However, that little bit of green does not bother me.


Three lucky shamrocks.


Almost too pretty to eat?


I hope you guys try your luck at making your own stencils. Send me photos if you do, and I will post them on the blog.


Happy St. Patrick’s day everyone! I am off to make a pot of black eyes peas for luck. (OK, who am I kidding; we all know I don’t cook. It sounded good though, didn’t it? 😀 )


dvuuuuu


CHECK OUT OUR ONLINE SCHOOL


Sharon

www.SugarEdProductions.com


Holy Cake!

June 7, 2009 by Sharon Zambito 74 Comments

First Holy Communion season has just ended down here in the deep south. Maybe where you live too. So I had the opportunity to do a few religious cakes over the last few weeks I thought I would share with you. I like doing religious cakes. They make me feel good. All religousy and stuff.

I remember my own first communion very well. It was such a big milestone in our young lives. I think we were in the first grade. I was so excited to finally be able to receive the Host. The pretty white dress and veil was such a treat to have in our modest lifestyle. I remember we practiced as a class in the church several times for the ceremony. Where to sit, how to file up to the front, when to approach the kneeler, when to kneel, when to stand. On the very last practice day they even served us unconsecrated hosts, so we could practice accepting it on our tongues (there was no hand communion back then), and to get a feel for its taste and consistency. That day I was SO excited. I mean SUPER excited that we were getting a real host. Of course, as per the curse of those whose last names start with a Z (yes, my maiden name started with a Z too), I was the last one. Last pew, last seat, last in line. I was so very worried that they would run out of hosts before I got up there. As the line moved forward I was just praying… please don’t run out… please don’t run out. Of course they ran out. Story of my life. Another emotional scar I have had to overcome. To this day I practically run out of my pew, knocking people over, to get in line at communion time cuz I am afraid they are going to run out.
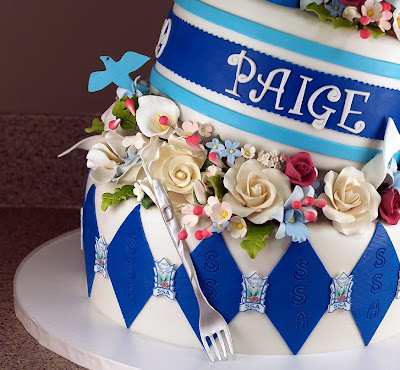
But I digress. Let me share with you some of the cakes I made this year:

This one was for a male, and the mom wanted it to be classic, elegant, simple, but no way feminine. No flowers, no colors. This one I iced in white buttercream. I used the diamond impression mat on the sides and put small candy pearls at the intersections.


I used a stencil to apply the pattern to the ivory stripes. I first rolled out the ivory fondant, stenciled the pattern on with buttercream, then cut the strips with my ribbon cutter. I then gently lifted them, applied water to the back with a brush, and attached them to the cake carefully with the aid of the end of a dowel rod so as not to smear the stencil. A 6 mm bead maker was used for the pearl border. (I show how to use these in Boxes and Bows.)

The same stencil was used with luster dust on the drape and knot. The cross was cut out from fondant with gumpaste, and allowed to dry firm. Later, 4mm pearls were attached to the edge, and the whole thing was airbrushed with super pearl dust after I applied the monogram initial.

                                                                  —————————


This cake was made for sweet little Elizabeth, a close family friend. Lizzy designed her entire cake from start to finish. This was the first custom cake she had ever had, and she was super excited. I did exactly as she instructed me to.

The cake was iced in white buttercream. 8 mm pearls were used for the borders. Satin ribbon was applied around the tiers, and the monogram was printed on an edible icing sheet and backed with fondant.

The cross was cut from fondant, piped with royal, and airbrushed with super pearl. All the flowers were made from gumpaste using this set.

My hubby delivered the cake, and said she was absolutely thrilled and overjoyed with her cake. She and her cousins and sisters were oogling over it, and they even ate the flowers!

Look at this sweet note she wrote me the next week. Just melts my heart:


                                                       —————————–

Here is another one for a young man. He also specified “very simple and nothing girly”. Those boys are very concerned that their cakes be masculine! LOL

Also iced in white buttercream. The lighting makes the cake look as if it is two tone, but it was not. The shaped plaque was molded white chocolate. The chalice and Host were made with a chocolate mold from fondant with tylose, dried and then painted.


I used this Patchwork impression tool on the stripes; then piped crosses in royal and painted them gold too.
The cookies were flooded with royal icing and sprayed with pearl spray. The letters were made ahead with this cutter, dried, painted, and then applied.
Beau came with his mom to pick up his cake and his face lit up. Yesssssss! Score Sharon!
—————————
This one was for Beau’s first cousin Eva. Hers was actually a kindergarten graduation cake but she wanted a cross too. “A big pink cross with pink icing inside and out, lots of flowers, and sparkly.” All my kids that I have been doing cakes for since they were babes are now getting very specific with their cake requests! Gone are the days of me having free reign!
I saw this design on a google search and loved it. I do not know who the original artist was to give credit. If you know, please let me know.

Mine did not do the original justice, but Eva was happy. Here are some progress photos:


I baked a single layer sheet cake and cut large pieces to fit under my cross template, made from card stock.


I cut out the cross shape, then torted and filled the cake with lots of pink icing per Eva’s request!
Crumbcoat applied.
Then I put the template back on top and gave it another coat of icing on the sides to refine the shape.
(Note : I do not know if card stock is considered food safe; so do some research before you use it. Wax or parchment paper would be good alternatives to use.)
Final icing base coat done.
I then wrapped a strip of pink fondant around the sides of the cake using the same technique as on my Oz cake.
I used the template to cut the top piece and applied it.
I used my fondant crimpers to seal the seams.
I also used impression stamps to make scrolls on the top piece before I laid it on top of the cake.
I made another template for the white inner cross and cut that from fondant. I used scrap booking stamps to impress her name. (Again: PLEASE make sure all stamps you use are food safe before using them. Not all plastic is safe for food.)
 
I made a frill border using this cutter set. The pink bead border was piped buttercream. The gumpaste orchids were purchased and I dusted them for color. Plunger flowers were made with this. And some sparkle dust to finish it off. Voila!
Eva seemed very please when she picked it up. Yessssssssss! Another score!!
And here are Eva’s cookies to go with the cake. The grad hats were made with these tappit cutters. The cookies were flooded with royal and dry dusted with super pearl.
——————————
So what do you think of my religious cakes this year? Leave me a comment and you will be entered into a drawing to win the script alphabet Tappit cutters used on Beau’s cookies and the cross topper above!
WOOOHOOOO. Another give-a-way! I love give-aways!
—————————–
My wonderful Wendy came over and helped me package Topsy orders and the first batch went to the post office today. I will keep working on that all week until they are all out. Please drop me a note and let me know what you guys think of it. I am really proud of this one and excited to get it to you!
Me tired now. Must go rest.
Happy Caking!
Sharon
http://www.sugaredproductions.com/


Graduation Wedge Cake

May 19, 2009 by Sharon Zambito 143 Comments

Hello everyone!
Good gravy have I been busy! Running pillar to post. Burning the candle at both ends. Nose to the grindstone. Running around like a chicken with my head cut off. Burning the midnight oil. OK, I will stop. You get the idea. I bet you guys have been busy too since it is graduation time.
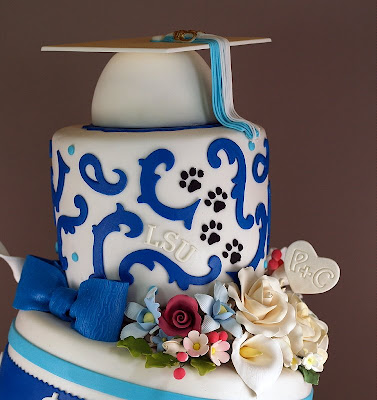
My beautiful and sweet niece graduated from high school last weekend, and I made her a special cake. I wanted to try the tilted method using wedges. I had not done that before. It was really pretty easy.
I wanted to of course use her school colors and mascot, but also incorporate little bits of her life, while making it fun and whimsical.
The grad hat was a styro ball I cut and carved a bit and covered with fondant. The mortar board was a square of fondant with tylose, dried ahead and glued on with chocolate. I used a 4 inch ball and a 5 inch square in this case. The clay gun was used to make the tassel.
The scroll work was done with a cutter set available here.
The paw prints were stenciled on, and represent LSU, where she is going to college. I used the alphabet tappit cutters for the LSU letters. I used the funky alphabet cutters for her name.
The initials in the heart are of Paige and her boyfriend, Chris.
I did not have time to make the flowers, so I purchased them, and dusted some to add color.

Here are the flowers I purchased:

Cally lily spray

Rose spray

Large roses

Blue roses


The graduation figure was made with a chocolate mold. I used fondant with tylose in the mold, let it dry firm, and then airbrushed it with super pearl luster dust.

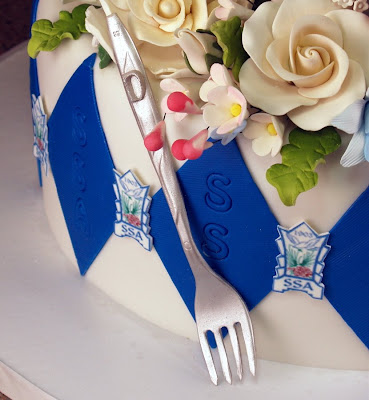
The fork represents the restaurant where she works as a hostess. That thing was quite a challenge to make. I was so engrossed in trying to get one of those suckers to come out right, I forgot to take photos. But here is how I did it:

I rolled out a piece of gumpaste and pressed it between 2 plastic forks that were stacked on top of each other. I squeezed them hard together to make the impression of the handle and the 4 tines into the gumpaste. While they were sandwiched together I trimmed around the outside of the fork edges with an exacto knife. Then I took the top fork off and let the cut out gumpaste sit atop the bottom one for a good long time. After it dried a good bit, I took that gumpaste “fork” and laid it on the table and trimmed to the exact outline of the impressions made by real forks. The handle was easy peasy, but trying to cut the tines out made me curse and throw things. And curse some more. They kept breaking off or were just crappy looking. After creating a graveyard of about 12 reject forks, I decided to go with shorter than real-life tines, and got one fork that was decent. I put that back on top of the plastic fork to get the proper shape and let it dry a day or two. Airbrushed it silver after I added the letter D on the top of the handle. I just knew I was going to break it, but God was smiling on me and it made it to the cake. Whew!
————————————-
Here are some photos of the construction. Please forgive the terrible quality of these photos. I was very pressed for time as my power had gone out for quite a while and put me behind schedule. On top of that, I was working with a heavily bandaged finger after slicing it it open cutting the Styrofoam wedges with a very long, very sharp knife. I think I needed a stitch or two, but no time for that!
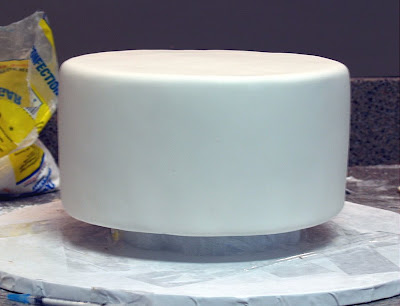
I put the ganached tiers atop a Styrofoam lift, so I would be able to tuck the fondant under the cake and foamcore board under it for a clean bottom look.
Here is one tier after it was covered.
I had topsy turvy dummies laying around, which worked out great, because the top slant was already cut for me. I just had to trim them down to the height I wanted. (Note: to be considered food safe, you need to cover your wedge and board with something appropriate.)
I attached a piece of thin foamcore to the bottom of each styro wedge with white chocolate. This would prevent the supports from going into the styro under the weight of the cakes. I doweled the bottom cake as usual under the wedge support.
I used melted chocolate to attach the wedge to the lower tier, and more melted chocolate on top of the wedge, then placed the middle tier in place and held it there until the chocolate firmed up. Then I drove 2 wooden dowels down through both tiers.

I repeated the same process to apply the top tier. I wanted the top tier to have more of a tilt to the opposite side, but I miscalculated my slant, so it basically came out straight. Oh well, live and learn. (Dagnabbit!) After the top tier was in place, I drove one large wooden dowel down the middle of all 3 tiers.

That cake was very stable and did not budge. Cutting and serving it proved to be a little bit messy, as the melted chocolate between the tiers did tear off some of the fondant when I disassembled it. But I guess that is the price you have to pay to get this look and have it be super stable. I guess you could try to do it without the melted chocolate, but I felt better having it there as glue.


I cut apart all the purchased flower sprays and arranged them on the cake, using royal icing as glue where needed. The fondant dove is the school mascot.
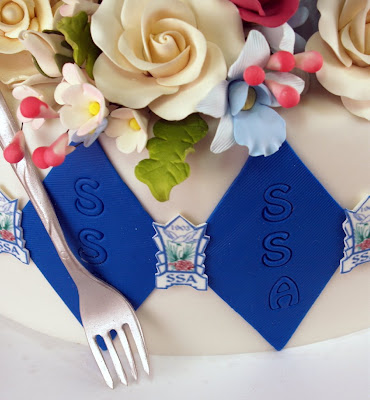


I used the school logo clip art that I got off their website. I made little icons with edible icing sheets backed with white fondant, to put between the diamonds. The school initials, SSA, were impressed into the diamonds using the JEM alphabet cutter set.

Paige just loved her cake and thanked me over and over and over. Everyone at the party went nuts over it; it was very good for my ego, LOL! I have 4 more nieces coming up behind her, graduating from the same school, so I better start thinking of more design ideas soon! Oy vay. I’ll think about that later.


—————————–
NOTE: THIS CONTEST HAS ENDED:

Totally Topsy Turvy is almost ready! Just a few more tweaks in editing and we are going to the presses! I am really proud of this one; I think you guys will like it too. I take you through every single step of making this cake from start to finish. No stone is left unturned. And there are a few fun surprises thrown in there too.

I am so happy with this DVD, I feel like having a give-a-way! (The crowd jumps to its feet and roars!) To enter, just leave a comment below, and you will be entered into a random drawing for a free copy of Totally Topsy Turvy! I will draw the winner on Monday.


GOOD LUCK!
Sharon
www.sugaredproductions.com

Trick or Treat!

October 31, 2008 by Sharon Zambito 18 Comments

Happy Halloween everyone!

Hope you have a wonderful day with your kids and families. Don’t get sick eating too much of their candy like I always do!

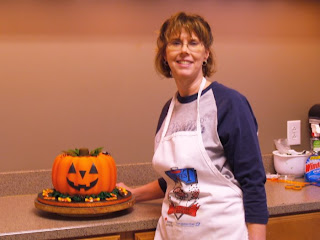
My sister Barbara, who has never decorated a cake in her life, came over for me to help her make a cake for her office Halloween goody contest. She has been a huge help to me with SugarEd over the last year, and has come with me to several of my demos and vendor shows, so she has been exposed to a lot this last year. (Some of you have met her! I also have another fabulous sister that you will meet later on.) She baked the cake herself and brought it over. I showed her how to do each technique (basically off the cake) and then she did the rest herself. She was quite a quick learner. She colored and rolled out the fondant, applied it (I helped her smooth one side while she did the other in the interest of drying out time.) She airbrushed it, made her own leaves and stem, piped the grass, and made the words. I helped her just a little bit with the face and spider.

We used 2 bundt cakes and spackled the seam with stiffened buttercream. Cream cheese filling was piped down into the center hole and a circle of cardboard sits on the top to support the stem.


Here is Barbara airbrushing her masterpiece. Do you dig the fancy taped up towels?

Piping the grass.

Finished!

Hers came out better than mine! And she won first place too! I am so proud, congrats Barb!

I also want to share with you the cookies I did yesterday for my bestest client.

All flooded with royal icing and candy eyes.

These were huge! The web was about 6 inches across.


The big bats are royal icing stenciled onto royal.

Pumpkins are royal stenciled on royal, ghosts are royal with fondant face.

Fondant face on airbrushed royal icing.
These were my favorite! They make me giggle.
Have a nice night everyone; have fun and stay safe!
Sharon
http://www.sugaredproductions.com/

Back in the Saddle

September 14, 2008 by Sharon Zambito 24 Comments


The cake saddle that is.


It sure seems like it has been a while since I did any caking. I purposefully took most of the summer off to spend time with my kids, since D was going off to college. (sniff, sniff). We hung out a lot and went on a family vacation. I also needed to finish some long overdue house projects and yard work. But mysteriously, none of that got done. Hmm…wonder how that happened. Oh well, I’ll get to it eventually.


Since I was refreshed and rejuvenated, I decided to upgrade my customer’s simple small cake so I could make a design I had in my head. Well, the cake had other ideas. This cake made my hurricanoids flair. (In other words, it was a pain in my rear.)
 
First of all, it is not a good idea to have big ole honkin’ chunks of cherries in a cake you know you are going to carve. I knew this was not a good idea going into it. But in my arrogance, I forged ahead. I was so cocky I even added more cherries than the recipe called for. I ain’t a skeered of no cherries.
 
Then came time to carve. And it showed me who was boss. Even with my super sharp knife; it was a mess. Cherries came out in chunks, bringing precious cake along with it. Calling myself a few choice names, I proceeded on. I finally got the 2 tiers carved and patched up.
 
 
Then I scorched my first batch of cream while making the ganache to ice the cake with. After the do-over, I got them iced and let them set overnight to firm up.
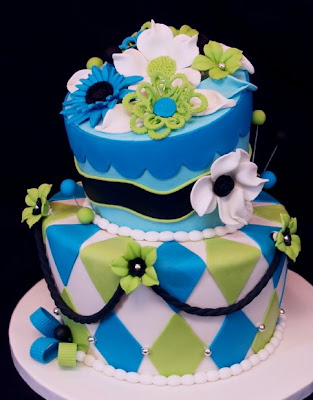


The next day I got the bottom tier covered beautifully; but within 15 -30 minutes the fondant just started acting wonky. It was bulgy and kind of baggy and getting a lot of elephant skin along the bottom edges. It was morphing before my eyes! I have had this happen before on rare occasion, so I chalked it up to an “off” bucket of fondant. If I tried to take it off, I would have destroyed the cake. So I did what any good decorator would do in this case: uttered a few more choice words, and then I changed the design. The harlequin diamond pattern in fondant is a wonderful way to cover up boo boos or naughty acting fondant. So diamonds it was.
 
The original design was going to be somewhat musical. I was dying to use my new sheet music stencil I got at ICES. I got the upper tier covered and greased it down to get the corn starch off. (Cuz we all know I love my cornstarch, LOL). I was under an impending deadline and getting worried about finishing in time. For one nanosecond, my brain said, “Sharon, do not stencil on that freshly Crisco’d tier. It will not work.” Obviously not having learned my lesson from the cherry fiasco, I blew myself off and proceeded to stencil. Folks, you cannot stencil with royal icing onto greasy fondant. You have to wait until it absorbs in. It was a smeary mess. Of course the black royal would not clean all the way off. It left a nice black stain. So I did what any self respecting decorator would do: after calling myself a new variety of very choice words, I changed the design. Hence the birth of the wacky black band around the top tier.

From there I just added the swags and the flowers I had made the night before. The cake no longer had a musical theme, but a gal has to do what a gal has to do. The customer loved it, so all is well that ends well.


Despite all my troubles, I thought it was kind of nice in the end.
And I very much love my array of fantasy flowers.


The filigree type flowers were made with cutters available here:


The trumpet like flowers were made with this petunia set:


The 2 white blossom flowers were made with the all in one rose cutter:


And I used various buttons from this mold for some of the flower centers:


The camouflage:


Moral of the story:
 
Listen to your gut;
never give up.


Sharon Zambito

Sharon Zambito

An RN turned SAHM turned cake maniac. Owner of SugarEd Productions Online School. Join me for some caking, baking, and all around sweet fun :)

Follow me..

  • Facebook
  • Instagram
  • Pinterest
  • YouTube

Pinterest

  • ??
    ??
Follow Me on Pinterest

Follow Me on Instagram

Instagram requires authorization to view a user profile. Use autorized account in widget settings

Recent Posts

  • Egg Safety Basics
  • Stable Mabel Support System Sale
  • Guest Post : 4 Vegan Cake Recipes No One Should Miss Out On!

Popular Posts

  • Ways To Make Your Cake Fluffy And Moist
  • How To Stencil on Cookies with Royal Icing
  • Doctored Cake Mix Recipes
  • Transferring an Image Without a Projector
  • All About Buttercream!
  • How to Fix Broken Ganache
  • Edible vs Non Toxic Gold Dusts

Categories

Search

Archives

Copyright © 2025 · Sharon Zambito and SugarEd Productions,LLC

Copyright © 2025 · Evangeline Theme on Genesis Framework · WordPress · Log in